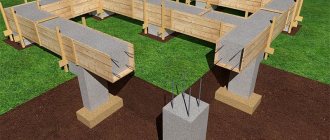
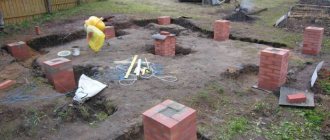
A columnar foundation made of 20*20*40 blocks is the best option for a wooden or frame building.
The technology for constructing such a support is simple, there is no need to prepare the soil in a special way, and the foundation material itself - 20x20x40 blocks - are inexpensive (one block costs about 50 rubles).
What is it, photo
To build a columnar foundation for a house (shed, terrace, veranda) on your own site, FBS blocks measuring 20x20x40 are most often used, since they:
- durable - withstand loads of 150 kg per square centimeter;
- frost-resistant - tolerate 15 or more freezing cycles;
- The approximate weight of one block is 32 kg, so no special equipment is required during construction.
Before starting construction of the foundation, it is necessary to find out what type of soil is located at the construction site and the depth of its freezing, the level of groundwater, as well as the presence of “water lenses” that should not exist.
Groundwater should not pass closer than 50 cm from the base of the pillars. The depth of freezing determines how deep it will be necessary to lay the support under the structure . In the central zone of the Russian Federation, the freezing depth is a maximum of 1 meter, but there may be deviations. The lowest point of the foundation must be located below the freezing point of the soil.
When choosing blocks, you should prefer those made on vibrating presses, since they are cast and therefore stronger. When constructing a shallow block columnar foundation, a wooden grillage is used.
For extensions (terrace, veranda), a separate foundation is built, which is then not connected into one structure using a grillage. This is done because the load on the support of such structures is different - it is less. The pillars for the furnace are placed separately from the general foundation system.
Introduction
Project Studio CS Foundations is part of the architectural and construction design line developed by the Russian company Consistent Software (www.consistent.ru), which also includes the modules Project Studio CS Architecture, Project Studio CS Structures and Project Studio CS Electrics.
The Foundations module works in the standard Project Studio CS environment (based on AutoCAD 2002/2004/2005/2006), which has many useful functions that track scales, automatically adjust formats, dimension and text styles. The user is provided with a convenient set of service functions for measuring, drawing, servicing layers, as well as for creating, marking and measuring construction axes, etc.
The main difference from the previous version, which turned the “Foundations” module from the AutoCAD drawing application (www.autocad.ru) into a powerful calculation, drawing and design complex, was the appearance in its composition of a package of commands for calculating, designing and drawing columnar foundations on natural and pile foundation for single or double columns of buildings and structures (including the design of corresponding reinforcement products).
Teams for designing and drawing multi-row pile linear and circular grillages have been developed. The tools for designing prefabricated strip foundations on a natural foundation and development of walls from foundation blocks of various types have been improved.
A distinctive feature of the modern “Foundations” module, which no other similar package has, is the complete integration of its calculation and design components into the AutoCAD environment: the process of data preparation, calculation, design and drawing occurs within a single time frame, without resorting to programs that are not applications to AutoCAD, and without importing DXF files created in other programs.
The calculation modules of “Foundations” actively use information from the graphical environment when obtaining data extracted from analogue objects, location coordinates, orientation, bindings, etc.
Data preparation for calculation is carried out in a single dialog box - while simultaneously monitoring the user’s formal errors. The results of calculations and design are instantly displayed on the drawing.
The key concept of “Foundations” was the reasonable minimization of input data while maximizing the volume of results obtained. The emphasis is on the use of flexible dialog modes, in which prompts and messages about the state of the program are constantly generated. In response to an unsuccessful design attempt, the program provides detailed information about the reasons for the failure, and incorrect user actions are blocked. At any stage of calculation or design, it is possible to return to previous stages.
The package is equipped with a convenient service device that allows you to easily achieve the desired results when placing piles in multi-row grillages, laying out wall blocks in basement wall developments, laying out strip foundation slabs in a continuous or discontinuous layout, or when placing foundation beams in a layout diagram.
Marking of all elements placed on the layout of columnar foundations, wall blocks, foundation slabs, rand beams, etc. is performed automatically with the creation of the necessary specifications and calculation of the volume of concrete for monolithic embeddings.
The program numbers piles in one of three possible modes, automatically performs a visual indication of piles of various brands, and generates a specification and a table of marks.
The “Foundations” package is divided into two parts: foundations on natural and pile foundations.
For foundations on natural foundations:
• columnar foundations are calculated and designed;
• strip foundations are calculated and designed;
• developments of basement walls from wall blocks of various types are designed:
— with automatic transfer of elements from the plan to the lateral projection of the scan,
— with automatic marking of blocks, creation of specifications and calculation of the volume of concrete for monolithic embeddings;
• the rand beams are laid out on the layout diagram.
For foundations on a pile foundation:
• columnar foundations are calculated and designed;
• single-row and multi-row linear strip pile grillages are designed;
• single-row and multi-row circular and arc strip pile grillages are designed;
• rectangular and round pile fields are designed using different methods of pile placement;
• single driven and bored piles are designed;
• automatic numbering and visual indication of piles are performed;
• tables of elevations and pile specifications are generated;
• the rand beams are laid out on the layout diagram.
Advantages and disadvantages
A columnar support made of 20x20x40 blocks is ideal for building a frame-type house or a wooden one from logs or beams, since:
- building materials (blocks) are inexpensive;
- work on laying the foundation does not require significant labor costs, therefore there is no need to attract outside labor;
- the size of all blocks is the same (GOST 13579-78);
- ease of assembly; if a mistake is made somewhere, the foundation can be disassembled and put back together again.
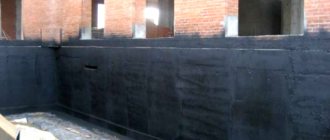
The main disadvantage of blocks is that they absorb moisture from the soil (up to 15% of their mass), which has a destructive effect on the foundation. To eliminate this drawback, waterproofing is used.
Technology Basics
Correct design is the key to the reliability and durability of any structure. To correctly calculate a columnar foundation, you will need to take into account:
Small area of support on the ground (when compared with a strip or slab foundation). Tying the pillars with a grillage will help reduce the problem to a minimum.- The depth of soil freezing.
The best option is for the supports to be buried below the freezing level, due to which the effect of extrusion forces is reduced. Backfilling the depressions with sand will help eliminate pulling forces. It would be useful to install a drainage system around the perimeter of the building. - In general, the characteristics of a columnar support are worse than those of a monolithic foundation.
How to do the calculations correctly?
When starting to calculate a columnar support from 20x20x40 blocks, you need to know how many pillars will be needed and what size they will be. These parameters depend on the load that is planned in the future on the foundation.
Factors determining load:
- the weight of the structure including furniture, equipment and people;
- weather conditions (wind, amount of precipitation).
After determining the number of pillars, you need to place them correctly on the site. It should be taken into account that:
- the pillars must be located in the corners of the building;
- in places where walls adjoin each other;
- if the walls are long, then the pillars are placed a maximum of two meters from each other along the entire perimeter of each wall (if a monolithic grillage is planned, then there can be a distance of 3 m between the pillars).
For shallow and above-ground columnar foundations, a hanging grillage is made, which requires the use of large quantities of reinforcement and the installation of formwork.
The weight of the future building is calculated taking into account the data given in the table:
The snow load is zero if the roof slope angle exceeds 60 degrees.
The calculation of the weight of the house includes the approximate weight of the foundation itself. Its approximate volume is calculated and multiplied by 2500 (specific gravity of reinforced concrete, kg/m3).
The total area of the bases of the pillars is calculated by the formula: S = 1.3 × P/Ro, where:
- P - mass of the house with foundation, kg;
- Ro—resistance (bearing capacity) of the soil, kg/cm2;
- 1.3 is a special coefficient showing the safety margin of the building.
The Rо value is determined from the table:
Strip foundation made of blocks
If you have started building a foundation, then you have a geodetic report on the soil, groundwater level, freezing depth on the site and a house design. For example, you are planning to build a one-story house from logs.
To calculate the foundation, you will need a design for the entire house.
Let's assume that our geodetic conclusion is favorable, so the foundation should not be particularly deep.
We must remember: even with the permitted minimum depth of a strip foundation made of blocks, there must be at least two blocks in height.
There are two ways, and their choice depends on the weight of the future house: install a foundation of large (for example, 2380x500x580 mm) FBS and FL blocks (for example, 2400x800x300 mm) according to all the rules. The “tape” will have much fewer seams, it will be stronger and its qualities will be close to a monolith. But this will require the use of a truck crane and an excavator to dig a huge trench. And for a future house, such a foundation is redundant and incredibly expensive, even though we can put a solid foundation only around the perimeter of the house, and at the intersections of the internal walls, pillars made of wall blocks will be sufficient.
Online calculator of FBS blocks for a foundation 44 meters long
An online calculator and a simple calculation based on approximate prices for central Russia show that FBS blocks alone will cost in our case more than 250 thousand rubles.
You will also need FL blocks (which are even more expensive), mortar and a sand-crushed stone mixture.
An example of using large FBS and FL blocks
The main difference between this type of work is the width of the trench.
- “Pillows” are placed downwards - on a concrete reinforcing belt or simply on sand.
Typically, foundation pads are laid using a crane. - Next, blocks are laid on the solution.
- Bunches of reinforcing bars are laid between their rows.
A foundation made from FBS and FL blocks is incredibly solid, incredibly durable and very rarely needed
For less heavy structures, the so-called intermittent foundation is suitable - when FL blocks are not placed close to each other, the permissible distance between them is no more than 0.7 meters; this allows you to save at least a little.
“Discontinuous foundation” - FL blocks are not close together
Video: building a massive foundation from FBS and FL blocks
But it is better to use small wall blocks (for example, 200x200x400 mm), the so-called “manual” ones - which a person can lift with his hands, and without “pillows”. In addition, such a foundation will be quite sufficient for a lightweight timber house.
Strip foundation made of small concrete blocks
First, you need to draw the layout of the blocks on the foundation in order to understand how many and which ones will be needed. If a whole number of blocks do not fit between the corners of the foundation, you can order “additional” blocks of the required size for laying the corners. In the same way, blocks with openings for communications (water supply, sewerage) and vents will be needed. They can also be ordered. Or you can lay standard blocks with openings, which are then partially filled with mortar.
There are many online foundation calculators available. But all of them are designed for large FBS blocks. You can use the wall calculator by entering the data of our blocks and foundation dimensions into it.
- We obtain results for the required amount of reinforcement and the cross-section of reinforcing bars.
Reinforcement in the reinforcing belt: section, location, quantity - We enter the necessary numbers - the thickness of the tape is 0.3 meters, the length, width and height of the tape, the grade of concrete and click on the “calculate” button.
- But there are many online calculators for concrete strip foundations, and they will help you calculate the consumption of concrete for the reinforcing strip.
Calculations are usually made in accordance with SNiP 52–01–2003 “Concrete and reinforced concrete structures”, SNiP 3.03.01–87 and GOST R 52086–2003. The amount of mortar we need for masonry - We get the results: the length of the tape, the total area of the masonry, the thickness of the wall, the required number of blocks, their volume and cost, the approximate weight of the mortar and other data.
Filling out the forms with data for our foundation - We fill in the data for our foundation: the dimensions of the block, the total length of the walls (perimeter), the height of the tape in the corners, its thickness, the thickness of the mortar in the masonry, the use of masonry mesh (and how often we will use it), the average price of such a block in central Russia , block weight.
Click on the “calculate” button. We get the calculated result - In addition, the required amount of solution becomes clear.
Enter the parameters of the reinforcing belt for the block foundation - You will need about 5 m3 of concrete per strip, and taking into account the solution that will be used for laying the blocks and the top reinforcing layer, you need to take it with a reserve of 6 or 7 m3.
The final result of calculating the quantity and cross-section of reinforcement
The calculations also show a drawing for the best location of reinforcement in the reinforcing belt.
The location of the reinforcement in the reinforcing belt is shown in the calculations
Table: solution proportions for Portland cement grade M400
| Position | Concrete grade | Mass composition - cement, sand, crushed stone (kg) | Volumetric composition per 1 liter of cement - sand, crushed stone (liter) | Amount of concrete from 10 liters of cement (liter) |
| 1 | 200 | 1:2,8:4,8 | 24:43 | 55 |
| 2 | 250 | 1: 2,2:3,8 | 18:35 | 44 |
| 3 | 300 | 1:2:3,6 | 16:33 | 42 |
| 4 | 400 | 1:1,3:2,6 | 15:25 | 32 |
| 5 | 500 | 1:1,2:2,4 | 11:23 | 30 |
We must not forget about the proportions of preparing the solution depending on the brand of cement. We were counting on M400 Portland cement, but there can be many options.
Table: solution proportions for Portland cement grade M500
| Position | Concrete grade | Mass composition - cement, sand, crushed stone (kg) | Volumetric composition per 1 liter of cement - sand, crushed stone (liter) | Amount of concrete from 10 liters of cement (liter) |
| 1 | 200 | 1:3,4:5,7 | 31:50 | 63 |
| 2 | 250 | 1:2,5:4,6 | 23:40 | 51 |
| 3 | 300 | 1:2,3:4,4 | 21:38 | 48 |
| 4 | 400 | 1:1,5:3,3 | 13:29 | 37 |
| 5 | 450 | 1:1,3:3 | 11:26 | 33 |
Required Tools
To build such a foundation you will need:
- Construction mixer for mixing concrete (or a trough for mixing by hand).
- Bayonet shovel.
- Shovel
- Hand wheelbarrow.
- Tamping (manual or vibrating).
- Welding machine (if you need to weld reinforcement).
- Hammers of different weights.
- Pliers.
- Grinder for cutting reinforcing bars.
- Nail puller, crowbar.
- Hydro level (or laser level).
- Roulette.
- Circular saw (or hand saw, for cutting lumber for formwork construction).
- Electric drill (for installation of formwork).
- Screwdriver (for installation of formwork).
- Goats (for installation of formwork).
Step by step implementation
- We prepare the site, as in the previous case.
- We make markings for digging trenches for the “tape”.
The pegs are driven not into the supposed corners of the foundation, but so that these corners are formed by the intersection of the cord. The pegs are driven in to the height of the future plinth. The pegs are driven in to the height of the plinth - We dig trenches according to the plan, the intended width and depth.
Digging trenches - don’t forget about trenches for water supply and sewerage - Sand and crushed stone are poured into the bottom of the trenches for a drainage cushion to a height of approximately 0.3 meters.
- The pillow is lightly filled with water and tamped down - manually or using a mechanism called a “vibrating tamper”.
The drainage mixture is processed with a vibrating plate or vibrating rammer - For formwork, use a circular saw to cut the board into the required pieces according to preliminary calculations.
- We knock together or fix low formwork for the reinforcing concrete belt using stops in the trench.
- We lay reinforcement on the sand in the formwork in the calculated number of layers and with the calculated frequency of installation of vertical columns.
- We mix the concrete solution from cement, sand and crushed stone.
If you have a construction mixer, then the process is very easy. The cement mortar can be mixed by hand or using a construction mixer - Pour the solution into the trench to a height of 30 centimeters. Such a support base will help to evenly distribute the mass of the foundation blocks and walls of the house. To ensure that there are no voids or bubbles in the hardened concrete, you need to stir it with a stick. The pouring must be done in one day, otherwise the foundation will be divided into segments that are poorly connected to each other due to the difference in the “setting” time.
- Using a trowel, smooth out the filling flush with the formwork;
it is very important that it is perfectly level for laying the blocks. Cover the filling with film and leave it to gain strength for two weeks. Concrete pouring must be perfectly level - In two weeks, we begin laying the blocks from the beacon corners.
Laying blocks (diagram): starts from the corners along the cord - We leave gaps for vents and water supply and sewerage pipes or use “additional” blocks with holes.
“Additional” blocks with holes are used for vents and water supply pipes - The “bandaging”, that is, the overlap of the blocks, should be equal to half the length of the block.
Installation of blocks must be carried out with all necessary dressings - Between the rows, thin reinforcing belts are made from mortar with reinforcement.
A belt about 30 centimeters thick is made above the foundation. Armopoyas prevent foundation subsidence - When the solution has set, you can strengthen the roofing material for waterproofing.
You can get by with roofing felt alone, or you can also coat the surface of the foundation with hot bitumen by placing roofing felt on it. The joints are overlapped. The edges are trimmed. To create waterproofness, roofing felt is most often wetted with petroleum bitumen - Now you can do general waterproofing of the foundation.
Step-by-step instructions for building a foundation
Step-by-step instructions on how to make a columnar foundation with your own hands:
Choosing a site for construction.- Site preparation (destruction of bushes and trees along with roots, mowing grass, leveling the soil).
- Marking the future location of the pillars with pegs and rope.
The structure will be strong if the pillars are 1.5 m apart from each other. The pegs are placed outside the border of the future pillar (so as not to move them during laying the foundation) along the lines of the walls of the building.
Mandatory waterproofing in one of the following ways:
- Along the entire perimeter of the pillar, under its sole.
- Installation of drainage around the perimeter of the future structure, below the level of the sole.
- Installation of a storm drain built into the blind area.
In preparation for installing the foundation, it is necessary to lay communications (pipes), if necessary.
Is it possible to build from solid foundation blocks?
FBS piece products are made from heavy concrete class B 12.5 and, according to their technical characteristics, are ideal for the construction of fortification structures.
installing block stones is similar to bricklaying , but instead of bricks, massive concrete blocks are laid. A prefabricated concrete reinforcement structure can be erected literally in a matter of hours and with minimal labor costs.
However, it should be taken into account that a block concrete wall is significantly different in strength from monolithic reinforced concrete structures. The fact is that with a large height and length, concrete blocks cannot provide sufficient stability and integrity of the wall structure.
The shear force of the earth masses and soil heaving squeeze out individual stones from the masonry. Therefore, the maximum height of a retaining wall made of FBS blocks with a thickness of 600 mm is limited and should not exceed 1.5 meters.
Main technical indicators of concrete blocks:
| Name | Compound | Strength (kgf/cm2) | Density (kg/m3) | Frost resistance (cycle) |
| FBS concrete blocks | Cement, sand, granite crushed stone, water | 100-110 | From 2400 | From 200 |
Installation technology
Approximate step-by-step instructions for foundation work:
- After preparation and marking, you will need to make holes up to 40 cm deep for a shallow foundation. The holes for pillars for a deep foundation should be 1.5-2 meters deep, since the most common level of ground freezing is 1 m. Using blocks to build such a foundation is not entirely rational, since it is necessary to dig very deep holes, which is labor-intensive.
- The area of the pit should be slightly larger than the cross-sectional size of the post (usually the pit is square with a side of 40 cm).
- A drainage system is installed around the foundation.
All post holes must be the same depth. The check is done with a level.- A pillow under the pillars is made from a mixture of sand and gravel or sand alone.
- The pillow is compacted using a log tamper. You can compact the sand cushion by pouring a lot of water into the hole.
- The bottom layer of two blocks is placed on a cushion of sand and gravel or on a special leveling layer of a special masonry mortar consisting of cement and sand (1 part of M400-500 cement is taken for 3 parts of sand and water is added so that the consistency of the mortar is plastic and thick) .
- The thickness of the mortar layer between the blocks is approximately 1 cm.
- A sand-cement mortar is applied to a row of blocks, and the next row of blocks is laid on top of it, perpendicular to the bottom row.
- The top mark of all foundation pillars must be the same. Sometimes it is necessary to level with a layer of sand-cement mortar or even with solid red brick.
- For fastening and wooden strapping, an anchor bolt can be inserted into the seam between the blocks of the top row.
The final step is to cover the top row with roofing felt and bitumen mastic (waterproofing device).
Waterproofing
To prevent the destruction of the foundation due to moisture penetration and freezing, the pillars must be waterproofed. There are several ways to prevent water from entering (waterproofing the foundation):
Coating. Melted bitumen must be applied to the blocks with a brush. Epoxy, bitumen, and polymer mastics are used for coating.- Polyurethane spraying . The most expensive method of waterproofing is a plastic, liquid mass that is sprayed onto the pillars.
- Plastering. The most labor-intensive of all methods. Special plaster mixtures containing plasticizing additives are used as a waterproofing layer.
- Pasting. A film with glass insulation and membranes is placed overlapping the polymer glue. Before and after pasting, coating is done with mastic (bitumen, polymer, epoxy). When applying multi-layer pasting, a mesh is placed between the layers, which is used for plastering. Pasting must begin from the bottom, with a horizontal overlap of at least 30 cm, and a vertical overlap of at least 10 cm. When pasting, layers can only be placed vertically.
The foundation pillars are placed on a special pad (with the exception of sand soil). Stages of making a pillow:
- The bottom of the pit, covered with geotextile, is covered with sand in a layer 20 cm thick. The sand is compacted.
- Crushed stone is poured onto the sand in a layer of approximately 20 cm.
If the groundwater in the area comes close to the surface, then the best option is a pad made entirely of gravel.
Sole
The foundation pillars will be installed more securely if they are placed on a base, which is a small expanded space of reinforced concrete. First, a special formwork is built, on which a frame made of reinforcement is placed and covered with concrete.
Rules for the construction of the sole:
- the size of the sole should be 2 times larger than the cross-section of the pillar;
- waterproofing made of reinforced concrete is required;
- the laid footing will prevent the sharp edges of the crushed stone from damaging the waterproofing and serves as a layer that levels the surface of the cushion.
The footing is a screed 5-7 cm thick, consisting of sand-cement mortar. If necessary, drainage outlets are made in the crushed stone.
Pillars
After erecting the base for the pillars, the foundation itself is built . To connect the post and the sole, reinforcement is used - several rods are protruded from the sole.
The blocks are connected to each other with sand-cement mortar. Each row of masonry is bandaged and checked vertically and horizontally.
The installation of reinforcement embedding blocks in the upper rows of the masonry will help to qualitatively connect the grillage with the foundation pillars. The side edges of the column are waterproofed on the last row of masonry blocks by wrapping the waterproofing onto the surface and securing it with bitumen mastic in 2-3 layers.
Grillage
There are several types of grillage:
- monolithic - poured along the heads of pillars;
- prefabricated - mechanically attached to the foundation pillars.
To prevent the grillage from contacting the ground, a gap is required between them , which is done in two ways:
- A layer of foam plastic is placed under the base of the grillage.
- A seven-centimeter layer of sand is poured onto the bottom of the formwork, which is removed after dismantling.
Thanks to the gap between the soil and the grillage, the adverse effects of soil freezing on the foundation are reduced.
How to buy: price and tips for choosing
The cost of FBS 20x20x40 for a columnar foundation includes the following components:
- price of raw materials;
- cost of production work;
- transportation costs.
The cost of blocks varies from 35 to 75 rubles per piece. The difference in prices is due to a number of reasons:
- weak competition - a small number of production leads to higher prices;
- quality and type of material - hollow expanded clay concrete blocks will be cheaper than solid ones;
- resellers on the market - it is cheaper to purchase building materials from the manufacturer;
- order volume – wholesalers are often given discounts.
When choosing and purchasing, you should pay attention to certain points:
- Compliance with the size and weight of the blocks. If the weight is below the specified value, and the dimensions are normal, this may indicate the presence of empty areas in the blocks or poor-quality compaction of the material. These shortcomings have a bad effect on the strength of FBS, so they should not be used for the foundation of a structure.
- Matching shape and size . Often there are batches made in different shapes and differing in size by up to 0.5 cm. You can check them with a template in the form of a plywood frame with a calibrated hole.
- Compliance with GOST . There should be no cracks or deformations on the FBS blocks.
- Compliance of building materials with the requirements of current regulatory documents. It will be confirmed by the presence of certificates and quality passports.
Possible errors during construction and ways to correct them
There are several mistakes that are most often made when building a columnar foundation from blocks with your own hands:
- Pillars without soles will quickly sag. Most often, a foundation is built without a sole, as this allows you to save on building materials and make the construction process less labor-intensive.
- A columnar foundation cannot be placed in subsidence soil, since even a well-made sole for each column will not save such a building from subsidence (sinking into the soil) in the future.
- You cannot build a columnar foundation in clay soil. In winter, the pillars will be pushed out (rise and move in different directions) from such soil, even if they are built below the freezing point and have a sole.
- Incorrect calculation of the load on the foundation from the load-bearing structures of the structure leads to the appearance of a lateral component that pulls the pillar to the side.
A sagging foundation can be leveled by placing the building on jacks and raising the pillars to the desired height.
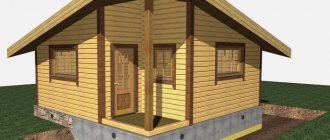
A columnar base is suitable for a wooden house (made of logs, timber) and for a frame structure with a height of no more than two floors . On such a support you can build a one-story house made of cellular concrete (the weight of the building material should not exceed 1000 kg/m3). It is important that the future building gives the same load to all pillars.
You will find a lot of important and useful information about columnar foundations here.
Columnar recessed and non-recessed block foundation
The simplest columnar foundation, regardless of depth, is easiest to build from blocks.
This foundation is made of blocks (concrete wall, expanded clay, foam concrete) or brick. We will look at a shallow foundation that is installed directly on the ground; shallow and deep ones differ only in that a different number of blocks are placed on the mortar in a conical-section pit on a sand-crushed stone cushion, and the deep pit is then filled with previously dug earth.
Columnar foundation (drawing in two positions, shallow and deep) shows the principles of its construction
Required Tools
To build the foundation you will need:
- construction mixer for mixing concrete (or a trough for mixing by hand);
- bayonet shovel;
- shovel;
- hand wheelbarrow;
- tamper (manual or vibration);
- rubber hammer;
- hydraulic level (or laser level);
- roulette.
Step-by-step creation of a columnar foundation
- We choose a place for construction.
- We prepare the site: mow the grass, uproot the trees, level the horizontal.
First of all, the soil surface is cleared of debris, trees, shrubs and their root systems are removed. - Using string and stakes, we mark the area (half a meter on each side more than the foundation) and the places where the “pillars” will stand.
You will need so many pillars that they are located a maximum of one and a half meters from each other. Then the building will be strong. The construction of the foundation begins with markings - We deepen the ground within the boundaries of the site by 0.3 meters (this can only be done at the locations of the pillars, then less crushed stone will be needed).
- We fill it with crushed stone, fill it with water, and compact it.
- We place two or four blocks on the crushed stone (in the first case - one above the other, in the second - layers in a perpendicular orientation) blocks on a self-prepared (M400 cement, sand and crushed stone in a ratio of 1, 2 and 5 parts, respectively) solution.
Let the solution harden. The same principle applies to bricks, only it will take more of them. It is not worth buying ready-made concrete, since the consumption is small. We place four blocks (in a perpendicular orientation) in a pit on crushed stone. - For waterproofing, coat the top of the pillars with molten bitumen and place pieces of roofing felt.
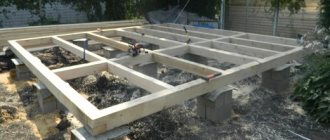
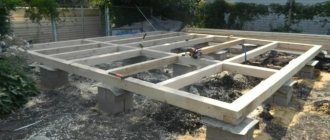
- We construct a grillage from wooden beams.
- We connect it with plank stiffening ribs.
The grillage should be at a distance of more than 10 cm from the ground level