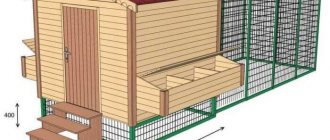
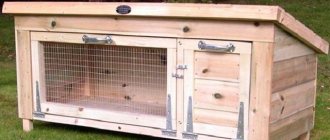
A barn is an indispensable building on a farm. It is used to store garden tools, firewood, small equipment, and with some modifications in the room you can organize a workshop, a bathhouse, a good-quality chicken coop or rabbitry. We will tell you how to build a shed with your own hands in this article.
How to choose a place
To accommodate outbuildings on the site, special urban planning and sanitary standards have been developed. They take into account the specific use of the premises and its impact on the environment.
When choosing a location, you need to follow these recommendations so that later conflicts with neighbors do not arise. If animals are not intended to be raised in the barn, a distance of at least 1 m is required from the boundary line.
Much stricter standards apply to premises for livestock:
- 4 m from the fence;
- 12-15 m from a residential building;
- 20 m from a source of drinking water.
The shed should be conveniently located in relation to the house and the entrance for the car, and not block the path of movement around the site. You can install the building on the northern side of the property to protect the area from cold winds and not create unnecessary shadow.
Don't forget about the fire gap, which is:
- for wooden buildings - 15-18 m;
- for buildings made of low-flammable materials with wooden floors - 9-12 m;
- for structures made of concrete, brick and other non-combustible materials - 6-8 m.
This takes into account the distances not only between your own buildings, but also between neighboring buildings.
How to build a hayloft?
How to build a hayloft for storing hay in bales/rolls.
The most inexpensive construction option is needed. Thanks in advance! Ekaterina, Sengiley.
Hello, Ekaterina from Sengiley!
When I hear the word hayloft, I always remember my childhood impressions of the place where hay was stored in the attic-hayloft of a barn.
That hayloft was capacious (about 15 cubic meters), dry (the roof had no holes), ventilated (there were a great many cracks in the gable and under the roof eaves).
This volume of space was quite enough to feed a goat. From October-November to April-May. Sometimes there was even hay left.
The only inconvenience was that the hay had to be dragged to a height of about three meters using a fork, or up the stairs with hands and armfuls.
The main rule when storing hay is that it should be dry. Hay is considered dry if it can be rubbed between your palms; its moisture content should be 15 - 17%. Hay is stored in haylofts not compacted, but simply piled up.
A hayloft is a room, usually an upper one, in barns, covered courtyards, stables, and sheepfolds.
In order to place hay in haylofts, especially with large volumes, hay lifts are used.
When storing hay compressed, if, God forbid, it is not sufficiently dried, the possibility of spontaneous combustion cannot be ruled out.
And if water gets through the roof onto the hay, it is possible that it will simply dry out.
When harvesting grain using the machine method, straw is currently rolled into pressed rolls, which are taken to the same places in the field, where this straw, dozens of rolls in volume, is sometimes stored until mid-winter, and sometimes almost until spring. Depending on his needs. But that's about straw
Straw on farms is often used as bedding for livestock. Although hunger is not a problem, if careless owners of animals that eat hay have nothing to feed them by spring, then the straw goes into feed.
I remember the last years of Soviet power, when we came to the collective farm for subbotniks to prepare the so-called vitamin supplement for cows. They brought pine branches from the forest on drag sleighs. So, a week later, when we again came with the next portion of pine needles to the barnyard, what remained from the previous branches, as thick as an arm, were thin, like matchsticks, gnawed branches. Because everything else from the food was eaten. Even straw.
Peasants at all times, when there was not enough food for artiodactyls, and even horses, in the spring, they tore off the thatched roofs from the huts and gave them to their pets.
However, all this is a lyrical digression with variations on the theme.
As for hay, a similar method of storing it in roll bales began to be used not so long ago. The main difficulty for individuals is dealing with large bales of hay, which weigh a lot. This is done much more often using the traditional classical method in haystacks and haystacks, when there are no haylofts.
If you rummage around on my website, you can find the answer to how to build a canopy with a roof over a haystack that slides vertically on four pillars at minimal cost.
For your option with hay in rolls, you can use a simple hay box, a sketch is given below. Its size can be varied depending on the amount of hay that needs to be stored. The area under the hay should be raised above the ground by about 15 centimeters. Otherwise, water from rain and melting snow can wet the hay with all the ensuing consequences.
The optimal site is when it is a concrete screed. Although you can simply lay something down, such as film or roofing felt, and put boards on the bedding.
Hay frame with dimensions
It wouldn’t hurt to put a couple of layers of polyethylene film over the supporting pillars of the hay field due to the same precipitation. Or reinforced film. Fasten with nails and wooden slats, then there is more guarantee that the film will not be torn by the wind.
Leave small longitudinal slits at the top and bottom not covered with film for ventilation.
Sketch of the closure for the hayloft
Cover the roof sheathing with roofing felt and sprinkling; it is relatively durable and not very expensive. One layer of roofing felt should be enough. To prevent the roof from being torn off by the wind, it is also secured with wooden slats with an approximate cross-section of 20/40 millimeters. Lathing - ordinary - edged boards 20 -25 centimeters thick and 10 to 20 centimeters wide. They are placed from each other at a distance of approximately their own width.
The roof slope is approximately 10 centimeters per 1 linear meter. That is, with a slope of 3 meters, the front of the roof should exceed its bottom by approximately 30 centimeters.
The roof should be covered by rolling out a roll of roofing material first along the lower edge of the roof, and covering the next section with the next roll. The overlap of one edge of the roll on the other is approximately 10 -15 centimeters.
With this sequence of rolling out the rolls, the water flowing down the roof will not fall under the canopy onto the hay.
Instead of roofing felt, you can, of course, also use polyethylene film on the roof (and the stronger it is, the better). But it will last no more than a season. Look at the cost, roofing felt will last for several years. And if you cover it in two layers, then it will last for a period of 5 to 10 years or more.
The minimum cross-section of canopy pillars with a height of up to 4 meters should be 40/100 millimeters. Edged boards or timber with a larger cross-section can be used, but smaller ones cannot be used. The structure may collapse. Instead of boards and timber, you can use trivial poles or sanded tree trunks with a diameter of 80 -100 millimeters.
The ends of the pillars are buried at least half a meter into the ground. To avoid having to deal with concreting them, saturate them with an antiseptic, possibly bitumen varnish (kuzbasslak). As a last resort, you can simply trim the bottom of the pillars with an ax (it crushes the wood fiber and compacts it) and, in addition, lightly burn them at the fire. This is what our ancestors did when there was no trace of any kind of impregnation.
Place rubble stones around the pillars to be dug in and compact them with a sledgehammer on top. Everyone will stand stronger.
Purlins (distances between pillars) are preferably 2, maximum 2.5 meters.
A sennik of this type is located from residential buildings at a distance of about 15 meters. And on the leeward side along your prevailing wind rose. All sorts of pranks with fire are not excluded, but you will be safer this way.
In winter, check the condition of hay storage a couple of times.
You can, of course, try to store hay quite cheaply by throwing a plastic film (or a car tarpaulin) of the appropriate size over the rolls of hay piled up in a heap. Throw several ropes over it, the ends of which are tied to stakes that are driven into the ground. Or to bricks, boulders, car tires.
Or don’t cover it with anything at all. Peasants sometimes brought hay from stacks to themselves from snowy meadows even in winter.
But this is only for a short period of time and then the responsibility for the results of storing hay will fall only on you. So, as traffic cops say, when you stop a violator, think.
Semenych (author of materials)
Our site is regularly updated with interesting and unique materials and articles on the topics of lumber, building materials and works, the author's opinion and knowledge of a real coven with more than 15 years of experience are provided. There is a section - funny stories of shabashniks. If you would like to receive information about this, subscribe to our website's newsletter. We guarantee that your address will not be shared with third parties.
Apartment renovation in Moscow and Moscow region
Wide range of repair work. Professional craftsmen.
Technologies and materials
As a rule, owners of summer cottages or household plots are not ready to spend a large budget on building a shed, so simple technologies and economical materials are used.
Most often outbuildings are erected:
- frame method made of wood or wood materials;
- made of concrete blocks or bricks.
The barn can be free-standing or interconnected with a garage, bathhouse, or other buildings. On the one hand, the extension allows you to save materials, on the other hand, it imposes a number of restrictions. Do not weaken the soil near the foundation of an existing building or reduce the load-bearing capacity of walls and ceilings.
Frame barn
The advantages of this technology are high assembly speed and cost-effectiveness of materials. At the first stage, the frame is assembled, then insulation and sheathing are carried out. A “cold” construction option without thermal insulation is possible to store equipment or contain fast-growing species of living creatures during the warm season.
For construction the following are used:
- timber, board, lath;
- OSB;
- moisture-resistant plywood;
- lining;
- insulation materials - mineral wool, polystyrene foam, polystyrene foam.
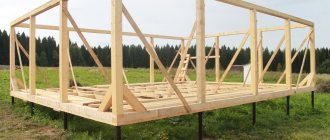
A frame outbuilding does not require a strong foundation. It is enough to install concrete pillars or mount screw metal piles.
Barn foundation on brick pillars
The frame can be made not only of wood, but also of metal, and then covered with sheet materials and insulated. This option is suitable for those who own a welding machine.
Metal frame barn
To finish a frame barn, you can use the remains after building a house, gazebo, or fence. Painting, siding, clapboard, corrugated sheeting, etc. are widely used.
All wood must first be treated with antiseptics and fire retardants. This will prevent rotting and rapid combustion of lumber, and will extend the life of the outbuilding.
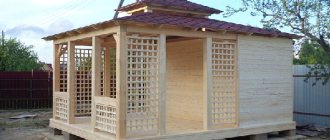
Shed made of blocks or bricks
The advantages of such structures are all-season use. For construction, blocks of lightweight concrete (foam concrete, slag concrete, expanded clay concrete, aerated concrete) with low thermal conductivity are used, so the walls of the barn retain heat well.
Disadvantages include the need for a solid foundation (strip, slab), high labor and material consumption. In addition, a permanent barn is required by law to be registered, which implies additional registration costs and taxes.
However, block or brick buildings are very popular. They are much stronger and more durable than frame ones, and are not afraid of moisture (with appropriate exterior finishing) and fire.
Construction of the foundation
If the structure of the barn is frame, then you can completely get by with a columnar or pile type of foundation. Block walls require a more powerful and reliable foundation. Such a foundation can be a shallow strip foundation, although in any case the type of soil should be taken into account. If the soil is clayey and heaving, then it is better to abandon the pile or columnar foundation altogether. During seasonal soil movements, the supports may simply be squeezed out or skewed. On weak peat bogs it is better to give preference to a pile foundation.
Marking stage
At this stage, the foundation is marked on the ground using a tape measure, a long cord, and stakes. Correctly, and most importantly, you can quickly mark the foundation using: Theodolite. Start marking from the longest wall of the building, fixing its position with a cord and pegs. After this, measurements are taken using a tape measure and, using stakes and rope, the position of all other walls is noted.
- Egyptian triangle. To do this, you need to pull the cord, after which a point is fixed at a distance of 4 meters from one of the base corners. Then from this point, 3 meters are measured in a perpendicular direction. There should be a distance of 5 meters between points. The second point is marked with a peg, adjusting its position. From this point further construction of the foundation is made.
Marking for the foundation
The correctness of right angles is controlled by measuring the distance between adjacent but diagonally opposite corners. If the distance is the same, then the angles are even.
More accurate fixation of dimensions is carried out using cast-offs, which are temporary posts and crossbars made of wooden slats, which are carried beyond the dimensions of the foundation. Nails are nailed to them, and a rope is pulled, which is removed before excavation work begins.
The process of constructing a strip foundation
The construction of a strip monolithic foundation consists of the following stages:
- Digging a trench half a meter deep and 40 cm wide.
- Pillow rashes made of crushed stone and sand, 10 to 20 cm thick, with compaction.
- Forming formwork from wooden boards.
- Laying the waterproofing layer.
- Installation of a metal frame (rebar).
- Concrete pouring.
After finishing the pouring, the foundation is covered with a film to avoid premature drying. This is especially true in hot weather. Alternatively, periodically water the foundation surface with water. After a week or a week and a half, it is permissible to begin further work. By this point, the concrete will already be able to gain initial strength.
As an option, not a monolithic type of foundation, but a prefabricated type of foundation, assembled from concrete blocks, is suitable. In this case, you should not use porous materials that have increased moisture absorption, which will lead to rapid destruction of the base.
Columnar foundation
To build this type of foundation, brickwork, concrete blocks, asbestos-cement or PVC pipes with a diameter of up to 150 mm, railway sleepers, etc. can be used as columns. Such posts are installed in the corners of the building, as well as every one and a half meters along the perimeter and under partitions.
If the columns are made of blocks or bricks, then they are made like this:
- First, holes are dug up to 40 cm deep.
- Sand is poured into the bottom of the pit in a layer of up to 20 cm and compacted.
- After this, blocks are laid or brick columns are laid out, measuring 40x40 cm and about 60 cm high.
- As the solution hardens, the columns are coated with waterproofing compounds.
A columnar foundation made of pipes is made like this:
- Using a hand drill, holes are drilled in the ground up to 1 meter deep.
- A layer of sand 10 cm thick is poured at the bottom of the wells.
- Waterproofing in the form of roofing felt is laid on top of the layer of sand.
- The pipes are installed and fixed.
- Fittings are placed inside the pipes, 3-4 pieces each.
- The inside of the pipes is filled with concrete.
- After the concrete has dried, the pit sinuses are backfilled.
In this case, the pipes act as formwork. If the soil is not problematic, then concrete is poured immediately into the prepared well with waterproofing.
Pile type foundation
Installing piles is a very labor-intensive process that requires special tools. Basically, screw metal piles are used, which are screwed into the ground. Here you cannot do without special equipment or special devices with levers for effort.
After installation, the piles are leveled by cutting, after which the pile cavity is filled with concrete. It is advisable to carry out compaction using a vibrator. After a week, when the concrete has hardened, work can continue.
Barn without foundation
If you plan to store only gardening tools in the building, which does not require a massive structure, then such a shed can be built without a foundation. Despite this, the structure will still have to be raised from the ground to a small height. For this you can use a wooden beam. The construction of such a shed does not require the construction of a foundation, which means you can save money on it, and there is no point at all.
In this case, the building area should not be more than 20 square meters and have a height of no more than 2 and a half meters. This is necessary so that the building has the lowest windage, otherwise a strong wind will easily overturn it. In this case, you need to take into account the nature of the soil, and it is better to equip the place with good drainage so that moisture does not accumulate under the shed, which can lead to rapid destruction of the beams. Such a shed will stand for many years on sandy soils that quickly absorb precipitation.
Naturally, the service life of such a building can be increased if the lower part is treated with antiseptics.
To build a shed without a foundation, you must adhere to a certain sequence, for example:
- First, the site is prepared by leveling, compacting and forming a drainage layer of crushed stone and sand.
- It is better to bury the posts in the corners into the ground to a depth of about 65 cm.
- To assemble the frame you will need a beam measuring 50x100 mm.
- It is enough to cover such a structure on all sides with planed boards, after which it can be painted.
The nature of the roof is single-pitched, made of corrugated sheets. This design turns out to be quite light, so the load on the walls and the ground is minimal. The design of the shed is not only simple, but also economical.
Drawings and diagrams of sheds
To organize construction correctly, you need to develop a clear plan and draw up a drawing or diagram of the barn. They are carried out to scale, indicating the dimensions, layout of materials, and solutions to the main components.
Drawing of a barn with a pitched roof
When developing a drawing, it is advisable to take into account the dimensions of blocks, sheets and measured products. This will help to use building materials without excess.
The layout needs to be thought out in advance - determine the area of the premises, the optimal number and location of openings, and provide options for subsequent redevelopment. For a workshop or poultry keeping, a source of daylight is a must.
Scheme of a frame barn on a columnar foundation
What's first?
- We get our bearings and talk to our neighbors. The goal is to find the best place for the shed: so that it is not very far away, but also does not stick out in front of your eyes and fits into sanitary standards for distances to water sources and other objects susceptible to contamination (residential buildings, plantings of agricultural crops, especially root crops);
- Suddenly there is no clarity on point 1, we are building either a mobile shed or a temporary shed from cheap waste material. However, it is possible to build a shed at the dacha from slabs or used boards that is quite durable, inexpensive and easy to refine until it gives it a quite attractive appearance, see below;
- If you have decided on a place for a barn right away, we choose the type of upper structure, taking into account the possibility of having pets;
- We select the roof for the “box”;
- Determine the type of foundation;
- We are designing a shed based on the terrain. The latter is especially important, because supervisory authorities do not stand on ceremony with sources of pollution;
- We reduce (compile) estimates for construction and decoration;
- We may adjust the project if the barn does not fit into the budget;
- We may also be considering the option of self-building with subsequent legalization. If the shed obviously complies with SanPiNs (Sanitary Rules and Norms), then it will be cheaper and easier than building it initially according to the project;
- We buy materials and build.
What to do with the project?
A barn is a lightweight, pre-fabricated, unheated non-residential structure, from which important consequences that make things easier follow. We will talk about them for construction later, but for now you need to know that when registering/legitimizing the greatest quibbles and difficulties should be expected in relation to the location on the ground in accordance with SanPiNs. The actual design of the barn should include sheets with facades, a plan with sections, see track 2 in Fig. and a plan diagram of the foundation with a specification of materials for it, as in Fig. with plan sections.
Sheet of facades from the barn project
As a rule, free shed projects from the RuNet are approved without anything and then no one ever thoroughly checks what is actually built there. It looks like a project, and ok. Deviations from the project in construction are acceptable, but in “small-scale construction” you can do without approval. But the layout plan for the site is studied very carefully, as are the plans of neighboring sites and their consent to construction. So make sure to collect these papers in advance, they are valid for 3 years.
Sheet of plan sections from the barn project
Perhaps the corrosive bureaucrat will require another sheet with the frame structure, because... It’s not residential, it’s not residential, but people go there. In such a case, for a sample, see the drawings in Fig. By the way, this is not a bad shed for a 6-acre dacha. In extreme cases, you can sleep there, lying down diagonally.
Mini-shed frame for a small area
Note: it is not necessary to list small fasteners (nails, screws, angles, staples) in the bill of materials for the drawings, because it is purchased as it is spent. It is also not necessary to indicate soft roofing materials costing up to 3,000 rubles. If, say, 2 rolls of roofing felt are spent on the roof, then it will cost up to 1000 rubles, so we also classify it as purchased as it is spent. Keep only sales receipts, in case they come to the rescue.
About temporary sheds
A good-quality wooden shed without a foundation weighs up to a ton; with a pitched roof and if you build it carefully, but not like a merchant, you can fit in half a ton. You can move it on rollers along the sleds, see picture, using a crowbar, you can move it together. To lift and place on the base using straps (ropes), 10-12 strong men are enough. Although, who knows, the subsequent treat for this crowd will cost more than renting a truck crane...
Moving a barn on rollers
What is the point of this, besides the fact that you can build anywhere at first? Moreover, in this case the project is needed no more than for a doghouse, and for it it is not needed at all. If it stands for a year, then later, on the foundation, they will legitimize it, as long as it fits into the SanPiNs.
However, here the question arises for yourself: how to put it on the foundation? We should put them on anchors, but not dismantle the building in order to push them through the crown? There is a way, see below for details.
Preparation
Before construction begins, the site must be cleared and leveled. Remove fertile soil to a depth of 30 cm and transport it to the garden or beds.
Place purchased materials nearby. Wood, insulation and tools should not get wet, so they are placed under a canopy or covered from rain with film or tarpaulin.
It is important to observe electrical safety measures and not leave connected equipment in the public domain for children or animals. The power source must be grounded and protected from water.
Marking
To mark the foundation you will need stakes, a cord, a tape measure and a tool for laying out a right angle. You can make a large square yourself, based on knowledge of the Pythagorean theorem - using nails or screws, 3 slats are connected, the lengths of which are in the ratio 3: 4: 5.
First, the long side of the shed is marked, 2 pegs are driven in, and the cord is pulled. Then a rack square is applied, and the width of the room is marked on its other side.
The marking is done with reference either to the surface of the wall (internal or external) or to the axes of the building (as in professional construction). The main thing is to correctly transfer this reference from the working drawing to nature, otherwise the actual dimensions will not correspond to the design ones.
To mark large sheds, higher accuracy is needed, so it is rational to use a theodolite. Using this device, you can find all corners of the building from one standing point.
During the marking process, it is recommended to make a run-out - moving the marked lines beyond the boundaries of the pit. To do this, outside the building, for each axis, 2 devices are installed from slats with crossbars into which a nail is driven or a screw is screwed. A cord is pulled along them. It can be removed for the period of excavation work and then restored.
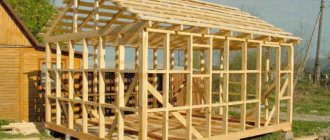
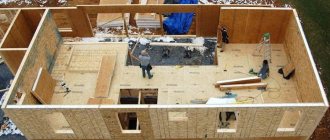
Construction of a barn frame step by step: detailed instructions
The most important part of construction is assembling the frame. All lumber is pre-treated with impregnation and dried.
Main frame elements:
- racks;
- lower and upper trim;
- crossbars, lintels;
- jib.
For connections, self-tapping screws, nails, corners, overlays, brackets, staples, clamps, and wood glue are used.
Installation can be carried out in 2 ways:
- whole sections assembled in a horizontal position (platform method);
- sequentially install the harness, racks, etc.
The first method is more technologically advanced; it is not for nothing that it is used for the construction of houses and other fairly large objects. But installing an entire section in a vertical position and securing it requires the help of several people, which is not always possible. It is much easier for one or two craftsmen to carry out installation sequentially.
Stages of alternate frame assembly:
- Lay a layer of waterproofing on the foundation.
- Install the strapping beam on the surface of the foundation, secure it with studs and nuts.
- Lay joists and subfloor. This will make it much more convenient to work.
- Install the racks at 60 cm intervals (for laying insulation). If thermal insulation is not used, the distance can be increased to 1 m.
- Reinforce the corners with jibs or perforated steel strips.
- Mount the top trim.
- In the openings, secure the boards laid on edge.
- Install window and door frames.
- Lay communications.
- Sheathe the structure with finishing materials and carry out protective treatment.
Many people are interested in whether jibs are needed if the frame shed is sheathed with OSB or plywood. In this case, the technology allows not to use reinforcement with jibs, since the sheets impart rigidity to the structure in 2 planes at once.
Video about building wooden sheds
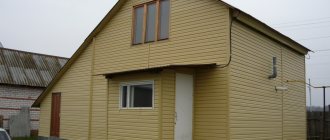
The barn turned out to be beautiful, but not cheap. But it is decent in size, strong and in appearance no different from a house - it fits into the composition. Everything is shown/described in detail, there is one violation: the waterproofing under the metal tiles is laid vertically. Even with good gluing of the strips, sooner or later the water will make a path for itself. Otherwise, everything is correct.
In this case, the barn is built with your own hands on what is probably the cheapest foundation: concrete is poured into old tires. The frame stands on these “pillars”. Naturally, they need to be placed on a flat, reliable surface and they themselves must be at the same level. In terms of strength, the base will not be inferior to the best concrete blocks, and may even surpass them. Tires protruding from under the structure can be closed by making a step and subsequently placing flowers on it or using it for other needs. It will be even more practical.
Another video with a step-by-step illustration of the construction of a frame barn made of timber.
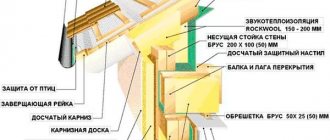
Roof structure
After installing the frame, you can begin the flooring and roofing, which is most often single-pitch or gable. These are the simplest to implement and quite functional designs.
Single-pitch
To install this option, one of the walls must be higher than the opposite one. The beam of the upper trim acts as a Mauerlat. The rafters are laid in increments of 0.8-1.2 m, along which there is a sheathing made of inch boards.
The distance between the sheathing boards is determined depending on the type of roofing material. For metal tiles this is 35-40 cm, for soft roofing or ondulin no more than 2-3 cm. Instead of lathing, you can lay a continuous flooring of OSB boards.
Gable
More difficult to manufacture, but compared to a single-slope roof it better withstands wind loads. In addition, the under-roof space can be used as an attic.
The rafters are laid with a slope of up to 45° and connected at the ridge using wooden overlays, notches or metal fasteners. The system can also be attached to the Mauerlat with a notch with additional mechanical fasteners or only with steel corners.
Frame sheds
Frame construction technology is applicable to any structure. Barns are no exception to the rule. The main idea is to create a rigid spatial “skeleton” that absorbs loads.
It can be assembled from a wooden beam or from a profile pipe. Any sheet and molded materials are suitable for cladding.
Wood (slab, board)
An inexpensive option for any task: keeping animals, garages, warehouses, workshops. A good owner always has some timber, a couple of cubes of boards or slabs in stock. They can be used to construct such a building.
Wooden frame posts should not be dug into the ground. Even impregnation with an antiseptic will not be able to protect them from rotting for a long time. Therefore, before starting to assemble the frame, you need to think about the foundation.
It is best to use columnar or pile. Having made it, they begin to install the support frame made of timber. Stands are attached to it.
The rafters of the pitched roof are placed along their upper ends. Having assembled the wooden “skeleton”, it is sheathed with a board or slab.
Over time, cracks appear in the cladding made from ordinary edged boards. Therefore, it is better to use tongue and groove material for work. If it is not there, then you need to fill the joints with wooden strips.
Another simple way to protect walls from blowing is to install herringbone paneling, when each top row of boards overlaps the bottom with its edge.
To build a warm barn for wintering livestock, you need to attach a wind-moisture-proofing film to the posts and place vertical bars on it to secure the sheathing. After this, insulation begins, laying insulation (mineral wool, polystyrene foam) into the inside of the frame.
When thinking about what to build a shed from, many people opt for OSB boards. At a cost of 1 m2, this material is slightly more expensive than boards, but cutting and installation are less hassle.
The main condition for quality is to position the frame posts so that the joints of the sheathing slabs are in their center. If everything is done accurately and evenly, then cladding takes a minimum of time.
OSB board practically does not rot and does not warp from moisture. However, you will have to paint the walls. Not only for aesthetic reasons, but also as additional protection.
The remaining metal remaining after installing the fence can be used in the barn. The frame for it is best made from a profile pipe, but a wooden beam is also suitable for this purpose.
There are uses for old water pipes. By concreting them in the ground, you will get reliable racks. Purlins for fastening the cladding are fixed to them (by welding or bolting).