Idea
Before starting such a large and ambitious project, you should familiarize yourself in more detail with all the proposals that companies for the construction of these structures can offer.
In order to find them, you don’t have to go to every store and check all the details. Using the World Wide Web, you can find information, photos of a brick fence, and any other information related to this product.
The main thing is to correctly analyze the market and choose exactly the product that is most suitable.
Materials for caps
On sale there are lids from:
- metal (stainless steel, galvanized steel, tin);
- concrete;
- bitumen shingles;
- clinker;
- stone;
- plastic;
- polymer sand mixture;
- ceramics, etc.
The color range of products knows no restrictions. The cap can be made with a glossy or matte finish.
To extend the service life of posts and fencing in general, experienced builders recommend installing ridges along the entire length of the structure.
Metal
The metal poles are durable. Provided they have an anti-corrosion coating, they are not afraid of exposure to the external environment. This is durable protection from precipitation and a good decor for brick columns.
To make installation easier, metal hoods are manufactured to be empty inside so they are lightweight. Convenient to transport. Effectively used in any conditions. The price is affordable.
Photo: purchased metal version with a lantern
The internal emptiness does not affect the quality of the lid in any way. Allows you to mount an original outdoor light in the cavity.
DIY method
To assemble at home you need to prepare:
- paper;
- compass, ruler and pencil;
- metal scissors;
- locksmith corner;
- Workbench;
- metal corner.
As a material for the workpiece, you can take a piece of galvanized steel or tin with a thickness of 0.5 mm.
Sequence of work:
- We take measurements of the pillar to be covered.
- We draw up a drawing of the cap on paper. We calculate the height of the base and the angle of inclination.
- We cut a strip from the prepared piece of metal. The width is equal to the height of the support skirt, the height is equal to the circumference of the pole.
- The future cap will be made of 4 triangles. We cut them out according to the drawing indicating the bend line.
- We attach the elements to the workbench, bend the marked edges, and align the edges.
- We assemble the parts into a whole. We go through the seams with rivets.
- We prime the workpiece and paint it.
- We install it on a pole.
The main thing is that the resulting product completely covers the top of the support and fits tightly to it.
Users often search for:
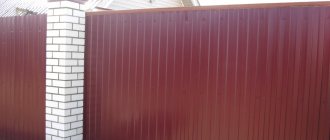
- Fence made of brick and corrugated board
- Installation of a foundation for a brick fence
Fastening methods
You can install the cover either using an adhesive mixture, or using dowels or self-tapping screws.
The latter option is considered more reliable, but requires careful calculations. At the top of the pillar, holes are made in the bricks to a depth of 5 cm. Holes of the appropriate diameter are also made at the bottom of the cap. The lower part of the lid is placed on a support and secured with dowels. Then the top is put on. The side seam is sealed with sealant.
In the case where the hoods will be equipped with lanterns, it is necessary to prepare in advance the holes for laying the electrical cable in compliance with safety regulations. If you don’t have the skills to connect electricity, then you should turn to the experts.
Concrete
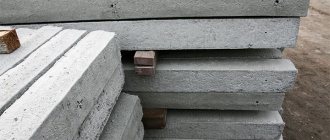
Concrete covers have a low price and are widely available on the construction market in different colors and shapes. Suitable for installation on brick fences.
Photo: toppings for concrete pillars
Their disadvantage is their heavy weight. Although concrete is not considered brittle when transported, it can crack or break into pieces if dropped.
DIY making
To try to assemble such a lid yourself, you need:
- Prepare a form for pouring the solution. It is cut out of a piece of galvanized sheet metal in accordance with the dimensions of the support.
- It is recommended to design it in the form of a pyramid. The edges should be smooth.
- The mold elements are fastened into one structure, placed on a flat surface and firmly fixed.
- Prepare a solution. The proportions of the ingredients of sand, cement and crushed stone are 2:1:4.
- The mold is filled to the top with the mixture.
- Drying time for concrete is 3 weeks. A product that is not completely dry may begin to crumble during installation.
If you want to get a colored cap while preparing the solution, you can add dyes.
Fastening methods
Installation is carried out in the following sequence:
- The top of the brick pillars is cleaned of dust and primed.
- Cement mortar or special glue is applied.
- A concrete cap is installed under the building level. The excess mixture is removed.
- The seams are rubbed down and treated with a water-repellent agent.
- It takes 2–3 days for the cement mixture to harden, and for glue – from several hours to a day.
Fastening of lanterns and other decor is carried out only after the solution has completely hardened.
Bituminous shingles
Photo: using bitumen shingles as a material for making a cap for a fence.
A good option for low-budget construction and in conditions of limited time. There is no need to create a drawing or carry out calculations. Attach the tiles to the top of the post, leaving small projections.
Plastic, ceramics, forging
Polymer (plastic) lids are lightweight, have a wide range of colors, and have a long service life. The basis of the products is PVC panels. The only drawback is the fragility of the material.
Forged and ceramic caps have a high price due to the high cost of raw materials and the complexity of the production process. They are durable and elegant in appearance.
Photo: forged frame with a lantern
When making lids yourself, without experience or skills, it is better not to take on these materials.
The basis
Before starting to lay a brick fence, a person needs to select the material that will be used in the construction of this structure. After all, we can say with confidence that a fence is not only a method of protection. It can also be used as an element of external decor.
Thanks to its presentable appearance, it will be able to form a whole design ensemble together with other items in the summer cottage.
Therefore, there are a large number of different types of bricks for this purpose. Here are some of them:
Advantages and disadvantages of a brick fence
The advantages of building brick fences from stone include the following:
The brick fence is very strong, durable and looks solid
The massiveness of the structure.
- Impressive appearance.
- Fortress.
- Aesthetic design.
- Combines into a single composition with all types of materials for construction.
- Durability up to 100 years.
- For construction, you can get by with minimal knowledge and the use of a number of professional tools.
There are not many disadvantages to brick fences, but they are also present, these are the following factors:
- It is necessary to build a strong foundation for the fence.
- Lots of fence work. This also causes slowness. After all, it is necessary to wait some time after each stage.
- A brick fence needs protection from moisture.
- The cost of such a design is quite high. And decorative elements will increase the price even more.
Sand-lime brick
Classic - sand-lime brick. An economically viable option, in terms of strength and power, not inferior to its richer “brothers”.
Of course, in appearance it does not match the expensive models, but if it is beautifully lined, you can get an effect that is in no way inferior to fences from expensive estates.
Preliminary, excavation and construction work
- All foreign objects and things should be removed from the future construction site in advance so that they do not interfere during the work.
- The area is cleared of debris and leveled. Levelness can be checked using a level, theodolite and similar tools.
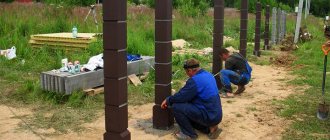
- Along the perimeter of the site, stakes are installed in two rows. The distance between the rows should be equal to the width of the future trench for the foundation. A rope is pulled through the stakes.
- Next, the places for installing support pillars are also marked with the help of pegs. Now you should dig a trench and holes for pillars along the marked area.
- Holes can be dug either manually with a shovel or using an ordinary hand drill. An excavator can be used to dig a trench, especially if the fence is quite long. The depth of the pits is approximately 1 m, and the trenches are at least 0.5-0.6 m and depends on the height of the pillars and spans, the type of masonry, the brand of bricks, the type of soil and other factors.
- Next, a small layer (0.1-0.15 m) of wet coarse-grained or medium-grained sand is placed at the bottom of the pits and trenches as a sand cushion under the foundation and thoroughly compacted. You can lay a small layer of crushed stone or gravel on top of the sand layer to prevent stagnation and drain water from under the base of the future foundation.
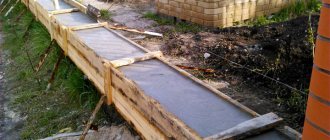
Construction of formwork
- Next, formwork panels are knocked down from the boards and then they are placed along both vertical walls of the trench along its entire length. The shields are always knocked down on the side that will be directed towards the wall of the trench. It is important that the front side of the formwork panels (the one that will be directed into the trench) is flat.
- Large gaps in formwork panels are unacceptable. They should be sealed with slats in advance. The height of the formwork should slightly exceed the upper limit of the future foundation.
- The shields installed in the trench are knocked together with transverse boards and supported from the outside to fix them in a strictly vertical position along the trench before pouring concrete. This way we will get a high-quality brick fence.
Construction of a reinforced frame for the foundation and installation of pillars
The reinforced frame is made from smooth and ribbed reinforcement by tying the intersections of longitudinal, transverse and vertical rods with knitting wire.
Instead of knitting, you can use welding - it is faster and more convenient, but less effective due to the lower strength of the subsequently obtained reinforced frame (weak bending strength under the action of vertical forces).
Longitudinal rods are arranged in two or three rows in each horizontal plane. The number of planes is two or three, depending on the height of the foundation and the design load on it. The distance between nodes should be approximately 200 mm.
Next, the made reinforcement frame is immersed inside the trench. Pillars are installed in the pits. Check their verticality in all directions: the pillars must have a strictly perpendicular orientation relative to the plane of the earth's surface. To fix the pillars in the desired position before pouring concrete, it would be good to temporarily support them with stones, sticks and other available materials. Another possible option is to tie or weld them to the reinforced frame.
Pouring concrete
Now the concrete mixture should be poured into the trench and into the holes. Concrete can be used either purchased or prepared by yourself. It is important to pour all the concrete at one time to ensure good strength for the entire foundation. It is known that concrete gains strength gradually, reaching 40% of its maximum strength on the 7th day. During all these days, the monolith should be protected from possible precipitation by wrapping it in a waterproof film. The resulting foundation must be waterproofed using any modern means, for example, penetrating waterproofing, bitumen, etc.
Laying spans, pillars and plinths
Brickwork begins with the construction of a base, and if it is not provided for in the project, then, as a rule, with pillars. The base is made on the basis of a foundation strip of 1.5, 2 or 2.5 bricks. The main purpose of a fence base is a beautiful appearance.
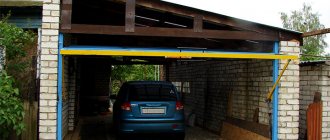
The height of the plinth is usually about 300 mm, that is, 4 rows of single bricks, taking into account the masonry joints. Masonry for pillars is usually used in 1.5 or 2 bricks. The idea of laying pillars comes down to the following. Above the base, in marked places, brick pillars are laid with a height determined by calculation. Metal pillars are covered with bricks on all sides. The result is the following structure: a metal pillar inside and brickwork forming the outer sides of the pillars.
After the masonry is completed, concrete is poured inside the brick pillars, and the pillar is covered on top with a special (usually metal) cap that prevents precipitation from entering the pillar.
You can either make the caps yourself or buy ready-made ones in any colors and configurations. The laying of spans is usually done in 0.5, 1 or 1.5 bricks. The span is built directly on the base or on the foundation if there is no base. The height of a fence for masonry of 1.5 ordinary bricks is usually limited to 2.2 m, so for higher spans the masonry should be made of 2 bricks. The height of the pillars usually exceeds the height of the spans by about 10%. From above, if desired, the span, just like the pillars, can be protected from precipitation with a cap.
Clinker brick
Expensive, but at the same time one of the most trendy materials in our time. Most often they attract people with their appearance and great installation capabilities. Clinker bricks are made using special clay and are not inferior in strength to other types.
Due to the absence of internal voids, it can last for decades, but due to the complexity of manufacturing it is quite expensive.
Marking the site and creating a foundation
Work on the construction of a brick fence begins with marking the site. To perform this work, a tape measure, pegs and ropes are used. The step-by-step instructions are as follows:
- Pegs are driven in at the places where the future fence will pass in increments of 1 meter, after which a nylon thread or fishing line is pulled. It is worth considering that at this stage you should indicate the location of the gates, pillars and gates.
- The angles should be carefully checked, as they must be strictly straight. To check the perpendicularity of the sides, use a square.
It is necessary to pay a lot of attention to this stage, since mistakes made will lead to significant problems in the future.
As previously noted, most often a strip foundation is erected under brickwork. It has the proper load-bearing capabilities. Among the features of the work, we note the following points:
- According to the previously carried out markings, a ditch is dug out under the strip foundation. According to recommendations, it should be several tens of centimeters the width of the brickwork. As for the depth of the trench, to determine this indicator, the type of soil and the level of soil freezing are taken into account. Crushed stone and sand are laid along the bottom and compacted. A cushion of sand and crushed stone helps to distribute the load evenly and also reduces the likelihood of the foundation being washed away by groundwater.
- After the trench has been dug, formwork is created. It consists of shields that are laid on the sides of the trench and fixed. It is worth remembering that when pouring concrete it will exert strong pressure on the formwork structure.
- In order to increase the strength of the foundation, a reinforcing structure is installed. It can be made with your own hands from metal rods, which are connected by welding or tying with soft wire.
- After this, the formwork can be poured with concrete. To save money, you should make the mixture yourself; to save time, order it with delivery to the installation site.
You can also insulate the foundation, but in the case of a fence this is not necessary. It takes about one month for the concrete to gain the required strength.
Hyperpressed brick
Well, a completely new trend is a protective structure made of hyper-pressed brick. The main differences are: resistant to environmental changes, durable, environmentally friendly. The material is made in various colors.
Note! For a more detailed study of the construction stages of the fence, we recommend that you look at the full description here.
Selection and calculation of bricks
The fence can be laid out from different types of bricks.
Brick calculation table
Each option has its own characteristics, namely:
- the red brick will need to be plastered after the masonry is completed. However, often red brick fences remain unplastered according to the owners’ design plans;
- facing brick allows you to imitate a variety of materials and does not require finishing;
- Frost-resistant brick will allow you to get a fence of the highest quality with an extended service life.
Choose the type of brick based on your preferences and budget.
Brickwork calculation table
It is very simple to calculate the required amount of building material, but to do this you need to know the total area of the future fence. The dependence is as follows: when laying walls with 1 brick, it takes about 100 building elements to build 1 m2 of wall, when laying double bricks - about 200 pieces.
Mortar consumption for brickwork
DIY fence installation
If a person has a number of specific skills, then he can easily make a brick fence with his own hands. To do this, he will need patience and an auxiliary construction tool:
- trough for preparing the solution;
- shovel for mixing;
- hammer;
- Bulgarian;
- rope;
- cement;
- fittings;
- sand;
- putty knife;
- crushed stone;
- water;
- buckets.
Do-it-yourself fence installation can be divided into several stages:
- stage one - collection of construction tools;
- stage two – selection of material;
- stage three – viewing recommendations related to general design;
- stage four – marking the site;
- this fifth is pouring the foundation;
- stage six - brick laying;
- Stage seven – final cleanup of defects.
Possible problems and their solutions
One of the most important problems that arise when building a brick fence with your own hands is the construction of pillars. When designing them, the following troubles arise:
- The upper part is wider. This defect occurs due to poor order control. This oddity may also arise due to different thicknesses of the seams. So, if there is a deviation on each row of at least 1 mm, by the end of the column you can already see as much as 2 cm. This problem cannot be corrected, it can only be avoided. To do this, use a tape measure or even a template made from a flat strip.
- The corners of the pillars have movement. If the corner boundaries are mixed, then visually such a pillar will be twisted, and securing anything to it will be very problematic. Such a defect is avoided when, during masonry, they use the construction of 2 corners at once, which are attached at the bottom.
Problems that arise during the construction of a brick fence are quite rare. These include defects such as:
- Shrinkage of the building. This happens due to the heavy weight of the structure and inadequate foundation. Or the base was not reinforced.
- Foundation shrinkage occurs due to violation of the rules for concreting the foundation. When they begin to build the structure itself without waiting for the strength of the cement. That is, earlier than 7 days. And in some cases it may take longer. It all depends on the temperature and climatic conditions.
- Destruction of masonry. The fence begins to fall apart, sometimes even with unfinished construction.
This problem occurs due to incorrectly created masonry mortar. The proportions of some of the cement in the composition of concrete plastic standards may be violated, or the materials may be of poor quality or have been improperly stored.
It is necessary to store building materials in a dry place without sudden temperature changes and high humidity.
If you don’t know how to make a brick fence, then building a high-quality brick fence will not be difficult if you adhere to the construction rules and pay attention to all the smallest details.
Care
A brick fence is relatively unpretentious, but still requires maintenance. Despite the fact that such a structure can serve for a long time, it is not immune to the appearance of chips and holes, so you need to constantly monitor this and, if necessary, promptly repair the “wounds” with a solution.
With careful step-by-step construction of the fence and the use of new high-quality materials, the risk of cracks is low.
Building a beautiful brick fence is a labor-intensive process that requires knowledge of the basic steps. Strict adherence to the instructions guarantees the appearance of durable, reliable and attractive protection on the site, capable of serving for a long time and with high quality.