Wooden foundations are used for the construction of lightweight wooden buildings. Since the building material - wood - has a weak load-bearing capacity, and products made from it have a limited service life, the scope of application of wooden load-bearing base structures is very limited. When choosing wood as a material for a load-bearing foundation, individual developers must remember that it is necessary to correctly take into account the categories of soil and the type of soil on the building site, since not every type of earthen soil is suitable for the construction of wooden foundations.
Types of wooden foundations
A wooden foundation can be classified as a pile foundation, in which the support piles are made of wood. Piles made of wood differ in the type of installation:
- Hanging piles, the installation of which is provided at great depths in soft soils.
- Piles in the form of racks, used to pass through weak soil layers until they stop at a solid foundation.
Wooden hanging piles and piles - racks differ from each other in the depth of penetration of soil layers and the depth of support on a dense, durable base.
The main task when constructing a wooden foundation is to create a support for the piled wooden structure to a depth not exceeding its total length.
Construction of a strip foundation
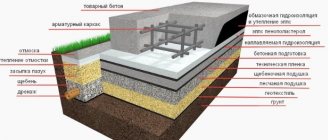
This type of base is suitable for rocky and coarse soils or dry sand (not dusty). As with the classic concrete or stone strip, the construction process looks like this:
- level the terrain or dig a system of trenches around the perimeter of the building and under the internal walls for the foundation of a shallow foundation;
- lay out the first “crown” of the thickest logs or beams on the surface or at the bottom of the trench - with this option it will act as a strip shallow foundation.
As a “folk” option, you can use used wooden sleepers for the base. They are cheaper than new ones, and unlike them, they always come with impregnation.
For other soils, this type is rare due to low strength and limited service life.
Decay (biological damage) of a tree occurs at the interface between the foundation and the surface. The tape has such a maximum surface. But while inspection and maintenance of pillars is quite simple, the condition of a shallow strip foundation is even difficult to control.
Advantages of wooden foundations
There are many positive characteristics in using wood for the foundation of a wooden house or other building. These include:
- Simple and affordable technology for the work.
- The ability to build a wooden foundation independently and with your own hands without the involvement of specialists.
- Low cost of material.
- Possibility of using manual labor for installation without the use of expensive construction equipment.
- The distinctive ability of wood to resist significant bending and tensile loads.
- The heat capacity of wood, due to which the heat losses of a wooden house or building will be insignificant.
Type of wooden foundation
The fragility of wooden foundations is their main drawback, especially in cases of construction on soils with variable humidity levels.
A good and interesting alternative to a concrete strip foundation would be to lay wooden sleepers as a continuous load-bearing foundation for the structure.
Types of columnar base - pros and cons of each material
The properties of construction raw materials will naturally affect the quality of the columnar foundation, its cost and labor intensity. For example:
- Brick. A popular material, often used in related construction. Inexpensive, durable. However, it is not suitable for very damp soils, as it absorbs moisture and collapses. It is not suitable for heaving areas - a pillar assembled from bricks is easily deformed under pressure during cold periods, and the structure will collapse at the seams of the masonry.
- Wood. A short-lived and fragile material for the construction of a columnar foundation. The base elements are timber or large-section logs. It is not used for residential buildings - maximum for the construction of a bathhouse. In addition to waterproofing, you will need to protect the log from fire, rot and parasites, so the affordability turns out to be mythical. The advantage of the foundation is the ability not to delay the construction of the facility for a single day.
- Reinforced concrete. The foundation can be made in ready-made structures or poured independently. The complexity of installation is compensated by its strength and durability. But at the same time, such a foundation requires formwork, reinforcing rod, and the finished structure requires reliable insulation and waterproofing, since the temperature difference between the material of the house and the supports will lead to the formation of condensation, which is bad for any raw material. The wood begins to rot, the concrete crumbles. Considering the dimensions of the foundation, its total cost is high.
- Asbestos cement pipes. It is necessary to drill holes for them, therefore, the price increases by the cost of attracting equipment. In operation, such a columnar foundation for a house made of timber shows satisfactory results - it is stable on problematic soils, durable and strong.
- Combined foundation - pillars and filler tape. The cost of the base elements is high. They are usually homogeneous and monolithic. The platform is strong and durable. Suitable for residential buildings with 1–2 floors and heavy construction materials.
To assess the possibility of using a columnar foundation on a site, you should contact your local land office or architectural department. The departments must have information about the nature of the soil in any area. For additional consultations, you can contact private construction companies that have their own design bureau and can offer you a diagram of a columnar foundation for any timber house.
Structural differences of columnar foundations
In addition to differences in building materials, columnar foundations for wooden houses have a number of differences in design.
Examples:
- Columnar. These include prefabricated structures made of brick, rubble concrete, poured columns and plastic formwork. The disadvantage of a columnar foundation is that the design is only suitable for light buildings - bathhouses, gazebos, frame buildings. The advantage is the speed of construction and low cost.
- Pillar foundation. Such a foundation has significant pros and cons. It consists of free-standing pillars with a concrete platform. One of the features of this foundation for houses made of timber is the creation of a solid foundation for the embedded crown and logs, which serve as the basis of the floor. The advantage of this design is its special stability on capricious soils. Such a foundation can support objects of more than one floor. The disadvantage is that it requires much more time and money to install.
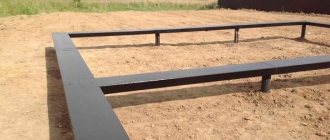
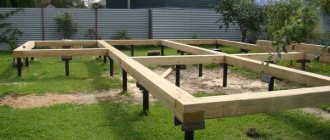
- Columnar base with grillage. A house made of timber has a powerful, reliable belt that allows you to build a two-story structure on any soil - heaving, floating, with a high level of groundwater. A similar columnar foundation for a house made of timber will cost more than without a grillage, but for a large residential property it is often chosen.
Structural differences of columnar foundations
For the optimal choice, private builders are recommended not to take only the cost as a basis, but to refer to the documentation “Columnar foundation SNiP and GOST” - they contain all the necessary parameters that affect the future operation of the structure.
Regulatory aspects
Correct arrangement of the foundation of a private log house is the key to the safety of residents. All parameters of the future foundation are regulated by regulatory documents - SNiP 2.02.0183 and GOST 24022-80, 24476-80. They indicate the following:
- Position and number of floors of the house. The proximity of cliffs, reservoirs, passing mines, wells or wells is taken into account. The total area of the building is not taken into account - only the weight of the house affects the load and pressure of the foundation on the ground.
- Bearing capacity and soil type. There are only 5 of them - clayey, loamy, sandy, peat, limestone. The behavior of the soil during rain will help you distinguish one from the other.
- Soil freezing depth and groundwater level. In the first case, the base of the post should be lower, in the second – higher, in order to avoid heaving during seasonal changes.
In addition, GOST for columnar foundations regulates the use of cement grade for poured columns or grillage, coupled with soil characteristics. Ideally, a surveyor is involved in the calculations and selection of the optimal foundation option for a specific timber house. A private builder should also inquire about the foundations of nearby properties.
Requirements for the construction of wooden foundations
Suitable structures for wooden piles are rectangular wooden posts or the bottom (butt) part of a tree with a diameter of at least 200 mm. The estimated length of the pillars and the required number are taken on the basis of calculated data depending on the characteristics of the soil at the building site.
At the intersection of internal and external walls, as well as at the corners of the building, it is necessary to provide for the installation of wooden piles. When constructing a large building, it is recommended to place additional piles between the main design supports.
Piles need to be installed in holes or holes with a diameter slightly larger than the diameter of the wooden support itself.
If you strengthen the base under the pillars with a concrete mixture, stones or wooden crosses, you can significantly increase the load-bearing capacity of a wooden foundation. When installing pillars in a concrete mixture to a depth of 100 to 150 mm, the fixation of structures is significantly enhanced, which will make the subsidence of the foundation minimal.
Stages of work
Calculation of the length and number of wooden poles
The depth of wooden supports is determined depending on the geological structure of the soil and the weight of the future structure. Most often it is 500 mm for internal walls and from 750 to 1550 mm for external walls.
The length of the wooden support is the sum of the length of the pillar that will be underground (750-1550 mm), plus the length of the pillar above the ground (no more than 600 mm), plus a small margin, which is taken into account when further cutting the pillars along the cord to the general level.
The distance between wooden posts is calculated by calculation and should not exceed 2 meters, taking into account the fact that they should be located at the intersection of walls and in all corners of the future building. The number of supports depends on the area of the building and the weight of the building structures. In this case, it is necessary to take into account the bearing capacity of the soil, and not the foundation itself. So, for example, if the diameter of the foundation pillar is 250 mm, then it, in turn, rests on soil with an area of 500 mm. If the soil has a load-bearing capacity of 2 kg/cm², then each pillar can carry approximately 1 ton of the weight of the house structures. Therefore, if you know the consumption of building materials that you will use to construct a building, then without much effort you can calculate the required number of foundation pillars specifically for your building.
Instructions for marking the foundation can be read in the article: Marking for the foundation. Rules for constructing a rectangular foundation. For a columnar foundation: Marking for a columnar foundation.
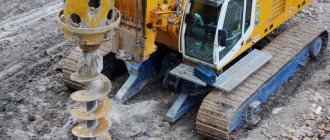
Digging holes
To install wooden poles, it is necessary to dig holes, the diameter of which must be at least 350 mm, i.e. 1.5 times the diameter of the pillar itself. For example, if the diameter of the support is 300 mm, then it is necessary to dig a hole with a diameter of 450 mm. Digging holes can be done in several ways:
- Manually - using a shovel, we dig holes ourselves. This method does not require any money, but it does take a lot of effort and time.
- Mechanized - using hired special equipment. Using special equipment will increase the cost of your foundation, but will save effort and time.
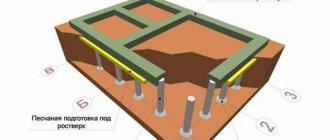
Sand cushion device
Sand 100-200 mm thick is placed at the bottom of the dug holes with mandatory compaction.
To calculate the depth of soil freezing in your city, you can use our calculator: Calculation of the depth of soil freezing.
Waterproofing device
Before installing wooden supports in the ground, you need to carry out protective waterproofing of the part of the pillar that will be underground. To do this, the chair is soaked in oily solutions and wrapped in several layers of roofing felt or roofing felt, gluing them with bitumen mastics. This stocking (bandage) protects the surface of a wooden post from contact with the ground, which reduces the likelihood of it rotting and freezing to the ground. When using a stocking, the impact of frost heaving forces on the support will be minimal, since the swelling soil will slide along the bandage without lifting the foundation pillars.
Installation of wooden poles
Wooden supports are installed in dug holes with the butts down and leveled in a vertical position. Note: But there is another opinion, according to which the pillars must be installed with the tops down and the butts up (i.e. in the opposite direction compared to the natural growth of the tree). It is believed that this will help prevent moisture from moving through wood vessels. The logs are installed level and in a strictly vertical position. Wooden pillars are placed in dug pits along the walls, and it is necessary that they be installed exactly along the axis of the wall. To do this, first of all, lighthouse poles are placed in all corners and intersections of walls, into which nails are then driven and the mooring (wire, nylon thread, fishing line) is pulled tightly. Then they begin to install all the remaining intermediate posts, checking their vertical position along the plumb line, and their horizontal position along the mooring cord.
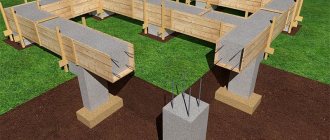
For the greatest stability and increase in the supporting load-bearing area of the chair, its lower part must be installed:
- on a wooden cross with struts (used when the foundation is not buried);
- on a concrete slab (“heel”) or bedded stone (used when constructing a buried foundation).
Cross. To make a wooden cross, take 2 plates up to 700 mm long, which are fastened together crosswise. Most often, the support chair is connected to the cross with several metal brackets. But to increase the stability of the fastening, a spike is cut out in the lower end of the post, and a nest is cut out in the upper bar of the cross. The fairly simple design of the cross allows not only to increase the supporting load-bearing area of a wooden chair, but also prevents the forces of frost heaving from lifting the foundation pillars from the pits.
Concrete slab. To increase the reliability of a buried wooden foundation, you can make a cushion from monolithic concrete. To do this, concrete 200 mm thick is poured into the bottom of a compacted sand cushion and while it is still fresh, a pillar is immersed in it to a depth of 100-110 mm. Thanks to this method, the stability of the foundation increases significantly, since after the concrete has set, the wooden chair is rigidly fixed.
backfilling
The space between each wooden post and the edges of the dug pit must be filled with coarse-grained material: sand, gravel, crushed stone, broken brick. This will help reduce the likelihood of putrefactive processes and moisture accumulation around the supports. Backfilling is carried out in layers 150-200 mm thick with mandatory compaction. In case of saving, you can first fill in 150-200 mm of soil, and fill the remaining space between the soil and the pillar with coarse gravel or crushed stone.
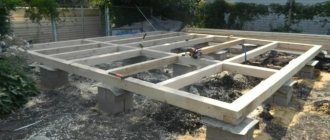
Aligning pillars horizontally
After backfilling and careful compaction, the pillars are leveled in height. To do this, the tops of the supports are cut down along a stretched cord, so that their ends are necessarily in the same horizontal plane.
Waterproofing of ends
After leveling the pillars, it is advisable to waterproof and antiseptic their ends. To do this, various waterproofing materials are laid on them: special membranes, roofing felt, birch bark (must be bent down).
Dressing belt device
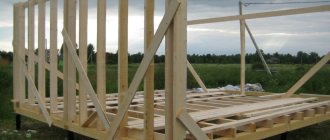
To connect the foundation with the lower frame, a spike is cut out at the end of each pillar. Its cross section is 50x50 mm, and its height is taken to be equal to the height of the bottom trim beam. When they begin to build walls, wall beams (tips) or lower logs are installed on these spikes, in which special nests are made in advance.
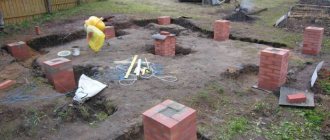
Wooden columnar foundations
For foundations made of wooden pillars, it is best to use oak or pine logs with a diameter of 250 to 300 mm, located under the main walls and along the perimeter of the building. Wooden pillars were called “chairs” due to their external resemblance to this piece of furniture. The chairs are installed directly into the ground to a depth below the freezing level. Typically, the lower level for installing pillars is 1.5 or 2 m below ground level.
If the base soil has a significant strength and density, it is allowed to install chairs directly into the ground. In case of weak soils, to increase the support area, wooden posts are installed on special beds made of wooden plates or rectangular log linings. Connecting struts significantly increase the stability of wooden pillars - chairs. Typically, the installation depth of wooden poles is from 1.25 to 2 m, the height of the chairs above ground level is 0.75 - 0.8 m.
When installing chairs, it is recommended to leave a slightly higher height above the ground for possible cutting when creating the overall upper design level of the foundations
Preparation and antiseptic treatment of wooden posts
In order for a columnar wooden foundation to last as long as possible, it is necessary to properly prepare and antiseptic the logs used for its construction. It is advisable to prepare pillar-chairs from November to January. Before protective treatment, they must be cleared of bark (sanded) and marked top and bottom, in accordance with how the tree grew.
If you want to increase the service life of a foundation made of wooden pillars by 2 times, then before installing it, be sure to antisepticize the logs, as this will help protect them from biological destruction and mold.
There are several antiseptic methods:
- firing to a coal crust;
- chemical method.
Firing to a charcoal crust. This method allows you to protect wood from contact with the ground and the formation of putrefactive processes. Firing is carried out using a blowtorch or over a fire. The entire part of the wooden chair, which will be underground, plus a part 200-250 mm high, which will be above the surface of the earth, is fired. Before starting the process, a 10 mm thick layer of clay must be applied to the post. You need to burn the log very carefully and slowly, while constantly ensuring that the depth of charring (coal crust) is no more than 20 mm. After this, the pillar is treated with bitumen or thick resin.
Chemical method The chemical method consists of impregnating wooden poles with special readily available chemicals before installing them. If you don’t want to waste your precious time slowly burning logs or are afraid of fire, then to protect the wood, treat it with one of the following antiseptic solutions:
- Aqueous solutions:
- Pour 5 liters of boiling water into the container, add 50 g of boric acid, 950 g of table salt and stir everything thoroughly until completely dissolved. With this homemade solution you need to treat the surface of a wooden post-chair 2-3 times.
- Clay paste of homogeneous plastic consistency. It is made from pre-sifted fatty clay and water.
- Purchased aqueous solutions: zinc chloride, ferrous sulfate, ammonium or sodium silicofluoride, sodium fluoride, etc.
An antiseptic is considered effective if:
- does not cause corrosion in metal fasteners,
- does not reduce the physical and mechanical properties of wooden posts,
- does not have an unpleasant odor,
- not dangerous for people and animals,
- has good penetrating ability,
- persistent,
- highly toxic to fungi.
Today, new products have appeared on the antiseptic market, which, in addition to their main protective function, also have decorative properties that can add aesthetics to the above-ground part of the foundation.
Disadvantages of antiseptics:
- Aqueous solutions are not recommended for use in conditions of direct contact of wooden chairs with wet soil, since they penetrate deep into the wood rather poorly and are easily washed off from it.
- In wet soils, it is necessary to use compositions based on organic solvents, such as white spirit, solvent.
- Oily antiseptics are considered the most toxic, so they should be used in accordance with the instructions indicated on the packaging.
Protective measures for wood processing
High-quality wooden piles for foundations are the key to the durability and reliability of the supporting structures of a house or other structure. If for some reason the wood material was not treated before installation in the ground, such a wooden pile foundation will be susceptible to rotting under the influence of moisture and freeze-thaw cycles and will become unusable after a few years.
Wood processing must be carried out before it is installed in the ground.
Treatment of wooden piles with antiseptics
The modern building materials market has a large assortment of factory-made liquid antiseptics, which have different price characteristics. Preparations for protecting wood from rotting are classified by type:
- Water soluble.
- With an organic oil or alcohol base.
- Combined.
Antiseptic compositions are available in the form of solutions or concentrates, applied with brushes or mechanical sprayers.
Treating wood with antiseptic
Alternative wood processing
In order not to spend significant amounts of money on the purchase of ready-made antiseptics, you can remember and apply ancient methods of treating wood against rotting:
- Charring of wooden foundation structures. The wooden post or pile must be cleared of bark and after sanding, the lower part is carefully charred with a blowtorch or propane torch.
- Treatment of poles with birch tar, waste machine oil or molten petroleum bitumen. This method of creating protection is considered the simplest and cheapest.
- Wrapping wooden foundation structures with sheets of roofing material. The log or post is first coated with molten bitumen and then wrapped in roofing material. Most often, roofing felt is used for this purpose.
Experts recommend using wood harvested in winter for wooden foundations.
It is believed that winter wood has increased resistance to destructive rotting processes and is better able to withstand temperature changes and precipitation than others.
Methods for treating wood against rotting can be seen in the video:
Timber for home, bathhouse in your city
Beam. Profiled. Glued. Natural humidity. Log. Log house. board. edged unedged
Tips for the developer
For a wooden, frame or panel house with a basement floor on wooden beams, a columnar foundation with a grillage high above the ground will be the most economical option.
For the above light buildings, it is recommended to install a shallow or non-buried strip foundation in the following cases:
- For frame and panel houses on medium and highly heaving soils.
- For houses made of logs and timber on very heaving soils.
- In case of refusal of the basement floor and installation of concrete floors on the ground or wooden floors on joists.
Foundations on piles, screw and bored with a reinforced concrete grillage, will be more expensive than a shallow-buried strip foundation.
Foundations on piles can be used when building a house in a swamp.
Read the developer's story about how he built with his own hands such a columnar foundation with a grillage for a house with log walls. A story about the joys and difficulties, the pros and cons of the foundation.
Read more:
Insulated thermally insulated foundation - the best for a home
Previous article:
Bearing capacity of soils at the base of the foundation of a private house
⇆
More articles on this topic
- Facade paint for exterior use
- Wooden floor on joists on the first floor of a private house
- Room thermostat for gas boiler from Aliexpress from China
- Frame house with communications - features and advantages
- Do-it-yourself floor with a dry prefabricated screed made of gypsum fiber board or gypsum fiber board sheets
- Self-learning room thermostat for gas boiler
- Solar collector - water heater for home, pool
- Eaves overhang of the roof of a private house
Wooden larch foundation
A high-quality wooden foundation can be made from certain types of wood: these can be deciduous or coniferous trees. If it is possible to use larch for the material of wooden posts and piles, then this will be the best ideal solution.
Larch timber is the best material for constructing a reliable and durable wooden foundation
A larch foundation can withstand any load and has excellent bacterial resistance. In addition, the fiber of this wonderful type of wood contains many essential resins, which themselves are natural preservatives.
Larch wood has a high density, which makes its processing difficult and time-consuming.
Advantages and disadvantages of a wooden foundation
To install a column-type wooden foundation, you must use only those types of wood that are resistant to moisture.
A wooden foundation made of free-standing supports has a number of advantages, which are:
- Simplicity of building a foundation for the house;
- Low cost of work;
- Excellent thermal insulation of a house on a wooden foundation, since wood perfectly retains natural heat and does not allow cold from the ground to penetrate into the building;
- Wood has the property of elastic deformation, which makes such support pillars as wear-resistant as possible under the influence of ground movement and house pressure on them.
The disadvantages of a wooden foundation include a low service life, estimated at several tens of years.
This negative side of wood can especially manifest itself on waterlogged soils. It is worth noting that different types of wood have their own service life, different from others:
- Thus, oak supports can last on average 15 years, and if they are treated with high-quality antiseptic, the service life can be increased to 27-32 years;
- Larch will last less in total - only 7-8 years. If the wood is treated before installation, it will be possible to increase the service life of these types of wood to 11-15 years.
However, even such a minus does not prevent a wooden foundation from being in demand, especially among self-made summer residents.
The procedure for constructing a wooden foundation
A wooden foundation for building a house can be done using 2 methods: by installing wooden piles and laying sleepers from logs. The most common and reliable method is a pile foundation.
Pile wooden foundation
Wooden piles are installed in prepared earthen trenches, which look like pits and are located over the entire area of the building site. The width of the trench must be 1.5 times the diameter of the wooden pile. Piles are placed at all external corners of the building, at the intersections and junctions of walls. For corner supports, logs with a diameter of at least 300 mm are used.
Scheme of wooden piles arrangement
Intermediate supports are installed between the corner piles in increments of 1.5 - 2 m. After installation, all piles are combined with a wooden grillage into a single strong supporting structure.
After installing the wooden piles, the pits are backfilled using medium-fraction crushed stone.
Strip wooden foundation made of wooden sleepers
If you need to make a wooden strip foundation for lightweight buildings, then the most suitable material for these purposes would be to use old railway wooden sleepers with a cross-section of 200 x 200 mm. The work is performed in the following sequence:
- First, you need to mark the foundation and dig earthen trenches with a depth of about 400 mm.
- A drainage layer of crushed stone or gravel up to 200 mm high is laid at the bottom of the trench.
- Wooden sleepers are laid on top of the drainage, fastened at the corners into prepared grooves.
- When installing additional rows of wooden sleepers, it is necessary to fasten them together.
- To fasten rows of sleepers, it is recommended to drill through holes and drive in reinforcing bars.
Watch a video example of a wooden foundation:
The construction of a strip wooden foundation made from sleepers is the simplest and most inexpensive type of load-bearing foundation. Since railway sleepers are initially impregnated with a powerful antiseptic, creosote, such a wooden foundation can last for decades.
Construction stages
The construction of a columnar wooden foundation consists of several stages:
- Preparation and processing (firing or antiseptic) of wooden poles
- Marking and clearing the area
- Digging holes with a diameter 1.5 times larger than the diameter of the pillar
- Sand cushion device
- Waterproofing device
- Installation of pillars (to increase the load-bearing supporting area, the chair can be installed on a cross or a concrete slab)
- backfilling
- Aligning supports in the horizontal plane
- Waterproofing of ends
Calculator Stolby-Online v.1.0 - design of a columnar foundation.
Let's now look at all these stages in detail. www.gvozdem.ru
Requirements for pile material when constructing a wooden base
The construction of a columnar foundation made of wooden piles is based on the use of chairs technology.
Excavation pit for piles
The main difference from other construction technologies is the need to additionally prepare pits for installing wooden posts. Moreover, it is possible to dig holes for a house only in those places where the groundwater lies either deep enough compared to the length of the piles, or very close to the surface.
In this case, moisture still gets into the wood. For this reason, special requirements are imposed on wooden piles:
- Wood must be treated with a special solution. Since the material needs to ensure durability during operation, all wooden piles are treated with fire retardants and a salt-containing solution with their own hands or using special equipment. Also, to give the wood waterproofing properties, its ends can be charred.
- Only dense types of wood are used for piles. Due to their natural density, species such as pine and oak are used specifically in wooden columnar foundations. The dense structure of the fibers allows them to practically not absorb moisture, due to which the service life of the base is significantly increased.
- The concrete foundation made of wood must rest on solid ground. If it is not possible to install racks on solid ground, it is necessary to use friction piles.
- Wood can only be laid to a depth of at least 1.5 meters.
- The foundation of the house should be buried 0.5 meters below the location of the freezing zone in your region.
Sealing cracks in the blind area
The blind area is an integral structural element of any building.
Over time, everything needs cosmetic or major repairs. Sealing cracks in the blind area is no exception. And repair work must be carried out as soon as possible to prevent the foundations from getting wet, which can lead to subsidence of the building. First, you need to identify the reason why the cracks appeared, their nature, and the consequences of which they are. If we don't do this and don't eliminate the root cause, then everything can happen again. Over a long period of my working life, I have encountered cracks of different types, so I will focus on the most common options and methods of sealing them.
Possible causes of cracks:
- The time factor - you can put it this way. Cracking occurs when the blind area is not new, and it is constantly exposed to temperature influences. In summer, according to the laws of physics, expansion occurs, and in winter, compression occurs. Microcracks form. When moisture gets into them, during repeated cycles of freezing and thawing when the temperature changes, these microcracks expand, destroying the integrity of the coating.
- If the tightness between the plinth and the blind area is broken due to uneven settlement of the building and the blind area, the latter may “move away” from the building. A gap is formed through which atmospheric water begins to flow freely directly under the wall of the building. In this case, the structure ceases to fulfill its intended purpose - draining water from the building, which means that cracks in the blind area need to be sealed.
- Subsidence phenomena. The appearance of cracks may be associated with subsidence of the blind area. This happens because the soil has subsided under the base of the blind area. In addition, all layers of the blind area itself must be made strictly according to technology and certainly compacted. For more information about the construction of the blind area, read the article - layers of the blind area.
- Major damage - the presence of a large number of cracks, in some places the concrete simply crumbled, the blind area moved away from the base. This is a completely neglected option, but this also happens in practice.
Now let's look at how cracks in the blind area are sealed in relation to each case.
In the first case, the cracks are usually superficial, so you can get by by simply filling them with M-100 solution and grouting on top. You can add PVA glue diluted with water to the solution to make the solution more durable and waterproof. First, clean all the cracks, blow off any dust, moisten them well several times, and only then seal them.
Repair features
There are several types of blind area:
- cobblestone;
- concrete;
- asphalt;
- tiled.
Its restoration depends on the materials used in its manufacture.
Repairing a cobblestone line involves replacing damaged areas. To do this you will need a chisel and a hammer. Using these tools, deformed cobblestones are removed from the structure. It is necessary to pour a mixture of sand and gravel or crushed crushed stone onto the empty space to level the layer, then compact everything well, fill it with cement mortar and insert a cobblestone of a suitable size. If there are small cracks, it will be enough to seal them with concrete.
Concrete protective strips are most often used due to their affordability and positive performance qualities.
Repair of a concrete blind area is divided into two types:
- Covering up small isolated tears.
- Replacement of large destroyed areas when the house subsides.
To prevent further deformation of the coating and the entry of water into the foundation of the house, repairs must be carried out immediately immediately after defects are discovered.
To eliminate damage, you can use mixtures of concrete and construction adhesive, special polymer materials, and moisture-resistant polyurethane foam . Penetrating into the cracks formed, such mixtures quickly harden. It is necessary to pay attention to the fact that cement is not suitable for these purposes, because it does not cover the entire depth of the crack, but only its upper part.
When restoring an asphalt strip, all areas to be repaired must be dismantled to its entire depth. The resulting pit is cleaned, and its bottom and edges are treated with liquid resin. After this, a new layer of asphalt is covered and compacted with a roller, and the new layer should be higher than the old one.
Rolling out the new coating must be done from the edges towards the center. The result will be a stronger grip.
Restoring a tile blind area involves replacing its defective part. Before replacing a new one, crushed stone or sand is added to the recess, after which a new tile is laid.
If there is a need to replace a large part of the tape, you can use a mixture of sand and cement in dry form using gunite (the solution is applied with a cement gun under compressed air pressure). After shotcreting, the surface must be moistened for 14 days.
Repairing a cobblestone line involves replacing damaged areas. To do this you will need a chisel and a hammer. Using these tools, deformed cobblestones are removed from the structure. It is necessary to pour a mixture of sand and gravel or crushed crushed stone onto the empty space to level the layer, then compact everything well, fill it with cement mortar and insert a cobblestone of a suitable size. If there are small cracks, it will be enough to seal them with concrete.
Video
It is also important to remember about the required slope and check that they are laid evenly with a building level. The gap between the plates should be at least one and a half to two centimeters. After laying and checking the cracks, carefully seal them with mortar.
Sand cushion and cross
The next step in constructing the foundation will be the organization of a sand cushion in the size of ten to twenty centimeters. The sand poured into the holes must be compacted. Installation of supports is carried out in already prepared holes with sand. The trunks fall either down or up along the axis of the wall strictly vertically. Before installing the pillars, it is imperative to carry out waterproofing work in order to prevent rotting or destruction as a result of the influence of rodents.
Also, to enhance the stability of the structure, before installing it, a cross is installed on the immersed end, which is two seventy-centimeter plates crossed between each other. The use of this product not only increases the load-bearing area of the support, but also prevents the process of squeezing out the column during frost heaving of the soil. Also for these purposes, it is recommended to pour a concrete pad on top of the installed support. When hardened, the concrete reliably fixes the position of the pillar.
Preparing to install wooden piles
Wooden piles
Wooden foundations belong to that large group of foundations for buildings and structures that can easily be used during the construction of a house made of timber or rounded logs. The most important and responsible stage in the range of preparatory work at a construction site is associated with a competent and accurate calculation of the type of foundation depending on the underlying soil and the load of its own weight on the house.
When building a small one-story house with your own hands, you shouldn’t think too much about the foundation. Even by making a strip base from scrap materials, you will be able to create a foundation that will last 5-10 years. However, if you are planning to build a wooden house of 2-3 floors with an attic, then it is best to choose a slab base or a columnar foundation made of wood. So the first stage of work is to determine the snow and wind load, as well as calculate the total mass of the house.
The second stage is related to soil research. The use of wooden piles is permissible and acceptable only in cases where the level of underground water flows is sufficiently high. This concludes the preparatory work.
If you place a columnar foundation directly into groundwater, then in a couple of years the piles will rot and the house will lean. That is why, when installing racks or hanging wood samples, builders try to place the lowest point of the structure as low as possible below the detected groundwater layer.