Needless to say that the foundation is the basis of the entire building? Probably everyone knows this simple truth. And since the foundation is the basis, work on its construction must be carried out especially carefully, adhering to the instructions.
After all, how long the building will last depends on this. It’s not for nothing that the cost of foundation is so high. In this article we will look at the most popular types of foundations, as well as the technology for their construction. You can build the foundation yourself from scratch.
Kinds
The strip foundation is a continuous closed supporting structure located under all external and internal load-bearing walls. In fact, this is a recessed base that can withstand loads from the weight of the building, soil pressure and other influences.
There are the following types of strip foundations::
- Monolithic. It is a one-piece casting made of reinforced concrete and has maximum strength and load-bearing capacity.
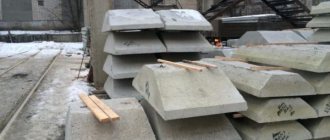
- Made. The tape is built from individual fragments or elements - foundation blocks (FBS), brick, natural stone, etc. The performance qualities of this type of base are somewhat lower than those of a monolithic tape.
- Combined. It is a combination of a strip base with another type - for example, a pile-tape base. Allows you to obtain reference points on which the load-bearing belt is installed.
In addition, there are variations in depth :
- Not buried. It is created on absolutely motionless soils - rocks, strong stable soils. It is extremely rare.
- Shallow. Used for construction on durable soils not subject to frost heaving. The depth is less than the level of winter soil freezing.
- Recessed. The depth of such a tape is slightly below the soil freezing level. Used for the most massive and heavy buildings, suitable for most types of soil and hydrogeological conditions.
The choice of the appropriate type is determined by an analysis of all site conditions - soil composition, number and properties of layers, depth of soil water, etc.
Necessary materials
Regardless of the foundation construction technology and its type, the end result should be a strong and durable structure. It is advisable to immediately pay attention to reinforced concrete structures, metal, asbestos pipes or antiseptic wood.
As a rule, almost all foundations being built are made of reinforced concrete, with which you can build almost any structure on any type of soil. Reinforced concrete is made from sand, cement, crushed stone and steel reinforcement, the rods of which are installed in the formwork, connected to each other and then filled with mortar.
Materials for USHP foundation.
If the structure is built on strong rocky soils or those that are not prone to heaving, then lightweight rubble concrete or natural stone can be used. The quality of such a foundation largely depends on the correctness of the foundation, because any natural stone has an irregular shape, so it is difficult to lay it tightly. In addition, almost no one will level granite or basalt at a construction site, because doing it yourself without using powerful equipment is almost impossible.
What buildings is it suitable for?
Strip foundations are a reliable support for buildings made of various materials:
- Tree.
- Foam and aerated concrete.
- Brick.
- Concrete plates.
The material and number of floors determine the weight of the building, on which the design parameters of the tape depend - the degree of depth and thickness. Along with the soil characteristics, the building parameters are the main material for performing engineering calculations during design.
From marking to filling
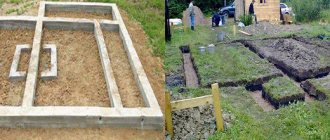
Site marking
One of the important stages is marking the site for the foundation. First, the site is cleared of foreign objects and small debris. Next, all soil from the site is cut off to a depth of approximately 15 cm to limit further rotting processes in the basement of the building.
How is marking done?
- Find the location of the first corner of the building axis. Using a plumb line, pegs are installed: they can serve as suitable pieces of reinforcement.
- Find the next angles , the second and third, using string and pegs. They install pegs there too.
- Pull the cord towards the fourth one from the previous ones, make the correct angle along the square, and also place a peg.
- Check the diagonals of the resulting rectangle, repeating the outer perimeter of the building. They should be even if the corners are built correctly.
- Similarly, the internal foundation is outlined , as well as its parts for individual components: porch, supports for columns, terrace, load-bearing walls.
- Install slats or planks of wood to align the markings in a horizontal plane, and pull a rope through them.
Land works
It is necessary to prepare a trench with a given depth, calculated in advance (or specified in the project). Digging work begins from the lowest angle so that the hole does not turn out smaller than expected. Its walls must be strictly vertical. The bottom is leveled.- A layer of sand at least 15 cm thick is placed in the dug pit. This cushion will play an important role in redistributing the load on the base. This is especially true for soils capable of swelling. Sand is poured in layers, each of which is soaked in water and compacted well.
Temporary supports must be provided to prevent soil from collapsing!
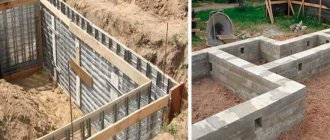
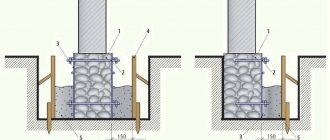
Formwork
Using a rope, mark the outline for the formwork. Install supports at the corners. This requires beams 5 centimeters thick.
The formwork is made from edged boards, which are connected using corners with screws or wooden blocks.
The corners and bars are located outside the formwork, the heads of the screws remain inside.
To avoid deformation of the structure when pouring the cement mass, supports are placed on the outside. The formwork must rise above the ground to such a height that the resulting foundation is at least 30 cm. The level to which concrete is poured is marked inside the foundation.
Armature
You will need 8-12 mm metal rod , which is cut into pieces of the required length. They are placed along and across the base, and if it is thicker than 40 cm, then also vertically.- The reinforcement is firmly tied together with metal wire and securely fixed to the walls of the formwork.
Welding violates the corrosion resistance of the material in the places where it is exposed, so its use is not recommended!
The process of pouring a strip foundation for a house
If concrete is ordered, the pouring is carried out at once, simultaneously.
Layer-by-layer filling is done if the mass is prepared on its own. Step-by-step pouring of strip foundation
- First, the concrete is prepared. The sand is sifted, mixed with cement and water, stirred evenly. The prepared composition is poured into crushed stone, the amount of which is equal to the amount of sand. Mix well so that all the crushed stone is evenly moistened.
- Concrete mixture is poured into the self-made formwork. To ensure high-quality filling and prevent the formation of bubbles, the concrete is pierced with an iron rod and compacted with a wooden beam. It is more convenient to use a special construction mixer or a hammer drill with an attachment for this.
- Fill the formwork with concrete mixture to the marked level. To speed up the settlement of concrete, tap the formwork from the outside.
- Smooth the surface of the concrete with a trowel or rule.
- The concrete surface is sprinkled with sifted dry cement powder. You can do this evenly through a sieve. This procedure will ensure quick setting of the concrete surface and prevent its cracking or erosion.
- The concrete is wrapped with covering material or regular burlap. It is left in this form for about a month to ripen. If the weather is hot and dry, then the top cement layer is periodically wetted to avoid drying out.
Completion of work and useful tips
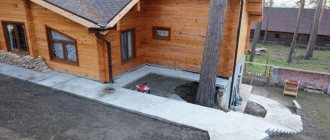
Only after the final maturation of the concrete monolith can we proceed to further construction and begin the construction of walls.
When the formwork is removed, it is necessary to perform high-quality waterproofing of the base. This will improve the moisture-insulating and heat-retaining functions of the strip foundation, and also increase its service life.
Useful tips
- It is better to make sure in advance that the ordered machine will pour concrete mixture from any angle.
- It is advisable to take care of making an additional tray: the composition will be supplied into it.
- The solution must be checked before pouring - sometimes it hardens a little during transportation.
- In the rain, take care of a reliable shelter, otherwise the top layer of cement may be washed away by jets of water.
How to calculate depth
Calculation of the depth of the strip foundation depends on the type of foundation. If it is planned to build a buried version, then it is necessary to rely on the tabular data of SNiP, displaying the depth of soil freezing in a given region.
When constructing a shallow type of belt, the composition of the soil, the presence and depth of groundwater are taken into account. The optimal depth is usually considered to be 0.75-1 m, but on stable and dry soils the depth can be slightly reduced.
NOTE!
The most common immersion depth for a shallow belt is considered to be 0.7 m.
Slab foundation
Used as a foundation for large houses built of brick, timber or building blocks. Depending on the planned location of the underground premises, it is divided into shallow and buried.
The main advantage of this technology is that they do not depend on the characteristics of the soil and ensure the safety of the building. However, it is quite expensive; special equipment must be used for filling.
How is a shallow strip foundation constructed?
A shallow strip foundation almost completely repeats the buried version, only with a lower level of immersion.
There is a trench in which a drainage layer of backfill is created and a concrete strip is poured .
The design of a shallow foundation has fewer capabilities than a full-fledged tape, but for relatively small low-rise buildings its load-bearing capacity is quite sufficient.
Reinforced concrete base
Today, the most durable materials for construction are iron and concrete. Therefore, structures made from these materials are very durable and strong. If we talk about the service life of reinforced concrete foundations, then according to preliminary estimates, this structure can last about 150 years. What makes it so durable and strong? Thanks to an iron frame protected from corrosion by concrete.
But it’s not easy to do this work yourself. The catch is that metal rods can freeze; in addition, it is important to choose the correct gauge of the rods. To fill a monolithic slab or strip, you must order concrete grade M250 or M300 (ideally M400 or M500) in advance.
In addition, the work should be done in one go. To fill the foundation, you can use removable formwork, for example, from metal panels or boards, as well as permanent formwork, using special blocks. The advantage of permanent formwork is that it does not require thermal insulation, although its price is quite high.
Assembling a reinforced structure requires some skills. If it is assembled incorrectly, the structure may crumble under the heavy weight of the building. For a reinforced structure, you can use metal rods from 10 to 16 mm in diameter. To carry out filling work with your own hands you need:
- clear the area of debris or other foreign objects;
- mark and dig a pit, you can use a level for marking;
- pour a drainage cushion of sand and crushed stone;
- install formwork or permanent formwork;
- place a reinforced structure and vertical frame elements;
- carry out the filling process;
- After complete hardening, dismantle the formwork.
Step-by-step DIY installation instructions
Let's consider the procedure for creating a strip foundation:
- Preparation.
- Site marking.
- Digging a trench.
- Laying and arrangement of the drainage system.
- Creating a sand cushion.
- Production of formwork.
- Installation of reinforcement cage.
- Pouring concrete.
- Wait for hardening.
- Stripping.
- Waterproofing and insulation tape.
- Further work.
IMPORTANT!
The order of actions does not change under almost any circumstances, since all stages are a consequence of previous operations.
Reinforcement
Since the building creates a significant load on the strip foundation, simply pouring a cement mixture into a trench is not capable of creating a concrete foundation of the required strength. To prevent the foundation from collapsing under the influence of compressive forces, reinforcing materials should be included in its design.
Reinforcement of a pile foundation consists of placing several rods of metal reinforcement before pouring concrete. For a strip foundation, a more complex spatial structure will be required, consisting of vertical and metal rods of metal reinforcement placed in a trench. The distance between adjacent (parallel) rods should not exceed 40 cm. To prevent the reinforcing rods from changing orientation in space, they should be tied with steel wire or secured with electric welding.
Basic mistakes
Most often, sedimentation of the sand cushion occurs due to poor compaction of the backfill layer. In addition, the use of unsuitable materials, especially concrete of the wrong grade, is often encountered.
Some unscrupulous suppliers deliver low-quality material to save money. Experienced experts recommend ordering heavier concrete - instead of M200, take M250 . The difference in cost and weight is small, but there is hope that the material will be more durable.
In addition, they often try to reduce the cost of money and labor by abandoning waterproofing and insulation. These procedures require some time, but, compared to the service life of the base, they are performed very quickly and cannot be neglected.
Pouring concrete
It is optimal to pour concrete at one time, this will ensure the monolithic nature of the structure. If this is not possible, it is important to fill the mixture as quickly as possible.
The mixture recipe will depend on the brand of cement and the required strength. For example, to obtain strength grade M250 from M400 cement, one part of cement will require 2.8 parts of sand and 4.8 parts of crushed stone.
Mixing the solution is a rather difficult process and occurs in three stages, which are performed step by step:
- sand and cement are mixed,
- crushed stone is added;
- water is added.
During the addition of components, the cement-sand mass must be constantly mixed. For ease of installation, plasticizing additives are used; they make the finished mixture more elastic, and the solution better fills all the nooks and crannies of the formwork. When calculating the amount of additives, it is important to strictly follow the proportions specified in the instructions.
Mixing the concrete mixture during preparation is carried out independently in a manual or mechanized concrete mixer. In this case, an electric or gasoline drive will save a huge amount of labor costs and the quality of the finished mixture will be higher.
Never use advice about adding detergents and other household chemicals as plasticizers; such experiments irreversibly change the structure of concrete and significantly reduce strength.
A mandatory step is compacting the concrete after pouring. If possible, it is better to rent a professional deep concrete vibrator. You can also use a hammer drill with a long nozzle to seal the seal, inserting it into the concrete mixture at an angle.
After about a week you can remove the sheathing. The initial strength gain of concrete lasts 28 days; during this period it is important to ensure uniform drying of the structure.
To do this, the surface, which dries much faster than the deep layer, is moistened and covered with plastic film. Hydration is especially important in hot, dry weather. After the standard period has expired, the foundation can be subjected to the design load, although properly prepared concrete gains strength over many years and becomes stronger over time.
After the formwork has been removed and the concrete has stood securely, external filling can be done. For this purpose, previously excavated soil is used and backfilled layer by layer with intermediate compaction. If additional waterproofing or thermal insulation is planned, they are carried out immediately before filling. The easiest way to protect your foundation from water. The backfill will be clay soil; this material will not allow water to pass through and is available free of charge during excavation work.
The formwork boards can then be used, for example, to add a veranda.
From blocks and slabs
A foundation made of FBS blocks is ideal for sandy soils. One of the advantages is flexibility, as well as the fact that work can be done at almost any time of the year.
The first thing that needs to be done is geological exploration. It is important to know exactly what kind of soil the work is being done on, because this material is not suitable for all types of soil. For example, if the soil is too soft or crumbly, then the blocks, due to their large weight, may simply sag.
You also need to accurately calculate the materials, and for this you need to decide what size block you need. For correct calculations, you can hire specialists or make calculations using special computer programs.
When installing blocks, the joints should not converge, because over time, cracks may appear in these places. In order to have as few joints as possible, it is recommended to use 2.30 m blocks. It is also very important to provide heat and waterproofing.