In private construction, foundations are often built that rest on the soil. A non-buried strip foundation is best installed on highly heaving and highly moist soils, because its foundation is not susceptible to soil shifts during severe frosts. The strip foundation, like the columnar version, is ideal for rapid construction, since it can be installed on your own without any problems.
Features of a non-buried strip foundation
The foundation tape may be poured over non-heaving and non-floating soils. A sand cushion with a thickness of twenty to forty centimeters is first placed under it. The monolith must pass under each load-bearing wall of the facility and the frame of all extensions, which include a veranda, porch, etc.
This type of base is approved for use when the wall length is no more than seven meters. Longer sections are susceptible to failure due to uneven shrinkage of the object. The reason is insufficient mechanical strength.
One of the main differences between a shallow foundation and a shallow foundation is that the walls are not affected by the soil, which is prone to movement. Frost heaving has a slight effect on the sole of the base.
Structurally, the base looks like this:
- reinforced concrete strip 0.2 – 0.5 m high, 0.3 – 0.5 m wide;
- a pillow whose materials are not prone to heaving. The optimal solution is sand and gravel. The latter can be replaced with slag or crushed stone.
The height of the cushion of a non-buried foundation depends on the tendency of the soil to heave, on the level of groundwater, on the building materials used from which the object is being built.
The properties of a pillow to suppress heaving decrease when moistened, followed by freezing. To prevent moisture from getting into the sole, a blind area with a heat-insulating layer and a waterproofing base is installed along the outer walls along the entire length of the foundation strip.
Why deepen the foundations at all?
In the classic case, the depth of foundations corresponds to the depth of soil freezing. Follow the link: – you can download a free calculator for calculating the depth of soil freezing (cities in Russia and the CIS) with climate maps. In this case, the penetration of cold into the underground of the first floor is sharply limited, and the heaving effect of the soil on the base of the foundation is excluded. Let us recall that frost heaving is the property of water-saturated finely dispersed (clayey, loamy) soils to swell when frozen.
It is obvious that in order to install a shallow foundation, it is necessary to solve two issues: leveling the forces of frost heaving and insulation.
Options for non-buried strip foundations
Let's take a closer look at how you can build such a foundation.
Prefabricated shallow foundation
It is mounted from FBS. The pillow for the base is prepared using conventional technology, having planned and marked the area.
The blocks are installed tightly, leveled, and the horizontal position of the tape is checked using a level. Block stones are rigidly fastened together using cement mortar. If they have metal embedded elements, you can use welding.
Non-buried columnar foundation
This type of foundation is recommended for the construction of bathhouses, panel-type houses, and outbuildings on slightly heaving soil. Supporting elements are placed at the corners of the structure and under the edges of the proposed door blocks, along the lines in increments of two meters.
Short supports are made from:
- foundation blocks;
- wall blocks;
- monolithic structures;
- wall brick material.
Monolithic non-buried base
I arrange it for light structures erected on highly heaving and low-subsidence soils. To prevent the monolith from “floating” during changes in weather conditions, it must be flexible in bending. This can be achieved through reinforced reinforcement and appropriate thickness of the entire structure.
Installation of a non-buried foundation cushion
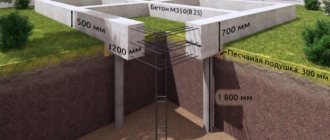
In both cases, you first need to prepare a trench for the cushion, the depth and width of which must first be calculated in accordance with the width of the tape, the weight of the house, the characteristics of the soil on the site and the depth of its freezing. For non-heaving soil, the depth of the trench and, accordingly, the height of the cushion can be from 30 to 50 cm, for slightly heaving soil 50-70 cm, and for heaving soil - more than 70 cm or to the freezing depth.
After this, the trench is filled with sand and gravel mixture or other non-heaving material in layers of 20-25 cm, moistened and thoroughly compacted. After the pillow is ready, we begin making the reinforced concrete strip. As already mentioned, it can be monolithic or prefabricated.
Stage-by-stage execution of work
Now let's look at step-by-step instructions for constructing a non-buried strip foundation with your own hands.
Preparation
Professional surveys in individual construction are rarely carried out, since few people want to pay extra money for this set of works.
Most often I use a visual method to assess the condition of the soil. As confirmed by statistical data, a linear meter of a low-rise building undergoes load effects of 4 - 12 or 15 - 20 tons (depending on the number of floors). For this reason, at the moment of swelling, these loads do not balance each other, and deformation begins to occur.
Calculated data for deformation due to heaving are used only for MZLF and NZLF. Uneven displacements of the strip base are permissible, but they should not exceed the limit values depending on the entire structure. As a rule, these are indicators of the rigidity of walls and foundations, which are used for calculations; in the case of NZFL, a standard calculation formula is used, which requires certain data:
- calculated indicator of soil resistance - it is taken from a special reference book or from building codes according to visual inspection indicators, which is carried out independently;
- total load - this includes the weight of the structure, loads from snow and winds, furniture, people;
- groundwater depth - affects the water content of the soil at the construction site;
- soil freezing is determined in special tables for the desired region.
To determine the composition of the soil, you need to roll a ball. Clay rolls to a minimum diameter; sandy loam is more difficult to do this. The loam breaks apart from time to time right in your hands.
To determine the width of the foundation strip, the units of measurement of all necessary indicators are brought to a single form. After this, the prefabricated load is divided by the calculated soil resistance, the length of the entire foundation base.
It is not recommended to make a foundation narrower than 0.25 m, because the supporting plane of the masonry and other building materials used for wall finishing is reduced.
If necessary, certain measures are taken to combat soil heaving:
- dry the soil under the base - if there is no moisture, then even clay soil will not create heaving;
- retain geothermal heat - the ground will not freeze if the blind area is insulated to a width of 0.6 m;
- The soil is replaced, a topsoil layer 0.4 - 0.6 m thick is removed, and ASG, crushed stone, and sand are poured in its place.
Drainage is rarely provided near the NZFL; storm drains are installed within the perimeter of the blind area.
When marking, you should integrate the structure into a place where its operation will be as comfortable as possible. For example, there may be power lines, septic tanks, and wells in the immediate vicinity. It is necessary to provide for their distance from the foundation by at least three to four meters. The foundation is located at a distance of five meters from roadways and fences.
Marking is carried out in several stages:
- I plan the street wall (main facade) parallel to the road;
- lateral - placed at right angles to the existing axis. The right angle triangle method is used for construction;
- diagonals are checked, the length of which must coincide up to one centimeter.
The corner sections will be created automatically; three cords are pulled under each side of the foundation. The side ones are for setting up the formwork, the axis is for controlling the geometry of the object.
Taking into account the design and technology of floor arrangement, the top fertile soil layer is removed over the entire base area or only from the foundation trench.
Filling the pillow
Design specialists recommend various inert materials for installing a cushion under the foundation. In individual construction, they prefer to pour sand and crushed stone in layers of twenty centimeters, carefully compacting each of them.
Experienced builders advise taking into account certain factors when making the underlying foundation:
- When exposed to moisture, sand turns into a shapeless mass and quickly loses its calculated resistance to load;
- crushed stone, even completely immersed in water, is able to retain not only its shape, but also differ in drainage properties;
- The waterproofing roll material is easily joined over the sand layer, the integrity of which is guaranteed to be maintained for the entire operational period;
- To ensure that the crushed stone with its sharp edges does not damage the waterproofing, you will have to fill in the footing, the thickness of the bark should be three to five centimeters.
Formwork
For pouring a shallow strip foundation on heaving soils, the formwork is made quite simply. To do this, it is suggested to use any of the popular methods:
- modules made of polystyrene material, insulating the side edges;
- boards made of edged boards, the thickness of which must be at least 30 mm;
- sheets of multilayer plywood, from which you can subsequently make a continuous sheathing for the roof;
- OSB boards.
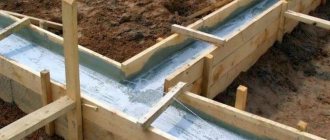
Reinforcement
Let's figure out how to prepare the frame base. The bottom of the foundation trench is covered with polyethylene material, after which reinforcing elements can be installed to give stability to the entire object.
Reinforcement forms the required stiffness indicator and is a connecting element created from reinforcing bars.
To give strength to the corner sections, they are reinforced with connecting corners. The reinforcing bars are connected with wire, the diameter of which is 1 mm. Sometimes it is allowed to use welding, but it is best to make connections with wire. To simplify the work, you can use a hook to tie together reinforcing bars, or prepare it like a screwdriver with a sharp, curved tip.
As soon as all the meshes of the reinforcement frame are connected, they are connected into a box of the required dimensions, transferred to the formwork structure and connected to each other.
Concreting
To pour a reliable monolithic tape, it is necessary to use concrete whose class is at least B17.5. The concrete mass is poured in portions in layers, with a thickness of no more than two tens of centimeters. After pouring the next layer, tamping is performed to remove air bubbles and allow the solution to settle evenly.
As soon as the work is completed, the foundation strip is covered with plastic film and the usual care is provided for it.
Hardening of the base lasts up to four weeks. After this, the formwork structure can be removed.
Having filled the tape, it is not left unloaded during the winter season. The active impact of heaving will begin on the foundation; the bulging soil can lift the structure above the ground and break it. The optimal load on the foundation before winter is up to thirty percent of the expected weight of the entire object.
Waterproofing
A non-buried foundation base is most often represented by a lattice structure, the section of beams of which has a limit of 0.6 by 0.6 m. This greatly facilitates measures to protect concrete structures that have contact with the soil from moisture. In such cases, popular technologies are used:
- carry out volumetric waterproofing with compounds that differ in penetrating properties in order to change the molecular structure of the concrete base, giving it moisture-repellent properties throughout its entire depth;
- use adhesive waterproofing materials that have a polymer or fiberglass base with a bitumen layer;
- Coating waterproofing compounds are used in the form of bitumen or epoxy mastics.
The use of Penetron allows you to create a high-quality and almost eternal waterproofing layer, the operational period of which lasts until the foundation is completely destroyed.
It is best to paste with roll materials after applying primers.
Insulation
It is recommended to carry out such work using inexpensive penoplex or extruded polystyrene foam. These materials have a high heat retention rate and are resistant to water and rodents. The insulation is fixed to the foundation after the waterproofing has been applied. At the same time, the basement part is insulated and a blind area is arranged.
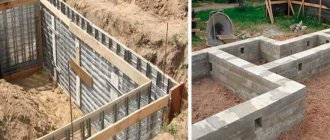
Preparing to pour a strip foundation with your own hands
At this stage of construction, everything is very simple; after marking, we dig a trench under all future walls of the house with a width equal to the width of our foundation. Then it is necessary to replace the excavated soil with sand or a sand-gravel mixture. In other words, it is necessary to completely fill the dug trench with sand or ASG with mandatory compaction.
After the cushion is compacted, it is necessary to build formwork for subsequent pouring.
It is necessary to construct the formwork immediately to the entire height of concrete pouring, since the tape must be monolithic. A strip foundation that is not buried does not tolerate cold seams, and each such seam reduces its already low strength.
The construction of formwork for a shallow foundation is practically no different from its construction for other types of strip foundations. The walls of the formwork must be rigidly fastened together so that the formwork does not swell when pouring or vibrating. Particular care must be taken when strengthening the corners, since this is where the maximum pressure on the formwork accumulates.
Features of use on heaving soils
Here are the basic requirements:
- if the heaving is intense, pour a monolithic strip or install a prefabricated foundation, rigidly pinching the beams of the structure;
- when making calculations, it is necessary to take into account the rigidity of the walls, due to which the deformation of the tape is reduced;
- the pillow is made of crushed stone, ASG or coarse sand;
- if a prefabricated belt is installed, the blocks are laid on a reinforced concrete base, the thickness of which is 10 - 20 cm, and are fixed on top with a reinforced belt 0.2 - 0.4 m high.
If the soil is medium heaving, it is allowed to lay blocks in two rows, placing reinforcing bars inside. If the masonry is done with brick or foam concrete, the requirements become more stringent:
- for highly heaving soil, the reinforced belt is installed along the mauerlau, interfloor ceiling, above windows and doors;
- on medium heaving soil, blocks are placed between the reinforced belt and the footing to enhance fixation.
A non-buried foundation on heaving soil has the following form:
- trench depth from 0.4 to 0.6 m;
- a layer of geotextile on which a sand-crushed stone cushion is poured, compacted with a vibrating plate;
- installation of formwork and reinforcement base;
- pouring concrete mortar.
Stripping can be carried out when the poured foundation reaches fifty percent strength.
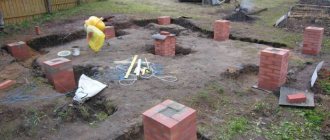
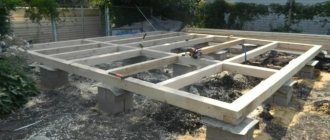
Columnar shallow base
A non-buried columnar type foundation is used quite often
A non-buried columnar type foundation is used quite often. It can be installed on slightly heaving and heaving soils, provided that the structure being erected has small overall dimensions and weight. As for rocks, coarse rocks and soils that are not characterized by movement, such foundations can be used under a large house made of timber or logs.
A non-buried foundation on supports can also be used in case of reducing the impact of heaving on the building. To achieve this, the soil under the supports must be replaced with a sand layer.
Pillars can be made from reinforced concrete, rubble concrete, stone, sand concrete and concrete foundation blocks. Typically, blocks of size 0.2x0.2x0.4 m are used. If you decide to use brick, then silicate products and ceramic material with low frost resistance are not suitable for these purposes.
The work is carried out in several stages:
Step-by-step instructions for creating a strip foundation with your own hands
- First, the construction site is cleared of debris, the fertile layer is removed, and the breakdown is carried out.
- Then a hole of the required size and depth is dug under each support.
- A sand cushion is placed at the bottom of each pit.
- After this, you can lay out the supports from the blocks. Usually two rows of 4 blocks each are made. Thick cement mortar is used to hold the blocks together. The open part of the supports is plastered.
- Parts of the supports that will be connected to the house must be waterproofed. For this, bitumen mastic, roofing felt, roofing material or glass insulation are used.
Important: sometimes a shallow foundation is made using wooden supports. Usually this is a beam made of pine or oak with a diameter of 200-300 mm. The element is impregnated with tar or processed by mining. To make the structure as strong as possible, the log is immersed 100-150 mm into a concrete solution poured into a dug hole.
Developer reviews
Numerous reviews confirm that a shallow strip foundation is the best option for individual construction.
Many people like this solution because of the small volume of work, the possibility of carrying out construction on their own, and the economical use of money.
Developers who built exactly this option recommend tape dimensions of 40 by 40 cm and reinforcement of three greasy rods for a small object in order to increase the rigidity of the base. In this case, the peppered rods should be installed in increments of 0.5 m.
Experts recommend strictly maintaining the composition of the components and proportions for preparing the concrete mixture so that the base turns out to be reliable. At the same time, they advise not to take breaks in work, to pour concrete in layers, but at once, carefully compacting each of them.
As useful tips - study the soil characteristics on your site, correctly draw up a work plan, follow the technology of reinforcement, pouring and installing a waterproofing layer. If you have even the slightest doubt about your own capabilities, seek help from experienced professionals.
Insulation of the foundation and blind area
Insulation of shallow foundations is critically necessary. Insulation will not only prevent the penetration of cold from under the floor, but also eliminate the cause of heaving. The latter is not possible at positive temperatures. The limiting depth of soil freezing is determined not only by the temperature of the coldest five-day period in the construction region, but also by the presence of molten magma in the center of the planet. In the absence of heat deep underground, seasonal freezing of the soil would be much stronger, up to the impossibility of the emergence of life on Earth. This circumstance makes it directly advisable to insulate the blind area around the building - it will not allow the soil around the shallow foundation to freeze and penetrate under it.
1-monolithic foundation, 2-wall masonry, 3-floor base, 4-sand bedding, 5-insulation, 6-waterproofing, 7-backfill, 8-blind area.
In this case, only hydrophobic materials that do not absorb moisture and have high strength properties are allowed as insulation. The best common material available is EPS - extruded polystyrene foam, often called "rigid foam". It can even be laid under the foundation slabs of light buildings.
Non-buried foundation
When building on heaving soils, a non-buried foundation is used mainly in the construction of light, non-rigid houses that allow deformation of their frame while maintaining performance qualities and the required appearance. When building on rocky and coarse soils, stone houses can be built on a shallow foundation. A non-buried foundation is made in three versions: columnar, in the form of a monolithic slab or lattice (Figure 46).
Figure 46. Types of non-buried foundations: A – columnar; B – foundation slab; B – foundation grid
Columnar non-buried foundation
A columnar, non-buried foundation can be used for small wooden and panel houses, bathhouses, outbuildings... built on non-heaving or slightly heaving soils. When building on rocky or coarse soils, this type of foundation can also be used for large log or timber houses.
Columnar foundation on short supports (chairs) located in increments
1.5...2.5 m is used quite often in individual construction. Many construction companies specializing in the construction of wooden houses, without burdening themselves with foundation problems, place foundation blocks on the ground, and on them - the house itself (Figure 47, a). This technique is quite suitable for construction on non-heaving and slightly heaving soils. If the soil is heaving, then the effect of soil heaving on the house can be reduced by replacing the heaving soil under the support with a sand cushion (Figure 47, b).
As a material for supports, you can use ready-made wall or foundation blocks. The supports can be made in the form of brickwork or made of concrete, rubble concrete or sand concrete. Please note that the use of ceramic bricks with low frost resistance and silicate bricks in the foundation is unacceptable.
Figure 47. Non-buried foundation pillars: A – foundation blocks; B – support with a sand cushion; B – support on coarse soil; G – wooden support; D – waterproofing of the support; 1 – foundation block; 2 – sand cushion; 3 – concrete; 4 – rubble stone; 5 – log; 6 – waterproofing; 7 – crown
If the soil is rocky or coarse, then the supports can be installed directly on hard, stable fragments of the soil, having previously removed its weak and weathered components. The support can also be made using rubble and sand-cement mortar, which ensures the solidity of the base and the supports themselves (Figure 47, c).
In some cases, the supports can be made of wood. To do this, use the butt part of pine or oak logs with a diameter of 20...30 cm. To increase the stability of the supports, a hole is opened under them, filled with a layer of concrete of 10...15 cm and the support itself is immersed in the concrete solution (Figure 47, d). The disadvantage of wooden supports is their fragility - no more than 8...15 years. To increase the service life, the wood of the chairs is charred over low heat and impregnated with tar, waste oils, etc.
The creation of foundation supports is associated with the implementation of waterproofing measures necessary to protect the house structure from being moistened by groundwater. Water easily rises through the structure of concrete, brick and wood due to the capillary effect, creating pockets of mold, mildew and rot along its path. A waterproofing coating in the form of bitumen mastic, roofing felt, roofing felt, glass insulation, etc., located at the junction of the house with the foundation, is mandatory (Figure 47, e).
If expanded clay concrete blocks, which are weak in frost resistance, are used as supports, then the outside is covered with bitumen mastic (except for the side facing the inside of the subfloor). This prevents the block from getting wet and helps dry it if wetness occurs.
When planning the layout of foundation supports, one should take into account the crushing of the crown on the supports. A large distance between them (more than 2.5 m) can lead to the concentration of large forces on each support, which will create the preconditions for the destruction of the wood structure. To reduce the collapse of the wood, it is better to reduce the pitch of the supports, and it is advisable to make the lower (frame) crown of the house from a beam or log of a larger cross-section and, if possible, from wood of more durable species (oak, larch).
Figure 48. Slab of frozen soil with a “warm” subfloor: 1 – foundation support; 2 – frozen slab; 3 – ground displacement vector
When planning to create foundation supports, it is necessary to take into account the design of the fence that is supposed to cover the underground space. Increased humidity in the lower part of the house (dew, splashes from storm drains from the roof, snow) requires the removal of moisture-resistant materials. Asbestos-cement or metal corrugated sheets, cement-bonded particle board, frost-resistant plastic, facade decorative panels attached directly to the wall or crown of the house are quite a suitable solution.
Support height
determines the height of the crown of the house. If the pillars are short, then the crown and lower part of the walls of a wooden house will quickly become moistened and rot, putting the structure in disrepair.
The high height of the supports makes it possible to create more comfortable conditions for the wooden structures of the house, but here other problems arise related to heaving phenomena. Heaving phenomena rock the supports under the house with large enough displacements that they can topple them. How does this happen.
If the soil is heaving and the subfloor of the house is insulated, then a hole of unfrozen soil will form in the slab of frozen solid soil that has formed around the house (Figure 48). During the freezing process, heaving soil increases in volume in all free directions, including towards the hole in the frozen soil slab. On heaving soils, horizontal displacement can reach 10 ... 15 cm. Such movements of heaving soil may well overturn not only high foundation pillars (Figure 49), but also narrow, weakly reinforced strips of a shallow or shallow foundation.
Figure 49. The inclination of the foundation support with a “warm” subfloor: 1 – slab of frozen soil; 2 – freezing limit; 3 – foundation support; 4 – backfill-insulation; 5 – snow cover
Figure 50. Slab of frozen soil with a “cold” subfloor: 1 – foundation support; 2 – frozen slab; 3 – ground displacement vector
The opposite picture of distortions occurs if the soil around the house is covered with a thick blanket of snow, and under the house the soil is open and cooled to ambient temperature. In this case, a powerful slab of frozen soil will begin to appear on the side of the house where the pound freezes faster (Figure 50) . With such freezing of the pound, the high support under the house will deviate in the other direction (Figure 51).
Figure 51. The inclination of the foundation support with a “cold” subfloor: 1 – slab of frozen soil; 2 – freezing limit; 3 – foundation support; 4 – floor insulation; 5 – snow cover
In order to prevent the support pillars from tipping over, it is better to rest them on a sand cushion (Figure 47, b), which neutralizes heaving displacements near the supports. In addition, the supports themselves should be more stable: their height should not be more than 1.5 times the width of the sole. As for other measures, they are aimed at ensuring that the border of frozen soil in the area where the supports are located does not change its depth sharply. To do this, the vents in the basement of the house should be closed for the winter so that the underground space does not freeze too much. You should not remove snow around the house all the way to the ground.
Developer, attention!
The winter cold will almost certainly topple the high supports if the heavily heaving soil freezes when the underground is open.
Heaving processes not only “rock” the foundation supports, but also raise and lower them, unevenly, greatly straining the structure of the house. If the house stands on separate support columns or on beams laid on heaving soil, even with sand backing, and the floor is dry and warm, then the supports under the outer walls will rise, and under the inner walls they will remain in place (Figure 52). In a wooden house, this will lead to distortions in door jambs and window frames, tilting of the floor and minor problems with the roof; and in a stone house - to cracks in the walls, which will live with the house all the time, without fear of cosmetic repairs.
Figure 52. Deformations of a house on heaving soil: 1 – house; 2 – foundation; 3 – freezing limit
What can be recommended in this case?
It is necessary to carefully insulate the floors of the first floor, then the soil under the house will freeze to the same extent as around the house; heaving phenomena will not appear so strongly. In addition to this, it is necessary to minimize soil moisture around the house by organizing drainage from the roof and snow retention around the house.
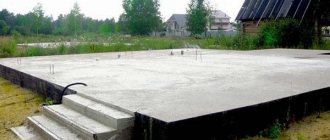
Monolithic slab
A monolithic non-buried slab is used as a foundation when building on weak subsidence soils, when erecting small buildings on silica-rich soils or in permafrost conditions (Figure 26). It is advisable to use such a foundation for light buildings that do not cause large stresses in the slab itself, or for rigid stone structures whose walls enhance the flexural rigidity of the slab.
The foundation, laid directly on heaving soil, sinks and rises as climatic conditions change; it “floats” on the surface of the soil. It is clear that if the house is installed on a slab, which is the floor of the first floor, then the soil under it does not freeze, especially under the middle part of the house. Due to uneven freezing, a soil failure forms under the house, which can reach 10...15 cm. That is why the slab of such a foundation must be very rigid in bending and have sufficient construction thickness with good reinforcement.
One of the common options for a non-buried foundation is one in which a layer of insulation (rigid polystyrene foam 10–15 cm thick) is laid between the slab and the ground. This solution allows not only to reduce heat losses through the floor of the first floor, but also to practically eliminate the failure of the ground underneath by leveling the temperature field under and around the house. The insulation itself is laid on a layer of coarse sand 30–40 cm thick (Figure 53).
Figure 53. Slab foundation on a sand cushion 1 – sand cushion; 2 – insulation; 3 – plate; 4 – freezing limit
It is advisable to build such a foundation on soils with a constantly high groundwater level if drainage is difficult to implement; as well as on weak subsidence and highly compressible soils (water-saturated sandy loam or clay, peat, water-saturated silty soil).
You can use a slightly different option to reduce uneven freezing under a house with a slab foundation - laying insulation in the soil around the house (Figure 54).
Figure 54. Slab under a light structure: 1 – slab; 2 – sand cushion; 3 – insulation; 4 – wall
The reason for the appearance of a crack in a monolithic slab
A developer came with a serious problem. House 8x10 m on two floors on heaving soil; foundation - reinforced concrete slab cast on crushed stone bedding 50 cm thick; walls made of foam blocks, reinforced with a seismic belt. There were no problems in winter, but in spring a crack appeared in the inner wall, spreading upward to a width of 1 cm, and the blind area was raised, which later returned to its original position.
They began to figure out what was going on. The winter of 2006 was particularly harsh. The ground under the perimeter of the house was frozen very hard. Increasing in volume, it could not overcome the weight of the heavy house, which is why it became very compact (Figure 55, A). The blind area around the house, rigidly connected to the slab, did not create much pressure on the ground with its weight, so its outer edge lifted up. Spring came. The soil began to thaw and decrease in volume. A gap appeared under the outer perimeter of the slab, increasing in size as the soil thawed. The moment came when the slab began to rest on the ground only with its central part. Unable to withstand the load, the perimeter of the slab sank, and the inner wall of the house cracked (Figure 55, B). The blind area returned to its original position. What design flaws appeared here? The large dimensions of the house increased the uneven freezing of the soil; the large weight of the house overloaded the slab with bending. The situation could have been aggravated by insufficient reinforcement of the slab, designed for the first stage of heaving, with dense reinforcement only in the lower part of the slab. It seems that the insidiousness of the heaving soil manifested itself in full when the cold weather had already subsided.
Figure 55. Heaving soil and a house on a slab - complex relationships: A - house in winter; B – house in spring; 1 – blind area; 2 – freezing limit; 3 – compacted soil; 4 – crushed stone; 5 – plate; 6 – crack in the wall
Lattice non-buried foundation
The lattice foundation (Figure 46, c) is used for construction on weak subsidence and highly heaving soils. Compared to a monolithic slab, such a foundation, having high rigidity, can significantly reduce the consumption of concrete and reinforcement. But the traditional approach to constructing plank formwork for such a foundation design is complex and expensive, which does not allow its widespread use.
The author proposes to use slabs of extruded polystyrene foam insulation (Figure 56) as permanent formwork.
Attention!
When planning a foundation in the form of a monolithic slab or lattice, you should first make a pit and install communications running under the house (water supply inlet and sewerage system outlet). Otherwise, after making the foundation slab, it will be very, very difficult to carry out this work. The walls of the pit must be independent of the slab or foundation grid so that their relative vertical movements cannot create destructive stresses in the slab structure.
Figure 56. Formwork of a lattice foundation: 1 – sand cushion; 2 – waterproofing; 3 – formwork; 4 – slab insulation; 5 – concrete; 6 – fittings
Options for performing NZLF
A non-buried strip foundation can be made in three variations:
Prefabricated strip foundation
The base is erected from FBS slabs, which are produced in accordance with GOST 13579-78. The size of FBS blocks depends on the area of the structure. In the field of private construction, FBS 9 and 12 are usually used. Prefabricated tape is best suited for constructing a foundation on sandy soil with low heaving. It is not recommended to make a prefabricated foundation on heaving soils, because... individual blocks will be pushed out unevenly and settle under the influence of frost heaving.
On the other hand, when implementing a set of measures that reduce the negative effect of heaving soils, a prefabricated strip foundation is more stable, because monolithic tape breaks when deformed, and FBS blocks can only bend.
To neutralize heaving forces when installing a non-buried prefabricated strip foundation, the following measures are taken:
- The blocks are installed on a previously prepared bedding.
- FBS are located strictly in one plane and aligned.
- The blocks are fastened together with M200...300 cement mortar or by welding metal embedded elements.
- If necessary, the prefabricated foundation is reinforced with metal structures.
The prefabricated structure is easy to install, does not require the installation of formwork and concrete work, and has a low cost. The only drawback is the need to rent a crane to install the FBS.
Monolithic strip foundation
The base tape is poured into the pre-created formwork. The technology for constructing a monolithic NZLF will be discussed below. This option can be used for the foundation of a house on heaving soils, subject to backfilling and effective drainage.
Advantages of monolithic NZLF: the ability to make a tape of any width and height, all work can be done with your own hands without the use of equipment, low cost.
Disadvantages: time and labor costs, monolithic tape hardens within 20-30 days.
Types of strip foundation and some nuances of its laying
In turn, the strip foundation itself can be different. The type of foundation is chosen depending on the soil and the severity of the structure, i.e.
e. it is necessary to take into account what kind of material the construction will be made of. Some people ask what a non-buried strip foundation is and how it differs from a buried one?
A non-buried foundation or it is also called a shallow foundation, and got its name because it goes deep into the ground to a very small depth. That is why strip-type foundations are divided into:
- Recessed are massive foundation foundations made of concrete, which is made with a depth of up to 1.5 meters or more, depending on the soil, the weight of the building, etc. Shallow foundations, or they have another name, non-recessed, which are applicable mainly for outbuildings , permanent garages, houses that are not planned to have more than 2 floors. They go deep into the ground to a small distance, which depends on the soil.
This type of foundation is very suitable for sandy loam and sandy soils; it has also proven itself well on clay soils. A shallow foundation justifies itself in areas where the soil is saturated with water.
Although, in the latter case, this applies to frame houses or some buildings made of timber. Strip foundations are also recommended for construction on hilly areas when other types of foundations are not suitable. Strip foundations are also good for the construction of basements and basements.
Expert advice: If the soil on which you are going to build a house is subject to deformations, which are known as seasonal, then in this case the strip foundation should have the shape of a frame that can independently redistribute the load depending on how exactly the soil will deform.