Types and principle of operation
All types of sliding gates operate thanks to roller carriages and a special guide rail. The mechanism ensures not only the mobility of the canvas, but also the transfer of load to the load-bearing beams and supports. According to the type of construction, gates can be suspended, supported on a ground rail, or cantilever, that is, with a fastening system at one of the ends.
Installation of sliding hanging gates
Hanging
Such gates are often used in industrial enterprises. The canvas with rollers is suspended on a horizontal beam supported at three points. When moving, the gate moves to the side like curtains. All loads are carried by the supporting structure, which must be sufficiently powerful and stable.
The advantages of hanging gates are a high service life, a small space for rollback. Disadvantage: the top rail strictly limits the dimensions of the vehicle, which forces the installation of high poles. In suburban construction, such systems are not very popular, since they require quite a lot of materials and labor.
But if the entrance area is equipped with a canopy, it is not necessary to make new supports. You can use ready-made racks, and design a collapsible upper beam. Then, for a truck to pass, it is enough to remove the removable part and then put it in place.
With support on the bottom rail
This design is simple and reliable. The canvas moves on rollers along a guide installed at road level. There are no load-bearing beams; all the load is transferred to the ground rail and side supports. An additional roller is attached to the top of the post to hold the gate while moving.
For good gliding and uninterrupted operation of the mechanism, you need to thoroughly clear the entrance of snow, ice, and debris caused by the wind or car wheels. In private buildings, it is not always possible to maintain road clearance in perfect condition, which is why sliding gates with a bottom rail are installed in areas with little snow in winter.
Console
This type of structure is more difficult to manufacture than others, but does not have the disadvantages of height restrictions or contact with the ground rail. The roller mechanism and the support that holds it are located on the side of the opening and are fixed to a separate foundation. A cantilever beam with a sheet welded to it moves along rollers. There are catchers on the return post. The upper guide device prevents the gate from swinging.
Most often, the load-bearing beam is attached at the bottom, but there are varieties with a console at the top or in the middle. This solution is convenient if the electric drive is often covered with snow in winter. By raising it above the ground, you can get rid of this problem.
Types of cantilever gates
What are double-leaf gates for?
Automated control of entry to a site can be used at a private or industrial facility. Sliding gates with two leaves are perfect in the following cases:
- If passage is required for large vehicles.
- When there is not enough space for one long sash to slide out.
- On narrow streets, when you need a wide opening for a car to enter.
- When a gate is required for a large industrial facility.
- To match the style and scale of the building with small sliding doors.
In a single-leaf system, the console with a long leaf carries a significant load, gradually leading to disruption of functioning; to automate it, you need to install a powerful drive. The width of the sash of the double-leaf type is 2 times narrower, so automatic control will require half the motor power. For the side rollback of a long leaf of a conventional design, it is necessary to provide a space corresponding to one and a half width of the opening. In sliding gates with 2 leaves this space is much smaller. But, due to their higher cost, double-leaf systems are used less frequently than single-leaf systems.
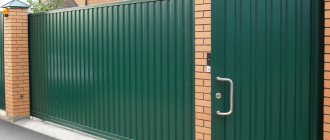
Pros and cons of sliding gates
The main advantage is ease of use. A fairly wide gate can be opened without difficulty. There is no need to arrange a large driveway, since the canvas moves to the side.
Even in strong winds, there is no risk of spontaneous closing and damage to the vehicle. In addition, the design can be easily equipped with an electric drive. Without leaving your car, you can open the gate and enter the site.
Separately about the advantages of cantilever sliding gates:
- have no height restrictions;
- there remains a small gap at the bottom, so snow, ice or accumulated sand do not hinder their work;
- high resistance to wind loads.
The rollers that ensure the movement of the door leaf are located inside the beam, which protects the mechanism from external influences and also allows you to use the gate without unnecessary effort.
Disadvantages of console gates:
- complexity of manufacturing;
- the length of the side space for rollback is at least 1.4-1.5 times the width of the opening.
If it is not possible to provide the necessary rollback, the cantilever gate has nowhere to move. It will not be possible to install them in a short area.
Types of sliding gates
Depending on the selected mechanism that opens the shutters, the designs can be:
- Console.
- Rail.
Rail options are used less frequently. This is an outdated version of a sliding gate that requires a solid rail on which the flight roller will rest. They can be found in large industrial plants that require durable structures.
Console gates, as the name suggests, have an additional console. It is hidden behind the gate and is a continuation of the canvas. Therefore, the opening and closing process is simpler.
Drawings and calculations
The main condition for long and reliable operation of the gate is compliance with the fastening system, current loads and compliance with installation technology. To draw up a drawing, measurements are taken. The canvas itself is usually made according to the width of the opening plus a few cm for the side rebates. The height is determined individually, taking into account the size of the fence and the material with which the frame will be sheathed. Usually it is 1.9-2.2 m.
When calculating cantilever gates, you need to take into account that they consist of a working part, which covers the opening, and a technical one. Their total length should be 40-50% greater than the width of the opening. This proportion ensures strong fastening and proper operation of all structural elements.
The frame for the cladding is composed of a reinforced contour, intermediate posts, braces and jumpers. Their dimensions can be simply calculated according to the rules of geometry or from a drawing if it is drawn up to scale. Based on the results, fill out a table (specification), which indicates the quantity of materials and components. Now you can start purchasing.
This is what a specialist’s drawing of a sliding gate should look like:
All structural elements - supports, foundations, canvas frame, rollers, holders, mortgages, etc. - work together. Therefore, it is quite difficult to independently calculate and select characteristics. It would be optimal to use ready-made solutions presented in manufacturers’ albums or using online calculators.
Features of the design and operation of sliding gates
Sliding gates vary in design and are:
- rail;
- hanging;
- console
rail cantilever suspended
To determine the choice of design that is suitable for you, we will consider each in more detail. They differ not only in the method of operation, but also in the complexity of the drawing and the duration of the work.
Console mechanism
Here the sliding blade is installed on top of the guide rail. The advantages of this structure are as follows:
- the absence of a limiter at the top, which is important if non-large vehicles will enter the territory;
- large windage;
- the mechanism is not easy to hack;
- simplicity of drawing and construction;
- easy to make yourself;
- hanging gates.
As the name implies, they are attached to the rail from below. They are suitable for garages, hangars and other covered buildings. When installing them on a personal plot, it is worth remembering that large equipment and vehicles will not be able to get into the yard. Their installation is more difficult.
Wheel gate
This is a ground model, and it has a lot of disadvantages:
- During installation, the guide rail is attached directly to concrete or soil, so an increased number of rollers will be required for smooth sliding.
- The structure is located directly on the ground, this increases the risk of clogging and blocking of the mechanism.
- In summer and in the off-season, debris, grass and leaves will get inside, and in winter there will be ice. When it rains and melts snow, the metal will corrode.
To make a choice in favor of any option, you need to proceed from your personal situation: do you live in the house permanently, or come from time to time, will vehicles enter the local area, etc.
Video: types of sliding gates
Accessories set
For standard sliding gates with a width of no more than 4 m and a weight of up to 500 kg, ready-made kits of fittings are available for sale. The set includes:
- guide beam 5-6 m long;
- 2 support roller carriages;
- end roller;
- lower and upper catchers;
- device for directing the movement of the web with 2 rollers;
- end caps for beams;
- rack.
Additionally, the kit may include adjustment stands and brackets.
With a non-standard opening exceeding 4 m, the loads will be greater, so it is better to contact specialists to calculate and manufacture the gate.
Cost of double-leaf sliding gates.
Many people think that since double-leaf gates are two separate systems, the cost of installing them will be double that of single-leaf options. But that's not true. The sum of the areas of both gates for a certain opening corresponds to a single-leaf design, so the increase in the volume of materials for production will be insignificant. The same applies to a foundation with a mortgage, the total length of which will also be insignificant. The main difference in price is the use of an additional automation system, but this difference will not be high.
The total length of the slats of both sets will approximately correspond to the single-leaf version. In this case, instead of one high-power engine, two motors of two lower power will be installed. The actual price ratio of both designs can only be determined in a certain situation.
Among the manufacturers of ready-made gate kits, the following companies can be noted: Roltek, Alutech, Welser Profile, DoorHan. When purchasing components for sliding systems, you need to inspect them in detail. All items must be well packed, assembled and level.
In specialized stores you can purchase automation and other elements from the best manufacturers in the world. A warranty is also provided on all modifications. Sellers of automation and gate accessories are ready at any time to advise consumers on any issue related to the creation of gate groups.
What materials are needed
Gates can be welded from steel profile pipes by connecting sections of different sizes. But now they produce special T-profiles for sliding gates, which are much more convenient to use - there is no need to weld 2 pipes around the perimeter of the frame and fill the cracks with sealant. This significantly saves time and materials, and since there is no seam itself, the corrosion resistance of the structure is simultaneously improved.
To make sliding gates you will need:
- T-profile for the external frame of the canvas (can be replaced with a 60x40 pipe and welded a 20x30 pipe to it);
- profile pipe 20x30 for racks and braces;
- pipe 60x40 mm for the cantilever part - shank;
- set of accessories.
Clean all metal, prime hard-to-reach areas with an anti-corrosion, quick-drying primer. In good weather, you can process all profiles at once.
Familiar design
Schematic representation of a simple product
The manufacturing process of a swing gate is no different from the manufacturing technology of one swing gate leaf. There is only one difference - the gate is much smaller. It is important to calculate so that even a curvy person in winter clothes can walk freely and not squeeze through the opening. Do not open the gates when you just need to pass a group of dear guests.
One should proceed from the calculation that the width of the opening will be at least one meter, and the height, so as not to disturb the harmony with the fence, should not be higher, but not much lower than the fence. Experts can calculate all the dimensions in their heads, but for novice builders it is better to use a drawing that will indicate the dimensions and the required material:
- pipes for racks, their cross-section depends on the weight of the future product. If you decide to make a metal gate, then do not forget that its weight will be immodest, so the cross-section of the rack pipes must be at least 80 X 80 mm;
- corners or pipes for the frame, their cross-section is acceptable 60 X 40 or 40 X 20 mm;
- the material for the stiffeners can be either a corner or a pipe; it can be taken with a smaller cross-section than for the frame;
- expected accessories, such as latch, lock, retainer and others;
- hinges and material for covering the frame.
How to make sliding gates: step-by-step instructions
Installation of hanging or rail gates involves installing a guide on the posts at the top or bottom and attaching the roller mechanism. It is more difficult to manufacture cantilever gates, the design of which consists of a working leaf and a shank. The current forces in them are distributed in such a way that the wind loads are absorbed by the fence supports, and the consoles pulled out by the weight are taken by the platform with a separate foundation.
Do-it-yourself sliding gates: manufacturing stages
If the pillars are already ready, then the work comes down to the following:
- Preparing the opening.
- Construction of the foundation for support roller carriages.
- Frame assembly.
- Sheathing.
- Installation of fittings.
- Installation of the canvas.
- Connecting the electric drive and safety elements.
- Checking the system's functionality.
If there are no supports yet, it is necessary to install strong pillars made of brick with internal reinforcement or racks made of 80x80 mm profile pipe.
Preparing the opening
It is advisable to decide in advance which gates will be installed - swing or sliding. This determines how the fastenings for the canvas should be mounted.
When laying bricks, metal embedded parts for catchers and the upper roller guide are walled into the seams. You can secure them into a ready-made pole using strong anchors. The distance between the mortgages must correspond to the height of the gate leaf. If the supports are made of profile pipes, the fastening plates are welded after their installation.
Foundation for the support mechanism
The foundation for the console support is laid separately from the foundation for the fence. It is placed next to the opening parallel to the fence. Several solutions for foundation construction are possible:
- screw piles;
- bored piles;
- reinforced concrete monolithic support.
When choosing the type of foundation, the soil structure and freezing depth are taken into account. If the site has weak or bulk soils, it is rational to use piles. Concrete foundations work well in dense soils.
Reinforced frames for concrete foundations are made from working rods and clamps with a diameter of 16 and 10 mm, respectively.
Channel No. 20 or two parallel channels No. 10 and No. 14 are welded to the piles or reinforcement outlets. They are laid close to the post, the length of the profile is equal to 1/2 the width of the opening. The top of the structure should be located at the zero level. Subsequently, 2 adjustment platforms and 2 roller bearings will be attached to the channel.
Frame assembly
The most convenient way is assembly on a special assembly table in a workshop for the production of metal structures. In the site conditions, several blocks (beams) can be placed horizontally as a working surface, or the frame can be welded vertically.
When assembled vertically, 2 “legs” are welded to the ends of the guide beam for stability. It is leveled on block linings. Cut to the size of the opening plus the length of the shank, which should be at least 1/2 the width of the opening.
The T-profile is aligned and welded along the beam strictly in the center, stepping back from the end by the thickness of the rack. The corners of the T-posts are cut off and welded strictly vertically. Temporarily secure with a piece of pipe.
They measure the diagonals, check the geometry, weld the upper T-profile, grabbing it in several places. To prevent the structure from deteriorating, complete welding of the gate is done only after complete assembly.
Inside the frame, 2 racks are welded at equal intervals, and between them there are horizontal jumpers and diagonal braces. The frame should be rigid and stable.
For gate widths up to 4 m, the shank is made in the form of a triangle; above that, a rectangle. A large load requires high rigidity, which a rectangular console can provide.
To make the shank, a 40x60 pipe is cut to size and welded to the bottom beam and the outer post. The gate is completely scalded. Now they can be laid horizontally without fear of deformation.
If automation is to be installed, it is recommended to immediately secure the rack. Pre-tighten the bosses and grab them to the beam. Then remove the rail and weld the bosses completely. The length of the slats should be equal to the width of the opening plus 50 cm. Fill all seams with automotive polyurethane sealant. Sand the joints and coat with primer. You can paint in any way - brush, roller or spray.
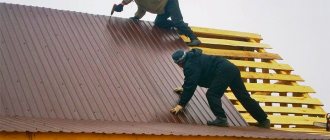
Sheathing
In order to correctly adjust the rolling mechanism, it is recommended to install the infill before installing the gate in the opening. It is not forbidden to do this afterwards, since adjustment is a simple operation that can be performed with a wrench in a few minutes.
For cladding use:
- corrugated sheeting;
- metal siding;
- Euro picket fence;
- tree;
- sandwich panels;
- forged gratings.
The materials are attached to the frame with self-tapping screws or welded.
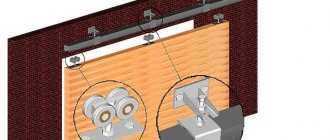
Installation of fittings and installation of canvas
The main rolling elements are rollers. They can be steel or polymer. The latter type has a silent, smooth ride.
Roller carriages are mounted on support platforms welded to the channel. To adjust the position, adjusting bolts are used. It is not recommended to weld the rollers themselves, since during operation they may need to be adjusted in some plane.
The canvas with the support beam is put on rollers, and the position is controlled using a level. Next, an upper limiter is attached to the post, protecting the gate from lateral swinging.
Installation of a plate with guide rollers
Catchers are mounted on the second post (receiving column), which will hold the canvas when closing. Limit switches are installed on the beam to reduce the load on the front carriage.
Installation of the lower catcher
Installation of electric drive and safety elements
After the mechanical part of the structure is ready, installation and configuration of the electric drive begins. It is attached to the supporting channel using brackets or a plate. The drive must be selected based on climatic conditions. In order for the device to operate flawlessly in frequent frosts below 30 degrees, the manufacturer must provide such guarantees.
Voltage drops are often observed in summer cottages, so the engine should not be too sensitive. It is better to choose a metal gearbox, not plastic. If the power is unexpectedly turned off, there is a mode switch in the drive that can be used to unlock it.
The electric drive is equipped with built-in current sensitivity, but it is necessary to provide other safety elements - photocells and signal lamps. Separate cables are laid for the drive and motion sensors. When a person or animal hits the target, the power is cut off and the reverse motion is activated. The warning light alerts road users that a car may be leaving the gate. To check the functionality, 5 test runs are carried out. If the blade moves smoothly, without stopping, the lamp and sensors react, it means the installation was done correctly.
Gate installation technology
The installation will go without problems if you follow all the technology. Done correctly, it will avoid problems with the structure in the future. First, let's look at laying the foundation.
Separate concreting for the pillar and cantilever frame saves time and reduces labor and cost. A significant disadvantage of this technology is the problems that can arise due to the characteristics of the soil.
Groundwater, icing, softening, and soil movement can create a distortion of the entire structure. The gate leaf will slide. Using such gates will become inconvenient. The gate mechanism will have to be adjusted all the time.
To prevent this problem, a single concrete base is laid for power pours. This solution will make it possible to further regulate the height level of the entire structure.
The first step is to dig a ditch. The width should correspond to the size of the support pillars. The depth to which the soil freezes in winter is taken into account.
If the soil is too soft, floating, or too loose, the size of the foundation should be increased by 20%.
The bottom of the ditch is covered with layers of crushed stone and sand for shock absorption. The thickness of the layers is about 15 centimeters. This will prevent moisture from entering the concrete base, therefore, will contribute to the durability of the foundation. Also, such gates will be more firmly secured.
The next step is soil reinforcement. Steel rods of small cross-section, approximately 6 mm, are placed at the bottom of the ditch. The rods are laid in the ground and secured with strong wire. It is better to use special wire, processed by firing. It is not advisable to subject the rods to welding. Despite the apparent strength of the welded metal, high temperature will make it more brittle.
Preparing for the installation of the foundation, done correctly, will avoid further problems in the work.
Foundation for sliding gates
A channel is placed on top of the rod. Lay it with the shelves down. It is necessary to position it level and check the level, otherwise misalignment will occur. The carriage is attached to the channel.
The formwork is built based on the type of support pillars. Ready-made poles are installed immediately. In another situation, the formwork is arranged taking into account the pouring of the base for the consoles. To strengthen the structure and avoid its breakage during pouring, wooden supports and panels are used.
Concrete is poured gradually. This is necessary so that the fill does not get on the channel, and also to allow air to escape from the substance. When the opening is densely filled, the surface of the fill will turn white. To prevent drying out, which can cause cracks, it must be watered with cold water. This advice is especially relevant in hot and dry weather.
After this, the foundation should be left alone for two to three weeks for complete hardening. Then you can begin installing the sliding gates.
Welding and installation
The basis of the mechanism is a supporting frame with reinforcements.
To weld the frame, a rectangular profile is taken. The lathing that will be inside the structure is made from pipes approximately thirty to forty mm in size.
The pipes are first cut. After this, you need to check their size so that they are the same in size. Next, the frame is welded. A reinforcement profile is welded diagonally inside the frame.
Welding is done by tack welding every 30 cm. At the very end, a rail is welded to the bottom of the frame.
After this, the seams are cleaned and the excess is removed. The seams are cleaned and sanded. Now everything is almost ready for painting and covering, all that remains is to secure the frame and components.
Checking the level, catchers and carriages are installed on the support posts. They are fastened with anchor bolts. This is a very important part of the job. Sliding doors themselves are heavy; the components must be securely fixed in order to withstand heavy loads and dynamics.
It is optimal to fasten the doors to the carriage profile and weld around them with a tack weld. This will provide additional stability.
Gate trim
As an option for painting, sliding doors can be sheathed. Before this, it is recommended to treat them with an anti-corrosion compound.
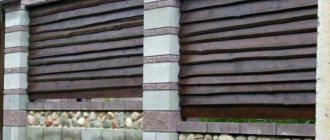
The main cladding methods are:
- profiled sheets with polymer coating;
- steel sheets;
- durable wood;
- sandwich panels;
- decorative forging.
Let's take a closer look at the pros and cons of each option.
Sandwich panels and metal sheets are the most economical option. This is the easiest way to give your gate a decent appearance.
Wood paneling and forging, on the contrary, are very expensive finishing methods. But they allow you to create a unique author’s design.
The main types of wood for cladding are pine, larch and oak, as they are more durable and can withstand adverse weather conditions longer.
Before starting work, the wood must be treated with a preservative. This will protect it from premature aging and destruction, and will also avoid deformation that is inevitable with changes in humidity and temperatures.
Primer and painting
The primer is applied in different ways. The simplest is priming with a roller or brush. For a more even distribution, it is best to use a spray gun. This method will allow you to apply the substance more evenly.
After the primer, the paint layer is applied.
Since the structure is located outdoors, you need to choose paint that is resistant to bad weather and temperature changes. It's good if the paint is anti-corrosion. Otherwise, anti-corrosion painting should be carried out before applying paint.
For a more even and durable application, the surface must be cleaned and degreased. White spirit or acetone are suitable as a degreaser. The coloring composition must be applied carefully, without missing joints and seams.
Depending on the type of composition, drying will last from several hours to several days. After the first layer has dried, the second is applied.
Fastening accessories
Finished doors are equipped with handles, locking elements, a deadbolt, and also an electric drive if you do not want to open them manually every time. The drive power unit is located next to the carriage channel, therefore, if the choice is made in favor of automation, two channels are immediately installed - one for the gate structure, the other for the electric drive.
Service
Regular gate maintenance is the key to long service life for sliding structures. It is not complicated; it is enough to lubricate the bearings in the rollers once a year and control the adjustment of the mechanisms. Photocells may become dirty or foggy due to humidity. They should be wiped periodically with a soft cloth.
The rack also needs to be regularly cleaned of ice and dirt. Creaking or grinding are dangerous harbingers of mechanism failure. It is not recommended to lubricate the beam with grease or lithol. Dust and sand accumulate in the thick lubricant, which can cause the gate to jam.
Wicket in sliding gates
If desired, a gate can be built into the canvas. On the one hand, this is practical, since you do not need to set the entire system in motion each time. In addition, if opened frequently, the equipment may wear out prematurely.
On the other hand, some inconveniences arise. It is difficult to carry a stroller or bicycle over a fairly high threshold, or you may simply stumble. The electric drive has a wicket passage installation mode, which can be used if necessary.
A simple and functional solution is to install a wicket outside the gate structure on separate supports. Then you can enter and exit without hindrance, and the equipment resource is not consumed.
Material for the gate-book
Frame material
Many owners try to build a gate into their sliding gates so as not to take up a separate space for it and not have to open the gate every time. But more on this in a separate article on our website. We will talk about sliding, but non-standard gates, in the form of a book. In the video below you can see this invention in action. And we’ll tell you a little about the material that will be needed to make such metal sliding systems. Everything is quite simple, you will need practically the same material as for a swing gate:
- a corner based on two doors, the dimensions depend only on the wishes of the owner;
- a connecting bolt that will secure two sashes;
- loops and stopper;
- sheathing material.
Manufacturing such sliding gates will significantly save time and money. And the system will not require channels, roller mechanisms, carriages and guides. Everything is quite simple and high quality. You will learn more about the manufacture of sliding gates from the video, and only wishes for success to those who want to make their own adjustments to this design.
Most common mistakes
Malfunctions during the operation of the gate may occur due to violations of the installation technology:
- Bulging or skewing of the support channel in cold weather - when the depth of the foundation under the support block is insufficient, heaving forces arise.
- The frame suffered during welding - the joints were welded in the wrong sequence. First you need to grab them, weld straight sections in short sections. Welding should be done after the frame is completely assembled.
- The gate moves unevenly - the rack is installed with mismatched teeth or the bolts have not been adjusted.
Assembly of finished factory gates
Some Russian companies offer DIY kits for assembling sliding gates. All profiles are already cut to size, components and components are designed by engineers, and a guarantee is given for the main elements. The frame can be sheathed with any material of your choice.
Of course, the kit will cost slightly more than buying metal at a metal depot. But you can save time on preparing profiles and cutting. All that remains is to assemble the structure correctly and carefully.