A level base of the floor is the key to ensuring that the finishing coating lays beautifully and will last for many years (this is especially true for materials such as laminate or tile). Cement-sand floor screed is an opportunity to create not only a smooth and even, but also a durable base. However, the work of filling it is not as simple as it seems at first glance. Let's figure out how to create such a screed yourself.
Cement-sand screed
Cement-sand screed
A screed made from a mortar made from sand and cement is an almost perfectly flat base that is suitable for laying absolutely any floor covering, be it tile, laminate, linoleum or parquet. It is with the help of such a screed that most often they level rough foundations - concrete floors in houses, brick floors, and even simply create a foundation lying on ordinary soil. On average, the thickness of a cement-sand screed varies from 3 to 8 cm. It can be larger, but due to the large weight of the mortar used for pouring, when calculating the thickness of the screed, it is necessary to take into account the strength of the floors.
Cement-sand floor screed
Concrete floors are leveled using cement-sand screed
The main tasks of the screed are not only to level the surface, but also to the fact that it will redistribute the loads experienced by the floor, create a solid foundation, make it possible to equip heat and waterproof layers, and even in itself is an excellent option for heat and waterproofing. Inside this structure, you can lay various types of communications, equip a heated floor system, etc.
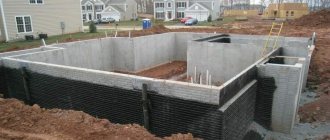
Reinforced screed on the ground
On a note! Certain types of screeds, called self-leveling floors, will help bring to life the most daring design solutions. Such floors can be of different colors or have a very interesting pattern. Special compositions make it possible to create real 3D paintings on the floor.
3D self-leveling floor in the bathroom
Semi-dry screeds
If additives or reinforcing additives are added to the standard cement-sand screed composition, less water will be required for the concrete to gain strength. Additives or admixtures speed up the process of concrete gaining strength.
They are different and impart different properties:
- Antifreeze additives that accelerate the maturation of the screed, while simultaneously lowering the freezing point of water. They are used if the temperature drops below +5°C (winter for concrete begins at these temperatures).
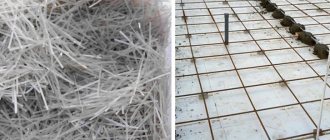
- Fiber fiber or pieces of steel wire significantly increases strength, and even under significant loads the screed does not crack.
- For water repellent properties. They are useful when pouring screed in the washing room and steam room of a bathhouse, bathroom, toilet or kitchen.
- Additives with which the solution self-compacts, that is, it does not require tamping.
Semi-dry screeds look like wet sand
The rates for adding additives are written on the packages. They range from 0.3-10% by weight of cement. That is, per kilogram of cement it is necessary to add from 3 to 100 grams of additives.
When making semi-dry screed, much less water is required. First, the dry ingredients are thoroughly mixed, then water is added. But the solution should be like wet sand on the beach. If you take it in your hand and squeeze it, a little moisture will release, but it will not flow, but will remain a lump in your hand. This will be the ideal consistency.
Due to the fact that such a solution is less plastic, its leveling is more problematic: more effort is required. By laying the composition between the guides, it is compacted. This can be done using special surface vibrators for concrete, or you can, as shown in the video, crush it with your feet.
Benefits and Features
Cement-sand screed has many advantages. This applies to its physical and physico-chemical parameters.
Cement-sand floor screed
Advantages of sand-cement screed.
- Evenness . Thanks to this method of leveling the floor, you can create an almost perfectly level base.
- Durability . Such a screed can easily serve for decades - on average, the service life is about 50 years.
- Durability . The screed does not deform under the pressure of heavy furniture; it is one of the most durable types of bases for a finished floor.
- Possibility to hide communications. Inside the screed you can lay water or sewer pipes, a heated floor system, or electrical wires. There they will not disturb anyone and cannot be damaged. If it is necessary to repair communications laid inside the screed, the cement-sand layer will have to be partially or completely dismantled.
Warm floor scheme
- High sound insulation rate . The screed does not conduct sounds well, which means noise from neighbors below will not disturb the residents. Various soundproofing materials can also be laid under the screed.
- Possibility of thermal insulation equipment . The cement layer itself retains heat well, but the use of additional materials when installing the screed will provide reliable protection from the cold from the outside, and will also not release heat from the inside of the room to the outside.
- Low shrinkage rates . Despite the fact that during the drying process the sand-cement screed “shrinks” somewhat, it still has low shrinkage rates compared to other materials. And if installed correctly, it will not crack.
- Low cost of work . Compared to other methods of floor leveling, screeding is not expensive at all.
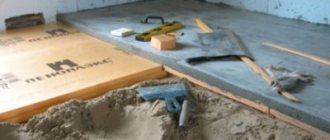
Leveling screed over insulation
But, like any other method of leveling the floor, cement-sand screed has its drawbacks, which you should be aware of before installing this type of base. The disadvantages of cement-sand screed are given below.
- Considerable mass . Cement screed exerts significant pressure on the floors, and therefore its use may be limited by this factor. For example, 1 m2 of cement-sand screed, laid in a layer of 1 cm, weighs about 20 kg.
- Long drying time . Before you can safely move on the screed and carry out further finishing of the floor, it is necessary to dry it well. The drying time is long - about a month.
- It is difficult to achieve a smooth surface by hand . Fortunately, if this was not possible, but evenness is necessary, you can pour a self-leveling mixture on top of the screed.
- Difficult installation . Pouring screed is a very complex process, which is often carried out with the help of strangers. The work, of course, can be done independently, but it is important to follow all the steps and key points when pouring the screed. Otherwise it will crack.
Cracks in the screed
In any case, a properly poured screed is an excellent base option for any type of finishing coating. In addition, after drying during use, it is easy to clean, even if not covered with finishing, and is also not afraid of water.
Types of cement screeds
There are a large number of ways to make such a screed. However, we can distinguish the main ones - tied and untied screeds and floating.
Types of floor screed
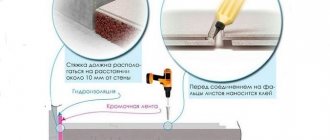
bonded screed method is used if the permissible leveling layer can be up to 4 cm thick. The base becomes one with the floor and walls. This type of screed requires careful preliminary preparation of the rough foundation - all large holes, cracks, cracks in the floors are sealed, all significant irregularities are removed as much as possible. If there are small bumps or pits on the surface of the ceiling, they do not need to be sealed. Builders even recommend artificially roughening freshly laid floors by walking over them with a metal brush - this way, the adhesion of the mortar to the surface will be better.
The solution for pouring the screed should have the consistency of sour cream or cake cream. It turns out quite liquid and about 20 minutes after pouring it will begin to gradually harden. Therefore, you need to have time to fill and arrange the screed during this time.
The solution for pouring the screed should have the consistency of sour cream
Attention! Large rooms are usually filled in stages, since one person cannot quickly level such an amount of mixture.
You can carefully walk around the room the next day, but the drying time for such a screed is long - up to 40 days. It is important to properly dry such a base - the water cannot quickly evaporate from the layer, it must come out gradually, so it is recommended to moisten the fresh screed with water and cover it with film.
There is an untied screed , which, on the contrary, is mounted on a perfectly smooth surface. In this case, the base should not have water-absorbing properties, so as not to draw moisture out of the screed. The thickness of such a layer can reach 5 cm. The main difference from the previous type is that a primer is not used before pouring such a screed. Also, no methods are used that can increase the adhesion strength of the solution and the rough base.
Floor screed - mortar and grout
Also often installed is a so-called floating screed . It is usually used if its thickness should be 5-7 cm. The design of such a layer is different in that it does not even directly come into contact with the rough base - on the contrary, layers of hydro- and thermal insulation are laid between the solution and it, various materials that simply will not give the solution will adhere to the ceiling.
Attention! It is this type of screed that is most often strengthened using reinforcing mesh. Fiber fiber can also be added to the solution to increase its strength, reduce the risk of cracks and reduce the risk of shrinkage.
Fiber fiber for floor screed
Fiber fiber mixture
Due to its large thickness, such a screed could have the maximum weight, but it is poured using the so-called semi-dry technology. That is, the solution is mixed using a small amount of water and resembles the structure of wet sand.
Prices for fiberglass for screeds
fiberglass for screed
Semi-dry screed over heated floor
Procedure for installing a screed
Preparation of the base for different types of screed will differ, but further work is almost identical. Here's how it happens:
- A zero level is marked, at which the beacons are subsequently set and the solution is leveled.
- Display of beacons.
Placing beacons is one of the most important stages, which determines how even the floor will be - Mixing the solution.
- Pour the solution between the beacons, starting from the corner farthest from the entrance. Its height is approximately 1 cm higher than the level of the beacons.
- Using a concrete vibrator, remove air and compact the concrete. In this case, the solution will settle almost to the level of the beacons.
- Using a rule bar, level the concrete.
- Pour in the next batch, compact and level again. So gradually spread the solution over the entire area.
When working, you cannot take long breaks - the edges of the concrete that has already been laid should not “get caught”. One more nuance: the normal plasticity of the mass remains 20 minutes after cooking. Therefore, there is no point in preparing large portions at once. In order for the process to proceed continuously and the solution to be prepared in small portions, at least two people must work: one mixes the concrete, the second distributes the previous portion.
For more information on how to set the zero level and poppies, how to lay the mortar, read the article “Do-it-yourself concrete floor screed”.
How to prepare a solution and check its density
The composition of cement-sand screed is clear from the name: it is cement, sand and water. Cement for general purpose premises is grade M-300, sometimes higher. Filler - clean sifted medium-grained sand. In some cases, fine gravel or expanded clay is used. The proportions are as follows: for 1 part of cement take 2.5-3 parts of aggregate and water.
Many people think that increasing the amount of cement will increase the strength of concrete. But this is not true at all. On the contrary, the surface will crack more because there is not enough aggregate or water to form strong bonds. If you want more durable concrete, take higher grades of cement, but pour it according to the norm.
First, cement and concrete are mixed dry, then water is gradually poured in. The solution should have a dough-like consistency. If you put it on the floor, it should not spread.
Water is gradually added to the mixed dry ingredients
It is easy to check whether the solution has the required consistency or not. The laid concrete is pressed down with a piece of board. If water has collected in the recess, it means that you need to pour a little less water when kneading. After checking, the solution is added to the recess and leveled again.
Care of cement-sand screed
After the solution is laid, the surface must be monitored and moistened. You can’t let it dry, you need the concrete to “set.” This requires a certain humidity. Therefore, before pouring the screed, you need to cover the windows and turn off the heating.
The next day, generously moisten the screed. Puddles should not be allowed to appear, but there should be enough water. It's easier to do this with a hose and sprayer. After wetting, the surface is covered with plastic film. It lies for at least 4 days.
After the screed has been watered, it is covered with film.
Over the next 8-12 days, the concrete screed is also wetted, but not so much. After a week, you can walk on the floor without fear, but you can lay the floor covering only after the solution has completely matured - this is at least 28 days. Experts say that all processes will finally stop only after 35-40 days. The period is very long, it is not always possible to wait that long. To speed up the process, semi-dry screeds were developed. When using such compositions, finishing work can be carried out within a week.
Proportions of cement and sand
Depending on which screed option is chosen, the composition of the mixture for its manufacture is also determined. The proportions of the two main components are selected depending on what brand of cement will be used and what quality of sand. To install a screed in an apartment, it is enough to use M200 cement. The finished base will be able to withstand a significant load - about 200 kg/cm³. You can take 1 part of M500 cement and mix it with 3 parts of sand. And you will need as much water as is necessary for the solution to achieve the required consistency. This is approximately 1 liter per 1 kg of cement.
Attention! There is no need to add a lot of water, as this will make the solution of less quality.
Screed mortar
It is very important to choose the right sand to create the solution. It should not contain (or at least contain) various inclusions - silt, clay, etc. These components negatively affect the strength characteristics of the finished screed. It is best to use washed river sand. Quarry sand is also suitable, but its quality is somewhat worse than river sand due to the angular shape of the sand grains.
Table. Mixture compositions according to GOST when using M400 cement, wt. h.
| Brand of solution | Cement | Water | Sand |
| 150 | 1 | 0,55 | 3 |
| 200 | 1 | 0,48 | 2,8 |
| 300 | 1 | 0,4 | 2,4 |
Calculator for calculating the amount of ingredients of a mortar for floor screed
Go to calculations
How to reduce dry cracks
Let's start with the fact that cement floor screed can vary in the amount of water. There are two types:
- Conventional, in which the volume of water is approximately equal to the volume of cement.
- Semi-dry, in which water is only 20-30% of the volume of cement.
With the same proportions of cement and sand, a semi-dry screed has higher strength and gains strength faster. After drying, it has fewer irregularities and fewer cracks. For some coatings, you can only rub the surface without using leveling mixtures. Why does this happen? Because there is less water, therefore less volume evaporates, causing less shrinkage (change in size). Hence - fewer cracks, fewer irregularities.
Cracks are not always visible, but they are always there.
Why is a regular liquid screed used more often? Because it's easier to make it. The liquid solution has a longer time to set. This allows even workers without experience to lay and level the composition. For a semi-dry solution, the time before setting begins is very short - about 20-30 minutes. And this is provided that the composition contains an additive to increase plasticity, prolonging the installation time.
To make a semi-dry screed with a longer period to start setting, look for cement with a long period to start crystallizing. This parameter is indicated on the bags. There are short periods - up to 20 minutes, there are 2 hours or more.
If a semi-dry mortar begins to “become”, but there is no time to lay it, it will not gain sufficient strength. That is why there are so many stories about fragile and crumbling semi-dry floor screed. It was just done incorrectly, with the installation time not correct. A properly made semi-dry cement floor screed is very strong and smooth.
A high-quality cement floor screed has very small differences, and to minimize cracking, expansion joints are laid
So what can you do to ensure that there are fewer cracks in the screed when filling the screed with ordinary mortar?
- Add the minimum possible amount of water.
- If necessary (on an elastic base), lay reinforcing mesh.
- Use reinforcing additives.
- Grind the surface after it begins to set.
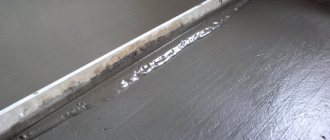
- Lay a damper membrane around the perimeter of the room.
- For large rooms (more than 10*8 m), cut/lay expansion joints.
This is a whole set of measures that allows you to obtain a concrete floor with a minimum number of cracks. But first of all, we must follow the technology and recipe. This will be a guarantee of quality.
How to choose materials
The strength of a cement floor screed depends not only on the quality of the cement, but also on the quality of the sand. For a good result, you need washed river sand, from which all dust and foreign components have been removed. It is highly desirable that the sand contains grains of sand of different sizes. If the sand is of only one fraction, part of it (1/3 or 1/4) can be replaced with fine granots. With this composition - large, medium and fine fractions - sand fills the voids well, and the remaining empty space is filled with dusty cement. This cement floor screed is dense and durable. This is good for sound insulation, it cracks less and behaves better in use.
Brand of mortar for floor screed - from M100 to M200
What brand of cement should I use? The best choice is Portland cement. Marked PC. A cheaper ShPC is suitable. It is better not to take any mixes, since the result of their use is unknown. We do not add clay and lime to the CPS. These are dust-like particles; they replace cement, reducing its strength.
Features of the batch
Beginners often have the desire to add more cement to the screed solution. It seems that the more binder, the stronger the floor will be. Well, no. There will be more cracks. That's for sure. And the presence of a large number of cracks means poor quality of the foundation. Another point: in order for the cement floor screed to be strong, you cannot add a lot of water to it. To make it easier to lay the “steep” solution, plasticizers are added to it. The most affordable is dish detergent. A couple of spoons per batch, and the solution with a small amount of water is perfectly leveled. But if possible, it is better to add an industrial plasticizer. Detergents that increase elasticity reduce strength. So it is better not to use it for solutions of low grades.
Sand-cement mixture for floor screed - the basis for mixing
Even if you make a traditional solution, do not pour water right away. First, mix the dry ingredients - sand and cement, and then add a little water (half the norm). Add a little water, stir well, add a plasticizer (special additive or dishwashing detergent), stir. Too thick? Add a little water. After laying the solution, there should be no puddles on the surface. The presence of puddles indicates that there is a lot of water and its amount needs to be reduced.
Thickness and calculation of floor screed
The thickness and process of laying cement-sand screed are regulated by regulatory documents (SNiP and GOST). According to them, the minimum thickness of the mortar layer can be 3 cm; at lower values, the screed will simply crack due to the high tension inside the material that will appear when drying. And the maximum thickness of the screed, according to the documents, is only 7 cm, although in some cases it may be more.
Floor screed
Expert opinion
Afanasyev E.V.
Chief editor of the pol-exp.com project Engineer.
It is easy to calculate the solution consumption per 1 m². To do this, you need to take into account that on average 1 m³ of cement and sand solution has a mass of about 2 tons. The composition includes 1350 kg of sand and 450 kg of cement. Thus, we find that for 1 m² of screed layer 1 cm thick, you will need 20 kg of mixture, which contains 13.5 kg of sand and 4.5 kg of cement. Knowing the thickness of the screed and the dimensions of the room, calculating the amount of mortar is very simple.
Dry mixes
You can prepare the solution yourself, or you can buy a ready-made mixture. The building materials market is rich in such offers. They are simple to use - just like when creating a regular solution, water is added to the dry ready-made mixture - all the necessary components are already mixed in the required proportions, often with the addition of plasticizers. These substances can reduce water consumption without losing the quality of the solution.
Dry mixes for screed
Attention! Any solution must be mixed using a construction mixer.
TOP 3 best manufacturers of dry mixes for screed
| Photo | Name | Rating | Price | |
| #1 | Perfecta | ⭐ 96 / 100 | More details | |
| #2 | Bolars | ⭐ 95 / 100 | More details | |
| #3 | Rusean | ⭐ 94 / 100 | More details |
Perfecta
Recommended for preliminary leveling and installation of a durable and reliable floor, used under conditions of low and moderate loads.
Perfecta
pros
- special reinforcement of the base screed with fiberglass;
- suitable for heated floors;
- environmentally friendly;
- easy installation;
- suitable for any base;
- maximum layer 120 mm;
- high frost resistance of the material;
- solution viability 120 minutes.
Minuses
- only tiles should be laid on top (for laying other floor coverings, the surface is sanded or leveled with self-leveling floors);
- cannot be laid at low temperatures.
floor screed Perfecta
Bolars
Suitable for rooms with any level of humidity, as well as foundations subject to significant temperature fluctuations and increased operating loads. It is used for filling floors manually and by machine.
Bolars
pros
- does not shrink and leaves the layer height;
- hardens quickly;
- compatible with heated floors;
- maximum layer up to 100 mm;
- it is allowed to lay the screed directly on the ground, wood, concrete;
- Suitable for most floor coverings.
Minuses
- the cost is above average;
- viability of the finished solution is 60 minutes;
- afraid of low temperatures.
Bolars floor screed
Rusean
Rusean floor screed is a highly effective, economical material based on cement binder, coarse sand (grain size up to 5 mm) and chemical additives.
Rusean
pros
- suitable for manual mixing;
- low mobility of the dissolved mixture;
- maximum layer up to 150 mm;
- suitable for heated floors;
- The screed can withstand frost down to -35 degrees;
- packaging up to 40 kg.
Minuses
- subsequent sanding of the floor is required to cover it with finishing material;
- high consumption;
- Complete drying time (for laying floor materials) is about 10 days.
floor screed Rusean
DIY cement screed
All work on pouring this type of screed involves several stages of work. Let's look at the process in detail.
Floor screed device
Step 1. The very first - the preparatory stage - includes preparing the necessary tools and clearing the base of debris. To create a screed, you should prepare a building level, a long rule, spatulas, containers for the mixture, beacons, a construction mixer and the construction mixture itself. All necessary calculations are also made in advance, because if there is a shortage of solution, you may not have time to buy more. Because of this, all the ingredients of the mixture are purchased with a small reserve. The surface is prepared very simply - it is cleaned of debris, dust, old coating (if any), all cracks are sealed. In some cases, it is recommended to treat the surface with a primer to improve adhesion.
Preparing the base
On a note! If you plan to lay waterproofing material, the surface is not treated with a primer. The waterproofing layer is laid with an overlap of approximately 20 cm on the walls, the excess is then cut off. As an option, you can use waterproofing mastic instead of rolled materials. It is also recommended in any case to tape the perimeter of the walls with damper tape.
Step 2. Using a building level, the slope of the base is determined. This is necessary for proper installation of beacons. Using a level, markings are applied to the walls, measuring the distance from which to the level of the rough foundation, it is possible to calculate the slope of the floor. In general, knowing the height difference is necessary in order to accurately calculate the mixture consumption, because if the slope is significant, then more solution will be required. After this, beacons are installed along the level, which will then help level the screed layer, although their installation is not always necessary. When the rule is carried out around the room according to the beacons, the places where there is not enough solution are easily calculated - it is simply added there.
How to set beacons
Installation of beacons
So, the beacons are installed approximately 50-70 cm apart from each other along a long wall, but so that the distance between them is not greater than the length of the rule. The basis for them are pieces of cement mortar. Beacons must be located on the same level! After their installation, the cement bases must dry for 2 days.
Beacons must be located on the same level
On a note! After the screed has hardened, the beacons are often removed, but this procedure is not necessary if a self-leveling mixture is applied to the surface at the end of the work.
Step 3. Only after the previous procedures is the solution mixed in a concrete mixer or any other container using a construction mixer. First, all the dry ingredients are mixed, then water is gradually added to them. Do not stir the whole mixture at once! The solution is applied to the surface, starting from the far corner of the room. The rule relies on the beacons and moves along them - this is how the screed is leveled by removing excess mortar and calculating the places where it needs to be added.
Pouring cement-sand screed
Important! During work on pouring the screed, the temperature in the room should be above zero (from +5 to +30 degrees).
Step 4. In this way, the entire base is poured and leveled. The screed is ready.
Ready-made floor screed
Installation of cement-sand screed, part one
Installation of cement-sand screed, part two
Video - Filling the floor screed
Video - Leveling the floors yourself
DIY concrete floor screed: detailed process with photos
Concrete flooring is currently perhaps the most common in both residential and industrial construction. It is suitable for almost any finishing coating or can, after appropriate processing, be used independently. Its main advantages, subject to the filling technology, are high strength, resistance to destruction, and durability of use. It is not surprising that when conducting private construction or when renovating an apartment, in the vast majority of cases, homeowners opt for this particular flooring technology.
DIY concrete floor screed
Is it worth inviting specialist builders, or is screeding a concrete floor with your own hands a completely affordable process for the average homeowner? This publication is devoted to answering these questions.
Types of concrete floor screeds
Concrete floor screeds can have different designs, be made using slightly different technologies and be intended for different purposes.
- Thus, they can serve solely for leveling the floor, which is carried out before installing the finishing coating. Powerful screeds serve as a reliable foundation in rooms where increased mechanical loads are expected. They can also perform the functions of ensuring the required thermal balance, acting, for example, as powerful heat accumulators in “warm floor” systems. Screeds are often used to cover communication systems. They can also be used to create a certain slope in those rooms where it is necessary.
- Concrete screeds differ according to the number of layers:
— They can be single-layer, that is, poured simultaneously to the entire calculated height. This is usually used in industrial, utility or ancillary non-residential premises, where there are no increased requirements for the evenness of the floor.
— Multilayer screeds are poured in several stages. Typically, the first layer serves as a rough base, and the top one creates a smooth surface for further flooring work. This approach is also used in cases where the total thickness of the required screed reaches too large dimensions, and it is more expedient to do it in layers.
- Screeds also differ in the degree of adhesion to the base:
Different types of ties
- Bonded ties have direct contact with the substrate. Of course, with such a filling technology, maximum homogeneity of the materials and their high adhesion to each other must be ensured. Such coatings are characterized by good strength qualities in terms of withstanding high mechanical loads. However, the condition of the surface layer will largely depend on the moisture level of the base. Such screeds are mainly performed on dry floor slabs on the floors of buildings.
— In the case where the base does not have sufficient waterproofing, a screed is used as a separating layer. A layer of waterproofing material (roofing felt, polymer film, coating composition) becomes a barrier to moisture penetration from below, and the screed itself has no contact with the base. With this technology, the layer of poured mortar cannot be less than 30 mm and, as a rule, requires reinforcement.
This technology is often used when constructing screeds on the ground, for example, in garages, sheds, basements, and on the first floors of houses without basements. They also use it in rooms with high humidity levels.
— Where enhanced thermal insulation of the floor is required or there is a need for sound insulation, floating screeds are used. In this case, the concrete solution is poured over a layer of insulation of one type or another. The screed turns into a completely independent structure - a slab, not connected either to the base or to the walls of the room. The minimum thickness of the fill in this case is at least 50 mm, and reinforcement of the screed becomes a prerequisite.
The humidity of such a screed is absolutely independent of the condition of the base; a good insulating and noise-absorbing effect is achieved. Disadvantages - excessively large thickness, and therefore - load on the floor. Typically, such screeds are used only on the first floors of residential or ancillary buildings, especially if the filling is carried out on the ground.
- Screeds can be made with a homogeneous solution or include certain fillers:
— The addition of a cement-sand solution of polystyrene foam chips significantly increases the thermal insulation qualities of the coating.
Screed using polystyrene foam chips
Typically, such screeds require a second, strengthening and leveling layer.
— Where screeds of great thickness or with increased thermal insulation qualities are required, expanded clay is added to the concrete solution.
Expanded clay concrete screed has good insulation properties
Expanded clay concrete has sufficient strength, but for laying some coatings, you will also need to fill in the front layer from ordinary mortar. But ceramic tiles can be laid directly on such a base.
-Good performance properties are shown by screeds with micro-fibre reinforcement. This technology allows you to dramatically increase the strength of the coating to mechanical loads, stretching, and bending.
Fiber fibers create an internal reinforcing structure
Such screeds usually do not crack, are less susceptible to shrinkage during hardening, and have less dust formation. They are great for underfloor heating systems.
- Concrete floor screed can be done using classic, “wet” technology, or semi-dry. Semi-dry screeding is a relatively new thing, and not everyone is still ready to try it in practice. In addition, it requires special professionalism in preparing the mortar mixture, laying out, compacting and leveling the mortar. Most home builders prefer to use proven “wet” technology, which will be discussed later in the article.
Solutions for pouring concrete screed
It is quite natural that if you need to pour a concrete screed, you will first need to decide on the type of solution. There are some options in this matter.
According to the existing canons of SNiP, the minimum strength of a conventional concrete screed, regardless of the type of further cladding, must be at least M-150 (the coating can withstand a force of 150 kg/cm²). If a self-leveling filling composition is used, then the requirements are even higher - from M-200. The solution should be selected in accordance with these requirements.
1. The “classic” concrete mortar used for pouring a regular floor screed is considered to be a cement-sand mixture in a ratio of 1:3. This “recipe” is time-tested and fully justifies itself. However, there are several nuances, without taking into account which you can easily ruin the future screed:
- To prepare concrete, you cannot use ordinary “washed” river sand that has not undergone special treatment. The frozen surface will not be durable and will begin to crumble, crumble and crack over time. The fact is that grains of sand have outlines smoothed out from prolonged exposure to water, which do not provide proper adhesion. In this regard, quarry sand is much better than its faceted grains of irregular shape. True, when choosing, you need to look carefully so that it does not contain a large number of clay inclusions - this will also reduce the strength of the screed.
The presence of a small amount of fine gravel component will not affect the strength properties of the screed. However, if a smooth surface is required, it will be necessary to sift the sand through a sieve.
- A very important condition for the strength and durability of the screed being poured is the optimally selected amount of water. It is no secret that some novice home builders, in an effort to make the work of pouring and leveling concrete easier, use an excessive amount of water, resulting in a semi-liquid, easily spreadable solution. By doing this, they are laying a “time bomb” - at the end, the screed will not have the required qualities.
Such a screed will probably not be durable.
Firstly, an excessively liquid solution will definitely shrink strongly when hardening. In this case, one cannot expect a flat surface in accordance with the set level. And secondly, a violation of the cement-water balance will certainly reduce the strength qualities of hardened concrete. The surface is loose, unbound, with increased dust formation.
There are, of course, specially calculated standards for the amount of water in concrete mortar, but they are usually adhered to by technologists at enterprises producing reinforced concrete structures and large mortar units. In home construction, people often rely on their own experience, intuition and common sense. In addition, it is very difficult to accurately calculate the amount of water due to the fact that it largely depends on the moisture content of the filler. The sand can be wet and heavy - and this is also water, which will participate in the process of preparing the solution.
Ideally, the concrete solution should be dense, but sufficiently plastic, so that when it is poured and leveled, there are no air voids left in the thickness of the floor. You can roughly focus on the following ratio - a liter of water per five kilograms of cement-sand dry mixture.
It is important to choose the right “golden mean” so that the solution is both dense and plastic
It is very difficult to mix the screed solution by hand using a shovel. It is better to use a concrete mixer or construction mixer of sufficiently high power for this. First, mix the dry ingredients in the required ratio (maybe with a little moisture), and then add water very carefully, portionwise.
An important condition for the quality of the future concrete screed is the purity of water. It is prohibited to use process water containing fats, oils, petroleum product residues, etc. Also, dirty, oily containers should not be used to carry water to the concrete mixing site.
2. The modern range of building materials on sale can significantly simplify the process of pouring screed. For these purposes, ready-made dry construction mixtures can be used.
In such mixtures, the component composition already has an optimal ratio
Compared to using the usual cement-sand mixture, this technology has a number of advantages:
- In terms of strength and other performance indicators, screeds made from ready-mixes are in no way inferior to ordinary concrete, and can even surpass it in a number of parameters.
- To prepare the solution, you do not need powerful equipment or heavy manual labor - a mixer or even a powerful electric drill (perforator) with an appropriate attachment is enough.
- In principle, there are no problems with the dosage of components - everything is already provided by the manufacturer, and the master can only strictly follow the instructions for preparing the solution.
- Many solutions prepared from such mixtures are much lighter, which reduces the load on the floor, reduces transportation costs and makes it easier to lift materials to floors.
It is possible to select the mixture to specific floor operating conditions
- It is possible to select the desired composition for specific operating conditions. Thus, there are solutions for rough or leveling screeds, for underfloor heating systems and for rooms with high humidity. Special plasticizers or microfibers added to their composition not only increase the strength characteristics of the coating, but also reduce the time it takes for the screed to completely harden, reducing the overall duration of construction work.
- What is very important for beginners is that working with such compositions is simple and does not require particularly high skills. The main thing is to follow the recommendations for pouring technology, which are necessarily attached to any batch of material.
All this will be true only if a high-quality dry mixture is purchased. Alas, there are a lot of fakes or low-quality mixtures on the building materials market in this segment. It is best to choose formulations from reputable manufacturers, be sure to check the certificate so as not to run into counterfeit products. It is also important to check the shelf life of the material - it is limited, and an expired mixture can significantly lose its quality.
The only drawback of this approach to pouring screed is that the price may be slightly higher than when making the solution yourself. Well, you have to pay for convenience and quality.
Prices for various types of screeds and self-leveling floors
Screeds and self-leveling floors
Preparing the surface for pouring concrete screed
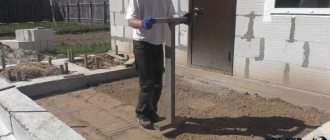
The surface for pouring the screed is prepared in different ways, based on specific conditions:
- If the floor will be laid on the ground, for example, in a private house without a basement or basement, then the work is carried out in the following sequence:
— The soil is selected to a depth of 500 mm.
-A sand cushion 100 mm thick is poured and carefully compacted. A gravel layer is poured on top of it in the same way.
— Rough pouring of concrete with the addition of expanded clay to a height of 150 - 200 mm is done to insulate the floor surface.
— After the base hardens, it must be waterproofed - with roofing felt or thick polyethylene film to prevent the penetration of ground moisture from below. The waterproofing material must extend onto the walls to a height slightly greater than the height of the planned screed. If necessary, another layer of insulation can be poured on top, and then a reinforced finishing screed can be poured.
- In apartments, first of all, it is necessary to remove the old screed. This is done for several reasons:
— Firstly, the old screed does not guarantee integrity, since it can peel off, crack, and these deformations will be transferred to the newly poured layer.
— Secondly, do not forget about the maximum permissible loads on floor slabs. Thus, in serial high-rise buildings of old construction, the permissible load is about 400 kg per square meter - static and 150 kg - dynamic. And one square meter of concrete screed, 50 mm thick, is close to 100 kg. Therefore, all work related to thickening the screed will have to be coordinated with design organizations. And it is far from certain that such permission will be obtained.
- And thirdly, the height of the ceilings in apartments is usually not so significant that you can afford to significantly raise the floor level.
The old screed is dismantled with a hammer drill, but very carefully to prevent destruction or damage to the floor slab. The remains of the chipped concrete are removed, and then the surface is thoroughly cleaned and dust-free.
A difficult, time-consuming, but necessary process of dismantling the old screed
Next, the base is inspected and, if necessary, repair work is carried out:
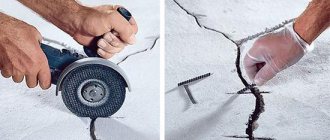
- If a bonded screed is planned, then it is necessary to thoroughly clean the existing recesses, cut cracks or crevices to a width of at least 5 mm so that the concrete solution can freely penetrate into them when pouring.
- If the screed is floating or on a separating layer, then all defects must be repaired immediately. You should not leave voids under the waterproofing layer - condensation can accumulate there, and these areas of high humidity are likely to become a “problem area”.
Defects are sealed using a repair compound, epoxy putty or ordinary concrete mortar. In case of large defects, polyurethane foam can sometimes be used.
Sealing cracks and sinkholes in old subfloors
The corners between the walls and the floor are especially carefully checked and repaired - water from the concrete solution when pouring the screed can penetrate deep into the ceiling or even leak to the neighbors below.
Primer for concrete surfaces
- Then, in any case, the surface of the ceiling should be treated with a penetrating primer. This measure will additionally remove dust from the surface of the slab and improve its adhesion to the concrete being poured. In addition, the ceiling will not actively absorb moisture from the solution. This is extremely important. A lack of water in the layer of wet concrete adjacent to the base will lead to incomplete maturation of the cement stone, and the screed will peel off or collapse under even minor loads.
Priming the floor surface before pouring the screed
The soil is poured over the surface in strips and evenly distributed with a roller. In hard-to-reach places, for example in corners, it is better to use a brush.
- An elastic damper tape is glued along the perimeter of the walls. It will become a compensator for the expansion of the concrete screed, which will prevent its deformation or cracking. In addition, under no circumstances should the screed come into contact with vertical structures, be they walls, partitions or columns.
Damper tape is glued around the entire perimeter
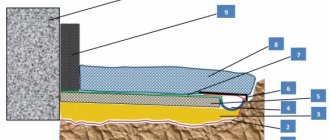
- If the screed is on a separating layer, then first the entire surface of the ceiling is covered with a dense polyethylene film, at least 0.2 mm thick. The strips are overlapped by at least 100 mm. The joints must be taped with waterproof construction tape. You need to try to very carefully lay the film in the corners so that strong wrinkles and folds do not form - air “pockets” may remain there. The edges of the film on the walls should be 5 ÷ 10 mm higher than the planned screed - it will be easy to trim them later.
Schematically - waterproofing film and damper tape for screed on the separating layer.
After the polyethylene is laid, the damper tape is glued - just as mentioned above.
Beacon system and reinforcement
To achieve horizontal screed and its required height, it is necessary to create a system of beacons along which the concrete mortar will be leveled.
Definition of zero level
It’s very good if you have a laser level on your farm or if you have the opportunity to borrow one from friends. In this case, the work will be significantly simplified - it will be much easier to cut horizontal stripes on the walls and control the level of alignment of the guides.
The presence of a laser level will greatly simplify the work
If this is not possible, then you can set up beacons just as well using a water level and a regular building level.
Time-tested hydraulic level
The water level consists of two cylindrical transparent vessels with the same scale applied, connected by a long elastic thin hose. According to the physical law of communicating vessels, the liquid level in them is always at the same height from the horizon. Thus, having made one mark at a certain level, it can be transferred with high accuracy to other surfaces within the length of the flexible hose.
Marking begins by determining the zero level of the future screed. To do this, first of all, you need to draw a basic horizontal line. This is done as follows:
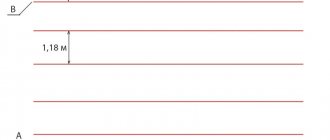
- The estimated highest corner of the room is visually determined. A mark is made on the wall in this corner at an arbitrary height. It is better, of course, to make it so that it is as convenient as possible to work, for example, one and a half meters from the floor.
Making marks to draw a horizontal baseline
- Using a water level, this mark is transferred to all walls of the room. The distance between the risks should allow you to connect them with a line using an existing ruler (you can use a long building level or a pure rule).
- The drawn line should run along the entire perimeter of the room and close at one point - this will indicate the correctness of the measurements.
- Measurements are taken from the applied baseline to the floor surface. Measurement points are usually every 0.5 m. It is imperative to ensure that the measurement is carried out strictly vertically. The obtained values need to be written down (on a piece of paper or even on the wall with a pencil).
The measurement point that gives the minimum height of this distance will correspond to the highest section of the base.
An example of how to mark the zero level
- The thickness of the future screed is subtracted from the obtained value at the highest point (minimum 30 mm). For example, the minimum height is 1420 mm. We subtract the thickness of the screed (30 mm) and get 1390 mm. This is the distance from the plotted reference line to the zero level.
- Now it will not be difficult to draw the entire zero level line around the perimeter of the room - to do this, you need to measure the resulting value from the base down, mark the points and connect them with a straight line. To simplify your work, you can make a template and quickly move the marks from the base line. After connecting them, you get the main line of the zero level.
- In construction practice, it is rare, but it still happens, when in the center of the room the floor level is slightly higher than at the walls. This must be checked by pulling the cord at the zero level between opposite walls and measuring the height from it to the floor. A similar check should be carried out in several places. If it is determined that there is a hill in the center, it will be necessary to shift the zero level upward to ensure the minimum permissible thickness of the screed over the entire area of the room.
Marking for beacon system
It is advisable to mark the beacons and guides immediately after hitting the zero level, guided by the following principles:
- The orientation of the guides should correspond to the intended direction of the most convenient pouring of the screed. This is usually done along the room, from the far wall to the exit.
- It happens that due to the complexity of the room configuration, it will be necessary to change the direction of pouring in a certain area. This should also be immediately taken into account when marking beacon lines.
- The distance between the wall and the parallel guide closest to it is usually maintained no more than 250 - 300 mm. If you leave it large, a poorly leveled area or even a failure may form along the wall, which will require additional intervention later.
The rule should protrude approximately 200 mm from the guides on each side
- The distances between adjacent guides are not particularly regulated. The main thing is that the leveling rule installed on them protrudes on both sides by about 200 mm. The guides should not be spaced too far apart - quite large gaps may appear in the center between them after the hardening concrete shrinks.
- I distribute the guide lines across the width of the room, usually at the same distance from one another.
How to set beacons and zero level guides
Previously, various improvised materials were used as guides for the beacon system, for example, wooden blocks or unnecessary pipes. Today, metal profiles are mainly used for these purposes.
- Thus, galvanized U-shaped profiles from plasterboard systems perform very well. They are resistant to deflections and create a reliable “rail” for working as a rule.
- Plaster profiles are very popular, although they are not without some disadvantages. They have a stiffening rib, but on long sections when working as a rule, they can still sag. Therefore, when using them, the number of support points must be increased.
- In some cases, you can do without using profiles altogether.
There are many ways to install a beacon, and it is impossible to consider everything. Let's look at just a few of them.
- One of the most accurate and simplest is using self-tapping screws.
— At the far end of the room, at a distance of 250 - 300 mm from the corner between opposite walls, a strong cord (for example, a fishing line or a thick nylon thread) is pulled strictly at the zero level. It is important to tighten it as much as possible so that there is no sagging in the center.
Setting self-tapping beacons to zero level
— At the intersection of the line of the extended cord with the line closest to the wall, the guide, a hole is drilled in the floor, into which a plastic dowel is hammered and a self-tapping screw is screwed in. Using a screwdriver, it is screwed in so that the upper edge of its cap exactly coincides with the zero level.
— A similar operation is repeated on the opposite side of the room, closest to the exit.
— Two self-tapping screws defining the guide line are connected to each other with a tightly stretched cord, so that it runs along the top of their heads.
— On this section, mark and drill holes for dowels, distributing them evenly so that an interval of 350 ÷ 400 mm is maintained between them.
— Self-tapping screws are screwed into dowels until their heads coincide with the tensioned cord. A check must be carried out using a building level - if necessary, the required adjustments can be made.
— In the same way, a line of screws is made on the opposite guide, and then on the intermediate ones. In this case, the check must be carried out in all directions - longitudinal, transverse and diagonal.
— Once the same zero level has been reached along all lines, the stretched cords are removed. Prepare a thick concrete solution. It is laid out in small slides along the line of screwed-in screws. Then a U-shaped profile is put on top and pressed into the solution. The transverse flange of the profile should rest against the head of the screw. It is important that the profile “sits” evenly on both sides, without distortions.
Installation and fixation of metal profiles - guides
— After the solution has set and securely fixed the profiles in the installed position, you can proceed to pouring the screed.
With plaster profiles it turns out to be somewhat more complicated - it is more difficult to fix them using the heads of the screws. For these purposes, special fastening elements can be used - “eared” ones, which are placed on self-tapping screws, and their petals are used to crimp the side flanges of the profile.
Video: placing beacons using self-tapping screws and “eared” fasteners
Another subtlety is that plaster profiles also have their own height, and this must also be taken into account when setting the screws to the zero level.
In addition, much more fixing solution will be required - to the point that I even resort to laying out a solid shaft into which the profile is embedded with emphasis on the screw heads.
Fixing thin plaster profiles with mortar
- Some craftsmen are accustomed to doing without metal profiles altogether.
“They tie the exposed self-tapping beacons together with thin wire, thereby creating a kind of reinforcement frame. Then the solution is laid out along the entire line in a slightly excess quantity, so that the resulting shaft is slightly above the zero level.
— When the solution begins to set, a guide plane is formed. Using the rule, the upper edge of this shaft is compared and smoothed down to the screw heads.
- After hardening, you will get excellent guides along which you can work as a rule, and then they will enter the structure of the poured screed.
- If the screed is carried out over laid waterproofing, then the self-tapping method becomes inapplicable - the tightness of the film cannot be broken, and in addition, there should be no rigid adhesion of the new screed to the base. In this case, you will have to tinker more, laying out piles of mortar and accurately inserting the guides at the zero level along the stretched cords.
To speed up the readiness of the beacon system, tile adhesive is often used instead of conventional mortar - its hardening time is much shorter. But gypsum compositions are unacceptable. Firstly, they practically do not shrink, unlike cement ones. Secondly, gypsum compositions have completely different indicators of water absorption, adhesion, strength, ductility, etc. We can say with 100% certainty that cracks will appear on the screed at the locations of the beacons.
Nuances of screed reinforcement
Of course, this measure is useful, especially with thick ties. Most often, a metal mesh made of galvanized steel wire with cells from 50 to 100 mm is used for this - it can be purchased ready-made in stores. Only when placing it, many people make a serious mistake.
If you look at numerous photographs on the Internet, you can see a mesh laid directly on the floor slab or on a layer of waterproofing. There are many doubts about the usefulness of such reinforcement. Ideally, for the reinforcing belt to play its role, it should be placed in the thickness of the mortar being poured, approximately in the middle of the height of the screed.
Two mistakes at once: the reinforcement lies on the floor surface, and the beacons are installed on gypsum mortar
To do this, you can purchase special polymer stands. However, it will not be difficult to make supports from wire or even to raise the mesh on linings from pieces of broken tiles or fragments of old concrete screed. Wooden pads should not be used under any circumstances.
Convenient polymer stands for installing reinforcing mesh
Obviously, it is necessary to install the reinforcing grid before setting the guides. Most often, the installation of the beacon system and reinforcement is carried out in parallel, and the mesh can also be fixed on those piles of cement into which metal profiles are embedded.
Video: Some more tips for installing a beacon system
Filling the screed
Oddly enough, the process of pouring the screed itself looks, in the series of all technological operations, probably the most uncomplicated. If all the preparatory work is done correctly, then this stage will not be difficult.
- For normal pouring and hardening of the screed, the optimal temperature is from 15 to 25 degrees. It is also possible to carry out work at lower temperatures (but not lower than +5), but the maturation period of concrete will increase significantly. In too hot weather, it is also better to refrain from pouring - = the top layer can quickly dry out and crack. It does not like screed and drafts, although the access to fresh air cannot be completely blocked.
- It is best, of course, to work together - one is preparing the concrete solution, and the second is directly pouring and leveling the screed. The technology for mixing the solution has already been described above.
- Work is carried out from the far corner of the room, gradually moving towards the exit. You should try to complete the pouring within one working day - this way the screed will be as uniform and durable as possible. If for some reason this is not possible, then the floor surface is divided in advance into sections (they are called fill maps) with jumpers installed between them.
- The finished solution is spread in excess quantities between the guides, so that its layer is 15 - 20 mm above the zero level. Initial distribution is carried out using a trowel or shovel. It is imperative to ensure that there are no empty spaces left - this often happens under guides, under reinforcement bars or in corners. It is necessary to achieve maximum compaction of the concrete solution and release of air bubbles from it. To do this, you can carry out “bayoneting” - the solution is pierced with a shovel or trowel before leveling.
- Next, a rule is set on the guides. Using forward and transverse zigzag movements, the solution is leveled to the level of the guides, so that a flat, smooth surface is obtained.
Directions of movement as a rule
If the sand has not been sifted and large fragments (pebbles or shells) remain in it, then certain difficulties may arise - these inclusions can leave grooves and you will have to suffer a lot, removing them and smoothing out the unevenness in order to bring the surface to an ideal state.
After the rule, there should be a flat, smooth surface
Concrete mortar is added as needed so that work continues uninterrupted. Excess mortar is carefully removed at the end of filling the room.
Video: a visual example of pouring screed along beacons
After the filling is completed, it is necessary to take measures to prevent accidental entry of people or pets into the premises during the first 5 to 7 days. In order for the ripening process to proceed effectively, the surface must be moistened with water daily (starting from the second day), keeping it moist. In extreme heat, it makes sense to cover it with film after initial setting to avoid drying out.
If a regular sand-cement mortar was used, then the readiness of the screed to withstand operational loads can be said no earlier than after 3 weeks. When using dry building mixtures, the timing may be different - they must be indicated in the attached instructions.
After the screed is ready, it is checked for evenness and surface quality. To do this, set a rule on the embedded guides and measure the resulting gap in the center. There is no escape from concrete shrinkage, and if the gap does not exceed 1 - 2 mm, then this will be within normal limits.
Often a thin layer of self-leveling compound is poured over the screed to make the surface perfectly smooth. However, this is a topic for separate consideration.