In the case of individual construction, the factor of saving money aimed at purchasing building materials and laying a foundation is very important. For small houses and garden buildings, a foundation of brick columns is often built. Support poles are made from different materials: concrete, wood and even asbestos pipes. Usually, after the completion of the construction of various objects, there are a lot of leftovers, from which it is quite possible to build a columnar brick foundation with your own hands for various outbuildings.
What kind of brick is needed for the foundation
Red and silicate bricks are used in construction. Columnar foundations made of bricks are in direct contact with the ground. Silicate material has increased hygroscopicity, that is, silicate can actively absorb moisture from the surrounding soil. As a result, the silicate masonry will quickly collapse.
Red brick is made hollow and monolithic. Hollow masonry, due to the presence of internal voids, has a low load-bearing capacity. Masonry made from this material is used to construct partitions.
For the construction of columnar foundations, red burnt solid brick is chosen. Its standard size is 250x120x65 mm. The construction industry also produces one-and-a-half bricks - 250x120x88 mm.
Before starting the construction of pillars, you need to select masonry material of the same size. If you have to use bricks of different sizes for masonry, it will take a lot of time to adjust the height of each pillar to the same level as the rest of the foundation.
Standard red brick
Choosing the right brick
Today, the most popular materials are silicate and ceramic bricks.
Today, the most popular materials are silicate and ceramic bricks. The first type is characterized by a low level of resistance to moisture, which leads to dampness and cracking in frost. It is for this reason that you should not choose this type for a wet area, as deformation or damage to the material may occur. This problem, of course, can be corrected with your own efforts, but these actions will be expensive and difficult to perform.
For construction tasks of building a foundation, red ceramic bricks are best suited. But, I would like to immediately note that this does not apply to all types of such material. Some manufacturers of such bricks save money on the firing process. It is worth noting that it is almost impossible to notice such a defect with the eye - this will only become possible during operation.
You can also look for a clinker type of brick, which can be fired at a high temperature level of approximately 1200 degrees. It is for this reason that the material is very high quality and durable. Its main advantage is the ability to withstand moisture and frost. This type is also called paving brick because it is used for laying sidewalks and bridges.
Advantages and disadvantages of a columnar foundation
Like any building structure, columnar foundations have a number of advantages and disadvantages.
Advantages
The advantages of brick pillars include several points:
- installing a brick foundation for a house is possible on almost any terrain;
- the ease of erecting supports is accessible to anyone who has minimal experience in construction;
- the high bearing capacity of the foundation makes it possible to build quite massive structures and buildings on them;
- provided that high-quality waterproofing is performed, the foundation can last up to 60 years or more without major repairs.
Flaws
The disadvantages of this type of base include the following:
- this type of support is not installed on moving and weak heaving soils;
- It is not advisable to erect pillars in areas with a height difference of more than 2 m;
- high labor intensity of masonry in cramped conditions.
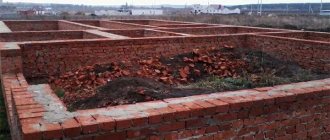
We create a brick foundation with our own hands
Having determined the purpose of the building, they decide to erect a ribbon or pillars.
But in any of the options, waterproofing is required. The old proven bitumen, rolled roofing felt, is well suited for this. For additional protection from moisture, dig a trench and lay a drainage pipe in it.
Let's look at step-by-step instructions for creating each type of brick foundation.
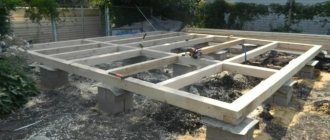
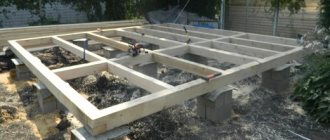
Stages of construction of a columnar foundation
Its strength is sufficient for light structures:
- small country houses made of logs;
- plank utility blocks;
- summer shower and toilet;
- gazebos.
It’s easy to lay such a foundation yourself, armed with guidance from experienced builders. Its price is affordable, and there is no need to make a blind area.
Before starting work, we advise you to take into account the following recommendations:
- For a one-story frame house, pillars measuring 38*51 or 38*38 cm are sufficient.
- If this is a summer kitchen with an attic, then the dimensions of the supports are increased to 51*51 cm.
- Cement grades M400 and M500 are best suited for mixing the solution.
- The bottom of the holes must be leveled, compacted and geotextiles laid. It will become an obstacle to the penetration of moisture into the foundation, will not allow sand to go into the ground, and weeds will not grow.
- A cushion of crushed stone and sand is formed on top, and roofing felt is laid.
- After this, they begin laying the pillars in the proven old-fashioned way.
- Every 4 rows it is recommended to strengthen the supports with a layer of wire mesh.
- To ensure that all columns are in the same plane, each laid out row should be checked with a building level.
An important feature that is worth considering is that the supports under the load-bearing walls are made much thinner, approximately 25*38 cm.
A detailed guide to building a columnar foundation for a gazebo.
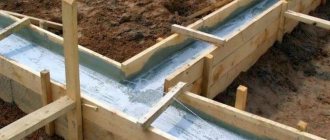
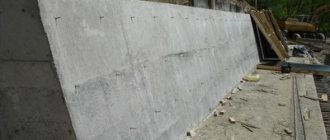
Construction of the ribbon
The choice in favor of this foundation is possible if you plan to build a building with a ground floor, basement, or attic on the roof. Walls can be built from stone or reinforced concrete.
According to the experts, the tape is a reliable foundation not only on hard ground, but also on sandy, heaving loam. The main thing is to perform high-quality reinforcement.
You can learn in detail about the pros and cons of strip foundations and the step-by-step installation method by reading the article: “Types of strip foundations.”
Depth of foundation brick columns
A columnar foundation can be made shallow or built with a base below the freezing level of the soil. Burying the pillars below the freezing layer of soil is required in the presence of weak heaving soils. Under these conditions, brickwork can be subject to significant deformation. The base of the pillar in the freezing zone will be exposed to groundwater due to changing cycles of freezing and thawing of the soil.
Approximate values of freezing depths for regions of Russia are presented in the table:
| № | Some regions of Russia | Average freezing value, mm |
| 1 | Surgut, Vorkuta, Nizhnevartovsk | 2400 |
| 2 | Kustanay, Petropavlovsk | 2000 |
| 3 | Samara, Uralsk | 1600 |
| 4 | Rostov-on-Don | 900 |
You can check this information for your region by contacting your local architecture department. Soil freezing depths are indicated in the table without taking into account the thickness of the snow cover. With a large thickness of snow on the soil surface, the ground freezes much less. For this, an adjustment is made to the depth of the columnar foundation downward.
Seasonality of foundation work
A feature of the construction of columnar foundations made of bricks is that the finished foundation cannot be left without load in the winter. If this is not done, then in the spring the height of each pillar may change and its spatial position may be disrupted.
Brick pillar
The construction of the foundation must be carried out within one season and not interrupt the process of further construction. Only in this case will the developer be guaranteed against the occurrence of the above negative phenomena.
Scope of application of a columnar brick foundation
The advantages of a brick columnar foundation are quite numerous:
- Short construction period;
- Low cost of building materials;
- The ability to perform work independently, without the involvement of specialists;
- No need to use specialized equipment;
- The service life of the foundation is 30-50 years (depending on the type of soil, its moisture, and the quality of the material).
So we can say with confidence that brick is perfect for constructing columnar foundations for low-rise residential buildings, bathhouses, garages and other buildings that exert relatively weak pressure on the ground. However, with proper design and construction, a brick foundation is capable of transferring the load from a wooden two-story house to the ground, not to mention frame houses and small outbuildings.
Layout
Brick columns can withstand the vertical load from the weight of a one-story house of any design. The following is taken into account when planning:
- For a foundation made of brick columns, supports with a cross section of 380x380 mm are used.
- The pillars are placed in the corners of the building, at the intersection of load-bearing walls and partitions.
- In special cases, more massive pillars are erected at the outer corners of the house from rows of masonry in 2 bricks with a section of 630x630 mm or a rectangular section of 380x520 mm.
- Along the line of load-bearing walls, supports are placed in increments of no more than 2 m.
- If the load from the weight of the building exceeds the standard values, metal pipes are installed inside the pillars.
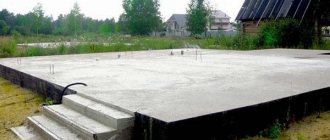
Monolithic slab foundation
This type of foundation is one of the most reliable and durable, suitable for installation on any soil. It can be used to construct heavy and light buildings, but it is especially popular in frame-modular construction.
Such a monolithic foundation has a thickness of 15 to 50 cm, depending on the weight of the house, its number of storeys, and requires preliminary preparation of a foundation pit, at the bottom of which a sand and gravel cushion is placed.
Before pouring the foundation with your own hands, you need to prepare reinforcement with a cross-section from 12 to 25 mm, depending on the planned loads on the foundation of the house, in addition, you will need to prepare cement of a grade not lower than M400.
In this case, uniform distribution of both vertical and horizontal loads on the ground will be guaranteed, which will ensure the stability of the building and protect it from deformation.
You can make the solution at the construction site, but this will require a powerful concrete mixer, since the continuity of the pouring process must be maintained. Therefore, it is more rational from a production and economic point of view to place an order to a concrete plant with an exact indication of the delivery time to the site.
In this case, you can be sure that all the necessary proportions of concrete for the foundation will be observed and then no problems will arise with the house built on it. For slab foundations, exclusively branded concrete should be used, class not lower than B15.
In the case when the question of which foundation is better for a house made of aerated concrete is being decided, then you can consider this option, but given that its cost is quite high, it is used mainly when constructing another type is simply impossible.
It should be noted that a monolithic foundation can be:
- solid;
- ribbed, caisson type, lightweight design with stiffening ribs for load-bearing walls and spaces between them filled with sand and gravel mixture;
- Swedish, which is a combined structure with the laying of communications and thermal insulation, most often in the form of water floor heating.
Calculation of the number of brick supports
The total supporting area of the building is calculated by the formula:
S ≥ KNF/KCRO, where:
S – building base area (cm2);
F – full load from the weight of the house (kg);
KN – safety factor (constant value equal to 1.2)
KC – operating condition coefficient;
RO – design resistance of the soil foundation (kg/cm2).
Having received the total area of the base of the foundation, it is divided by the area of the base of one pillar. As a result, the optimal number of required columnar brick supports is obtained.
Technology for constructing brick pillars
Before starting work, it is necessary to draw up a plan for the stages of foundation construction, which includes preparatory activities and the actual implementation of the main work.
Preparing to build the foundation
It is necessary to prepare the following materials and tools:
- red burnt brick grade M-150 or M-200;
- clean washed sand without clay inclusions;
- crushed stone of medium fraction;
- cement M-400;
- roofing felt or roofing felt;
- bitumen mastic;
- reinforcing mesh;
- water;
- to prepare cement mortar, prepare a concrete mixer or a suitable container for mixing the mortar manually;
- shovels, trowels;
- vibrator or tamper.
An example of a shallow brick pillar
Stages of work
The stages of work are arranged in the following order:
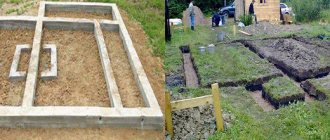
- According to the drawing, the location of the pillars is marked on the site.
- Using a cord and wooden pegs, mark the centers of the supports.
- The building plan is usually a square or rectangle. The correctness of the site marking is checked by measuring the diagonals between the opposite corners of the marking. The permissible difference in the lengths of the diagonals should be no more than 20 - 30 mm.
- Holes are dug at the centers of the support markings. They must be of such a size that the worker can freely carry out masonry work.
- Using a level, they achieve leveling of the bottom of the holes to the same level.
- Crushed stone 100 mm thick is poured into the bottom of the pits. A cement screed 50 mm thick is made on top of the compacted crushed stone. The size of the sides of the square preparation must be at least 50 mm wider than the base of the post.
- The pillow is covered with roofing felt.
- Finally, check the level of the pit cushion with a level.
- Start laying brick pillars.
- Reinforcing mesh is laid after 2–3 rows of masonry. Each row is leveled, both horizontally and vertically.
- A week after the completion of the masonry, the voids around the pillars are backfilled. The backfill is made of gravel, crushed stone or sand.
- The masonry is made protruding above the ground in several rows. The openings between the supports are covered with a brick wall or other sheet material.
Video “Construction of a brick columnar foundation for a barn”:
Strengthening the load-bearing capacity of support pillars
During the laying process, a cavity with a square section of 130x130 mm is formed inside the column. The cavity is filled with mortar every 2–3 rows of masonry. The gaps are filled with rubble (brick fragments or crushed stone). This is done not only to save mortar, but also to avoid bursting the walls of the column with a large mass of liquid cement. Each layer of mortar and rubble must be compacted with a handy tool - a piece of reinforcement or a suitable tamper.
To increase the load-bearing capacity, a metal pipe is inserted inside the column. It is convenient to use a pipe with a diameter of 80 - 100 mm as an internal support. At the end of the laying, the upper part of the pipe is cut off. Concrete solution is poured inside the pipe with layer-by-layer compaction. Compact every 300 mm of concrete pouring.
Construction technology of insulated slab
In order to protect your house from heat loss, you can create insulated slab foundations with your own hands - step-by-step instructions and drawings will help you implement this task in a short time. Any reinforced concrete monolithic slab includes several layers, and if there are insulating elements, their number increases
To obtain the required quality, it is important to create each level correctly
Preparing the base
At the initial stage, the foundation is prepared. The parameters of the pit must correspond to the size of the building and be 1 m larger. In a designated area, a layer of fertile soil is removed, and drainage pipes are fixed along the edges of the pit to drain surface water.
The bottom is carefully leveled, the holes are filled up, and the hills are removed. A layer of geotextile is laid on the treated surface - it should cover the bottom and walls of the pit.
Next, clean sand of the middle fraction is poured out in a layer of 20-30 cm. A vibrating plate is used to compact it. Crushed stone is poured on top in an even layer, followed by compaction. At the preparatory stage, all engineering systems should be installed.
Concrete preparation
Along the perimeter of the recess, formwork is installed from boards 40 mm thick or plywood with parameters of 18-21 mm. The height of the structure is determined taking into account the thickness of the remaining layers. It is convenient to monitor the level of concrete mortar along the edges of the formwork, so it is better to use an edged board. A 100 mm layer of concrete is placed on the gravel bed.
Low grade material is suitable for this work - B7.5 or B10. The presence of a concrete layer will provide a reliable basis for hydro- and thermal insulation.
Waterproofing
Since the monolithic foundation slab for a private house is buried in the soil, it must be covered with a layer of waterproofing. For these purposes, coating and roll insulation is used. The base must be cleaned of dust and then soaked in kerosene or solvent. When fixing the roll, it can be released beyond the limits by 10-15 cm.
Insulation
Extruded polystyrene foam with increased density is used as an insulating material for the foundation. This layer should be 10-15 cm thick. The exact parameters depend on the operating conditions.
Reinforcement
The role of the reinforcing element is performed by class AIII ribbed reinforcement with a diameter of 12-14 mm. It is laid lengthwise and crosswise, observing a step of 15-30 cm. Reinforcement parameters are determined by separate calculations. The reinforcement process creates a cage.
Pouring concrete
The parameters of the slab can vary depending on various factors and vary from 20 to 50 cm. It must be filled with B30 grade concrete mortar in one go, excluding the appearance of vertical joints.
It is better to order concrete for delivery and distribute its portions in advance. The material must be compacted using deep vibrators with high-frequency vibrations.
Curing
The construction of a slab foundation requires proper pouring after it has been poured. In order for the raw material to harden well, you need to maintain humidity within 90-100% and temperature +5ºС. It is better to fill in in warm weather at +20ºС.
Subsequent care involves handling the slab carefully to protect it from damage. After laying, the concrete is covered with a blanket or a layer of tarpaulin, which is necessary to protect it from direct sunlight and wind.
When to remove formwork
Dismantling of formwork for FBS is carried out after the concrete has reached 70% of the factory strength. The exact term is determined by the ambient temperature.
Waterproofing of supports
The installed columns must be covered with waterproofing. To do this, the side surfaces of the brickwork are coated with hot bitumen mastic. Pieces of roofing felt or roofing felt are glued onto the mastic.
Before installing grillage structures, the horizontal surface of the pillars is also covered with roofing felt on hot bitumen mastic.
Properly done waterproofing will protect the brick from moisture penetration, thereby significantly increasing the service life of the columnar foundation.
Installation of a grillage on a columnar foundation
The grillage along the pillars is made of wooden beams, monolithic concrete and rolled metal.
Wooden beam
The timber is laid out on metal embedded parts secured to poles. The wooden beam is fixed with self-tapping screws through holes in the embedded parts or in another way.
The wooden grillage is supported on posts covered with roofing felt. Typically, grillage wood is used for the construction of small outbuildings.
Monolithic tape
Construction of a monolithic grillage
A reinforcement frame is placed in the wooden formwork. In the places where the pillars rest on the metal pipes, holes are made in the bottom of the formwork. The metal frame is attached to the pipes by welding or binding wire.
After this, concrete is poured into the formwork. After 28–30 days, further construction begins.
Decorating screw piles with facing bricks
In some projects, screw piles act as supporting supports for second-floor structures (balconies, large terraces, etc.). The appearance of black metal pipes is unattractive. In such cases, metal supports are decorated with facing bricks.
The masonry around the pile in the underground part is made of red brick, and above the ground is made of ceramic cladding.
Building a columnar foundation made of brick is much more profitable than installing a monolithic strip or using other materials. Properly constructed brick piers can last up to 100 years.