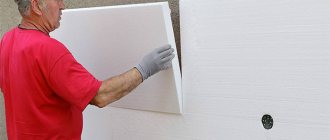
Facade plaster for aerated concrete in the decoration of houses made of cellular lightweight concrete is necessarily used due to the high hygroscopicity of the block and the need to protect it from moisture. Thanks to plaster, it is possible to significantly extend the service life of the material, make it resistant not only to moisture, but also to various weather influences, and also prepare it for applying the finishing layer or implement decoration at this stage.
Aerated concrete today is highly popular on the market due to such advantages as a high level of thermal insulation, relatively low cost, simplicity and ease of installation, and the ability to save on the foundation and all stages of construction. But, along with a lot of advantages, aerated concrete also has certain disadvantages - first of all, we are talking about the ability to absorb moisture and then collapse under its influence.
Aerated concrete has a cellular structure with open pores, so moisture entering the material remains in the structure, then freezes, expands and deforms the material. In order to protect aerated concrete blocks from moisture, plastering is done, but the mixtures are chosen so as not to impair the vapor barrier characteristics of aerated concrete, due to which an optimal microclimate is created in the house, condensation does not accumulate, and mold and rot do not appear.
Basic requirements that plaster for aerated concrete walls must meet:
- Adhesion to the block surface is around 0.4 MPa.
- Vapor permeability – in the range from 0.17 to 0.2 mg/(m*h*Pa).
- Frost resistance – from 50 cycles.
- Water absorption is less than 5% of weight.
- The strength of the hardened mass is about 0.29 MPa.
- The density of the hardened mass is from 500 to 1000 kg/m3.
- Compressive strength - class CS
- Resistance to all external negative factors.
- High thermal insulation properties.
- A decorative appearance if facade plaster on aerated concrete acts as a finishing layer and does not involve the use of other materials.
The following properties are also desirable: rapid drying of the plaster layer when wet, the ability to maintain integrity with the risk of slight cracking of the masonry and the presence of cracks up to 0.3 millimeters.
When to do plastering work
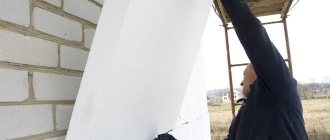
External plastering is recommended after completion of finishing work in the building. It is generally accepted that if the surface of aerated concrete blocks is not protected from the street, it will absorb moisture. This is not true; primed walls can stand without a protective layer for a whole winter; when the climate changes in the spring, the moisture from the surface will evaporate. In the opposite case, when the house is treated from the facade, evaporation vapor will be directed into the room, which will lead to the appearance of dampness.
Note! An exception is the option of building a house on the seashore or pond. When it is necessary to protect external walls from the influence of humid climates and winds.
Before plastering, the walls made of aerated blocks must dry thoroughly. If during the construction process a cement mortar was used, which has the ability to absorb moisture. For this reason, exterior decoration will not be effective during the rainy season. But especially dangerous for walls is cold water, which then turns into ice. During the melting process, the structure of aerated concrete begins to collapse.
Requirements for plaster
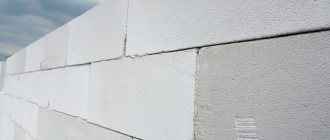
Aerated concrete has a cellular structure with open pores, which provides not only thermal insulation properties, but also high vapor permeability. Thanks to this quality, an optimal microclimate is created inside the house, the accumulation of condensation is eliminated, and the risk of mold development is minimized.
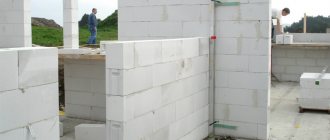
Aerated concrete walls
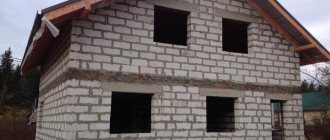
House made of aerated concrete
But there is also a downside: open pores increase the hygroscopicity of the material, and absorbed water destroys the cells when freezing. For this reason, the exterior finish must be waterproof in order to reliably protect the walls from moisture, and have a vapor permeability no lower than that of aerated concrete, so as not to prevent the escape of fumes.
Cons of aerated concrete
Important! According to the standards prescribed in SP 50.13330.2012, in heated houses, the vapor permeability of materials should increase from internal to external layers. Only under such conditions is normal functioning of load-bearing structures possible. Since for aerated concrete this parameter varies between 0.11-0.23 mg/(m h Pa), the plaster composition must be selected with a vapor permeability of at least 0.12 mg/(m h Pa).
Additionally, facade plaster must have the following qualities:
- high adhesion to the base material;
- frost resistance (minimum 35 cycles);
- increased compressive strength;
- resistance to atmospheric influences;
- decorativeness.
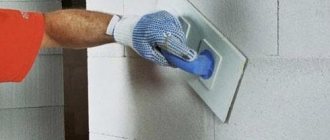
Decorative plaster Plastering process
In principle, aerated concrete surfaces can be used without a protective coating, but after a few years the external attractiveness will disappear: the blocks will darken, peeling will appear, and mold may develop. So it is better to immediately complete the façade finishing and then only periodically update the coating by painting.
Renewing plaster by painting
Prices for aluminum stairs
Aluminum ladder
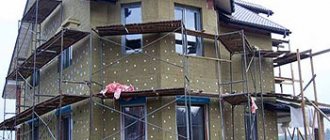
Facade insulation
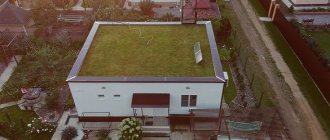
If the building is properly insulated, you can heat the room faster and save money on heating costs. It is recommended to insulate the outside with mineral wool, polystyrene foam, polystyrene foam or other options. For example, the insulation and plaster of the facade of a house can be replaced by building an additional brick wall or treated with liquid polyurethane foam.
Is it necessary to insulate the facade before plastering?
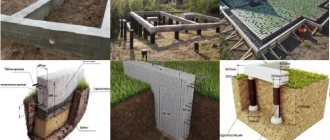
Before carrying out plastering work, the facade of a house made of aerated concrete blocks should be insulated if:
- Construction is taking place in areas with severe winter conditions.
- The blocks were installed not with special glue, but with cement-sand mortar (the seams are large, cold bridges are formed and heat loss occurs).
Mineral wool will best perform the insulation function. It's all about vapor permeability. To prevent condensation from occurring. This insulation is attached with glue, without additional drilling and installation of the frame, which is also very convenient.
Mineral wool will best perform the insulation function.
Types of plasters
There are several types of plaster that are suitable for treating aerated concrete walls. There are certain requirements for mixture compositions for outdoor work.
- The material must be permeable and its coefficient must be higher than that of the surface being treated - aerated concrete or sealant.
- The plaster must be resistant to frost and temperature changes.
- To prevent cracks, the applied layer must be elastic.
- The plaster must have strong adhesion properties to aerated concrete.
Mineral
How to plaster aerated concrete walls? Professionals and private builders recommend using mineral-based plaster compositions. They are among the thin-layer compositions specially created for finishing aerated concrete. Such solutions are made with your own hands; they are affordable, have good vapor permeability and are light in weight.
Ready-made formulations include the following components:
- lime;
- white cement;
- marble chips and other fillers.
The color palette of such plaster mixtures is limited. They can be easily painted; the only caveat is the use of vapor-permeable coloring compounds. Painting can protect the coating from moisture, because a damp environment can destroy mineral plasters.
Plaster vs putty: why plaster aerated block walls from the inside
It's no secret that the lion's share of the costs when building a house is spent on interior work. For many years, plastering for stone houses was a mandatory step and the only way to prepare walls for further finishing. The situation with brick houses today has not changed much, except that the plaster compositions have been improved. With aerated concrete blocks, under certain conditions, an alternative is possible - thin-layer compounds or, simply, putty. Is it possible to do without a thick layer of plaster and what exactly to replace it with – say the participants of our portal.
auggust_70 FORUMHOUSE Member
I have seen a lot of information and please share your experience, who has done this (putty immediately without plaster) and what are the disadvantages, maybe operating experience (heated/unheated room)? The main disadvantages for finishers and sellers of building materials are clear - lack of work (I predict sharp criticism, especially for finishers), but from the point of view of quality and operation?
Introductory: a house made of aerated blocks from a fairly well-known manufacturer, D500, 400 mm, the quality of the masonry is at the level (differences in the region of several mm), the walls are cleaned and conscientiously primed. And auggust_70 does not understand what is the point in thick-layer plaster in his case, if the wall with thin-layer masonry is almost uniform and even.
A very informative answer.
Sleng FORUMHOUSE Member
Because it is necessary. Plaster serves not only to level the surface.
Yes, in a general sense, plaster has a wider functionality:
- leveling walls;
- sealing seams;
- insulation;
- protection;
- hardening.
In a situation with correctly and neatly built walls made of high-quality aerated concrete:
- alignment is redundant;
- sealing is quite possible with starting putty or an adhesive mixture along the seams;
- there is no need for insulation; aerated concrete is either not insulated at all, or it is thoroughly insulated from the outside;
- protection may be required in rooms with a specific operating mode, but not in living rooms;
- strengthening with voiced input is excessive, but not everyone is so lucky with the material.
PapaSer FORUMHOUSE Member
I would like to get some kind of wall strength when plastering. Otherwise, my block, despite the D600 and B2.5, just crumbles. If you are carrying a board, if it catches it on a wall or, especially, on a corner, it is already a pothole in the full sense of the word. Etc.
In such a situation, plaster is possible and necessary, but it is no less effective, with less effort, money and time, to perform reinforcement with a fiberglass mesh embedded in the adhesive layer. In wet facade systems, this intermediate layer is also called “vandal-proof”, since even relatively soft foam plastic after reinforcement is very difficult to damage on purpose, let alone accidentally.
However, the mesh is not a panacea and should not be used unless absolutely necessary.
Artem Malinin Member of FORUMHOUSE
Same thoughts, why plaster if the walls are smooth?
We have approximately 250-300 m² of aerated concrete walls. It's scary to think how much plaster is needed. I'm thinking of doing this:
- remove all spray and unevenness;
- prime a couple of times;
- putty with mesh.
Palych P34 FORUMHOUSE Member
The grid should not be drowned in everything. If this is not a special adhesive composition, then the mesh can cause delamination rather than strengthening the layer. For ordinary rooms, it is quite enough to retighten with gypsum putty. And without nets. In gypsum materials, and even in a thin layer, the mesh only causes harm. Choose a GB primer with a good dry residue. Preferably at least 11%.
As the topicstarter expected, finishers are strongly against such simplification.
Romann FORUMHOUSE Member
I also approached this process and also in thought. I know builders, and they unanimously shout that it is necessary to plaster, and then putty. There is no other way - everything will crack and collapse. But the neighbor has already done it in a simple way. I covered the seams and small irregularities with starting gypsum putty and went over everything with a branded thin-layer putty. Yes, before that, of course, deep penetration impregnation. So far nothing has fallen off. I'll look at what my neighbor has in the spring. He leaves the cold house for the winter, and I will start plastering (or puttying) in the spring too. But I would like a professional answer. Is it possible or not?
In the rooms you can.
Palych R34
Internal walls do not need to be plastered if the differences are insignificant; puttying is sufficient if the finishing is done with wallpaper or painting. You cannot putty under the tiles. When finishing the interior with aerated concrete in heated rooms, there are no sudden temperature changes (no thermal expansion of materials) and the base behaves stably. Therefore, there is no strict need to level with a thick layer of plaster, with the exception of walls for cladding. The only thing is that the thinner the leveling layer, the more carefully the aerated concrete needs to be primed.
And there is a real positive example of thin-layer preparation.
Voevoda78 Member FORUMHOUSE
This is the third year in a house with such walls, there are no cracks, everything is smooth. The first year we generally spent the winter with heating, consisting of a couple of heaters per floor. Gypsum putty, no cracks, layer maximum 3 mm. The point is to pile tons of mixture onto the walls; the blocks need to be laid down normally right away.
As always, everyone chooses for themselves, but a thick layer of plaster is also not a guarantee of the integrity of the finish; there are dozens of topics on the forum about cracking plaster.
The need for facade plastering of aerated concrete is also not obvious to some and they choose other finishing methods. And of course, you can do without internal plastering if you plan to use liquid wallpaper or cork. The video is about a house made of aerated block with a facade made of acrylic-marble chips.
Subscribe to our Telegram channel Exclusive posts every week
Silicate
This type of building plaster is based on potassium liquid glass, which is a binding component.
Advantages of silicate mixture:
- Easy to apply;
- Resistance to moisture;
- Vapor permeability;
- If necessary, it can be painted in any color;
- Acceptable price;
- Long service life (up to 25 years);
- Decorative qualities.
Silicone
It is better to plaster aerated concrete blocks with façade silicone plaster. It has high technical and performance characteristics and is superior to other plaster mixtures.
The advantages of silicone plasters include:
- properties to repel water;
- the building material is easy to apply with your own hands, without the involvement of specialists;
- plaster has a high degree of resistance to atmospheric phenomena and vapor permeability;
- Long service life;
- Fillers have different textures;
- The material is elastic.
Acrylic
The material has high decorative qualities and durability. The big disadvantage of acrylic plaster for processing aerated concrete and other cellular textures is the low level of vapor permeability. For this reason, condensation forms in the inner layer of the plastered surface. As a result, such exposure causes surface deformation - peeling and cracking.
Cement-sand
Cement plaster is not suitable for treating external aerated concrete surfaces. For what reasons is this popular building material not suitable:
- The solution does not adhere to the smooth surface of aerated concrete due to insufficient adhesion properties. The mixture has high density and high weight;
- When applying cement mortar to the surface, aerated concrete absorbs moisture and the adhesion of the materials weakens. As a result of such rapid drying, the integrity of the layer is destroyed;
- Low vapor permeability of cement mixtures means non-compliance with building codes and violation of optimal microclimatic parameters in residential premises.
If cement plaster is used for interior work, it will protect aerated concrete walls from steam penetration into them.
Important! Expanded polystyrene and polystyrene are not recommended for use on aerated concrete surfaces.
How to plaster aerated concrete surfaces
In order for the repair of an aerated concrete house to last for many years, it is necessary to competently approach the choice of material for finishing the walls inside and outside. Masters distinguish four options for processing walls made of cellular material:
- Gypsum plaster.
- Cement-sand mortar.
- Facade mixtures.
- Drywall.
The last option is the so-called dry plaster. What is better than plasterboard or plaster on aerated concrete walls is a controversial issue. Plastering a surface is a costly and labor-intensive process. Working with gypsum plasterboard takes less time and, as a result, smooth walls are obtained. Procedure:
- vapor barrier of surfaces using polyethylene film, membrane or glassine;
- installation of lathing for fastening gypsum boards;
- fastening drywall to the frame;
- filling joints between sheets using serpyanka tape.
Any type of decorative finish can be applied to an aerated concrete wall leveled in this way. What plaster is best for plastering aerated concrete walls? To answer this question, it is necessary to know the specifics of solutions and their interaction with the base material.
Plaster
The plaster base, which includes gypsum, has the following positive qualities:
- dries quickly;
- the solution does not shrink;
- the mixture goes on smoothly;
- no finishing coat required.
Disadvantages of plastering walls with gypsum:
- average level of vapor permeability;
- a larger amount of water is required compared to special mixtures, approximately 10-15 liters per 1 bag of 25 kg;
- the surface will quickly get wet after rain and snow;
- spots appear on the surface that need to be painted over.
Plaster for aerated concrete
Having summarized the experience of builders and owners of aerated concrete houses, we can conclude that three types of finishing materials are used for plastering walls made of aerated concrete:
Cement-sand plaster for aerated concrete
This is the most famous solution, which has proven itself on other materials, but is not suitable for aerated concrete blocks.
Is it possible to plaster aerated concrete with cement mortar?
No you can not. Regardless of whether the aerated blocks were laid with cement or glue. In general, plastering aerated concrete with cement mortar is extremely undesirable, because aerated concrete is very smooth and the mortar does not stick to it, and also strongly absorbs water from the mortar.
Reasons why you cannot plaster a house made of aerated concrete with cement mortar:
- Cement mortar has a lower vapor permeability rate than aerated block. This is the most important reason why it should not be used. In the case of finishing walls made of aerated concrete, professionals have a rule that they can only use finishing material that, in terms of vapor permeability, does not differ from aerated concrete itself or has a higher indicator than it. Only in this case will the optimal microclimate of the aerated concrete house be maintained.
Note. For the same reason, it is undesirable to use rigid insulation materials (foam plastic and expanded polystyrene) to insulate a house made of aerated concrete.
- Cement-sand mortar has a high moisture content. To mix the components into the sand-cement mixture, you need to add water. It is also obvious that aerated concrete, having a significant moisture absorption rate, will tend to absorb this water from the solution. This, in turn, reduces the quality of the applied solution and its ability to adhere to the wall. After all, concrete gains strength only if it dries evenly and slowly.
Remember, the foundation must be periodically moistened and covered with film to ensure uniform drying. So why should it behave differently on the wall? The primer helps the situation, but not much. The appearance of a web of small cracks on the plastered surface of aerated concrete cannot be avoided.
Note. In order to save money, you can mix a cement-sand mixture and a special mixture for finishing aerated concrete blocks in a ratio of 1 to 1. But is such saving necessary, which will significantly reduce the speed of work, and the finished surface will not be of 100% quality.
- Cement mortar for plaster has low adhesion. It cannot provide high-quality adhesion to aerated concrete. One of the reasons may be the weight of the solution and the presence of large impurities in its composition.
You can increase the adhesion rate (adhesion, adhesion of surfaces) by adding lime to the classic recipe for cement mortar (proportion: 8-10 kg of lime per 100 kg of concrete).
Cement-lime plaster can be purchased in the form of a ready-made dry mixture. For example, dry construction cement-lime mixture KREPS Extra-light (240 rubles/25 kg), Osnovit Startwell T-21 (208 rubles/25 kg), Baumit HandPutz 0.6 (300 rubles/25 kg).
Plaster composition KREPS Extra-light
Facade plaster Osnovit Startwell T-21
Facade plaster Baumit HandPutz 0.6
- mandatory application of the finishing layer. Because It is difficult to make a smooth surface using a sand-cement mixture.
Is it possible to plaster aerated concrete with aerated concrete adhesive?
Also undesirable. Despite the fact that the adhesive mixture was developed taking into account the specifics of aerated concrete, it is intended for application in a thin layer and the formation of seams, and not for exterior wall finishing.
Violation of the vapor permeability of aerated concrete will lead to problems such as cracking of the finishing layer, the appearance of traces of seams (disappear after drying), and the appearance of mold.
Gypsum plaster for aerated concrete
Advantages of gypsum-based plaster:
- high drying speed;
- non-shrinkability of the solution;
- the ability to make a smooth surface;
- no need to apply a finishing layer.
Disadvantages of gypsum plaster:
- mediocre vapor permeability;
- higher water content required for mixing the mixture compared to a special mixture (10-15 liters per bag);
- getting wet quickly during rain or snow;
- the likelihood of stains appearing on the surface that have to be painted over.
Despite the disadvantages, plastering walls with gypsum is an acceptable option for finishing aerated concrete. Well proven: gypsum vapor permeable highly plastic plaster mixture Pobedit Velvet G-567 (previously Pobedit-Egida TM-35 for 320 rubles/25 kg), Knauf Rotband (360 rubles/30 kg) and Bonolit (290 rubles/30 kg).
Plaster mixture will win Velvet G-567
Plaster mixture Knauf Rotband
Bonolit plaster mixture
Facade plaster for aerated concrete
The most effective material for plastering external and internal walls made of aerated concrete. Plaster for facade work has a number of characteristics, including a vapor permeability indicator identical to that of aerated concrete (for most types of plasters), good adhesion to the base, and a beautiful appearance.
When choosing what to plaster aerated concrete with, it is best to choose a high-quality special mixture. In addition, the use of facade plaster simplifies the finishing of an aerated concrete house with your own hands.
What plaster is best for plastering aerated concrete walls?
The market offers a variety of ready-made mixtures for plastering aerated concrete walls. To make the right choice, you should pay attention to the characteristics of the plaster:
- vapor permeability;
- the required amount of water for mixing the mixture (no more than 0.2 liters per 1 kg of mixture);
- boundary values for the thickness of plaster application (minimum and maximum);
- adhesion to the base (minimum 0.5 MPa);
- resistance to low temperatures;
- crack resistance;
- pot life of the solution. The more, the easier it is for beginners to work with it.
Plaster for aerated concrete Ceresit CT 24 And only when choosing between two equivalent mixtures, you should be guided by the price, it plays not the last role in this matter, but not the key one either.
According to reviews, plastering walls made of aerated concrete outside the room is popular among users - a dry mixture with plasticizers Ceresit CT 24 (380 rubles/25 kg), the leader in terms of price/quality.
Material prepared for the website www.moydomik.net
Facade
The mixture is most effective for treating both external walls and indoors; the material is easy to apply with your own hands. Plaster has a number of positive qualities - good adhesion to the base, attractive appearance. Including the material has vapor permeability indicators identical to those of aerated blocks. When choosing plaster for building aerated concrete, it is better to choose a high-quality special mixture, this will simplify the process of finishing the house.
If you have to choose plaster or drywall, which is better for aerated concrete inside the house. The following facts should be taken into account: walls made of aerated blocks are smooth, and they do not require leveling. Accordingly, plaster will cost less, and the solution will form an even and beautiful layer.
Self finishing
We plaster the aerated concrete on the outside with plaster intended for exterior use. There are two options for applying the mixture - a thick layer or several thin layers, which are applied in no more than 3 layers and no more than 1 cm each.
Work order:
- the surface is prepared for plastering - contamination is removed;
- Next, you should hang the surface with your own hands using beacons;
- spray is applied - the first layer of plaster coating;
- the primer is applied and leveled;
- cutting corners;
- finishing of slopes;
- a covering layer is applied;
- the surface is rubbed.
How and how to properly plaster aerated concrete walls indoors with your own hands
In principle, how to plaster the walls inside a house has already been described above. But since all plasters are different in their properties, we will try to be more specific. Let’s take, for example, a lime-cement mixture, which protects walls from steam penetration better than gypsum, and the screed has a lighter shade than cement screed. You can find many types of such plaster on sale under different brands.
For example, the Decorator option, from a Russian manufacturer, which can be used for both interior and exterior work. Application thickness – from 5 to 30 mm, maximum filler fraction no more than 1.25 mm. This is a dry mixture that will need to be mixed with water. Let's figure out how to properly plaster aerated concrete walls indoors using it.
How to correctly calculate plaster consumption
First of all, you need to determine what the material consumption will be - in order to understand how many bags of plaster you will need to buy. For this:
- You should calculate the area of all the walls in the house, minus window and door openings (for example, it turns out to be 128 m²).
- Using a long rule and a level, you evaluate the degree of unevenness of the masonry: protruding areas are taken as zero.
- By measuring the depth of the recesses (for example, 6 mm), and adding to them the height of the beacon (usually 10 mm), find the arithmetic mean value: (6+10):2=8 mm. This is the average thickness of your screed.
- Look at the plaster packaging to see what consumption the manufacturer indicates. In this case it is 12.5 kg/m² with a layer thickness of 10 mm. At 1 mm there will be 1.25 kg, and at 8 mm - 10 kg.
- We multiply the consumption by the area of the walls, and we get 10 kg/m²*128 m² = 1280 kg.
- Packaging 25 kg. We calculate the number of bags: 1280:25=51.2. Round up, you get 52 bags.
Preparing the wall
There are certain requirements for the quality of the base prepared for applying plaster. They can be formulated as follows:
- Maximum deviations of angles from the vertical within one floor are no more than 5 mm.
- Deviations of wall planes from the vertical are no more than 3 mm/1 m.
- Deviations in the position of openings are no more than 4 mm/1 m.
- The depth of unevenness when applying a two-meter strip vertically is 5 mm.
- The depth of chips and chips on blocks is a maximum of 10 mm.
If the size of the defects exceeds the specified tolerances, then before starting plastering work, it is necessary to repair the surface using an adhesive masonry mixture or any basic version of thick-layer plasters. The one we chose as an example is quite suitable.
When using cement plasters mixed with water, the humidity of the aerated concrete base is not standardized. That is, work can be done indoors either on dry masonry or immediately after construction - but it’s still better to wait at least a couple of weeks. In winter and without heating, it is better not to start at all.
Expert opinion Vitaly Kudryashov builder, aspiring author
Ask a Question
Note: Residues of the hardened adhesive solution protruding on the surface must be removed with a plane or aerated concrete float. Dust must be swept away with a brush or vacuum cleaner. Its remains will be bonded with a primer.
If plastering compositions with high water-holding capacity (more than 98%) are used, the masonry surface must either be pre-moistened or primed with deep penetration compounds.
Applying primer
A primer is usually called a type of impregnation designed to improve the adhesion of plaster (paint) layers and reduce the absorption of the base, which literally “drinks” water from the solution.
- Most often, they are based on compositions of water-soluble polymers, which, after application, fill the pores, harden in them and form a water-repellent film. However, this film can allow vapors to pass through, which ensures timely drying of finishing layers.
- Primers usually do not emit unpleasant odors and dry fairly quickly. There are compositions designed specifically for cellular concrete surfaces, and there are universal ones. Both of them can be used.
- Primers are applied manually in two or three layers (depending on the density of the base) before plastering the aerated concrete. There is no need to apply more layers, since if you overdo it, you can achieve the opposite result - the plaster will not stick to the almost glass base at all.
- Between layers, it is necessary to maintain the time interval necessary for the soil to dry. As a rule, this is 4 - 6 hours. The composition is consumed on average 200 ml per 1 m² of wall per 1 layer. Accordingly, the total consumption can be easily calculated by multiplying it by the square footage of the masonry.
- When purchasing a primer, read the instructions on the package. There are concentrated formulations that require dilution with water. Some of them are diluted in half or a quarter only on the first layer, the second is applied without dilution.
Expert opinion Vitaly Kudryashov builder, aspiring author
Ask a Question
Note: If you decide to reinforce the finishing layer with mesh, then this should be done at this stage: after priming and before installing the beacons. If you don’t have any adhesive solution left from installing gas blocks, you can use regular tile adhesive to fix the fiberglass mesh. It is applied to the wall in a thin layer, mesh sheets are recessed into it with an overlap, and covered with another layer, distributing the glue over the surface with a wide spatula. In order for the plaster to stick to this layer better and not slip when applied, furrows should be made on it with a notched trowel.
Installation of beacons
A galvanized T-shaped profile with perforation is used as plaster beacons. The standard length is 3 m, which allows you to cover the height of almost any wall. Accordingly, they are mounted vertically, parallel to each other.
The distance should be such that it is convenient to work with the one and a half meter rule (about 130 cm). With a greater distance, you need to take a longer tool, but it will bend, which is not very convenient. Or then you need to calculate so that the rule can cover 3 beacons.
To install them, you first need to make markings - draw lines along which the planks will be mounted. The first is located 20-25 centimeters from the corner, the rest, with the step determined according to the length of the tool.
Next, the following operations are carried out:
- Indented from the ceiling along the installation lines of the beacons, holes are drilled for self-tapping dowels - their protruding caps will be the basis for installing the planks. Mount the dowels along the perimeter of the wall and in one line in the center.
- Screw in the screws.
- Between them you should stretch the fishing line in all directions, including diagonally.
- Now you check the position of their caps, adjusting it, screwing it in or unscrewing it with a screwdriver until all the fishing lines are in the same plane. You need to orient yourself along the most protruding point of the wall.
- Install beacon strips onto the screw heads and secure them with mortar.
- When the solution has set, you need to additionally fix the beacons with dowels and coat them on all sides so that even areas are formed on their surface.
Expert opinion Vitaly Kudryashov builder, aspiring author
Ask a Question
Note: To attach beacons it is better to use gypsum mortar, as it sets much faster.
The beacons are removed after the base plaster, already applied to the required thickness, has set, but has not yet completely hardened. If you do not miss this moment, this usually does not cause any problems. Not only are the planks removed along with the plaster, but the screws are also unscrewed, after which the resulting recesses are moistened with water and sealed with cement mortar.
Throwing on a fur coat (spray and primer)
The first layer of plaster is called the spray, and its role is to fill all the recesses and irregularities on the surface. The solution for this layer is usually diluted more liquid, but not too much so that it does not flow down under its weight. For casting, a plaster ladle is used (it is more convenient for them to take the mixture from a container) or a spatula (they usually use it to take plaster from a falcon).
The solution is poured with some acceleration so that the portion is guaranteed to stick to the base. If you haven't done this before, practice a little and you'll get the hang of it. If the thickness of the plaster layers is more than 4-5 cm (and this happens, and often), the plaster is applied not in two, but in three steps. That is, between the spray and the covering there will be an intermediate layer - soil.
In this case, processing of the first layer is not even required: it does not need to be leveled - just as you applied the solution, let it dry. The next day, a second layer, already thicker in consistency, will be applied, which will smooth out all the unevenness of the spray. It is at this stage that the specified thickness of the plaster layer is formed.
Forming corners
To achieve a good appearance of the plaster, it is very important to ensure the geometric accuracy of the angles. When plastering along beacons, it is easier to form the corners using the rule. When installing beacons, the first one is mounted with a slight indentation from the corner. If you install the tool close to the junction of two walls and run it along the beacons, the end of the rule will carefully remove excess mortar in the corner.
The second side of the corner will be plastered when the first one is already dry, and you will proceed to the next wall. You can bring the corner to the ideal shape using husk and offset spatulas. The first is for internal corners, the second is for external corners. You can also use a straight spatula, but you need the appropriate skills.
Expert opinion Vitaly Kudryashov builder, aspiring author
Ask a Question
Note: It is much easier for beginners to use counter-shultzes to decorate corners - profiled corners with a mesh attached to their shelves. But this method is more suitable for small plastering thicknesses.
To install the counter-shoulder, apply a thin layer of mortar in the corner and lightly smooth it with a spatula. While the screed retains its plasticity, a profile is applied to the corner and pressed slightly with a rule, the mesh is recessed with transverse movements of the spatula. The solution that comes through the perforation of the corner and mesh cells will securely fix them. Its excess after hardening can be easily removed with sandpaper.
Final finishing
The top layer of plaster is called the top layer. It is applied after the previous layer is well leveled and dried. If a plaster composition with a finer fraction of filler is used as a covering, it is advisable to perform priming again before applying it. One layer will now be enough. If the plaster is universal, and the base and finishing layers are made with the same composition, you can simply use water instead of a primer.
The thickness of the finishing layer usually does not exceed 1-2 mm. It may be a little more if the plaster is decorative - in them the thickness of the layer is usually determined by the size of the filler and is aimed at obtaining one or another effect. Apply the finishing layer with a Venetian trowel, level the screed with a float, and rub in a circular motion using a plastic trowel. The same tool is used to create textures on decorative coatings with pebble filling.
If highly plastic textured plasters are used, the desired effect can be achieved with any available items - from a crumpled plastic bag to a dish sponge. There are also various ready-made devices for applying beautiful textures on sale - rollers and silicone stamps. Such plasters can either be tinted in bulk, or, after completing the relief, a paint and varnish coating is applied on top of them.
In general, materials for plastering aerated concrete walls indoors are selected depending on the quality of the masonry and the amount of unevenness in the walls, and the visual effect that is desired to be achieved.
External work technology
- If necessary, insulation is installed for the blocks under the plaster.
- Preparing walls - leveling the surface to reduce material consumption and application thickness.
- Before you start plastering the walls, aerated concrete must be treated with a primer. For this purpose, compositions designed for the fine-cell structure of materials are used.
- Applying a thin layer of plaster mixture for aerated concrete surfaces - up to 5 mm. This base will serve to attach the mesh.
- Reinforcement of plaster with mesh.
Adviсe
It should be noted right away that plastering aerated concrete blocks from the outside with adhesive solutions is unacceptable. Because glue won't do the job. In order to protect and level surfaces, it is recommended to use specially designed mixtures that meet all operational requirements.
When plastering aerated concrete facade work is carried out, it is recommended to follow some rules, which are described below.
- after the building is erected, a certain period of time must be maintained so that the internal moisture evaporates naturally;
- the brand of plaster must be suitable for outdoor use;
- sequence of repair work - first inside the house, then outside;
- the temperature regime must correspond to +8 to +30 C0 - for exterior finishing;
- Building regulations that must be observed in relation to increasing thermal conductivity coefficients. Each material installed or applied to the gas block should be taken into account.
When can plastering begin after masonry?
When building a house from aerated concrete, you should not rush to finish the walls both inside and outside the building. Even when placed on glue, the blocks will still shrink - this is their property. There is no need to explain what will happen to the plaster on the wall that has shrunk - continuous cracks and a complete replacement of the plaster layer.
Experts say that after the construction of the wall, you must wait 7 months, and only after that begin plastering work. However, we cannot agree with this recommendation. Simply erecting walls does not lead to their shrinkage - there is no pressure on the blocks. Only after the roof is erected does the full shrinkage process begin. Therefore, the countdown should be carried out from the moment the roofing work is completed.
Reinforcement
To the question whether it is necessary to reinforce the plaster, and whether a mesh is needed. The answer is simple, since the plaster layer of aerated concrete can vary from 5 to 15 mm. If the layer exceeds 10 mm, a metal mesh with a fine cell texture is used as a reinforcing layer. For example, a mesh with a wire diameter of 0.1 mm and a cell size of 0.16 x 0.16 mm, or fiberglass mesh with cells of 5x5 cm, is suitable.
The mesh must be installed with an overlap of 5 cm; for the corners of the house, perforated corners with mesh are used. This method will help prevent the formation of cracks in the plaster after the building shrinks. It is better to install the mesh into the applied solution using a spatula. A particularly important point is the installation of the mesh in places with a high level of stress - the area of windows and doors.
Advice! If you attach the mesh to a dry surface, the result will be zero. Because the mesh needs to be fixed to the wall using self-tapping screws, and then a layer of mortar must be applied. Otherwise, the unfixed mesh will move along with the putty.
Work order:
- Level the plaster layer over the mesh using vapor-permeable plaster.
- It is necessary to wait until the first layer is completely dry. Otherwise, it will fall off under the weight of the next layer. This technique involves thin-layer application of the mixture. You will have to wait three to four days for complete drying. Accordingly, the thicker the layer, the longer it takes to dry. Checking whether the surface is dry is done using water. Having splashed the liquid onto the surface, it was quickly absorbed - this means that it is time to begin further work.
- A second layer of plaster is applied, which is considered leveling. Therefore, the layer should be even and smooth;
- A third finishing coat of plaster is applied and will require further grouting if necessary.
- Painting the surface with materials for exterior work or applying putty.
- Treatment with a water repellent. Experts recommend applying this solution 12 months after painting and completion of all facade cladding work. A water repellent gives any coating additional water-repellent properties.
Note! When the plaster layer dries, it must be protected from the influence of such undesirable environmental factors as moisture, snow, rain.
Technology for plastering aerated concrete facades
When carrying out such work, it is important to take into account the fact that the pores of aerated concrete are open, in contrast to foam concrete, whose pores are closed. As a result, its vapor permeability is very high.
When carrying out such work, it is important to take into account the fact that the pores of aerated concrete are open.
Surface preparation
Aerated concrete walls themselves are quite smooth and do not require much preparation. The only thing is that if there are any chips, they should be plastered with the glue that was used during installation. Knead a little of the remaining glue, add crumbs and sawdust from the blocks for better strengthening. Then the unevenness, cracks and seams are filled. Finally, using an iron brush, grout is done to make the surface smooth.
If there are any chips, they should be plastered with the glue that was used during installation.
Padding
When working with primer, read the instructions. If you leave aerated concrete without plaster for the winter, be sure to prime it. This is primarily to protect your structure. The primer protects against moisture and strengthens the base for further work. Before priming, make sure that the surface is thoroughly dry. Work is carried out at a temperature of 10-25 degrees Celsius.
It is better to use a more expensive primer. Must have deep penetration and have strengthening properties. Such primers create vapor-permeable films that are not exposed to water. Priming is carried out in several layers, usually one or two. Sometimes three layers are necessary, depending on the climate region. The higher the climate humidity, the more layers of priming. Conversely, if you live in an area with a dry climate, one layer will be enough. The composition is applied with a roller, evenly, without missing a single centimeter of the surface. In corners and where it is impossible to reach with a roller, prime with a brush.
The primer protects against moisture and strengthens the base for further work.
Plastering and reinforcement
If the plaster is applied in a thin layer, reinforcement can be omitted. If not, you will need fittings. It looks like a fiberglass mesh measuring three by three millimeters. When purchasing fittings, it is important that they are resistant to alkalis. This information is available on the packaging.
For work, it is better to use materials from imported manufacturers; they will last longer.
When purchasing fittings, it is important that they are resistant to alkalis.
Next, let's look at the plastering process step by step:
- To prepare the solution for use, carefully follow the instructions for use. Water at room temperature is poured into the container in the amount prescribed in the instructions. According to the instructions, pour a thin layer of the mixture, stirring constantly. To obtain homogeneity, use a construction mixer. Once the mixture has steeped for five minutes, move on to the next step.
- The work is carried out with a wide metal spatula at an angle. Thin-layer technology is used. The layer is applied with a thickness of no more than five millimeters.
- Reinforcement queue. The mesh is laid carefully, distributing it over the entire surface. Then press it a little, rub it with a spatula and add a little solution. To avoid cracks, the mesh is laid overlapping. There is another correct method of reinforcement. It consists of screwing the mesh to the wall using ordinary self-tapping screws.
- All outdoor corners, window and door openings are reinforced with perforated profiles. Like fittings, they are placed on plaster and deepened a little.
- Now achieve a smooth surface and leave to dry for about five days.
If you decide to do the work yourself, you should carefully read the videos on this topic.
The work is carried out with a wide metal spatula at an angle.
Finishing layer
Mix the solution according to the instructions. Everything is done carefully, since this is the layer that will remain the facade. The thickness varies. On average it is six millimeters. Then everything unnecessary is removed.
After the plaster mixture has partially dried, the surface is rubbed down. They take a plastic grater, sometimes a metal grater, and move it in different directions along the surface. After grouting, you need to leave the surface until completely dry. Then the surface is painted and decorated as desired.
After the plaster mixture has partially dried, the surface is rubbed down.
putty
When deciding whether to putty aerated concrete, it is recommended to learn about the types of building mixtures. There are 3 types of product varieties on the market that are intended for finishing. By and large, this is a facade plaster intended for thin-layer finishing of an already plastered surface, differing only in composition. Ready-made mixtures are sold in buckets and come in silicate, silicone and acrylic.
Important! When plastering the outside of a house, it is recommended to use only vapor-permeable building materials. This will provide not only a reliable finish, but will serve as a decoration for the building.