The characteristics of the constructed building will depend on how well the brickwork is made. Both the strength of the structure and its durability and thermal insulation are all determined by the masonry. The masonry is one brick, half a brick or two - its quality determines how convenient the building is to use.
The masonry thickness of 1.5 bricks is calculated as follows: brick length - 25 cm + brick width - 12 cm + joint width - 1 cm.
The design of the future house must necessarily indicate the thickness of the walls. It is determined by careful calculations, although it may seem to be done at random. All calculations made are related to various nuances of the subsequent operation of the building. Brick walls can have different thicknesses depending on the intended conditions of use. For example, laying a brick on the floor is 12 cm. But half a brick is very little, and this type is used only for the construction of partitions.
What is it and how is it produced?
It provides a width of wall structures of 380 mm , which meets the requirements of SNIP for residential buildings no higher than 6 floors.
The masonry scheme involves using both a whole brick and its shares: 0.5; 0.25 and 0.75, which are beaten with a hammer-pick from defective blocks. The use of small pieces makes it possible to prevent the imposition of vertical and transverse construction seams, which generally increases the strength characteristics of the entire structure.
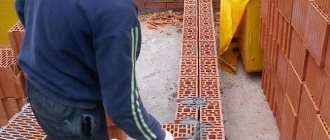
After finishing laying 2 rows of bricks, the vertical/horizontal of the corner rows is controlled; for this, the initial row is laid out using a level, applying one thick seam to the base. After laying the corners in 4 rows, the construction of the main walls begins .
This scheme involves combining only spoon or spoon rows with bonded rows. Initially, the cord is pulled, for which nails are driven into the seam of one high-rise row.
The cord will perform two functions: controlling the level and direction of the masonry . If the span being constructed is quite large, intermediate beacons are installed. For external masonry walls, it is recommended to install bricks with straight edges and smooth surfaces, and defective blocks are used for backfilling.
Laying 1.5 bricks is considered a responsible construction work, and if ordinary walls can be done by masons of the 3rd or 4th category, raising the corners of the house is trusted to more experienced builders of at least 5-6th category.
How to increase the decorativeness of masonry
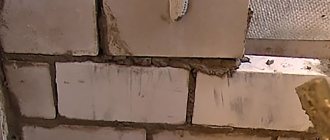
Only hyper-pressed brick can boast of ideal geometry without the slightest deviation, but it is not particularly popular. Whereas for ceramic, especially clinker, the dimensions are somewhat worse, but possible errors are leveled out due to the thickness of the seam (10-12 mm according to standards) and compliance with masonry rules.
NegativFORUMHOUSE Member
Brick is rough ceramics. The better and higher quality the clay, the greater the likelihood of different shrinkage of the brick. The weaker and more primitive the clay, the easier it is to fire and the more predictable its size. Due to the above arguments, you should not be afraid of a slight scatter in geometry. This is acceptable and normal.
Any brick should be laid from 5-6 pallets in parallel to ensure uniform color and balanced dimensions. This is the standard recommendation of any responsible Western and domestic manufacturer! The brick is uniform in texture and masonry from different pallets averages it out and makes it truly beautiful in any case.
Sometimes the size range is even a plus, but there are some peculiarities.
Village and peopleForumHouse participant
I bought not German clinker, but domestic local ceramics - colorful bricks were sold cheaper. Naively, I believed that it was only colorful, and this effect was the main parameter. As it turned out, the brick also travels along the length and thickness, plus, some come across it with a convexity. Now I’m laying cladding on the garage myself from leftovers and I’ve understood the following rules:
- If the geometry of the brick is out of whack, you need to sort it out along its length and use this disadvantage when laying; if something runs in, you can even avoid small inserts.
- Laying should be done on a rod thickness of at least 10 mm, so deviations are less noticeable, especially in thickness.
- When the geometry is not ideal, it is better not to select contrasting solutions or grouts.
As for the choice between a smooth and textured surface, the first type is demanding on the skill of the performers and “reveals” any imperfections in the masonry. Whereas the texture, on the contrary, takes your eyes off minor defects, which is especially important if construction is being carried out for the first time and on your own.
When and why is it used?
This method is rational and justified when constructing high-rise buildings located in the temperate climate of the central regions of Russia. Laying walls of 1.5 bricks with an external main wall size of 380 mm guarantees the house wear resistance, thermal protection and strength.
The calculated width of the wall is formed by the sum of the block dimensions in width, length and joint thickness up to 10 mm. For northern areas, thicker walls will be required, which can be increased by a separate layer of thermal insulation, or by installing a brick wall of 2, 2.5 and 3 bricks.
The final decision should be made during the design work after completing a feasibility study of the selected option.
In order not to break the brick blocks in half, a special arrangement was developed: the rows are alternated with alternate installation on the facade of either the end or the long side - a spoon . By shifting the placement of bricks on each next row, the master ties the rows together.
When and where is its use inappropriate and why?
Laying 1.5 bricks is expensive, it requires highly qualified performers, in addition, it puts a serious load on the foundation, so serious reasons are required for its use.
Conditions when, when constructing walls, masonry of 1.5 bricks is not used:
climatic - for the southern regions and northern regions;- height of buildings - for objects below 4 floors and above 6 floors;
- for load-bearing internal walls;
- for non-load-bearing internal walls;
- for auxiliary household facilities;
- for weak-bearing columns.
Laying ceramic bricks with reinforcement and cladding
Reinforced masonry . It is used in cases where structures experience significant loads. The reinforcement is located in vertical and horizontal joints. The thickness of the seam should be 4 mm greater than the diameter of the reinforcing cord. Transverse reinforcement is used using metal mesh of rectangular or zigzag shape. The grids are laid in 3-5 rows of masonry.
bricks
Laying ceramic bricks with cladding. When, simultaneously with the erection of the wall, the outer wall is faced with facing (very smooth, with clear shapes and even color) brick. The ligation of the facing row and the masonry itself is carried out at the level of the bond row.
Features and rules of creation
This type of masonry begins to be performed exclusively from the corner of house construction. First, the base is waterproofed to prevent moisture from entering the wall. The parts laid first are mounted so that they are perpendicular.
Between 2 blocks, nails are fixed into the masonry joint , and a mooring is attached to them to indicate the 1st row, up to 5 m. To prevent it from sagging, at a distance of more than 10 m, beacons are additionally installed every 5 m.
Dimensions and parameters of a brick wall
The modular standard size of the brick determines the dimensions of wall structures and makes it possible to design brick houses taking into account their dimensions. Due to the unification of brick dimensions, most of the interfaces of brick objects are made standard, which makes it possible to use ready-made solutions in a variety of projects.
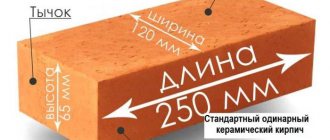
Due to the standardization of bricks, laying 1.5 bricks creates a wall - 380 mm, which is formed from a length of 250 mm and a width of 120 mm, between which a 10 mm laying mortar is located.
The vertical characteristics of the masonry are also standardized for each standard brick size : regular - 65 mm and thickened - 88 mm. Design standards allow laying joints of 12 mm, in practice they range from 10 to 15 mm. When reinforcing brickwork, reinforced mesh is laid in horizontal rows, and therefore the seam will be increased from 12 to 16 mm.
The height of the walls, calculated in rows for ordinary bricks, will be a multiple of 77: 77; 154;….. 462 and beyond, and for reinforced modification, through 100; 200;……500 and more. Thus, 13 rows of a standard block are equal to 10 rows of a reinforced one.
For the construction of brick walls, the specific gravity of the wall masonry, taking into account the weight of the mortar, is of great importance. The indicator has a dimension of kg/m3 and depends on the specific gravity of the brick.
The specific gravity of the blocks depends on the place of production, technology and components; it ranges from 650 to 1900 kg/m3. The higher the indicator, the stronger and more durable the wall structures will be.
Selecting masonry type
The thickness of the brick partition is selected taking into account external conditions and the purpose of the structure. In everyday life, half-brick masonry is usually used, which allows you to get a 12-cm wall. This value doubles if a whole brick is laid. This technology is relevant if the room is not limited in free space, and the wall should be quite strong. The thickness of a brick partition is rarely more than 25 cm, as this leads to excessive consumption of material, a reduction in the usable area of the room and longer masonry work. And for a wall that does not bear a load-bearing load, such a thickness is simply not needed.
Requirements for building materials
Brick is the most popular material for building houses; there are hundreds of manufacturers producing products with distinctive characteristics. Before purchasing it, the developer will need to familiarize itself with its production parameters so that they comply with GOST requirements.
The most important of them:
- Strength characterizes the ability of a brick to withstand external natural factors without destroying the structure. This characteristic is marked “M”. For wall structures of residential buildings, bricks of M - 150 and M-200 are allowed, which corresponds to a compressive strength of 150 and 200 kg/cm2, respectively. The brand of brick is also characterized by bending strength, which for the above modifications is respectively 22 and 34 kg/cm2.
- Thermal resistance should be from 0.5 to 0.8 W/m*K and characterizes the ability of the wall to retain heat in the house.
- Moisture absorption is set at 6-14%, this is a high figure, but the porous structure of the brick cannot guarantee less, therefore, during the construction of walls, waterproofing will be required, which, as a rule, is performed in the process of thermal insulation of external walls.
- Frost resistance is set at F50 and must provide at least 50 freezing/thawing cycles of the walls.
- The vapor permeability of brick corresponds to 0.14-0.17 Mg/(m*h*Pa).
- The shrinkage of bricks is no higher than 0.1 mm/m; for this reason, cracks in brick buildings are quite rare.
- Sound insulation of walls of 1.5 bricks provides protection of 50 dB, which corresponds to SNiP.
- The fire resistance of a brick should provide resistance to direct flame exposure for more than 5 hours; in practice, this figure is higher and reaches 10 hours.
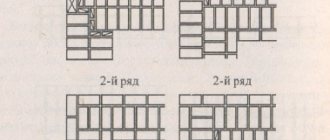
Scheme
Laying walls of 1.5 bricks can be done with single-row or multi-row ligation. The first is considered stronger and more durable and involves swapping the tie and spoon rows from the outer part of the wall being built, while observing the following basic rules:
- the rows at the top and bottom are laid with pokes from the outside;
- longitudinal seams in the following rows are shifted by 1/2 bricks, transverse seams by 1/4;
- the blocks of the upper row overlap the vertical seams of the lower one.
This laying method has a significant drawback, since it will require many incomplete bricks, which leads to increased labor intensity of construction work and increased mortar consumption.
Multi-row dressing is performed according to the following row scheme:
- the first is “spoon-poke”;
- the second is “poke-spoon”;
- from 3 to 6 - laying only with spoons with dressing of seams in 1/2 brick;
- from the 7th row the action is repeated from the first row.
Multi-row ligation is characterized by the highest productivity and the need for the smallest number of incomplete bricks, although the strength is somewhat less than with a single-row scheme.
Corners are considered the basis for the construction of walls of any object , therefore even the slightest mistakes made during their laying will lead to damage to the geometric shapes, and, consequently, to a decrease in the load-bearing capacity of the structure and the duration of its operation.
When using the 1.5 brick technology, the construction of corners is carried out 4 rows ahead. This is required so that it is possible to install the order and expose the cord. In this case, it is possible to maintain horizontality as accurately as possible when laying rows.
The correct layout for laying one and a half bricks is in the video:
How many pieces will you need?
To calculate the volume of building material for a two-story house in a 10x10 m plan:
- The perimeter is determined by the outer walls: 10x 2+ 10 x2 = 40 m.
- At a height of 3.00 meters, the area of the wall structures is: 40 x 3.0 = 120 m2.
- The area of windows and doors is 11 m2.
- When laying 1.5 bricks, the wall thickness is 380 mm.
- According to the table, it is chosen that 1 m2 of walls with 1.5 bricks requires 189 bricks
- Brick consumption: (120-11)* 189 = 20601 pieces.
- Mortar consumption taking into account a 5mm thick mortar joint: 5.263 m3.
Required materials and tools
While it is easy to calculate the amount of brick, the volume of masonry mortar also depends on the characteristics of the brick.
Theoretically, these are the same correction factors that must be subtracted from the volume of the masonry when determining the number of bricks. That is, for 1 m3 of single brick you need about 0.23 m3 of mortar. If we take into account technological losses, we can round up to ¼ m3.
When using slotted bricks, it must be taken into account that part of the mortar will be used to fill the voids. In this case, the volume is increased to 0.3 m3.
But as mentioned above, less mortar is needed per 1 m2 of masonry in one brick. Therefore, instead of 70-75 liters of cement-sand masonry mixture, 60-65 liters are sufficient.
In addition to bricks and mortar, before starting work you need to prepare the following tools:
- trowel (trowel);
- bushhammer;
- tape measure, plumb line, level;
- mooring cord, plus beacons so that it does not sag;
- order.
Step-by-step installation procedure without insulation
After all the building materials have been delivered to the site, the tools have been prepared and the foundation has been erected, the craftsmen begin building the walls. Before starting, waterproofing is laid on the base.
The process of laying a wall of 1.5 bricks with your own hands:
First, corners are created with an increase of 4 rows.- The side blocks are laid perpendicularly and controlled with a special square. Seam control is performed using a spiked spatula.
- Next, they begin to form the base row. On the inside the block is laid flat, on the outside it is placed on its edge.
- After the 1st row is formed, the 2nd column is raised and so on along the entire perimeter of the building.
- The inner layer of 1.5 brick masonry is similar in principle with the formation of corners, but the technological approaches are different.
- The laying is carried out simultaneously on 2 layers of the wall, leveling the inner surface along the nylon thread.
- The next row is shifted by 1/2 the width of the block.
- The first elements are laid perpendicular to each other, the 1st row of masonry is carried out along a stretched cord.
- The butt plane is placed outside the wall.
- In the 1st row, blocks are placed inside with the spoon part. The outer plane of the wall looks like half a brick, and the inside looks like brick.
- The bricks are laid at a short distance from each other on freshly laid masonry mortar.
- To ensure uniformity of the solution level, each subsequent block is shifted slightly back and slightly moved along the plane back and forth.
- After which the block is mixed to the previously installed one, and the mortar is pushed into the inter-brick joint with the butting surface to ensure a high-quality vertical joint.
- Next, firmly press the block in the vertical direction, aligning it with the others, and tap the trowel handle in the center, avoiding angular distortion.
- The unnecessary solution is removed from the surface with a trowel.
- Reinforcing mesh is laid on all subsequent 5th rows.
- For reliable ligation of seams, in places with vertical restrictions, at the points of intersection and abutment of wall structures, partial bricks are used.
Step-by-step instruction
The brick partition is placed along the cord to regulate the evenness of the walls. The latter are connected to the partitions with conventional fittings. In order to attach it to reinforced concrete without damaging the material, you should make a hole to install the pin. It should be located 25 cm from the floor where the second row will pass. The brick partition in this place is connected to the side wall with a rod with a diameter of up to 8 mm.
Before laying bricks, a layer of waterproofing should be laid on the floor. Roofing felt or glassine are suitable for this. A layer of mortar is placed on top. It will allow you to level the surface for the ideal position of the bricks in the first row.
We should also not forget that the masonry scheme should provide for the presence of a lintel in the brick partition. It can be made of metal or reinforced concrete, and is necessary to strengthen the doorway. Metal elements are used if it is not possible to use prefabricated ones. Although the masonry itself is quite strong, and the solution is capable of holding the products, a jumper will still be needed until the liquid mixture gains strength. The advantage of prefabricated structures is the speed of their installation, reliability and ease of selection.
Preparing for the masonry process
When the master has already decided on the thickness of the brick partition, he can begin preparatory work. At the first stage, you need to take care of the availability of tools and materials, namely:
- trowels;
- containers;
- building level;
- jointing;
- hammer;
- plaster spatula.
A container will be needed for mixing the solution.
Interior partitions cannot be laid on a surface made of old concrete. The process can only begin if the base is in satisfactory condition. Laying on any screed cannot be carried out if it is filled with:
- perlite;
- sand;
- dropouts;
- expanded clay;
- inorganic bulk materials;
- fine-grained slag.
Before making a partition in a bathhouse whose floors are made of old wood, the base is disassembled.
Before erecting the partition, markings are carried out. The boundaries of the future wall are drawn on the floor and walls. Vertical marking is carried out using a building level and a plumb line. You can make a partition out of brick by first clearing the floor of debris and dust. In the place where the partition will be located, a cord is stretched along it, which will act as a guide.
Construction and ligation of half-brick walls
The thickness of a half-brick partition will be 120 mm. Such a structure will not have load-bearing capabilities. In order for the wall to be able to take on impressive loads, it should be built in 1 brick, which will give a thickness of 250 mm. Half-brick masonry is carried out on the most even foundation, which is covered with roofing felt-type waterproofing.
Work begins with laying out two products along the edges of the first row. If the installation of a brick partition is carried out on a not very flat surface, it is necessary to start from the highest point. The material is soaked in water before masonry work. In this case, the spoons of the products should be facing outward, and a layer of solution should be applied to the bonded surface. The second brick is installed end-to-end. Vertical seams must be filled. In order to ensure reliable fastening of the products to each other, you need to perform a dressing - you need to start laying each even row with half of the product.
How to lay a half-brick wall
When laying out a half-brick thick partition, before forming the first row it is necessary to lay out 3 cm of mortar. In order for the brick partition to be as level as possible, you should check the position of each row using a building level. A brick wall can be built from decorative products. This will not only save usable space due to the reduced thickness of the structure, but will also reduce finishing costs. The masonry can be left in its original form, then it can become part of a modern style called loft.
Before laying a half-brick partition, you should take into account that such a scheme does not allow your imagination to run wild. But the wall can still be made original by providing an oblique displacement of the brick. Each next row of the partition should be started not from half, but from a quarter of the product. Such a displacement must go in one direction. You can change it when the bricks are laid in one ladder from one wall to another.
Additional expressiveness of the effect can be achieved if you use bricks of different colors and textures. Half-brick masonry may include another variation of the dressing: the work will be carried out not according to the principle of oblique masonry, but with a variable quarter-spread offset.
Rules for strengthening openings and problem areas
It’s not enough to know how to make a partition in a bathhouse. You also need to inquire about how to strengthen the structure at the doorway. The construction of a brick partition at this stage will involve the use of reinforcing elements, such as:
- corners;
- channels;
- I-beams
They are connected into a single structure and cover the perimeter of the opening. When building a partition, it is important to indicate the location of the lintel; its ends should extend beyond the edges of the opening by 250 mm or more. This element is fastened to intercept the load. Afterwards you can continue masonry work. The jumper should not protrude beyond the surface, therefore, before installing the product, double-sided grooves are carried out in places above the future opening.
If the brick partition will include a channel, its number must be determined at the design stage. Tightening is carried out through the hole using studs or bolts. A partition that has an opening reinforced with a channel must have a metal plate located at the bottom of the lintel. The reinforcement element is attached to the brick partition by filling all voids with cement mortar. Its grade must be M100 or higher.
If the thickness of the partition is insignificant and amounts to 120 mm, you should think about the question of how to make problem areas of the structure non-hazardous. Areas of stress arise in those places where sections of the building with different heights adjoin the partition. To resolve the issue, you need to familiarize yourself with the features of reinforcement. A reinforcement mesh is suitable for the partition, the rods of which can be less or more than 10 mm. Typically, light fittings are used for partitions in bathhouses or other rooms. The thickness of its rods does not exceed 8 mm.
Attention! The partition may involve the installation of a mesh made of basalt or composite. These options are lightweight and offer superior performance. Thus, working with them is accompanied by the possibility of reducing the thickness of the seam between bricks. In addition, these materials do not rot and are easy to install. They weigh little and have reduced thermal conductivity with proper temperature stability. Another bonus is that such reinforcing mesh is resistant to corrosion, which cannot be said about their metal counterparts.
How and with what to insulate?
As a rule, a 1.5 brick wall is insulated from the outside, which allows you to get the maximum effect from the implemented protective measures, and also provide not only thermal protection, but also vapor permeability, water and noise insulation.
Almost all types of insulating materials are well suited for brick; their choice depends on the preferences of the developer, climatic conditions and the project budget.
The most popular heat-insulating materials for a house with walls laid at 1.5 are:
- Mineral wool is an inexpensive, highly effective complex-action insulation material that has two types of protection for heat and sound insulation. The material is fire resistant. There is only one significant drawback - high moisture absorption capacity; such an insulator requires additional waterproofing and wind protection.
Heat-protective plaster is used for southern regions where a thick insulating layer is not required.
The material has high thermal characteristics, and in addition is non-flammable, waterproof, vapor-permeable and noise-proof. The disadvantage is the high price and the layer is not higher than 50 mm.- Expanded polystyrene is the most affordable heat-protective material with a low water absorption coefficient.
Its use is hampered by increased flammability with the release of toxic substances and almost complete vapor permeability. Among the disadvantages, it is worth noting the low ability to transmit steam and high flammability. - Penoplex is an improved heat insulator that does not have the disadvantages of polystyrene foam, is more durable, does not propagate combustion, and is universal in use. It is easy to install and has several modifications for walls, facades, roofs and with acoustic protection.
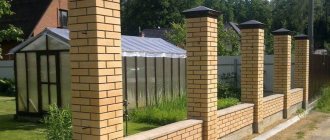
Laying fence posts: technologies
In most cases, fence posts are made of 1.5 or 2 bricks, the cross-section is 380*380 mm and 510*510 mm, respectively, and the height is up to 3 meters.
The masonry is carried out with bandaging (offset) - the seam of the bottom row is overlapped by the “body” of the brick lying on top. The standard seam is 8-10 mm. The diagram for laying columns of one and a half and two bricks is in the photo below.
Brick pillars of 1.5 and 2 bricks
Laying pillars: work order
Cut-off waterproofing is spread on the finished foundation. It can be roofing material in two layers, but it is better to use waterproofing with bitumen mastic. This layer is necessary so that the brick does not “pull” moisture from the soil. If wet brick freezes, it will quickly begin to crack and crumble. Therefore, waterproofing is necessary. Rolled waterproofing can be replaced - coat the foundation twice with bitumen mastic, and in areas with high humidity it is better to do double waterproofing - coat it with mastic, and then lay “Gidroizol” as well.
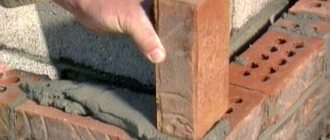
According to the size of the pillar, a layer of mortar a little more than 1 cm is applied to the waterproofing. Bricks are laid on it, according to the diagram. They are leveled in vertical and horizontal planes by tapping with a special rubber hammer. Craftsmen can use the handle of a trowel, but in this case, the remains of the mortar can fly off the surface of the trowel, staining their hands and the brick, and it is difficult to wipe off the cement.
Ceramic brick absorbs moisture very quickly, so if you hesitate a little, it will be difficult for you to “put” it in place. To ensure that the solution retains its plasticity longer, the brick is dipped in water for a few seconds before laying. The same maneuver makes it easier to wipe the solution from the surface (it is removed immediately with a dry cloth).
We hit with a hammer
The second row is laid in the same way: the mortar is spread on the bricks, the bricks are placed on it, but with a bandage - unfolded so that the seam is blocked. Level again. Then take a tape measure and check the dimensions of the laid rows. Even a small displacement of 1-2 mm is eliminated. Tap the end of the brick (called a “poke”), moving the bricks closer. Then, if the side edges were not coated, fill the vertical seams. All subsequent rows are placed similarly.
If there is a void between the inner reinforcement pipe and the brickwork, it is filled. If the distance is small, you can use masonry mortar; if the void is significant, to save space you can fill it with crushed stone, compact it, then pour it with liquid cement-sand mortar.
Masonry under the rod
The masonry of pillars described above has long been tested, but for beginners, when making it themselves, it is difficult to maintain an even seam. Another problem is that the solution comes out of the seam, staining the surface. It doesn't turn out very nice. To make the work easier, we came up with a laying under the rod. Take a square metal rod with a side of 8-10 mm, cut it into pieces, 10-15 cm longer than the dimensions of the post.
Bar layout
Having laid the first row, a rod is laid on it along the edge of the brick. Fill the area with a small amount of solution, with a larger layer being made closer to the pipe. Then, running a trowel along the rod, remove the excess, clearing the rod of the solution. But at the same time, the slope of the solution is maintained. They place a brick and level it. At the same time, the rod prevents it from settling too much, and we control the position of the other end with a level.
Apply the solution to the side edge under the rod
Then take a short piece of rod about 10 cm (for a vertical seam), place it along the butt, apply the mortar with a trowel to the side of the laid brick, also removing the excess along the rod. The second brick is placed and leveled. After the level is set, the seam is pressed from above with a trowel, and the vertical rod is removed.
We take out the rod, holding the seam with a trowel
This is how all the bricks are laid out in a row. Then the rods are removed and proceed to the next row. This technology for laying brick pillars allows you to control the seams and make them neat. Even a novice amateur mason can fold a pillar this way with his own hands.
It is only important to control the parameters of each row during the process (so that the column in the cross-section is the same size)
Video lessons
A more complex version of a brick pillar - twisted with a screw
Features of working with ceramic bricks
Possible difficulties and errors in the process
This masonry is a complex type of wall construction and can only be performed by highly qualified masons. The main difficulties arise due to the need to accurately create angles.
The most common mistakes when laying 1.5 brick walls:
- Low quality bricks with a density of less than 650 kg/m3, curved edges, defects and different geometric dimensions are used in construction;
- the insulation layer between the base and the wall is not completed;
- when raising corners, the rule of perpendicularity of the first blocks is not fulfilled;
- no reinforcing layer;
- The layout of the butt and spoon sides has not been completed.
Preparation
Laying one and a half bricks begins with the preparation and purchase of the following building materials and tools:
- solid brick;
- cement;
- sand;
- shovels and bayonet shovels;
- water;
- hammers;
- mallet;
- plumb lines;
- Master OK;
- building level;
- durable cord.
The selection of materials should be approached carefully. The characteristics of the future construction depend on their quality. To build walls using this masonry method, you will need roofing felt, which is laid on the foundation, covering its surface. This improves waterproofing. Posts are installed at the corners of the building, and twine is stretched between them to simplify the laying out of the vertical plane. In case of high humidity, it is necessary to dry the brick blocks.
Advantages and disadvantages
Laying wall structures with 1.5 bricks is the most common, as it can ensure the integrity and reliability of high-rise buildings for 100 years.
The main advantages of such a wall are:
- High strength characteristics.
- Good noise protection.
- Fire resistance.
- Environmental safety and biological stability.
Disadvantages include the need for thermal protection, high price and the need for qualified builders for installation.
How to lay a brick plinth correctly?
The construction of a brick plinth differs little, regardless of the thickness of the wall and the number of rows.
Step-by-step instructions on how to lay a brick plinth:
- The foundation is treated with bitumen mastic.
- The base is waterproofed by laying roofing material and treating the side surfaces with penetrating compounds. The rolled material is laid with an overlap of 10 cm, the waterproofing should protrude beyond the foundation by 3-4 cm.
- Final check of the correct location of the angles and plane.
- Prepare a working solution of grade M100 (M75-M125).
- The solution is laid on the foundation to a thickness of up to 2 cm, and a 4 mm wire with a cell size of 4 cm is inserted inside.
- Laying the first row is carried out; work should begin from the corners.
- After the first layer, check the level of the plane to adjust the thickness of the seam.
- When laying subsequent rows, bandaging is performed; the pattern is selected individually, most often occurring after 1-3 rows.
- Reinforcing mesh is laid every 4 rows.
- In the last layer of the plinth, holes may be required for laying the floor with the installation of rails or channels.
- Insulation of a brick basement from the inside or outside with extruded polystyrene foam.
- Covering the base with decorative stone, plaster or ceramic tiles.
1 brick
Laying a base of 1 brick is used for lightly loaded structures: garages, agricultural buildings, workshops, etc.
If you do everything yourself, you can simplify the task a little and lay the bricks one next to the other
The installation procedure is carried out according to a single system, but it is important to adhere to the basic rules:
- during the laying process, the seams of one row and another should not be allowed to coincide;
- the wall must be reinforced to prevent cracks from appearing;
- It is recommended to cover the brick base with cladding.
In 2 bricks
Laying a plinth with 2 bricks differs only in the technique:
- dressing is performed infrequently, once every 2-3 rows is enough;
- It is better to perform reinforcement once every 2-3 rows;
- acceptable brick displacement in each row is 25%, ideal is 50% of the brick width.
Cost of work
The estimate for laying walls includes the volume of basic and auxiliary materials that will be needed in the laying process and the cost of the work itself. The cost of erecting walls of 1.5 bricks depends on the volume of construction, the height of the building, transport interchange and region.
The most expensive services of builders are in Moscow and the northeast of the country. In other regions, prices are almost equal, with a discrepancy of up to 10%.
Average prices for operations for laying the walls of a 1.5 brick house by region of the country:
| Type of construction operation | Dimension | Moscow prices | Perm prices | Prices for Severomorsk |
| Dismantling work on walls 1.5 bricks | rub. per m2 | 1100 | 700 | 900 |
| Masonry, facing brick | rub. per m2 | 3200 | 2300 | 2100 |
| Exterior wall masonry | rub. per m2 | 1800 | 1600 | 1700 |
| Masonry of external walls with insulation | rub. per m2 | 2800 | 2400 | 2500 |
All the most important and useful information about the types of brick walls is presented in this section.
Laying in 2 bricks scheme
For laying 2 bricks, the mortar is mixed according to the standard scheme: 1 part cement to 3 parts sifted sand. When erecting structures made of ceramic bricks, you will need additional equipment:
- cutter;
- trowel;
- building level;
- hammers;
- plumb lines;
- construction mixer;
- shovels;
- spatulas.
Cement-lime mortar is not used in the construction of high-rise buildings. With its help you can create decorative elements inside or outside the building. The thermal conductivity of the mass is low, the plasticity is average. To increase the fire resistance of a building, fireclay clay is added to the cement. It is more convenient to mix the solution in a concrete mixer.
Parameters of typical brick dimensions (according to GOST):
- the width of the masonry will be 500-510 mm;
- height (including blocks and seams) - about 155 mm.
Before starting construction, experts recommend calculating the width and height of the future building in order to draw up a cost estimate for the material.
Type of masonry
Each of the methods of laying 2 stones is distinguished by the edges of the blocks. There are 3 main surfaces:
- poke;
- spoon;
- pastel.
Pastel is the largest face of the block, another name for it is working. The surface can be upper or lower, much depends on how it is placed inside the masonry. The spoon is understood to be the second largest perpendicular side. The poke is located perpendicular to the other two faces in the brick block. This surface is the smallest in size.
There are several main types of 2-stone masonry:
- Cross. Lay out 3 tie and 3 spoon rows. The scheme is repeated the required number of times.
- Double row (chain). The simplest way to construct buildings. First, lay out 2 rows parallel to each other and strengthen them with cement mortar. During the laying process, a ladder is formed with a shift of 3-4 cm.
- Art. This type of masonry allows you to form the design of the facade through the design, coloring of the joints and laying of brick blocks. The facade is not a perfectly flat surface, but an angular architectural relief with slopes, columns, protrusions or niches. Another name for masonry is patterned-relief.
- Single row. It is based on a stepwise alternation of spoon and butt rows. This method is suitable for building a fence.
- Multi-row. The wall is laid out in even layers of 6 lines. Every 6th row is a splice row, all the rest are spoon rows. Vertical seams are tied longitudinally in 6 rows.
Laying is carried out horizontally. During the construction process, the purpose of the structure, the possible load on it and geometric characteristics are taken into account.
During the period of laying stones, attention is paid to the thermophysical properties of the material. Dimensional parameters of brick and cement make up the total thickness of the walls
The strength of the building directly depends on the chosen dressing scheme: it is carried out transversely or longitudinally. Masonry often involves a lot of pressure on the foundation of the building, so experts recommend pouring a reinforced base.
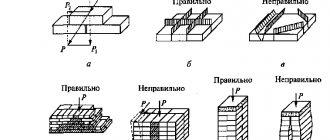
Designation of brickwork elements
To make this article more informative for you, you need to understand the simple terms inherent in brickwork, the definition of which is presented below.
Brick laying is done in horizontal rows. The bricks are laid on the mortar with a wide edge - a bed (there are methods of laying on a spoon).
Horizontal seam - a seam between adjacent horizontal rows.
Vertical seam - a seam separating the side edges of adjacent bricks. There are transverse and longitudinal.
The inner mile is a row of brickwork that faces the inner surface.
The front or outer verst is a row of masonry that faces the outer (facade) side.
Zabutka - rows located between the inner and outer versts.
Spoon row - a row of bricks that are laid with spoons to the surface of the wall, i.e. long edges.
A butted row is a row of bricks that are laid with butts to the surface of the wall, i.e. short edges.
The suture dressing system is a certain order of alternating spoon and butt rows.
Spoon masonry is a masonry in which the brick is laid with a spoon outward in relation to the front surface of the wall.
Buttered masonry is a masonry in which the brick is laid with the butt facing outwards in relation to the front side of the wall.
The width of the brickwork must be a multiple of an odd or even number of halves (1/2) of bricks.
Main stages of construction of internal structures
Internal partitions are an important part of the overall construction
In order to ensure that the thickness of the brick walls is sufficient, it is necessary to perform the following steps:
- pour out the solution and level it with calf;
- we take the product and put it in the right place, to perform the work efficiently, you should ensure that the markings coincide with the top edge of the building material;
- then we settle, i.e. fix the product and use a rubber hammer to knock on it from above until the edge fits onto the previously installed lacing;
- Finally, we remove the excess mortar; it can be laid on top of the building material or between its ends.
Expert advice! If you are not sure about the correct thickness of the brick walls, use chalk or a wax pencil, this will help avoid mistakes during the work process.