Brick laying can be done either with seams or using bricks without seams. Brickwork is one of the main technologies in the installation of buildings and structures. When laying bricks, a large number of important laws of masonry must be observed in order to achieve high strength and solidity. The rigor of the construction technology is due to the fact that the structure needs to withstand quite large loads - from its own weight and supporting elements.
The appearance of bricklaying occurred at the same time that people learned about brick itself. This technology has been available to humanity since the eighth millennium BC. All technologies and production are subject to unambiguous, strict requirements, which are written in state standards. The rules for cutting brickwork are also determined.
Three cutting rules
The main thing to do when laying bricks is to use the rules. The brick is perfectly prepared to withstand compression, but not bending.
Rule #1.
In order for the stone to receive a compressive load, make sure that the planes of the rows are parallel and the brick does not receive excess pressure at an angle (maximum 17°).
Rule #2.
In the rows of faces located on the sides, two systems of perpendicular areas should be created (be next to each other).
Rule #3.
Seams located transversely, longitudinally and vertically must be parallel to each other, and there must be a seam between them.
//www.youtube.com/watch?v=2MW-JnMPoXg
Types of facing bricks
Building blocks are divided into the following types:
- Ceramic is the most popular option among builders. It is made from clay with mineral additives. The workpiece is passed through dies. As a result, manufacturers receive a block, it is sent to a kiln in which it is fired at a temperature of 1400-1600 degrees. The finished ceramic brick has excellent hardness and strength, and it practically does not absorb moisture. It is possible to choose a color shade. It is chosen for lining a wooden house.
- Clinker - brick is a variation of the previous option. It is produced from the same raw materials and using the same technology, but it is fired at a higher temperature - about 1900 degrees. The result is a monolithic block. It is resistant to atmospheric agents. The service life reaches over 100 years. Laying is done using a special solution. These types are more expensive than the previous option. The photos of the houses show cladding with clinker blocks.
- Hyper-pressed - clay is not used in the production process of the building material. It is made from a cement-limestone mixture with mineral additives to increase strength and obtain the required color shade. Brick does not go through the firing stage during the manufacturing process. It is formed under the influence of high pressure. As a result, the block becomes harder and denser. The material weighs quite a lot. The working edges have the texture of natural stone, which looks beautiful when laid. It is expensive and is used for cladding mansions. This type is used for laying gas silicate blocks with facing bricks.
- Silicate - it is made from silicate sand to which water and lime are added. It has light shades. Brick absorbs moisture well, so it is not resistant to severe frosts. The service life of this type is not long. It is not often used for cladding buildings. We will have to additionally hydrophobize the house. Costs less than other options.
Types of masonry dressings and seams
Bonding is the connection of rows of masonry in order to achieve complete distribution of the load in the brickwork (the brick is placed on the seam between a pair of stones along the length of the entire wall). There is ligation of vertical, transverse and longitudinal seams.
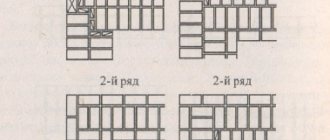
There are three suture dressing systems (Fig. 1):
- chain (consists of one row) - alternate formation of layers of brick laying;
- three-row - the first tying row and three spoon rows alternate, while the last row remains tying;
- multi-row - laying rows in turn (for example, one splice row, two spoon rows).
Masonry under the template
A solution with a thickness of 0.8-1 cm is laid on the walls, while about 1 cm should remain to the front edge of the block. It must be placed under a certain template. This is a special wooden strip, the width of which is 600 mm and the thickness of 0.8 - 1 cm. There is a longitudinal protrusion at the bottom. It should rest against the facade, and then the composition is applied to it.
A calibrated steel rod is used as a template; it has a square cross-section. The coating mixture should be thicker so that it does not spread under its weight. The mixture is fixed on the narrow edge of the facing block. It is installed vertically on the surface horizontally. A sand-cement mortar is placed under the template. Using a trowel, it is distributed between the blocks and arranged in a row. It will be convenient to install ventilation boxes.
Types of brickwork
Lightweight (well) masonry is used when installing buildings with a small number of floors. It consists of two walls located on parallels. The walls are insulated with special materials. It is important to know that the entire wall cannot be completed in this way, therefore, skipping one meter in height, it is necessary to insert a stud row. Made only from whole brick.
solid masonry
Solid - the width of this monolithic structure is made from half a brick. The elements are laid out in several rows. Bricks are laid along the entire length of the outer side of the wall.
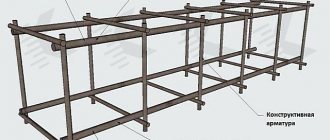
Reinforced masonry is designed for buildings that bear heavy loads. The reinforcement is built into the seams horizontally and vertically; the permissible thickness is 4 mm greater than the reinforced rod. During construction, nets made of the same material are used. Lay out every 3-5 rows of masonry.
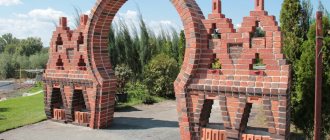
Decorative. Currently, many variants of this type of masonry are used. It is very popular when cladding buildings due to the fact that as a result you can get more variations of brick patterns of different colors and sizes.
Facial. It consists of two walls located on parallels, internal and facing. The front one consists of decorative bricks, and the inside wall is made of ordinary bricks.
They are selected so that both rows are the same color.
Only a system consisting of multiple rows of dressing is used, i.e. the front and the walls inside are tied together so that the bonding rows alternate with every fifth spooning row.
Tools and accessories
To properly lay out facing bricks with your own hands, prepare the appropriate tools and materials. To work you will need:
- level to check the evenness of the row;
- trowel - it is used to apply masonry mortar, remove its excess, and level the brick in place;
- a hammer in the form of a pickaxe - will be needed to split the brick into elements of suitable size;
- grinder, diamond wheel - replaces the pick to adjust the stone to the required size;
- steel rod with a square section of 1 by 1 cm - it is used to form inter-row seams;
- a smooth rod with a diameter of 1 cm - it is used for jointing;
- marking cord;
- anchor;
- scaffolding material;
- templates;
- buckets, various shovels, a container for mortar mixture, a concrete mixer;
- hammer, plumb line;
- brick stone;
- cement material, river sand, lime and plasticizer additives.
Brickwork without seams
This type of masonry includes a decorative variety.
It is made of decorative stone consisting of gypsum and is used to decorate walls indoors. The thickness of a brickwork seam can reach only 8-10 mm, but when laying tiles without seams, its imitation will remain due to the roughness of the tiles. But keep in mind that the process will, of course, go much faster, but at the same time the consumption of your tiles will increase by almost 15%. Remember that plaster is a material that must be handled carefully to avoid breaking it.
When preparing the surface for masonry, wash it thoroughly to remove all dirt and grease. It should be dry and clean, completely free of old plaster or wallpaper. Treat all irregularities with putty or gypsum glue. For the surface, use an acrylic primer. Do not forget to observe the drying time on the surface, it is indicated on the packaging.
Bricklaying Tools
| Brick parameters | Hyperpressed brick | Clinker brick | Sand-lime brick | Ceramic brick |
| Compressive strength, kg/cm² | 150-300 | 300-500 | 75-200 | 100-175 |
| Frost resistance, cycle | 75-150 | 50-100 | 35-50 | 15-50 |
| Moisture absorption,% | 6-8 | Less than 6 | 6-12 | 6-8 |
| Thermal conductivity, W/m° C | 0,7-0,8 | 0,7 | 0,3-0,7 | 0,3-0,5 |
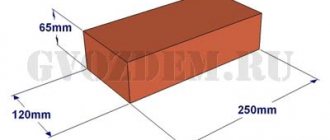
| Weight for size 250x120x65., kg. | 4 | 3-4 | 3,8 | 3,5 |
For high-quality cladding you need the appropriate tools:
- building level - without it it will not be possible to lay bricks in even rows;
- trowel - it is used to apply the mortar, remove excess, and trim the brick when laying;
- hammer-pick - used for splitting facing material;
- grinder with diamond blades – used for cutting bricks;
- a square metal rod with a cross section of 10x10 mm - for forming identical seams between the rows;
- round rod with a diameter of 10 mm - for jointing.
Additionally, you will need a thin construction cord or strong thread, anchors and tying wire to connect the masonry to the load-bearing wall.
How to style
//www.youtube.com/watch?v=RCxJo33DslI
Step 1.
Make marks along the horizon every 10-15 cm using a level. This will help you visually style. If the walls do not accommodate the usual number of rows, leave room for half tiles. Start working from the corners and lay only along horizontal lines. How you lay the stone vertically is up to you, it doesn’t really matter. The color scheme and size are also your choice.
Step 2.
When using a glue solution, it must be applied from the back side of the stone using a spatula. If the surface turns out to be completely uneven, use glue. Try to make your drawing interesting in color and texture. Remember that the temperature during installation should be no less than 10°C and no more than 40°C. The jointing should take place a day before you work with the stone.
Step 3.
Cut and process stone with the most common tools - a grinder or a hacksaw.
Step 4.
You can lay decorative stone with or without a seam, but if your stone is a seam stone, try to keep the lines parallel. When laying the seams of the brickwork, you can remain somewhat careless, so the walls will look more natural.
Step 5.
To decoratively fill the seam between bricks, use gypsum glue. Apply it to the back surface - the thickness of the mortar between the bricks should be 5 or 6 mm. When installing tiles, adhesive mortar will be squeezed out of it and will be used to seal the seams.
Before the solution sets (looks like plasticine), smooth the seams with a wooden spatula. Carry out the rest of the treatment with a wet brush.
Step 6.
If you are installing using cement mortar, moisten it with water using a brush. When decorating a fireplace, make sure that the tiles do not come into contact with a surface that could get hot.
Remember that when laying stone on a hot surface, when heat treating it and installing masonry at a cold temperature (close to zero degrees), you risk that the tiles will simply move away from the wall or burst.
Step 7
After you have taken into account all the previous steps, prepared the glue, made markings and chosen the decor of your masonry, you can safely begin installing it. Rub the glue solution with a spatula on its smooth side in order to eliminate all microcracks, then use a notched trowel. Apply a small layer of adhesive to the bottom surface of the stone, using the smooth side of the tool, so that everything is evenly covered with the solution. Press the tile firmly against the wall so that it can lock into place.
When using sealant, apply it in wave movements and try to press the tile firmly to the surface so that the seam does not lose its evenness.
Step 8
If there are chipped stones left, use them in the areas of doors and windows, first sharpening the chips with grout or specially designed dyes to create an even seam between them.
Brick cladding technology
First, markings are made on the wall, and the material is dry laid out. A block layout diagram is drawn. You need to immediately mark places near window or door openings for trimming material. Alignment is done with reference to the level of the base. The initial row is installed around the entire perimeter of the building. The mixture is made in small portions. The composition should be applied with a slight indentation of 1.5 cm from the edges.
When the initial row is laid out, they proceed to the installation of corner posts. Their height should correspond to 4-6 rows. A rod is pulled between them, and further masonry will be carried out along it. Using this guideline, horizontality is maintained. To tie the cladding to the wall, additional anchors are used simultaneously with wire. When the seams have set, jointing is done using special equipment. The front part of the facing material is periodically wiped during the process.
Preparing the base
The beginning of the process is preparatory activities. If you do not prepare the wall for laying, the cladding will turn out uneven. First, gutters, lanterns and platbands, as well as various decorations, are removed from the front side of the house. The old paint is cleaned from the surface, all its remnants are removed. All cracks are sealed with putty. If the wall is uneven, you will have to re-plaster it. The surface must be primed to improve the adhesion of the adhesive composition and the wall.
Preparation of the solution
The adhesion strength of the brick to the white mixture will depend on the quality of the composition. This problem most often occurs with clinker-type masonry, so special mixtures are added to the cement mortar to increase adhesion rates. To prepare the mixture you will need high-quality cement, it is advisable to choose the M500 brand, river sand and water. The mixture ratio for masonry is 1:4:1, but less or more water is added, everything will depend on the quality of the sand and cement. The brick should not “crawl” on the mortar made.
Experts recommend adding clay to the composition, then it will be more plastic.” Color mixtures are also used for cladding to create a unique façade. To prepare colored masonry mortar, special pigments are purchased.
Laying the first row
The workspace is being prepared for work. Not only the mortar and the facing block, but also all the tools should be at hand. A container with water is installed and the first blocks are soaked in it. It is recommended to lay the initial row first without any mixture. The length of the building perimeter is not always equal to the length of the cladding material in some places. You need to trim the blocks and choose the location of the seams.
If the initial row is immediately laid on a cement mixture, then problems with trimming may arise; sometimes the facing bricks in the masonry are replaced. The lining is done from the corner of the house. Each block is laid on the plinth base using a level, and the seams are immediately leveled. An air pocket of 2-3 cm is always left between the cladding and the wall surface so that there is room for ventilation.
Laying corners
After installing the initial row, they move on to facing the corners. They are raised to a certain height of 4-6 rows. A special cord is stretched between the corner blocks, and they proceed to laying the wall. The bricks must be in contact with the cord. After laying, it is removed and the remaining mixture is wiped off. When installing corners, control is exercised over right angles and verticality.
Wall covering
This is the next stage. A thread is stretched between the corners of the second row and fixed to the surface with something heavy. The edges of the initial row are placed under the rod, and the surface is covered with the mixture. The blocks on the ground are laid out vertically. A little bit of solution is applied to the ends.
The blocks are applied to the wall and slightly tapped using a trowel. The rod is removed and the remaining cement mixture is wiped off with a soft cloth. Be sure to control the horizontality of the row using a level. When the height of the wall reaches the height of the masonry of the corners, they are increased by another 4-6 rows, and then they proceed to covering the surface using a cord.
Tying the cladding to the wall
It is produced in several ways. The first is that the layers are tied using bonded bricks. Simultaneously with the binding, insulation is installed and a gap is created for ventilation. The second is that the connection is carried out using reinforcement. Holes are made in the walls, and thin reinforcement is inserted into them - 8 mm in diameter. The loose ends must be placed in the inter-row seams. The rods sway over time due to the effects of temperature and movement of the solution. They can move and break the strength of the binding.
The third method is a connection between the lining and the surface using reinforcing mesh. It is nailed to the load-bearing wall. But if this option is used, then insulation cannot be installed. The use of flexible connections is the fourth method. Polymer rods with a diameter of 6 mm are installed in the wall. This is done using dowels. The free end is supplied with sand, which increases the adhesion to the solution. This option is most often chosen for the bundle.
Slopes
To decorate the house, they are used in a different color shade. The masonry of window openings is made using interlocking bricks. The perimeter of the opening will be strengthened. The result will be a beautiful, even column, and the edge of the canvas will become denser. The slopes may protrude slightly beyond the surface cladding; figured masonry is often done. Be sure to check the verticality of the installation using a building level.
Joining
It represents the contouring and ordering of the seam. The work is carried out using a jointing knife. Its width is 9 mm, and the blade is slightly convex, thanks to this you can create the desired profile for the seam.
When several rows are laid, the jointing is done by smoothing the seam to give it an even shape. The recess is made relative to the masonry.” If the solution sets, it is unlikely that jointing will be possible.
Secrets of unstitching
Carry out jointing using a special syringe gun for mortar or a repair bag, which can be used to fill the seams with mortar between the bricks (you can use a regular bag, making a hole in the corner, the main thing is to take into account the size of the hole and the desired size of the seam). Make sure that the thickness of the seams is uniform, so that when the relief is completely leveled, contrast will appear on your wall.
When decorating your home, take into account all the rules of precautions and work performance, then the renovation will go much faster and you will not need to make unnecessary expenses.
//www.youtube.com/watch?v=95A5cKPmT8A
Facade reinforcements using the example of MURFOR structures
Deformations of the walls, as a result of which cracks appear on them, can be prevented if reinforcing structures are used during the masonry process. An example is the MURFOR wall reinforcement system. This design consists of two parallel elements (rods) that are welded to a third element shaped like a sinusoid.
How does MURFOR work? After it is laid in dangerous areas where there is a risk of displacement of wall elements, it takes on the resulting loads, ensuring their even distribution. The recommended installation areas for such a system are window and door openings, which are most often subject to height deformations.
Window opening
Door opening
Potentially hazardous areas subject to changes in masonry height
Installation diagram of the MURFOR reinforcing system, which is installed when there is a risk of ground subsidence under the building. First, the elements of the system are laid in five rows in a row, starting from the bottom.
Next, every fifth and sixth row is reinforced.
The traditionally used reinforced concrete armored belt is an expensive and time-consuming solution. Instead, you can use MURFOR structures, installing them in the upper rows of masonry.
Thanks to the use of MURFOR, the spacing between expansion joints can be increased:
The MURFOR reinforcing system provides the possibility of using special clamps with it, which allow the installation of window and door lintels.
Horizontal masonry option
Vertical masonry options
Recommendations
Under no circumstances should you lay out more than 6-7 rows at a time, because the masonry may begin to deform from the enormous load. It is important to check every 3-4 rows with a level to ensure maximum verticality. Also, you cannot fill the gaps between the building wall and the cladding with anything; an air layer is required for ventilation of the surfaces, in addition, it will also serve as thermal insulation. The jointing of the slopes can be done immediately after laying, so that the scaffolding does not have to be rearranged twice.
Step-by-step guide to action
At the preparatory stage, the condition of the foundation is studied: one of the requirements of the technology is the laying of bricks exclusively on established and strengthened structures, reliably protected from moisture. In particular, brick walls are erected on a tape or grillage completely covered with rolled waterproofing. The diagonals and level of the foundation are checked; the permissible difference is 20 mm; if it is exceeded, leveling work is carried out.
Before starting work, components are prepared (sand is sifted in a sieve with cells no larger than 3 mm) and tools: concrete mixer, containers for transporting the solution, shovel, trowel, carpenter's angle, building level, cord and marker for marking. To eliminate errors, a material placement plan is drawn up taking into account the selected dressing scheme, and the required quantity is calculated (with at least a 10% margin).
When laying bricks with your own hands, it is recommended to follow the following step-by-step guide:
- Marking the lines of the walls, pulling the cord.
- First row of bricks: without the use of mortar, with interlocking masonry made of exclusively whole products.
- Preparation of the masonry mixture in a volume for no more than 1-2 hours of work, placing it and leveling it with a trowel.
- Laying corners, starting with two bricks placed at an angle of 90° and checked with a building triangle. In addition to clearly verified products, you need to lay out several more pieces with control of the level of each. Thus, the wall rises at least 3 rows up, the process is repeated at all other corners. This rule – corners are 2 bricks higher than walls – is relevant for all structures. For fixation, an aluminum frame is used, secured with metal brackets.
- After this, you can lay brick walls: each element is brought to the right place, the coincidence of the markings and the location of the ribs is checked, after installing the blocks, they are tapped with a hammer or trowel until they come into full contact with the cord. Excess mortar is removed (placed on top of the brick or in vertical joints), and the level of the row is checked.
- The next rows are placed with a mandatory offset (it is advisable to note the number of completed rows in a pre-prepared plan). Regardless of the chosen method of laying the seams (in hollow, undercut or decorative), their thickness is controlled (the recommended limit is 6-12 mm, for defective or uneven products - 10-15).
During the laying process, all bricks are wetted; after a break in work, it is recommended to coat the lower rows with a damp brush. In especially loaded walls, reinforcement is placed: a metal rod of about 4 mm in longitudinal and transverse seams or a mesh every 4-5 rows of brickwork. The final stage is grouting and forming the seams; when plastering work is carried out, it is lowered (removing excess from the outside is enough). If necessary, the frozen solution is carefully washed with water or special compounds.
If there is the slightest doubt about how to lay bricks, the work is entrusted to professionals. If you have no experience, you should start with simple enclosing or unloaded structures. The next stage of construction (installation of floors, finishing) proceeds after 70% strength gain (1-1.5 weeks in the warm season), the final hardening of the brick walls takes 28 days.
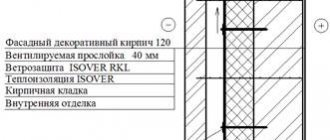
Insulation of walls in three-layer masonry
Rigid mineral wool boards or sheets of foamed polymers are usually used as insulation: expanded polystyrene - extruded polystyrene foam (EPS) or expanded polystyrene board (EPS), PSB foam.
Heat-insulating slabs made of cellular concrete and foam glass are used less frequently, although these materials have a number of advantages compared to the above-mentioned insulation materials.
The thickness of the insulation is selected depending on the climatic conditions of the construction area.
How to determine the required heat transfer resistance of a wall and calculate the thickness of the insulation, read the article “Heating costs and heat transfer resistance.”
How to make masonry?
We already know what kind of masonry there is. Now all that remains is to figure out the techniques for doing it.
Right in the middle
For laying brick stone, a plastic mortar mass is used. The mixture should be flexible, quickly applied and easily moved to the desired location. This is possible if you add special additives to the solution that prolong the setting period.
Stepping back one and a half to two centimeters from the edge of the wall, lay out a two-centimeter layer of mortar. Using a spoon technology, the stone is held with a certain slope and brought to the place, raking the mortar mixture with a poke. At the time of joining, the seam area is almost filled with mortar. All that remains is to press the brick, level it in place, and remove excess mixture.
When working using this technology, you do not always completely fill the vertical seams, so the method has a second name - “empty space”. They are filled while laying the mortar under the next row. If you are not fluent in this technology, first fill the seams, and then lay out the masonry mixture. Otherwise, cold air will begin to penetrate through the empty spaces.
The butt row is laid according to a similar pattern, only the mixture is raked in with a spoon edge.
Butt-together with trimming
The technique has an average level of productivity. The bed of mortar is laid a centimeter from the cut of the brick row, the stone is laid according to the previous option: the mortar is raked, the brick is pressed in place, the excess mixture is removed. If further finishing is not planned, the masonry seams can be embroidered, giving them the desired shape.
For ease of use, the solution is mixed with medium plasticity.
Press it in
This method is good when constructing walls made of hollow brick material and rigid masonry mortar.
The mortar mass is laid out at a distance of one centimeter from the edge, its thickness remains the same. The mixture is raked with the tool onto the edge of the laid stone and held, the brick is fed with the left hand, the edge is pressed against the trowel, which is immediately pulled out. Pressure continues on the stone until the thickness of the seam is about ten to twelve millimeters.
The masonry is dense, but the process takes more time due to additional movements.
Key points of clinker brick laying technology
As with any facing brick, laying clinker bricks must begin with dry laying of the first row, that is, without using mortar, observing the required seam (optimally 10 mm). This will be required for reference marking of vertical seams and obtaining the first horizontal, the so-called leveling seam, which will guide all subsequent horizontal seams.
To maintain the level of the masonry, vertical slats are mounted along the edges of the row, onto which a cord is pulled, measuring the average height of the layer - the total height of the bonding mortar and brick. Using such beacons, row laying is carried out much faster.
If a ventilated façade is provided, then the masonry must provide space for air inlet and outlet under the cladding. This is achieved by leaving empty vertical joints in the lower and upper layers of the masonry, which are then filled with insulation.
Expansion joints are designed to protect the cladding from cracking during shrinkage. They are left in the least visible places of the facade, every 9–15 m of its width. They are combined with the vertical joints of the masonry and are not filled with mortar, but protected from the outside with an elastic sealant. Horizontal expansion joints are also provided under balcony slabs or other structural elements that limit the vertical thermal expansion of the cladding.
How to choose the right quality seamless tiles and adhesive for them
Manufacturers of finishing materials almost always specify a specific adhesive for the porcelain tiles they produce. Do not neglect the manufacturer’s advice: they indicate the required adhesive based on the composition of the components included in a given batch of tiles. Since seamless tiles are quite an expensive product, it is better not to skimp on glue, otherwise you can lose much more by getting poor-quality cladding of the room. The latter can sometimes even lead to injury.
Only a professional can perform high-quality installation. If you do it incorrectly, then the drawing will not converge and discrepancies will be visible.
When choosing tiles, you need to pay attention to some details:
- All tile elements must belong to the same batch and production series; they are indicated on the product packaging. Otherwise, you may end up with the wrong pattern or the wrong shade, which will be very noticeable on the floor or wall.
- It is necessary to carefully inspect each tile to ensure that there are no microcracks, scratches or chips.
- High-quality porcelain tiles should have perfectly smooth edges and uniform dimensions.
- Several types are suitable for seamless installation, differing in strength and reliability - this information should be specified on the labeling.
- For seamless masonry, porcelain stoneware or lithoceramics are used.
- It must be taken into account that tiles with a rough surface are selected for flooring, and tiles with a smooth and glossy surface are selected for walls.
- It is advisable to buy 10% more tiles, just in case.
The use of seamless tiles is one of the most expensive and beautiful options for high-quality floor organization in an apartment or office.