Design options
Recently, a subscriber wrote a step-by-step guide on how to make a chicken coop with your own hands for 20 chickens and also posted a second work in which he made a barn with his own hands, we recommend you read it.
Each owner decides for himself what kind of home to build for his four-legged friend:
- The simplest booth is a wooden box with a pitched roof and a small canopy for protection from the sun or precipitation.
- A more complex option is a booth with a built-in canopy. The animal sleeps in the kennel, and under cover it can carry out its security activities without the risk of getting wet or overheating.
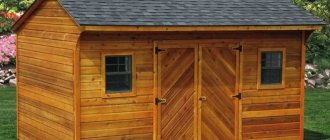
- A multifunctional design consisting of a house with a vestibule, equipped with a feeding area and a compartment for storing edible supplies. A spacious indoor enclosure turns the kennel into a real premium-class home for a large breed pet.
When keeping several animals at once or a dog with puppies, the dimensions of the room are calculated for the simultaneous occupancy of all residents. If the pets are not very friendly, it is recommended to separate it with partitions and equip separate holes.
The location for the booth is chosen on a flat area or a small hill to prevent flooding by rain or melt water. To prevent the dog from lying on damp ground, the kennel should be placed on a low wooden scaffold.
Drawings of a winter kennel and a warm enclosure for a dog
Having decided on the dimensions, you should draw a sketch of the booth, observing the following rules:
- make a hole in the long part of the booth, and not in the center, but moving it to any side;
- a gable roof with an attic looks better, but dogs love to lie on the roof, so it is preferable to make a shed roof;
- an insulated but removable roof will allow for regular cleaning of the room;
- In a winter enclosure for a dog, wind protection must be provided;
- you need to install a dog enclosure on a hill, in a place where the dog will have the maximum view of the area;
- The booth must be placed on a platform that prevents flooding with water.
- the floor of the insulated booth should not touch the ground;
- To prevent wind from blowing into the booth, the entrance from the vestibule to the warm room should be made obliquely from the outside.
- Insulation of walls, floors and ceilings must be done conscientiously, “like yourself.”
Alabaev FORUMHOUSE
I have a frame with 100 mm polystyrene foam without cracks, siding on the outside, 40 mm floorboard on the inside, soft tile roofing.
Here is a drawing of a classic winter booth, on the basis of which many projects of FORUMHOUSE participants have been implemented.
And these are the drawings of an insulated enclosure for an Alaskan Malamute puppy, built by our user with the nickname Sat-Electric.
The walls of the enclosure are sheathed and insulated in the place of the built-in booth
The drawings were made based on the size of the dog with a small margin for the internal partition.
Design principles and drawings
As a rule, the owner begins to build a house “by eye”, based on his considerations regarding convenience and comfort for the dog. But experienced dog breeders give very specific recommendations on how to make a doghouse so that it is maximally adapted to the needs of the animal.
The dimensions of the structure are selected depending on the size of the pet. To do this, its length, height at the withers and head, and chest width are first measured.
The drawing is drawn up taking into account measurements:
- the longitudinal size of the booth is equal to the length from the head to the base of the tail, so that the dog can lie down freely;
- the width is determined by the height of the animal at the withers;
- the highest point of the house should be no lower than the level of the crown;
- The width of the hole is taken to be slightly larger than the width of the chest, and its height is slightly less than the size of the dog at the withers.
This design takes into account the behavior of the animal and gives it the opportunity to feel comfortable. Depending on the size of the breed, the dimensions of the dog house range from 60x70x80 cm to 210x140x100 cm. If the pet is still young, a small allowance is made for growth.
Booth with vestibule
Booth with a porch
To make your dog’s home more comfortable, you can build a kennel with a vestibule. This is a design consisting of two compartments: the far one is a sleeping place, and the near one protects from drafts and cold. They are separated by an insulated partition with a manhole.
Prices for lining, imitation timber, block house
Lining, imitation timber, block house
Video - Insulated booth with vestibule
You should not make the sleeping area too large - dogs usually sleep curled up. But the dimensions of the vestibule should be such that the dog can freely stretch out to his full height, and also easily pass through the hole and turn around in the booth. The assembly of the kennel with the vestibule is carried out as standard; the only difference is the partition: to make it you will need 40x40 mm bars, a piece of plywood, insulation and screws. A frame is made from the bars to fit the width and height of the interior. The plywood is cut into two parts; one part is nailed to the frame, insulation is inserted between the planks, and covered with the second part of plywood. To ensure that the partition can be removed freely, take two wooden slats and, using a cutter, select longitudinal grooves in them to suit the thickness of the partition. Then they are screwed to the walls of the booth and a partition is inserted.
Materials
To build a house, you can use materials that are safe for dog health:
- tree;
- moisture-resistant plywood;
- brick;
- blocks;
- OSB boards;
- sandwich panels.
The roof of the house is made from any roofing materials. Corrugated sheets, metal tiles, and roofing felt left over from the construction of a house or gazebo are perfect. To periodically clean and treat the dog’s home, the lid is made removable or hinged.
Some craftsmen build a structure from rounded logs. Outwardly, it looks like a real hut, only in miniature. Of course, this is not the most budget option, but next to the owners’ log house it looks quite organic.
Thermal insulation - a warm bun for a dog
Dogs with thick fur can be kept outside all year round. These are Alabai, German or Swiss Shepherd, Laika, Husky and others. But despite the fact that animals have a high body temperature and their skin is protected by a dense undercoat, it is advisable to insulate the booth well.
Severe frosts can lead to hypothermia and even death of the animal. Hypothermia is especially dangerous for puppies. If the region has mild winters, protection should be provided in case of sudden cold weather.
To insulate the booth, natural materials are used - wood, hay, straw, felt, mineral wool. Dog breeders recommend laying pine or spruce shavings on the floor - the smell of the resin from these trees repels fleas.
You can use polymer insulation - polystyrene foam or polystyrene foam. They are effective even with a small layer thickness and are not afraid of moisture. To prevent your dog from chewing them, you need to take measures. To do this, the thermal insulation is protected with some kind of sheathing that is resistant to dog teeth - plywood, OSB, board.
Panel or film heaters provide quick heating. They are mounted under the inner lining and connected to the nearest power source.
The hole in the kennel can be covered with a curtain in severe frosts. It will protect the house from the penetration of cold air, wind and snow.
What material is best to make a booth from?
The owner of the animal himself determines the size of the structure and its location. First, the material for construction is selected. Next, calculate the need for building materials.
You need to decide which materials are suitable for creating a pet’s home and which are not:
- Materials coated with varnish or paint heat up in the sun and emit an unpleasant odor. Can cause allergies in animals.
- Metal structures cause discomfort to the animal in hot and cold seasons. The metal heats up in the sun and the kennel will be too hot. In winter, your pet will be very cold in such housing.
- You should not make a slate roof. This material is harmful to the health of both humans and animals.
- It is better to avoid insulation with polystyrene foam, polyurethane or various types of compressed wool. These materials emit odors, which reduces your pet’s sense of smell and reduces allergies.
- A box made of pressed wooden panels quickly loses strength, and in winter it may even fall apart.
After making the booth, it must be carefully inspected. Under no circumstances should self-tapping screws, nails or wood burrs stick out inside. Sharp protruding objects can injure your pet.
To make housing for dogs, boards made from coniferous trees are best suited: pine, spruce, cedar. To insulate the kennel, natural materials are used that will not cause allergies in the animal. The roof is made of metal or ondulin. A mattress filled with sawdust or straw is placed on the floor; the animal will sleep comfortably and warmly on such a bedding.
How to build a canopy booth
To keep a dog temporarily, for example in the summer at the dacha, you can get by with a lightweight option - a small canopy on supports. It will protect your pet from rain in case of bad weather or scorching rays of the sun.
The canopy booth can be installed in an open enclosure, attached to a house or a fence. Leftover building materials will come in handy: for the frame - bars, pipe scraps, for the roof - boards, corrugated sheets, metal tiles.
If the supports are metal, they are driven into the ground, tied around the top with bars or a profile pipe, and sheathing and roofing materials are laid. It is recommended to install a moisture-resistant lounger with legs or a boardwalk under the canopy.
The wooden posts do not need to be dug in, but only connected to the horizontal lower and upper strapping bars. Since such a structure does not have reliable support, the wind can overturn the building. To prevent this from happening, it is recommended to firmly fasten the frame to the ground, fence or wall.
Choosing insulation for a dog house
Selecting a method of material for insulating a kennel encounters two big problems. First of all, the insulation should be relatively harmless and not cause allergic reactions or aggression on the part of the dog. Secondly, the material should not absorb moisture and lose its heat-insulating qualities over time.
Mineral wool
Of all modern insulation materials, fiber mats, panels and rolled materials are strictly not recommended for insulating a dog kennel. There are many reasons for such a limitation, for example, the phenol-formaldehyde resin used in the manufacture of mineral wool, as well as stone dust, which cannot be avoided, cause severe irritation of the mucous membranes of the eyes and larynx.
Mineral wool emits a lot of dust, you need to think ten times before trying to insulate a dog’s kennel in this way
You can, of course, build and insulate a kennel using the method shown in the video:
It is unlikely that the Alabai for which the booth was built will feel comfortable in winter. If you build a kennel and try to insulate it according to science, then it would be better to use polystyrene foam.
Styrofoam
You immediately need to clarify such a characteristic as the vapor permeability of walls for a dog kennel. It can be equal to zero, and at the same time the dog will feel great, since the huge entrance and cracks under the roof provide normal ventilation and removal of water vapor. Therefore, insulating a doghouse with polystyrene foam is one of the most optimal options for solving the problem.
If you let the polystyrene foam sit under a canopy in the open air for a couple of weeks, the remaining solvent smell will completely disappear, after which the polystyrene foam can be laid on the inside of the body and the joints can be glued with polyurethane foam.
Roll type heat insulators
You need to insulate a dog house with the most affordable and simple materials, for example, the remnants of the substrate for laminate flooring, isolon, and even ordinary padding polyester. The material is sewn onto the walls from the outside; if the frame is wooden or plank, you can use a furniture stapler and staples.
At the corners it is necessary to overlap and seal the joints with regular tape. This is not done to combat water vapor, but only to fix the overlap of the fabric and make the insulation more durable. If the dog’s kennel is spacious enough, you can also insulate it from the inside of the room. After this, the insulation layer will have to be covered with clapboard or wooden slats, otherwise the dog will tear the foam insulation in winter.
Felt
An excellent material for thermal insulation of any premises. If you insulate with natural felt, then before laying the material will need to be treated with an insecticide against parasites and fleas. If the felt is thin, 3-5 mm, then it is better to insulate the kennel from the inside; you can also sheathe the outer surface, but in this case you will need to make a ventilation gap from slats, a vapor barrier, lay a thick felt layer and a plastic film that protects the insulation layer from getting wet.
Insulation with felt is much faster and easier
How to make a booth from timber, plywood or OSB
A simple way to make a house for a dog is to sheathe a wooden frame made of timber with plywood or OSB. These materials are inexpensive, environmentally friendly, and easy to process.
The timber must be thoroughly dried, as fresh wood dries out and warps greatly. The optimal cross-section of lumber is 40x50, 50x50 mm.
Moisture-resistant plywood is made from tree veneer impregnated with organic resins. It costs 1.3-2 times more than oriented strand board, which is made from wood waste. The properties of the materials are very similar, so inexpensive OSB is often used for the construction of dog housing.
If desired, you can paint the walls of the finished booth with waterproof compounds and decorate them with any decorative materials. Protection from moisture and sun significantly extends the service life of wood-based structures.
For construction you will need:
- bars 40x50 or 50x50 mm for the frame;
- plywood or OSB for cladding;
- flooring boards;
- wood screws, nails;
- roofing material - corrugated sheets, flexible or metal tiles (remaining from the roof of a house or gazebo), roofing felt, slate;
- insulation - foam plastic 20 mm thick;
- jigsaw, hammer, screwdriver.
Some stores offer cutting materials to the customer's size, so when you go shopping, you need to take with you the drawings of the dog house. The finished kit will only need to be assembled like a construction set and installed in place.
The first stage is assembling the frame. The cut bars are connected with self-tapping screws. You can immediately nail the floor boards, which will give the structure initial stability and facilitate further work.
The second step is covering the house with plywood or OSB. It is advisable to cut a hole for the dog in advance. Sand the edges of the materials to avoid burrs.
The third stage is the installation of the roof. You can put the same plywood or OSB, but on top you will need mandatory protection from rain and snow with roofing material, for example, roofing felt or soft tiles.
Exterior finishing is chosen according to your taste: waterproof painting, clapboard, blockhouse, PVC cladding. If you put foam or other insulation between the plywood and the sheathing, you will get an excellent warm house for your pet.
Do-it-yourself insulation of a dog house for the winter
Most often, it is necessary to insulate the yard dog’s apartment in the winter, when it is impossible to delay or postpone the insulation process for obvious reasons. A dog kennel, designed and constructed wisely, should be easy to disassemble. The roof, and sometimes the back wall of the booth, is usually made removable, so before you insulate it, you need to disassemble everything, thoroughly clean and dry it.
Bottom and floor covering
The most difficult thing is to insulate the bed or floor inside the kennel. Almost all dog breeds are extremely distrustful of replacing bedding and any attempts to insulate, change, or remake it. The dog can tear the insulation, throw it out of the kennel and defiantly lie down next to it. Therefore, the floor has to be insulated in two ways:
- A sheet of extruded polystyrene foam is placed under the bottom of the kennel, which is often used to insulate the walls and foundations of buildings for the winter. 50 mm thick EPS sheets are laid under the kennel, preferably in one piece, without seams or joints;
- Soft materials are laid on the floor, it can be an old woolen blanket, or a layer of sawdust can be added.
It is best if it is a thick mat with Velcro, which in winter can be easily taken out, cleaned of snow and accumulated debris and returned to its place. Therefore, owners often sew special mattresses with a top made of thick felt, an inner insert made of thick foam rubber and rubberized fabric at the bottom.
Be sure to place a film under the felt or sawdust
Wall insulation
For the vertical surfaces of the booth, it is best to use regular foam. If the dog lives on the street all the time, and it does not have the opportunity to hide in a summer kitchen or in an extension to the house, then it is best to insulate it with prefabricated slabs that can be easily pulled out if necessary.
In winter, with the onset of frost, you can easily remove the roof and lay foam plastic in the walls of the kennel. Typically, slabs are cut with tongues to avoid the appearance of cold bridges. At the end of winter, the insulation can be easily removed from the frame, thereby improving ventilation inside the booth.
Ceiling and roof
To insulate the upper part of the kennel, it is best to use rolled materials, such as polyethylene foam. The roof and ceiling most often suffer from condensation, so other materials cannot withstand moisture saturation and freezing. If the winter is severe enough, the roof can be further insulated by placing an old blanket or several compressed bales of hay on its surface.
How to insulate the entrance to a dog house
If the kennel is built according to all the rules, with an additional partition in front of the entrance, then there is no particular need to curtain the entrance to the kennel. Many dog owners play it safe, especially if the winter is harsh and frost can reach 25-30°C with strong winds.
An old blanket or jute will do, or in extreme cases, PVC film
Advice! In such conditions, it is better to give the dog the opportunity to spend the night in the hallway or utility room. A curtain at the entrance will not insulate the kennel, and the risk for the dog to get sick still exists.
The curtain or curtain at the entrance is usually made of very thick plastic film or rubberized tarpaulin. If you insulate a kennel, you need to be prepared for the fact that the curtain material may freeze to the wall. Therefore, for winter, the curtain is cut into strips:
- For small dogs, 4-5 vertical cuts are made, thick polyethylene will not freeze at the joints in winter, the animal can easily leave its kennel in any weather;
- For tall dogs, the curtain is slightly bent and cut with two side cuts. As a result, the curtain turns out to be quite rigid and does not flap in the wind, which is especially valuable for retaining heat in winter.
It is clear that the curtain will need to be changed periodically, so it is attached to the outside of the kennel facade. If it gets covered in snow in winter, the dog will always be able to push out the snow and fabric and get out of the kennel.
Pallet booth
A durable, practical kennel can be built from any available materials. In warehouses, when packaging products or building materials, pallets are used, which are sometimes thrown away as unnecessary.
The shields are made of bars and boards, and they are useful for constructing a kennel. Before starting work, the pallets must be disassembled, the lumber must be sorted, and one pallet must be left for the bottom of the booth.
The frame is made of bars, sheathed with slats inside and outside. Insulation is placed between the layers.
The roof is single or gable. It is also advisable to insulate it. If necessary, the folding hinges are screwed on - and a budget warm dog house is ready.
Barrel booth
Another option for a simple and quick-to-make home for a dog is a booth made from a disused barrel. Wooden, metal or plastic containers are suitable, except for those where fuel oil, toxic or strong-smelling substances were stored.
The barrel must be placed on its side and supported on all sides on strong stands. A hole is cut in the lid (if available). Instead, you can make a panel from boards or thick plywood and attach it to the ends of the container. The interior space is insulated with any available material.
House for a guard
Guard dogs - German or Caucasian Shepherds, Moscow Watchdogs, Giant Schnauzers, Alabai and others - are medium or large in size. They are active and need constant movement, so the animal’s booth is usually large and built in conjunction with an enclosure.
The house for guards is made according to the same algorithm as for ordinary dogs. Kennel parameters based on the animal’s body type:
- height 90-120 cm;
- width 60-90;
- length 130-180 cm.
A hole 40-50 cm by 50-60 cm is cut into the front wall. The roof structure is often single-pitched, since guard dogs like to jump up and guard the territory entrusted to them from above. If you attach a ladder or slide to the house, you will get a good simulator for active exercises.
The booth is installed in a protected area of the yard or in an enclosure, but it can be part of the enclosure itself and have common supports, flooring, and walls with it. This is already a fairly solid structure, the construction of which will require serious skills and more diverse materials.
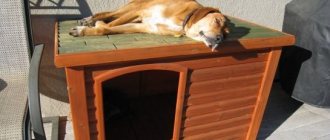
Assembling a booth with a pitched roof
Most dogs like to lie on top of the kennel, so houses with a pitched roof are more convenient for them. The roof should be at a slight slope and must be openable - this design simplifies cleaning and disinfection of the booth. To protect your pet from the cold, the house should be thoroughly insulated, and it is better to do this right away, at the assembly stage. For the same purpose, it is recommended to place the hole on the wide side of the booth with an offset to one of the corners. This way the room will not be blown out and the dog will have a cozy and warm sleeping place.
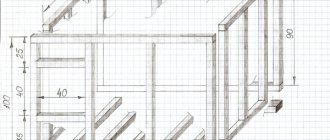
Marking and cutting bars
Step 1. Making the bottom frame
Manufacturing of the bottom frame
Manufacturing of the bottom frame
Making the bottom frame
40x40 mm bars are cut to the length and width of the bottom, laid on a flat area or on a table, and connected into a rectangle with self-tapping screws. If the animal is large, the frame is additionally strengthened with one or two crossbars made of timber. After this, the frame is sheathed with boards on one side.
Step 2. Insulating the floor
The photo shows a variant of foam insulation, which is laid between the bars and covered with boards.
The frame covered with boards is laid so that the bars are on top. Line the inner surface with glassine, attach it with staples, and then cut the foam to the size of the frame and lay it tightly between the beams. The height of the insulation must correspond to the height of the bars. The foam is covered with another layer of glassine on top and the finished floor is filled.
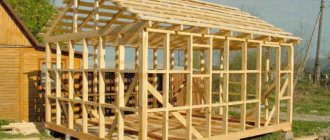
Step 3. Assembling the booth frame
Assembling the frame of the booth
The 100x100 mm beam is cut into 4 parts: 2 pieces in length are equal to the height of the booth, 2 are 7-10 cm longer. These bars must be secured in a vertical position at the corners of the bottom. Longer racks are installed in the front, and shorter ones in the rear. This is necessary to form the roof slope. Each block is leveled and secured with nails or self-tapping screws. Additionally, vertical bars are filled in the center of the walls and 2 smaller bars on the sides of the hole. At internal joints, metal plates are used to strengthen the frame.
Step 4. Wall paneling
Wall cladding
Wall cladding
Wall covering
The finished frame is covered with clapboard on the outside, and insulated from the inside: first, the walls are covered with glassine, secured with a stapler, and then the space between the bars is filled with mineral wool or pieces of foam plastic. On top of the insulation is covered with another layer of glassine, on top of which plywood, chipboard or other similar material is stuffed. The sheathing must be fastened with small galvanized nails, carefully recessing the heads so that the dog does not get hurt.
Wall cladding
Step 5. Making the roof
For a pitched roof you will need an OSB sheet and 40x40 mm bars. A frame is made from the bars according to the size of the inner perimeter of the kennel. A piece of the same size is cut out of OSB and stuffed onto the frame. Foam plastic is placed tightly between the beams, covered with film, and secured with a stapler around the perimeter. Next, take a larger sheet of plywood and lay it on top so that it overlaps the bottom frame by 10 cm at the back and sides, and protrudes at the front by 15-20 cm. This is necessary to protect the walls and the crawl space from rain. Instead of plywood or OSB, you can take boards 20-25 mm thick. The finished roof is attached to the booth using hinges, and roofing felt or soft tiles are stuffed on top.
Making a roof
Step 6: Finishing
Finishing
The finished structure is treated from the outside with a regular antiseptic or special impregnation and dried well. Next, roofing felt is nailed to the bottom, bending the edges 5 cm onto the walls, and two 100x50 mm bars are attached to the roofing felt. The bars are also carefully coated with a primer mixture. The booth is turned over again, the manhole and the ends of the sheathing are decorated with wooden trim.
The roof is additionally covered with a sheet of roofing iron and painted
Step 7. Installation of the booth
Booth
The booth is ready, and now you need to choose a suitable place for it. This should be a dry, flat area, not far from a residential building, protected from the wind. It is advisable to choose a well-lit place next to a canopy or tree so that the animal can hide from the heat. Of course, the dog must have an excellent view from his place in order to notice strangers in time.
Brick or block booth
Brick or block construction is not the most popular option due to the high cost of the material. But in strength and durability it surpasses all other types. Such a structure can be used for decades and become a shelter for more than one generation of dogs.
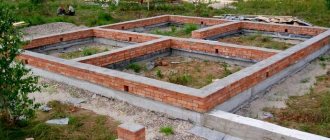
The construction of a booth made of brick or block materials is similar to a permanent house, albeit in small quantities, and includes the following steps:
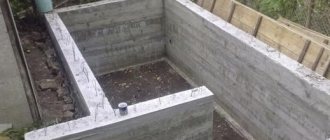
- Clearing, leveling and marking the site.
- Preparing a 15x30 cm trench around the perimeter.
- Laying reinforcement bars.
- Preparation of concrete and pouring into the pit.
- Strengthening takes 3-5 days.
- Laying half-brick walls with bandaging of seams and corners.
- Installation of a lintel over a hole from metal corners or oak boards. If you have enough skill, you can lay out the opening in the form of an arch without using lintels.
- Installation of rafters and sheathing.
- Laying waterproofing, roofing. You can make a separate lid with a lifting mechanism to facilitate changing the litter and cleaning.
Brick, gas or foam concrete retain heat perfectly, but additional internal insulation will not be superfluous for the dog’s winter residence. Exterior decoration in accordance with the general style of the estate will give the building a complete look and emphasize its solidity and solidity.