It may seem that making them yourself is too difficult, but it is not. Even a beginner can cope with the task. The first attempt is unlikely to be perfect, like that of an experienced builder, but with our instructions, the support pillars will definitely turn out strong and reliable.
Here you will read how to make fence posts from brick, how many bricks are needed for one post and much more - from specialists who have been building fences for 14 years!
List of materials
First, we list what materials and tools you will need:
- decorative or red brick, it is better to take a new whole one;
- cement mortar of a grade not lower than M400;
- a metal pillar around which the brick one will be built;
- gas drill or hand drill, shovel;
- crushed stone and sand for butting;
- metal rods 8 × 8 mm;
- plumb and level so that everything is smooth and beautiful;
- grinder, welding machine and rubber hammer;
- trowel - a spatula for applying the solution;
- mortgages, on which the fence itself will then be attached.
A natural question arises: what about the number of bricks per fence post? Below we will tell you how to make the calculations, but on average you will need 128–132 pieces per support. It is better to take a little more so as not to interrupt construction if there is not enough.
Tiling pillars
If necessary, you can tile any support column, for example, brick or wood, to look like stone. The stages of work are as follows (step-by-step guide):
- Preparing the support surface. The column is cleaned and treated with a primer.
- Fastening the mesh to the pole. For reinforcement, a mesh with a cell cross-section of 50x50 mm is required.
- The mesh is covered with plaster. This levels the surface for laying tiles, and it also additionally protects the post from moisture penetration.
- Facing. The tiles are laid on a special adhesive. If necessary, the material can be trimmed with a grinder.
- Grout. The joints between the tiles are filled with grout and cleaned.
- Decorative visors. The final stage is installing the caps on the fence supports.
Construction ready for cladding
Canopies are required for all types of supports. This way you can protect the structure from moisture penetration inside. Decorative canopies are sold in hardware stores, or you can make them yourself from tin.
The photo below shows the finishing tiles.
Variety of tiles
Calculation of bricks for a fence post
There is nothing complicated about the calculation either.
Let's take a standard installation, when 4 bricks are laid around an installed pillar. Let’s take the size of one unit according to GOST “Ceramic brick and stone”: it varies from 55 to 88 mm, let’s stop at 55 mm. Let's take into account the error per layer of mortar that should be in the masonry - here you need to rely on the thickness of the reinforcing bar, which is laid between the layers in order to maintain uniformity. Let it be 8 mm. Total brick + mortar = 63 mm.
Suppose you need to build a pillar 2 meters high - or 2000 mm. These 2000 mm (height of the support) must be divided by 63 mm (height of the brick together with the cement layer). It will turn out, in round numbers, 32 rows of 4 bricks each, for a total of 128 pieces. Plus four more pieces (one row) just in case.
Decorating tips
Ways to decorate hedges:
- A rubble fence looks attractive on its own and usually does not require additional decoration. But if the top is made, for example, in the form of an arc, then the design will be significantly transformed.
- A fence made of wild stone with forged elements is an ideal way to combine materials. In this case, the fence looks light and airy, unlike a solid fence.
- Stone combines well with wood. Such a fence looks cozy and does not weigh down the space.
- Brickwork and stone are a classic way to combine materials. The appearance of the pillars becomes attractive due to the contrast of the structures of different building materials.
- Also, torn stone is often used for decoration, which can be artificial or natural. The artificial material is an imitation of natural stone with smooth edges but a torn surface.
The texture of a natural product is obtained through special processing.
The photo below shows the stone fence supports.
Fence posts
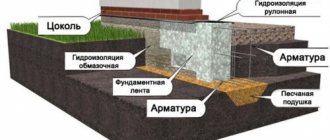
Stage 1. Construction of the foundation
Let's start laying pillars for the brick fence, and the first stage will be the construction of the foundation. Let us dwell in detail on the pile type: this is when steel supports are dug deep into the ground, serving as reinforcement. Actually, we wrote about how to install metal poles in another article, but we will repeat the sequence.
Our recommendation is to do butting from below, “dry concreting”, and pour cement on top. The method consists of filling the support with crushed stone mixed with sand. The mixture is thoroughly compacted. The advantages are obvious:
- there remains space between the particles of crushed stone, which allows groundwater to drain away, that is, the pillar will not be pushed out due to thaws;
- The technology itself is extremely simple - even a novice builder can easily handle it.
Sequence of installation of a pile foundation
- a hole is drilled, the depth of which should be at least a meter, and the diameter should be 25–35 cm; for this you can use a hand drill or a gas drill;
- at the bottom a cushion is created from a mixture of sand and crushed stone, which is compacted well, preferably using a vibrating tool, but it can also be done manually;
- a support pillar is installed, around which the same crushed stone-sand mixture is poured and compacted;
- starting from the middle of the part immersed in the ground and up to the surface, everything is filled with cement mortar.
The reinforcement can be slightly shorter than a brick pillar, except for those supports on which you plan to hang gates and gates: they need reinforcement to the very top.
A pile foundation is suitable for not too windy areas and relatively light fence materials - corrugated sheets, metal pickets, mesh. If you plan to build the entire fence from brick, you will have to make a full-fledged strip foundation.
Possible problems and their solutions
The main problems that may arise when laying pillars with your own hands are changes in size and “twisting”. Both defects arise from insufficient control.
When laying pillars with your own hands, often the top rows become much wider than the bottom ones. This happens gradually, a millimeter or even less is added, but in almost every row. As a result, at a height of 2 m the width of the column is 400 mm or even more. This is instead of 380 mm. The fix for this error is to control the size of each row.
It is not enough to control the dimensions of the pillar using the building level alone. Basically, a household tool (yellow) is used, and it has a fairly large error. And if the level is 60-80 cm long, you simply will not see minor vertical deviations. Therefore, they additionally use a tape measure - measuring each row. To reduce the time it takes to control, you can make a template according to the size of the column (for example, from even planks) with which to check for deviations.
The fence posts are laid around a metal reinforcing pipe, verticality is checked after laying each row
Laying pillars on your own without experience in such work can lead to another mistake: the edges of the pillar can shift, causing the pillar to twist around its axis. This drawback is much more unpleasant: try attaching spans to such pillars. There will be many problems. Therefore, when laying each row, you must strictly ensure that the corners are located strictly one above the other.
You can make the task easier by using two corners screwed to opposite corners. They are temporarily attached to the lower rows (with bolts or self-tapping screws in the seam) and then used as a guide, placing the bricks strictly in the corner.
Stage 2. Preparation of the foundation and materials
Cement and sand should be mixed in a ratio of 1:5, gradually adding water and carefully monitoring the consistency. To make the mass plastic, you can add a little liquid soap (20 g per bucket), and adding soot (you can buy it at any construction market) will make the solution black - it looks very nice against a light background.
How to check if the solution is ready? Apply a small amount somewhere and use a trowel to make a cross on it. The finished solution should not “float”.
After that, sort out the bricks. A deviation of 5 mm in height is allowed, but it is better if they are more or less the same. If the batches are different, sort them by size.
Before you start laying brick fence posts, ensure waterproofing so that the support never touches bare soil or concrete. You can coat the installation area several times with bitumen mastic, you can lay roofing material or waterproofing. The fact is that clay actively draws moisture from the ground, and when it freezes it begins to crack.
Now that we're done with the preparations, let's get to the fun part!
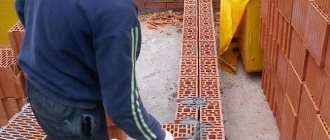
Stage 3. Construction of brick fence posts with your own hands
Typically, bricks are stacked either one and a half, or two. The first option is four pieces per row, when one is placed straight, the second sideways, and it turns out that there is a brick and another half on one side. The second is in two pieces, when one side of the pillar is wider than the other. Let's focus on the first case as it is simpler and more common.
Before laying, it is advisable to dip each brick in a bucket of water. Cement on a damp surface will retain its plasticity longer.
Subsequence:
- the solution is applied to the waterproofing in a layer of approximately 1 cm;
- the first brick layer is laid out, leveled using a level, and tapped with a rubber hammer;
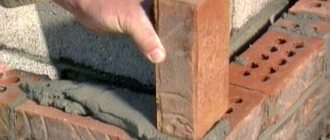
- then a pre-welded rod is placed on the structure, which will help maintain the width of the cement layer;
- mortar is applied to the rod, two bricks are pressed against it on top; You should have one more rod at hand - it can be used to regulate the size of the side seam;
- then the rod is carefully removed, while the two bricks already laid are held in place with a trowel - under no circumstances should they move;
- then the remaining two are laid at the level of the installed bricks; use a level so that the masonry does not warp;
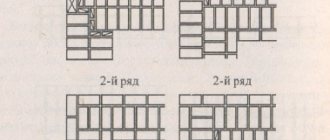
- remember that the rows are laid with dressing: that is, the top row should overlap the seams of the bottom.
Another tip: often when laying bricks with your own hands, the pillar expands upward. It is not easy to control involuntary expansion at the household level, because it has an error. We recommend measuring each laid row with a tape measure and aligning it with the bottom row by tapping with a hammer.
Masonry under the rod
It is not enough to simply cover the pillars with brick; it is important that the masonry remains durable and aesthetically attractive. Achieving even seams is not possible for all specialists (both experienced craftsmen and novice masons), so to make the work easier, masonry under the rod was invented. The main tool is a metal rod with standard dimensions of 8-10 mm. It must be durable, without damage or chips. Laying a pillar of one and a half bricks using a rod is carried out as follows:
- The foundation is prepared in advance (pile, strip, monolithic reinforced concrete) depending on the operating conditions of the structure and the load placed on it. The first row is created in a standard way, with a rod placed on top of it. The free surface is filled with a solution based on cement, sand or clay (as well as with the addition of a certain amount of slaked lime to enhance the performance characteristics of the solution) with a small margin. The further from the pipe, the thinner the layer should become.
- Excess mortar is removed, the rod is cleaned of cement, since its remains can accumulate on the brick, spoiling its appearance.
- A new portion of brick is laid, which is leveled horizontally and vertically using a level. After setting the level, a seam is formed, the brick is pressed using a trowel or a special hammer. The rod is removed only after the layer is securely fixed by tapping the end of each brick with the handle of a trowel or a special hammer.
The quality of masonry depends not only on compliance with the creation technology and following instructions, but also on the use of proven materials. The raw materials for the mortar (usually sand, cement, slaked lime) must comply with quality certificates. If you extract sand yourself (no matter quarry or river), you should keep in mind that it must be thoroughly cleaned of any debris and foreign impurities, the entry of which into the solution can spoil its quality. In one row, bricks selected for one fraction and size should be used so that the strength of the masonry remains high.
Installation of mortgages for fastening fences, gates and gates
All this is good, but how to attach, for example, sheets of corrugated sheets to brick pillars? For this purpose, special iron inserts are used, which are welded directly to the metal support and released outside.
They look like corners or ears, usually flat in places where they are laid, so as not to change the height and not get in the way. To install them correctly, you need to think in advance at what height the logs will go and how many there will be, and then carefully align them along all the pillars.
The type of mortgages is influenced by the massiveness of the materials. The heavier they are, the more powerful the elements must be so that nothing collapses.
General rules for reinforcing brickwork
To strengthen a building, it is necessary not only to choose the correct wire cross-section and laying order, but also to follow the installation rules.
- The reinforcing mesh of rods is completely immersed in the concrete mixture.
- When using ferrous metal for rods, it is pre-treated with anti-corrosion agents and then painted.
- The thickness of the brickwork joint exceeds the size of the reinforcement by at least 0.4 cm.
- When constructing a building, rods and reinforcing mesh with the same strength and size are used on each wall.
- The ends of the mesh protrude a few millimeters beyond the outer line of the masonry.
- Hand-made mesh cells are connected using knitting material; welding is not used.
- The dimensions of the grid cells are determined by calculations before starting work.
The last element is the cap on the top
A cap on a brick pillar is needed to prevent precipitation from getting inside. Moisture is the main enemy of the builder: because of it, the clay freezes and cracks, and the service life of the materials is greatly reduced.
You can use anything as a cover: for example, buy a ready-made version or make it yourself from roofing iron. A simple concrete cap, slab, or some metal will do. You can look at examples of cap implementation on the Internet and understand what you want to see on your fence. It is important not to forget it, otherwise the fence will not last long.
Read other blog articles: we regularly publish step-by-step instructions and simple useful tips. Still have questions? Call us!
You can call our team to build brick fence posts if you don’t have time to do it yourself.
Useful videos
See how to lay columns from grade 100 brick with reinforcement and concreting with your own hands: And this is the laying of a column from one-and-a-half, silicate bricks - all stages: Technology of laying a helical column: The process of laying a pillar, nuances: Brick pillars and columns are critical elements, from which determine the strength of the entire structure. When making them yourself, you should pay special attention to the reliability of the foundation and the correct ligation of the masonry rows. Compliance with all recommendations will ensure long-term and reliable operation of structures.
Select brick
Laying a pillar using two types of bricks
The simplest is ordinary ceramic brick. May be solid or hollow. In the first case, the advantages include strength, but the disadvantages include heavy weight. With the second option, everything is the other way around.
Another advantage is its low cost, but it also comes with a disadvantage - its unpresentable appearance. Typically, simple brick is used if the pillar will subsequently be additionally lined.
Clinker brick. Beautiful, durable, practically does not crumble. It captivates with its variety of textures and the ability of clinker to harmonize with buildings made in both classical and modern styles. Of course, it will cost more than its simple clay counterpart.
Sand-lime brick is very durable, frost-resistant, has excellent noise-absorbing qualities, environmentally friendly and, of course, not cheap.
So, we weigh the pros and cons and choose one of the options, and then move on.
How to make a similar tool with your own hands
In order to make a device yourself, you need to decide for what purpose it is intended:
- Cord attachment . Ordering is not always in the arsenal of the first available tools, but securing the cord is necessary. There is an option for fastening with nails, but for this you need to wait for the solution to dry completely. This is not very convenient. In order to solve the problem, you can make a fairly simple tool yourself. A device in the shape of the letter “T” is cut out of a metal sheet. A cord is attached to it. Then the edges of the device are bent strictly according to the shape of the brickwork. Thus, even without the use of complex devices, the cord is securely attached to the masonry and does not disturb it.
- Work at height . Situations often arise that require working with bricks at height. Construction companies use cranes for this. For work at home or in the garden, structures such as scaffolding can be useful. Making such a device is quite simple. Near a wall or fence, for which it is necessary to lay masonry at a height, 2 trestles of equal height are installed. Wooden boards are placed on them. The main thing when constructing such devices is to ensure their maximum stability.
- Brick laying at the same height . If you don’t have a cord or level at hand, you can use the following simple device. M-shaped parts are cut from a steel sheet. Then a hole is drilled in the middle of each piece. Next, it is bent at an angle until the correct corners are obtained, and an elastic band is inserted into the hole. One corner is attached to the outside of the first brick in the row, the other on the outside of the last brick in the row. The elastic band is stretched, and a kind of level is obtained. It can be used both to check finished masonry and as a guide when performing work.
- Dosing the solution . Very often there is a need for an exact dosage of the solution; it is needed in cases where the thickness of the seams is calculated up to a millimeter. A trowel won't help here. But there is a device that you can make yourself. To do this, take a sheet of iron or steel of exactly the thickness needed for the seams. An oblong hole is cut in it, which corresponds to the width of the brick. It's quite simple to use. It is simply applied to the brickwork, using a shovel and a trowel, the mortar is applied, leveled, and the excess is removed. The result is an absolutely flat surface and the same thickness of the mortar throughout the entire masonry.
- Filling joints with concrete mortar . It is not always possible to accurately and quickly calculate the amount of mortar and fill the seam completely. Another device is designed for high-quality performance of such work. It can also be made from metal sheet. A rectangular sheet is cut out or taken, holes are cut in it, which are the same size as the brick. The device is leaned against the bricks, the seam is rubbed exactly over their area. Using this device, just like the previous one, you can control the thickness of even the side seams in hard-to-reach places.
Thus, there are a large number of tools that are made specifically for correct and quick masonry. If any of the main devices is missing, it can be successfully replaced with a home-made device.