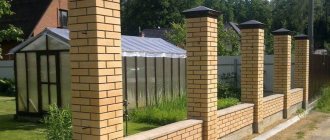
Concrete retaining walls are often installed on sloped areas.
They help not only to strengthen the existing slope, but also to create zoning, terracing and decoration of the area.
One of the functions of a concrete retaining wall is to protect foundations from ground movement.
To fill the wall, concrete of certain grades is used, and before performing work, it is necessary to calculate the dimensions and amount of material for the wall.
What it is?
The retaining wall is located in suburban and urban areas where there is complex terrain. If there are hills or ravines in the area, which create problems for creating a normal garden and arranging a beautiful yard, they decide to fill retaining walls.
In this case, the site is divided into several zones, terraces are made, where the wall plays a key role. Terraces are artificially strengthened with such structures; owners have the opportunity to decorate the yard as they wish without taking into account problems with the slope.
The retaining wall performs the following functions:
- zoning of the territory;
- addition of landscape design;
- keeping soil from washing away;
- water redirection;
- in areas with slopes, creating an obstacle to soil erosion.
A retaining wall decorates the garden and can protect the alleys from destruction. In landscape design, it can be used as a large pot for planting plants. The main role of such a structure is to protect foundations and areas from soil erosion and sliding.
Despite the fact that to prevent the soil from sliding, it is enough to plant plants - their roots will hold the soil, a wall is still necessary.
Over time, insects settle in the roots of plants and trees, which can easily destroy a healthy root system and cause the earth to slide down.
This design is especially important in areas with a slope, where it is difficult to predict the collapse of the earth. The walls are erected from concrete and other materials, lined with finishing to taste. The result is a beautiful and functional element of the exterior.
Design Features
According to its design, a retaining wall can be either solid or simple. In the first case, the wall has a foundation; it is made of mortar. Simple structures are laid out without mortar, using stone.
A massive main wall will have a lot of weight and even extensive soil sliding will not be able to move it. If the wall has a small thickness, then soil is used during the arrangement, which creates forces directed in the opposite direction to overturn the earth.
A permanent retaining wall is also made using reinforcement, and a thin-walled one involves excavation work. If the budget is small, then corner structures with a cantilever are erected: such retaining walls serve as an excellent place for planting plants.
Low retaining walls, 30-80 cm high, are more used as decorative ones. They are made in the form of a trapezoid or parallelepiped. When the soil swells, they will not budge. If the height of the wall is low, then the foundation for it is not poured, and the fertile layer is replaced with non-metallic material. If the height is greater, then the lower part is recessed 30 cm down.
If the height difference is 1 meter, in areas with a slope medium-height walls are made. The structure is expanded at the bottom using a heel, and the wall itself is poured with concrete in place. If the height of the retaining wall is average, drainage from polymer pipes must be used.
For high walls, make a small thickness, using soil in parallel to create resistance.
Design requirements
Cross-sectional diagram of a sub-concrete assembly.
The basic requirements for interior brick partitions are as follows: they must be reliable and durable.
The structure is constructed at the end of all stages of construction work, after the installation of absolutely all load-bearing walls and ceilings. Construction must begin after the floors and walls have completely dried.
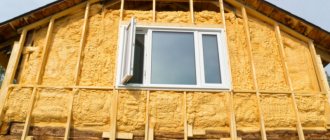
A brick partition weighs a lot, so its installation should be done on reinforced concrete floors. The weight of the structure can be reduced by using porous or hollow bricks. Although the weight of this structure will still remain heavy, so you should not build a partition in old houses and rooms with wooden floors.
Heavy brick partitions are usually built on the ground floor of a building, where they can carry the load of a load-bearing wall.
Scheme of steel lintels.
For a partition 5 m long and 3 m high, use gas silicate or foam concrete blocks.
In pools, bathrooms and living rooms where humidity is high, use red solid brick. This type of brick does not absorb moisture so much and is not subject to rapid destruction. The partitions should be free of cracks and crevices through which insects can enter.
If you have built a new house, then you should wait at least six months with the construction of interior partitions in order for the final shrinkage of the load-bearing structures of the room to occur.
What brand of material is suitable for filling?
To pour a concrete wall, you need to choose the right material. Most often, M200 grade concrete is used for this purpose.
Several characteristics of concrete that meet the requirements for supporting wall materials:
- belongs to class b15;
- moisture resistance from w2 to w6: during hardening it is able to withstand a water column pressure of 0.6 atm;
- density 2200-2400 kg per cubic meter;
- fast hardening;
- compressive strength – 196 kg/cm. sq.;
- withstands loads up to 20 MPa/m3;
- mobility from P2 to P4;
- frost resistance F100.
Concrete M200 has low thermal conductivity and is highly resistant to adverse and aggressive weather conditions. Used for civil and industrial construction, the solution obtained from it is strong and reliable.
Pros and cons of use
In most cases, retaining walls are made of concrete, but sometimes wood, natural stone or brick are used instead.
A few reasons why concrete is still better suited for this purpose:
- choice;
- strength;
- resistance;
- simplicity;
- flexibility;
- good appearance;
- environmental friendliness.
When choosing concrete, the site owner has the opportunity to independently decide what type of structure will be used.
Concrete blocks, precast concrete panels, and on-site concrete casting are equally suitable for this purpose This material is so strong that it can withstand tons of soil and water. Every year the finished retaining wall will only gain strength.
Such walls are durable and resistant to repeated cycles of defrosting and freezing; they are not afraid of aggressive chemical elements and road salts.
Concrete walls are easy to create; with their help you can easily create curves, corners and even stairs, thereby diversifying your site. Concrete can be finished with a variety of materials and is easy to maintain. It does not emit harmful substances and is available for construction.
There are several cons that vote against the use of concrete:
- Firstly, this requires careful planning and design, which not every site owner can do.
- Secondly, this is the complexity of the work, which should only be performed by qualified craftsmen.
- Thirdly, such walls are difficult to dismantle, and it may be necessary if there is a desire to redo the design.
Drainage for retaining wall
When constructing a retaining wall, it is necessary to take care not only of strength and high quality, but also of the organization of drainage. It is necessary to protect the back side of the wall from excess moisture. To organize such protection, you will need high-quality drainage - a drainage system. Today, professional landscape designers offer 3 options for organizing water drainage:
- Underground drainage. The system is presented in the form of a special perforated drainage pipe, which is installed at the base of the wall. For reliability and protection, the pipe is wrapped in geotextile. With its help, water will not accumulate, but will go down the drain along the laid route.
- Ground drainage. When building a wall, a layer of loose material (gravel or brick) is laid on the back side. It will not allow excess moisture to destroy the structure of the base of the retaining wall. Water will naturally go far into the soil.
- Filter. The drainage can be equipped with special filtration holes. They are made in a wall made of stone or concrete. To do this, when laying across a row, it is necessary to leave one vertical seam without mortar. Excess moisture will escape through these seams.
Every territory needs a high-quality drainage system, but special attention must be paid to regions with constant precipitation. A large amount of groundwater can have a detrimental effect on the structure.
How to make a calculation?
In order for the structure to fully fulfill its function, at the planning stage it is necessary to calculate its dimensions: thickness and other indicators.
There are SNiP requirements that should be adhered to during calculations:
at 60 cm the wall should be minimally buried in the ground;- from the height of the entire wall, its width should be within 50-70 cm to start calculations;
- the wall should be recessed towards the elevation by 12.5 cm for each linear meter;
- The top cut for a solid wall should be at least 40 cm.
According to the regulations, it is necessary to choose the type of drainage: longitudinal, transverse or combined. For example, if the level of height difference in the area is 130 cm, then the height of the wall according to the standards should be about 2 meters with dimensions for deepening. The calculations also take into account the type of soil, namely the value of its specific adhesion.
Materials and tools for self-construction
When the calculations are completed, you can begin to prepare materials and tools.
To build reinforced concrete walls yourself you will need:
- concrete mixer;
- wooden beam;
- buckets;
- water;
- nails;
- a simple pencil;
- expanded clay;
- shovel;
- Master OK;
- roulette;
- building level;
- cement grade M200 or class b
You will also need reinforcement to strengthen the walls. To create formwork for pouring, wooden boards will be useful, which will need to be placed around the perimeter of the future retaining wall and then filled with concrete.
Expanded clay is used for drainage, but if this material is difficult to obtain, crushed stone and gravel can be used instead. Nails will help securely secure the formwork with boards, and if there is a risk of it bending from the concrete, then you can use metal corners.
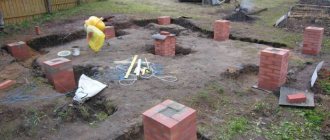
Description of the technology for pouring a support structure with your own hands step by step
The technology for creating a retaining wall begins with digging a trench . To do this, you can order an excavator or do everything manually using shovels. The trench is leveled using shovels.
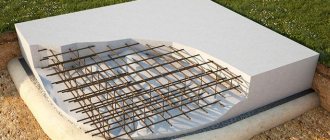
Wall reinforcement
To strengthen a retaining wall when it is thick and high, reinforcement is used. For this, metal rods and rods are used.
After a layer of crushed stone or expanded clay, reinforced mesh or rods are laid at the bottom of the trench - this gives the foundation strength.
The rods are placed vertically along the entire contour of the ditch . Thick rods are installed vertically, then thin wire is welded to them horizontally.
The result is lattices that are connected by bridges with a thickness less than the thickness of the thickest reinforcement in the structure.
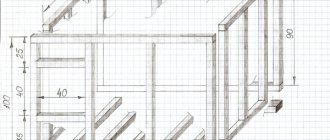
Creating formwork
At the next stage, formwork is created. For this, wooden boards with a thickness of at least 3 cm are used. To connect the boards, wooden blocks with a cross section of 5x10 cm are used.
To fix the formwork, metal pins are used: they are driven into the ground in increments of no more than 50 cm. The formwork begins to be built from the back wall, then the rest of the structure is made.
Creating drainage and other actions
Drainage is made of moisture-absorbing materials. To do this, you need to make a hole with a diameter of 10 cm in the retaining wall and place a polymer tube there that will remove moisture.
Next, mix the solution in the following proportions:
- cement 1 part;
- sand 3 parts;
- fine crushed stone 1 part;
- water 1 part.
Concrete is poured after installing the reinforcing belt along the entire length of the formwork. Cured concrete is periodically moistened with water to prevent cracking. At the final stage, waterproofing is carried out using roofing felt or roofing felt.
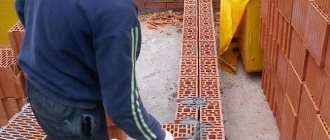
Brick wall construction technology
Retaining wall diagram.
The construction of a brick retaining wall begins with laying a zero row, the elements of which are laid on an edge or flat. The last row is laid in the same way. Work should begin with calculations of the required amount of materials. Bricks need to be purchased with a small margin; some of the material will need to be cut to ensure the stability of the masonry. White sand-lime brick is laid on a base made of red, laid out in 5-6 rows.
Before starting construction of the wall, you need to make markings using a nylon cord. Since the first row of the wall is designed, the elements are laid dry, leaving a gap of 1 cm between them throughout the entire length of the future structure. If the wall is built in 2 rows, the edges of the masonry are folded into a lock; when laying out in 1 row, the bricks will have to be cut.
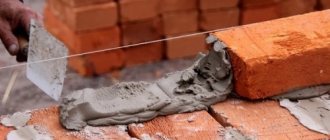
After the markings are completed, they are removed, a layer of mortar 1 cm thick is laid along the cord. The first row of bricks is placed on top, the correctness of the laying is checked by the building level. In the same way, each part is checked and the correctness of their location in relation to each other.
Methods for laying brick retaining walls.
Several rows of bricks are laid along the edges of the wall, checking the evenness of the structure with a spirit level. This is done to form beacons along which a cord will be pulled, marking the height of the masonry. Subsequent rows of bricks are laid out at its level. Each of them is placed in a lock with the previous one, the mortar is applied to both sides of the brick, pressing it firmly against the previous row. Excess mortar is removed using a trowel.
To form right angles, an order is used - a metal tool with marks made according to the level of the masonry. The first corner bricks are laid out using a level, after which the order is installed. When building brick walls and partitions, dressing must be observed: the seams in the upper and lower rows should not overlap. Reinforcing mesh is installed every 5 rows. Before starting construction work, the material must be moistened; it is left for several hours in a container with warm water. The horizontalness of the masonry is checked with a building level every 3 rows.
There are several wall construction technologies. With a chain pattern, the longitudinal seams are shifted by half the size of the brick, and the transverse seams by a quarter. This technology is one of the most difficult to implement; its construction requires highly qualified workers and a large amount of material.
//www.youtube.com/watch?v=AShGOXOLcxw
With four-row ligation of seams, elements are used that provide additional strength. The laying of the supporting parts of the walls is carried out in the form of a basket: the cavity of the pillar is filled with broken bricks mixed with mortar. If the pole is reinforced with a metal pipe, the reliability of the structure will increase several times.
A brick wall with an air gap retains more heat. It can be built from any type of material. The air space in such a wall should be no more than 5 cm in thickness, the thickness of the masonry itself will be 40 cm.
Features of device technology on a site with a slope
If the site contains a slope, then the technique will be similar, but at the planning stage you will have to worry about the size and terracing of the site. The owner will have to divide the area into several horizontal zones, and also hire equipment to dig a trench for retaining walls.
A gentle slope can be strengthened with the help of plant roots, but if the slope has a good difference in height, then the construction of a concrete wall cannot be avoided.
For formwork, it is better to use OSB boards, since you will have to bury the base of the wall into the ground as much as possible. Drainage must also be effective: polymer or asbestos-cement pipes are used for its installation. It is better to do transverse drainage with drainage.
Natural stone structure
A good decoration for a dacha are walls made of natural stone - rubble. The large mass of the structure does not require connection to a hill. After construction, the wall does not require special care and will last a long time. The laying of stones can be done dry, filling the voids with fertile soil. In the future, climbing plants are planted between the seams. But this option requires great skills in laying stone. The best option for building a stone wall at your dacha with your own hands is the wet masonry method. It involves laying stones on cement mortar.
Material selection
The weight of each stone can reach 30 kg or more. Sizes and shapes are also varied. Therefore, before laying the wall, it must be sorted:
- the largest samples will be used for arranging the foundation and laying the lower rows;
- The front side of the building is laid out from large stones with a smooth surface;
- small fractions will go inside the masonry.
During the laying process, the stones will have to be chipped to smaller sizes. For these purposes, use a 5 kg hammer and chisel. After trying on the stone, a mark is made on it with a wax pencil. Then set the chisel at the mark at an angle towards the chip and hit it sharply with a hammer.
Features of dressing masonry
The dressing of the seams of uneven rubble must be observed in all directions: between the rubble in each row and between adjacent rows:
- stones are laid alternately with short and long sides;
- To connect the front and back parts of the masonry, transverse masonry is made at a level of 60 cm and in the last row. For these purposes, large fractions of rubble equal to the width of the wall are used.
When laying out a wall with your own hands, you should not make the structure larger than 1-1.2 m. Without a certain skill, the wall will turn out to be unstable.
Construction of a retaining wall made of stones
The procedure for constructing a wall
Construction work must be carried out at a temperature not lower than +5°C. To fill voids between stones, prepare a liquid solution separately. Next, proceed to work according to the instructions:
- Having marked the site, you begin to dig a trench for the base. Its width should be 60 cm greater than the thickness of the wall. The depth is determined by the level of soil freezing, plus 10 cm is added for reliability.
- Tamp the bottom of the trench tightly. Then spread the geotextile so that its edges extend above both sides of the trench.
- Place a 15 cm gravel cushion on top of the geotextile fabric. If the site has heaving soil, the thickness of the cushion must be increased to 50 cm, with the condition that the bottom row of stones be buried by at least 20 cm.
- On both sides of the trench, drive 2 rods with a slope of 8 cm towards the hill for every 100 cm of wall height. Between them, pull two cords along the edge of the front and back of the wall.
- Place a row of large stones on the gravel. Fill wide voids with crushed stone. Next, fill all small voids with cement mortar. The foundation is ready for the construction of a retaining structure.
- The first row of stone is laid without mortar along the front and back edges of the building. They must be laid out taking into account the dressing of the seams of the foundation stone. Having aligned the masonry along the cord, lift each stone and lay it on a 40 mm layer of mortar, tapping it on top with a hammer.
- The space between the edges is laid in smaller fractions with cement mortar. Fill the resulting voids with a solution with the addition of small stones.
- Subsequent rows are laid out in the same way, gradually raising the cord up. Do not forget to make cross-laying at a level of 60 cm and the last row.
- Having completed the laying, you begin to grout the joints with mortar. To add aesthetics, you can add colored pigment to the solution. It is better to do the jointing with grooves so that water runs down them. As the solution dries, moisten the seams with water to strengthen them.
Possible difficulties and errors
If technology is not followed, retaining walls may collapse if the master makes a mistake.
The most common problems:
- insufficient foundation depth;
- poor drainage;
- failure to comply with the rules for resting a wall on a hill;
- the height and weight of the wall are too high;
- construction on soft soils with close water levels.
As a result of these errors, the walls may collapse, become covered with cracks, and also collapse at the bottom. If there is not enough experience in construction and calculations, then it is better to invite a team of specialists.
Price for pouring work
The total cost of pouring a concrete retaining wall varies according to the regions of Russia:
- In Moscow, for such work they will ask for 3,500 rubles per linear meter, while 1,500 rubles will have to be paid for arranging the foundation of the wall.
- In Novosibirsk, they charge from 5,500 rubles for a wall up to 100 cm, while another 1,500 rubles will be charged for digging a trench.
- In Krasnodar, turnkey work will cost from 5,940 rubles per linear meter.
Let's get acquainted with the design
Basic structure
Before starting construction, you should carefully study the design. This will allow you to properly plan all the work and get a good result. So, any retaining wall consists of three main parts:
- Foundation. As with the construction of a house, this part is almost entirely underground, which allows it to bear the entire load of the structure.
- Body. The main part is a vertical wall.
- Drainage. Artificial drainage reduces the likelihood of destruction from moisture.
Retaining wall made of different materials: device
The next step will be to calculate the retaining wall, since soil pressure will act on it from the opposite side. Because of this, care must be taken in its design to ensure that barriers to pressure resistance are created. Based on average statistical data, walls with a height of 30 cm to 1.5 m are most often erected in a dacha. They are small, so you can easily carry out all the calculations yourself, without involving specialists.
For suburban areas, low retaining walls are relevant
A special computer program for landscape design will best cope with the task. If the difference is more than 1.5 m, professional advice will be required, as well as engineering and geological surveys.
Note!
If you make the wrong calculations, then next spring, it is likely that the soil along with the wall will collapse and you will have to do everything from the very beginning.
It is necessary to choose the material not at random, but in a planned manner. The choice will be influenced not only by the size of the planned budget, but also by the existing style of the site and landscape design. By using your imagination, you can quickly come up with everything and be sure to sketch it in order to then calculate the required amount of material. Let's look at the most common options.