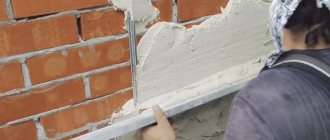
Among finishing and repairs, leveling plasterboard walls is one of the most common. Working with gypsum plasterboard is not difficult and does not require special knowledge; in addition, the price is much lower than that of many other materials. That is why plasterboard is popular in home construction, in the decoration of offices and premises, and in production.
Features of working with plasterboard sheets
One of the most budget-friendly options that does not require a lot of money is painting gypsum boards. This method is much simpler than gluing large pieces of special paper that requires precise measurements. In addition, the simplicity is noticeable, since there is no need to adjust the design. The ease of finishing and painting makes plasterboard a practical and convenient material that is useful for finishing home construction. When painting the material, you can use any designs, making the wall exclusive and not similar to the other.
Do-it-yourself painting of gypsum boards without putty:
- Increasing the strength of the material;
- Increased adhesive properties, so the paint lasts longer;
- There is a decrease in absorbed liquid;
- The color of the paint is evened out, which gives a beautiful appearance.
However, there are also negative features. If you do not use putty, stains may form due to uneven drying. Puttying drywall for painting is a necessary process that is carried out to perfectly level the surface.
Important. If you don't want to use putty, you can avoid using it, but you should use it on seams and paint joints. This will allow the coating to be distributed evenly over the entire surface.
Types of drywall
Modern industry produces several types of products with the abbreviation GKL, which differ in composition, scope of application and pricing policy. It is customary to divide slabs into ceiling and wall slabs. The former are thinner and lack additional protection from mechanical damage. The latter are thicker and may include a layer of reinforcement.
There is a broader classification of material based on its composition.
The following types are available for sale:
- Simple. Consists of thick paper with a plaster core. The scope of application is limited to dry heated rooms. These are mainly apartments, private houses, offices, government agencies.
- Water resistant. Indicated by green cardboard and the GKLV marking applied to it. The filling and shell of the slabs are treated with impregnations and antiseptics. There is no hygroscopicity, which makes installation possible in a humid environment. Plastering of walls is carried out using mixtures appropriate to operating conditions.
- Fire resistant (GKLO). The casing is impregnated with fire retardant, and the filler contains fiberglass threads. When in contact with fire, the paper smolders, but the coating holds its shape. Used for lining stoves, fireplaces and chimneys.
- Arched. Internal reinforcement provides the slabs with flexibility when wetted with water, and antimicrobial additives prevent the development of fungus and mold. Moisture-resistant gypsum board plaster protects products from dampness and loss of shape.
- Combined. Used for insulation during interior work. Expanded polystyrene, which has a low thermal conductivity coefficient, is added to the filler.
The edges of the sheets can be smooth or chamfered. At the joints, the plaster is open, which is necessary to create a monolithic shield in which all the fragments are glued together into a single structure.
Materials and tools
In order to carry out the putty job efficiently, you need to have some tools in your arsenal that will facilitate and speed up the process.
Main tools:
- spatulas;
- paint bath;
- grater;
- containers for storing building materials;
- sharp painting knife.
The main thing in this work is a complete set of spatulas. Without them, it is impossible to imagine most finishing work, so this tool will be the main one when performing the work. It is best to acquire a variety of spatulas of different widths. This is very convenient in cases where you need to seal cracks or small joints, or vice versa, use it for large, flat surfaces where it is better to distribute a large amount of putty.
An object width of 50-60 mm is suitable for finishing a hole or crack, since this requires using a lot of putty at once. To reinforce and putty seams, a wider spatula is needed. When work related to finishing putty is necessary, the largest tool sizes are used, which reach up to 500 mm.
The main requirement for a spatula is a smooth surface of its metal part. If the surface has defects or unevenness, the coating on the drywall will be uneven, which will lead to disproportionate shapes. In addition, the instrument must be absolutely clean and free of dust and other contaminants. If you do not adhere to this rule, the coating may deteriorate over time due to mechanical stress. After previous use, always wash your instrument, as drying it out will negatively affect the final result.
A paint spatula may come in handy. This is the same tool, but with a tooth along the edge. This will make it easier to work related to reinforcement.
A paint bath is best suited for finishing and preliminary priming. Another useful tool is a roller. It is advisable that it be fitted with a comfortable handle made of plastic or wood.
To cut sheets of drywall, a construction knife, preferably with different attachments, is best suited. This will allow you to quickly deal with the material and cut it out after the measurements have been taken.
And finally, prepare special containers for materials. It is best, according to the experts, to use long but narrow trays that will be approximately the same thickness as a spatula. This will make the labor-intensive process much easier and increase efficiency.
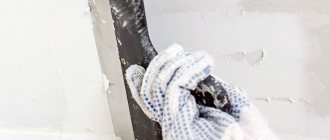
Sealing screws and seams
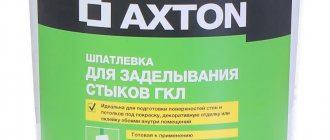
For seams there are special compounds Knauf-Fugen, Knauf Uniflot, Fugenfuller and their analogues. After the soil has dried, dilute the putty to the consistency of thick sour cream. Please note that these putties dry quickly, so dilute a small amount at a time.
We take a small spatula, apply the composition to the places where the screws are installed, and remove the excess. There should be just enough putty in this place so that the surface is even. This way we go through all the screws. They can be sealed parallel to the seams, or they can be sealed first. It doesn't matter.
The principle of working with putty is that a roller of the compound is placed on the edge of the spatula, then it is stretched in the right place
There are two types of drywall joints. Along the long side of the gypsum board, the edges are uneven - for easier sealing of this joint. But the sheets are also connected in height, where there are no ledges. You also have to cut the sheets and the joint is also end-to-end. Such connections require special technology, which will be discussed below.
Vertical joints
When puttingtying vertical joints of drywall with normal factory edges, they are first carefully filled and then glued.
After filling, while the composition is still wet, it is glued with a sickle mesh or paper reinforcing tape. This is necessary so that cracks do not form at the joints. If tape is used, it is torn into the required pieces and soaked in clean water for 10 minutes (while the seam is being filled).
The tape is recessed to the required distance
Having filled the seam, take out the tape, hold it between your fingers, remove excess water, and glue it to the seam. Then take a spatula 8 cm wide (this is a must) and press the tape below the surface of the gypsum board. She “sits” on one of the factory ledges. They begin to press from the middle to the edges. When pressed, the putty is squeezed out from under the tape; we collect it. As a result, if you apply a wide, hard spatula (at least 20 cm wide) to the surface, you can see that the tape is below the surface of the cardboard. Then they go through putty again, leveling the joint level with the surface.
Trimmed seams
It is better to putty plasterboard in places of horizontal joints - where two slabs are connected or on vertical ones, but without edges, after pre-treatment. First, the surface is moistened with water - dip the brush in water and coat the joint well. Walk several times until the plaster gets wet. Then use a sharp knife to cut grooves at an angle of 45°. These joints can be treated before priming. It's even more convenient.
Preparing seams for putty
We coat the prepared joints with primer. In this case, it is more convenient to use a brush. After drying, fill the seam with a composition for puttying drywall joints. It is more convenient to work with spatulas 10 cm wide and hard 20 cm. Apply the composition with a small one, and remove the excess with a large one. Fill well, pressing the composition into the seam. If you did everything correctly, a small roller will form, slightly protruding above the surface.
Once again we go through the seam, applying fresh putty about 0.5 mm thick, take the soaked reinforcing tape and glue it to this compound. Use a spatula 8 cm wide and press the tape well onto the surface, squeezing out the excess putty from underneath it.
Puttying of cut seams on gypsum boards
In this case, a wave of paper is formed (you can see it in the photo), we make sure that it does not wrinkle, we catch it to the end, where it straightens out. Remove excess solution into the tape and adjacent area of the sheet. And the last stage - again take the putty and coat the pasted tape on top with a thin layer. We make this layer as thin as possible, as they say - “to tear off”. Actually, we stretch the remaining putty in a very thin layer.
Second technology: first tape then putty
There is a second technology - first, serpyanka or paper reinforcing tape is glued onto the plaster, then it is puttied. This works faster, but the disadvantage is the voids that remain under the tape. In these places, the wallpaper may wrinkle or the putty or decorative plaster may crack.
This is how you stick serpyanka onto drywall
They also use sickle mesh instead of paper tape. Serpyanka is more difficult to work with - it is rigid and its edges often stick out from the mortar. To make it a little easier, the mesh is pre-glued, and after the glue has completely dried, it is puttied. In order not to think about glue and speed up the work, use a self-adhesive serpyanka (there is such a thing).
An example of puttying a seam with serpyanka
But, anyway, it’s more difficult to putty drywall - its surface is uneven, the spatula “jumps” on the fibers and you get a small wave that is not at all easy to smooth out.
Types of putties for drywall for painting
There are 3 types of drywall putty:
- polymer;
- plaster;
- cement.
The polymer type of putty is universal. It contains polymers. It is suitable for finishing any premises, which is why it is popular. It can even be used in children's rooms, since its composition is environmentally friendly and does not cause any harm. This is the safest type of putty used for both walls and ceilings.
Gypsum consists of 50% gypsum. It is designed for fragile materials. It should not be used in bathrooms, as it may destroy the surface.
Cement is best suited for bathrooms as it protects against moisture. This is the strongest type of putty, therefore it is often used for finishing work.
Which putty should I choose for drywall?
To understand which putty will be better for drywall, you need to understand some points.
Construction stores offer a large selection of materials for puttying surfaces. With all their diversity, it is better to give preference to dry mixtures , since they are stored for a long time.
Ready-made compositions can be subject to various changes , in which the quality of the putty suffers significantly.
Based on the nature of the constituent components that make up the basis of the material, putties are divided into three types:
- cement;
- plaster;
- polymer.
The advisability of using one or another type of putty is determined by the nature of the room in which finishing work is carried out.
When finishing a bathroom or kitchen, the best option would be to use a cement mixture. In this case, gypsum putty will not work, since it is not able to withstand changes in humidity , as a result of which the dried surface will crack.
To make cement putty, cement is used, to which a certain amount of clay, limestone or other materials is added. Thanks to chemical additives, the mixture is durable and resistant to cracking . It does not absorb moisture and is not affected by temperature changes.
Gypsum putty is easy to apply to the surface, it dries quickly and sands well . With its help, surfaces are leveled, cracks and joints are sealed.
Polymer putties are distinguished by their plasticity and versatility. Such materials are best suited for finishing drywall. In addition, the polymer mixture is consumed in much smaller volumes than other types of putties, but at the same time has a higher cost.
Putties are also classified according to the nature of their purpose:
- Starter - used for leveling surfaces, has a coarse-grained structure.
- Finishing – has a structure with fine grains, used to apply the final finishing layer.
- Universal putty is used if there are no significant defects on the surface.
Cleaning and priming drywall
There is a lot of debate about whether a primer is needed before further processing of drywall. The debate concerns which part of the surface needs to be primed. Some believe that only the caps and seams of the joints need to be modified, while others believe that the entire surface needs to be treated. Still others believe that there is no need to use a primer for drywall, and it is not needed at all.
Practice shows that it is best to use a primer over the entire surface of the drywall.
Reasons for using around the perimeter:
- The primer improves the adhesion of materials, so it will reduce the costs of materials such as glue, and others;
- when removing old wallpaper, the primer will allow this to be done without harming the material itself. If you stick the wallpaper on bare gypsum board, the wallpaper can no longer be replaced, since the material has deteriorated;
- Paint absorption occurs noticeably less when priming with GCM. This will allow the paintwork to be applied evenly to the surface, which will prevent the formation of stains.
Important. The use of primer on GCM is a controversial issue, but experts believe that it is best to apply primer over the entire surface of the coating. This will improve adhesion, coloring properties and make it possible to throw away old wallpaper.
Is it possible to plaster drywall?
Now that the difference between leveling mixtures is obvious, let’s look at what exactly gypsum sheets need to be treated with. Let's start with the fact that after installation, the base finished with such plates is flat. If the installation was carried out correctly, only marks from the fasteners and seams at the joint areas will remain on it. Dents are possible, but very small. All these flaws must be smoothed out.
Putty is enough to remove them. A special composition is used for fasteners and corners, finishing for final finishing. And it's all. No need to plaster. If mistakes were made during installation, the base will be uneven. In this case, many try to plaster it and level it at the same time. You need to understand that this is only possible for small differences. To seal significant defects, it will be necessary to apply a thick layer of material, and this is extremely undesirable for gypsum boards.
Firstly, the leveler will have a significant mass, which can even destroy the structure. Secondly, over time, the thick layer will begin to crack and collapse. Therefore, if the differences are large, it is better to dismantle the sheets and redo the frame. Plastering drywall without any doubt is necessary only in one case: if a decorative mortar is applied, which will become the final finishing of the base.
Instagram shtukaturimvse
Drywall does not always need to be plastered. Sometimes it's enough just to putty
Preparing putty
Preparing putty is an important process, since it will affect the quality of the material used for the work. However, it is difficult to choose a decent option, since the market is crowded with various manufacturers whose reputation is unknown. In addition, it is necessary to pay attention to such nuances as the dryness of the mixtures and storage methods.
Experts give recommendations on the use of dry mixtures, since they will enable long-term storage and proper temperature control. That is why such mixtures are always suitable for use, since they can be stored for a long time. Ready-made putties pose more problems, since when purchasing them they must be immediately used for their intended purpose. In addition, ready-made mixtures, already diluted with water, have a high cost.
Preparation consists of diluting the dry mixture with water. Before diluting, you need to look at the instructions that are on each package. The main thing is to calculate the correct consistency and proportions.
Choice of putty
Puttying a plasterboard ceiling begins with the selection of material. The final result and the aesthetic picture of the final finish are directly dependent on its quality characteristics.
Putty compositions are classified depending on the following factors:
- Degree of readiness before starting the process: dry powders or ready-made solutions. The dry composition is more accessible, is stored longer in sealed packaging and resists temperature fluctuations. Ready-made mixtures require active stirring immediately before use and can perform the intended task even after long periods of time when the integrity of the packaging is compromised (dry powders do not have this property).
- Purpose. The starting solution is intended for the first rough treatment, correction of obvious defects, covering up cracks and joint boundaries. The finishing material completes the puttying procedure, finally leveling the ceiling for the subsequent application of paint and varnish material. Universal mixtures are equally effective for both stages.
- Component composition. It is advisable to use gypsum solutions during construction work in dry rooms intended for permanent occupancy by owners. Cement mixtures will do a better job in the bathroom, indoor pool, kitchen and rooms without heating. The polymer solution is universal and will cope with leveling and related functions under any conditions.
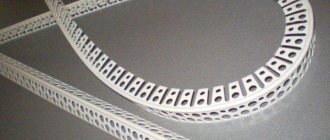
Trimming corners and reinforcing seams
Corner reinforcement is work that is associated with the processing of walls, the purpose of which is to align the corners. This process is one of the most important in processing, since the proportions and beauty of the work performed will depend on it. Since the GCM itself already assumes smooth surfaces, reinforcement is only necessary to provide reinforcement and prepare areas for further processing.
Various materials can be used for reinforcement. It can be like regular paper that is attached to the corner of the wall. For stronger reinforcement, metal inserts made at an angle of 90 degrees are used. The essence of the technology is not very different between the two types, since working with roll tape involves the same actions.
There is also special equipment that is designed for reinforcement. It allows you to get work done quickly and efficiently.
How is it shown:
- applying the solution at the required width and height;
- there are installations for applying the solution;
- angles that allow them to be used for alignment.
In home construction, it is not necessary to use special equipment and adjust the correct angles. You can do this yourself, from improvised or purchased materials. In addition, you can use basic tools that everyone has at home.
Puttying joints
Make a small indentation at the joint
When processing gypsum plasterboard walls, special attention should be paid to the joints between individual sheets. On their sides there are special chamfered recesses designed for filling the joints with putty and reinforcing tape.
Sometimes, after cutting the sheets, the chamfered edges are cut off and the gypsum board joints turn out straight, without indentations. In this case, you will have to make the indentations yourself using a knife or a special finishing plane.
Using a sharp knife, cut the cardboard covering along the entire joint of the sheets, and pass along the gypsum base with a plane. As a result, in the area of the seam there should be a depression of 2-3 mm and a width of about 5 cm, running along the entire joint. For more information on how to seal gypsum board joints, watch this video:
In some cases, simplified preparation of joints is used: the edges of the sheets forming the seam are simply cut at an angle of 45 degrees. But this option does not allow the use of reinforcing mesh, as a result of which the sealing of the seam is not so strong.
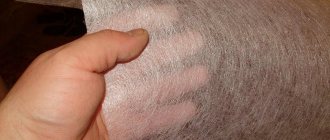
Seam reinforcement
Secure the serpyanka to a layer of putty
After this, you can begin reinforcing the seams with sickle tape. It is usually produced in the form of a self-adhesive mesh, rolled into narrow rolls. There are two ways to reinforce joints with serpyanka. In the first case, it is glued to the seams immediately before puttying, in the second, the mesh is embedded in a freshly applied layer of putty using a narrow spatula.
Gluing the serpyanka should start from the very top of the ceilings. The adhesive tape is carefully unwound and pressed firmly to the surface of adjacent plasterboard sheets. The joining seam should be located exactly in the middle of the sickle tape.
The second method, with the mesh deepening into the already applied putty solution, is considered preferable by many finishing craftsmen. In this case, the reinforcing mesh is located in the middle of the putty layer, working more efficiently.
Choosing putty for seams
To seal joints, buy base mixtures
To ensure high-quality sealing of joints, you should choose the right putty composition. All putty mixtures, regardless of the material of manufacture, are divided into two large groups - base and finishing putties.
Basic putty mixtures are intended for rough leveling of surfaces, as well as for sealing relatively large wall defects - cracks, sinkholes, chips, etc. Their distinctive feature is the use of coarse-grained components as a filler. The result is a strong bond between the filler and the binder component, allowing the mixture to be applied in a sufficiently thick layer of up to 5-7 mm. The surface treated with basic putty appears rough and rough to the touch.
Finishing mixtures are intended for final leveling of the surface. They consist of a fine fraction of filler, due to which the treated surface is smooth and suitable for final decorative processing - painting, wallpapering, applying a thin layer of decorative plaster.
To putty joints between plasterboard sheets, only basic putty mixtures are used. Only such a mixture, due to its strength, can reliably seal the joints between individual gypsum board sheets.
If the room is humid, then gypsum mixtures will not work
Basic putties are most often made from cement, and coarse quartz sand is used as a filler. Such mixtures are suitable for use in rooms with high humidity, since cement, after hardening, is not afraid of dampness. Basic putties made on a polymer and gypsum basis can also be found on sale.
Gypsum mixtures, unlike cement ones, are not recommended for use in wet rooms - bathrooms, toilets, kitchens, since gypsum itself is very hydrophobic and swells, cracks and deforms when in contact with moisture. Polymer compositions can be either moisture-resistant or damp-resistant.
Information regarding this can be obtained from the instructions for use on the package.
Applying putty to seams
To apply the putty composition to the joints you will need the following tools:
- drill with mixer attachment;
- container for diluting the mixture;
- putty knife.
Cement and gypsum putty compositions are most often supplied for sale in the form of dry mixtures, and polymer ones in a ready-to-use form. This is due to the rather complex technology for diluting polymer putties and the need for its strict adherence.
A construction mixer or drill with an attachment will make mixing the mixture easier.
To prepare a solution from a cement or gypsum dry mixture, you should read the instructions from the manufacturer, which indicate the proportions of its dilution with water. The required amount of clean water at room temperature is poured into the container. After this, the dry mixture is added to the water and mixed with a drill with a mixer attachment.
If necessary, add dry mixture or water to the container to obtain a solution of the desired consistency. The finished solution should resemble thick sour cream - be plastic enough and at the same time viscous so as not to form smudges after application to the wall.
Apply the solution to the seam using a spatula. The width of the spatula should be slightly wider than the groove formed by the edges of the plasterboard sheet (50 mm on each side). You should start filling the seam groove from the floor, moving the spatula from bottom to top. In this case, the spatula should be firmly pressed against the drywall to avoid bumps and sagging. For a detailed master class on seam processing, watch this video:
If they form, they must be removed immediately, otherwise it will be much more difficult to do this after the solution hardens.
Grinding
In order to bring the coating to perfect condition, it is necessary to prepare the drywall, namely sand it. To do this, use a special tool - a grater with a fine sharp coating, which is used to rub the GCM. It should be remembered that sanding must be done carefully, as you can remove an excess layer of coating, after which the GCM will become unusable.
After this process, it is necessary to completely get rid of dirt and dust and prepare the drywall for finishing activities, for further priming.
Important. All work must be carried out only on a dry surface, free of dust. After applying the next layer, you need to wait until the layer has dried.
How to prepare gypsum boards for puttying?
Before you start puttingtying the surface of plasterboard sheets, it must be primed with a thin layer (no thinner than 0.03 mm) using a roller - this will ensure a moisture-resistant effect that will not allow glue or paint to soften the top layers of plasterboard. It is worth noting that in this case the use of an alkyd composition is not allowed, because it can affect the deformation of the coating and its bubbling with subsequent peeling. Painting drywall without putty is not possible, because a good repair should not have open protruding screw heads with an uneven surface covered with a layer of paint, so before that you will need to level it to perfect condition. There should be no protruding or overly driven bolt heads (otherwise dents will appear). Here you need to make sure that the sheet is intact; its core should not move away from the picture component; if a detachment appears, it must be removed. To do this, you need to tear off the paper layer and clean the exposed surface with sandpaper (this will prevent the putty from peeling off or becoming cracked).
Do-it-yourself drywall putty for painting video
Puttying drywall for painting is done with your own hands, without the need to use special tools and equipment. We have already figured out that before painting, you need to use putty. Before work, it is necessary to treat with a water-soluble composition, as this prevents the paint from peeling.
Application instructions:
- the corners are puttied one by one;
- screws are puttied;
- The joints of the gypsum board sheets are sealed.
To make the work more efficient, we will attach a video. Puttying drywall with your own hands is not particularly difficult.
It is advisable to use all the rules that are indicated in the article, since the effect of finishing work depends on this. In order to paint drywall, it is necessary to use putty. The main thing in this work is not to rush, since it is necessary to carry out subsequent actions after the previous layer has dried.
Treating seams with putty
Before you properly putty the drywall for painting, you will need to finish the seams. To complete this work, you will need a container for diluting the composition and a spatula.
Procedure:
- Gypsum and cement compositions are sold in the form of dry mixtures, but polymer ones are ready for use. The reason is the very complex technology for diluting polymer drugs and the need for strict adherence to it.
- To obtain a solution of the required consistency, the dry mixture is combined with water in the proportion indicated in the instructions. Mix everything using a drill with a mixer attachment.
- To obtain a solution of the required consistency, you can add water to the container. It is important that the finished mixture resembles thick sour cream - it is plastic and at the same time viscous. Then you can avoid smudges after applying putty to the wall. It doesn’t matter how the drywall was prepared for painting, because the wrong consistency of the solution will ruin everything.
- Apply the solution using a spatula. Make sure that its width is wider than the groove formed by the edges of the drywall sheets (50 cm on each side).
- You need to start work from the floor, moving the tool from the bottom up. It should be pressed firmly against the sheets to avoid the appearance of lumps and sagging.
- If it was not possible to avoid their appearance, then you need to remove them urgently, otherwise the solution will harden and this will be much more difficult to do.
Plasterboard ceiling plastering technology
Work is carried out only on moisture-resistant gypsum board sheets installed on a metal frame. All other materials will quickly absorb moisture, which will lead to a loss of strength and quality characteristics. If the sheets are attached to a wooden beam, only the plasterboard ceiling is puttyed and the heads of the hardware are sealed.
Important! Before plastering, sand the surface - this will increase the adhesion of the composition to the base.
Tools for work
When figuring out how to plaster a plasterboard ceiling, first check the availability of all the tools:
- container for mixing the composition;
- drill with attachment;
- wide spatula with a side of up to 300 mm;
- brush or roller;
- trowel mesh with a fine mesh or sandpaper fraction No. 140-180.
Preparation of plaster
The composition has a large grain, so it is always applied in a thicker layer. Like putty, there is ready-made and dry plaster. Ready-made formulations do not need to be diluted with water, but dry ones require preliminary mixing strictly according to the instructions. When ready, the mixture should look like thick sour cream. First, all the plaster is mixed, and you need to mix for no more than 10 minutes, then let it sit for setting and mix well again for about 3-5 minutes, after which the composition is ready for use.
Plaster application technology
The work algorithm is as follows:
- The prepared base with recessed heads of hardware, sealed seams and fastener installation areas should be sanded and primed. Allow the surface to dry thoroughly.
- Apply the first layer of the mixture, smoothing out all rough defects. Plaster is applied up to 6-8 mm thick.
Advice! To increase the strength of the layer, it is better to dilute the mixture using PVA. The ratio is as follows: 0.5 parts PVA to 1 part water.
- As soon as the first layer has dried, sand it with sandpaper or a machine. It is better to take finer grains.
- Now the second layer. Plastering plasterboard ceilings is applied in the direction opposite to the first layer - this is very important. The thickness is no more than 5-6 mm (if it is not a textured mixture).
All that remains is to let the ceiling dry, sand the entire surface with fine-grain sandpaper or a sander. The surface is ready for decoration.
Is it necessary to apply plaster to drywall?
Today there is an opinion that it is impossible to apply plaster on walls finished with plasterboard under any circumstances. A large mass of plaster in combination with water in its composition will lead to damage to such surfaces and deformation of the frame.
However, this does not apply to decorative types of plaster, which can be easily applied to gypsum boards as a residual finishing option.
Only decorative plaster can be applied to drywall
However, if you still need to level the surfaces, some experts recommend adhering to the following technology:
- Apply plaster only to sheathing consisting of moisture-resistant plasterboard;
- before work, you need to carefully treat the sheets with deep penetration soil;
- The plaster must be applied alternately in several thin layers.
Plastering a plasterboard wall is carried out as a last resort using tools and separate rules
But taking into account this technology, and in the event of differences or defects, you can simply use starting gypsum putty, which will eliminate the defects.
Puttying drywall surfaces is an almost mandatory step, but it can be neglected in some cases. So, is it necessary to plaster drywall before wallpapering and painting?
Puttying under wallpaper
If, after installing plasterboard structures on the walls, you plan to glue wallpaper, then you don’t have to resort to completely puttying the sheets.
When preparing a plasterboard surface for wallpapering, the walls are puttied in a thin layer without removing the ideal surface
It is important to follow the rules for preparing walls:
- Without fail, the joints are reinforced with tape and the fastening points are hidden with putty. At the joints of plasterboard elements, reinforcing tape is initially glued and coated with a thin layer of special putty for sealing joints. The points where the screws are screwed in are simply coated with putty.
- The rest of the surface must be carefully covered with deep penetration primer, which will act as protection for drywall.
- Puttying is carried out by applying the mixture to the surface. After drying, minor defects may appear that will hide the wallpaper.
All the intricacies of this work are shown in the video:
Plaster for wallpaper and painting
If you plan to paint walls and ceilings made of plasterboard, then puttying is necessary. All imperfections will be visible on the painted surface, and color consumption will increase significantly.
The material used is “Rotband”. This is a gypsum mixture for universal use. It is used as a starting and finishing mixture in a complex.
Knauf is distinguished by high product quality indicators.
Stages of applying plaster:
- All walls finished with gypsum plasterboard are first prepared by applying deep penetration soil. This increases the adhesion (adhesion) of the plaster to the top layers of drywall. And also the soil “blocks the rapid and deep penetration of water from the plaster mixture.
Drywall should be primed carefully, without making any mistakes. Be sure to seal all joints between the sheets. They are glued with reinforcement tape (serpyanka) and plastered with a mixture for reinforcing joints. After drying, these lines are rubbed with a grater and sandpaper, removing minor defects and sagging.
Correct reinforcement of plasterboard joints The plaster composition is applied with a wide spatula (width from 300 mm), placing it at an angle to the surface of 30–40 degrees. When applying, you do not need to press hard on the tool, otherwise the plaster will lie in waves, forming unnecessary sagging. The starting composition is laid until the desired layer thickness is obtained. On large defects, the mixture is applied in 2 approaches, in layers of 3–5 mm.
Plastering the walls is done without applying pressure to the tool. After the starting mixture has dried, it must be finally leveled with putty and a finishing compound. It is applied in a thin layer up to 1 millimeter, eliminating the smallest defects on surfaces.
The finishing putty is applied in a thin layer. Drying will last 1-2 days, the dry plastered wall will be snow-white. After this, using fine sandpaper with a grain size of 120–160, it is necessary to eliminate minor defects.
Removing defects using sandpaper
Plaster is used to prepare already mounted plasterboard walls with cracks or dented areas for painting or wallpapering. Moreover, the size of the damage does not exceed 10–15 mm.
The same technology is used to prepare drywall for tiles.
As a result, plastering plasterboard surfaces comes down to eliminating minor defects and defects; you can also level the level with differences of no more than 10–15 mm.
Coating a plasterboard wall with paint
If there is a very large difference in the levels of different areas, it is not advisable to use thick layers of plaster that the frame and its cladding cannot withstand.
Roughing
Painting drywall without putty is impossible, primarily due to the presence of seams. To completely disguise them, you will need:
- Fill the indentations with the mixture. In this case, the spatula is positioned almost horizontally, which allows you to get the most even surface possible.
- Tape the seams with sickle tape, which will prevent the formation of cracks. Apply a layer of putty on top and level it.
- Seal all existing self-tapping holes on the ceiling and walls.
After drying, the seams are first sanded using a float and then primed with a brush.
Finally, all joints on the ceiling are taped with paper tape, which will prevent microcracks from appearing. To fix it, use PVA glue.
Processing the corners of walls and partitions made of plasterboard has its own specifics. First, they, like door and window slopes, are reinforced with perforated aluminum corners, for which putty is used. The corner is pressed in such a way that all the holes in the profile are filled with the mixture. Then, using a wide spatula and mortar, level the surfaces.