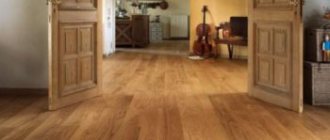
Laminate is rightfully considered one of the most popular types of flooring. It is distinguished by its beautiful appearance, durability and ease of installation. However, all work on its installation must be carried out in accordance with certain requirements, otherwise even the highest quality material will too quickly become unusable. Many novice craftsmen have a natural question: how to lay laminate correctly, along or across the room? There is no definite answer to this, so let’s figure out what will determine the direction of orientation of the lamellas during installation.
How to lay laminate flooring correctly - lengthwise or crosswise
How to lay laminate: lengthwise or crosswise
If you listen to the advice of experienced craftsmen, you will hear that there is one rule, according to which the orientation of the slats in the rooms is carried out. The direction of the covering strips completely depends on where the main light source is located (for example, a window or bright lamps that will replace the first option in a room without windows).
In which direction to lay the laminate
Why will the direction of the lamellas depend on the light source? It’s simple - the rays of the sun or the light emitted by a lamp, hitting the material perpendicularly (at an angle of 90 degrees), will demonstrate all the joints. They will be especially noticeable if the lamellas are joined poorly. And therefore, the laminate is always laid so that the coating strips are located along the rays of light - only then can the visibility of the joints be reduced. Thus, the slats will lie with their narrow side facing the window, and the installation of the covering is carried out starting from one of the side walls of the room (usually from the one where there are no doors).
Laying laminate perpendicular to the window
On a note! Where there is no natural light source, laminate is placed using an artificial one.
Prices for Tarkett laminate
Tarquette laminate
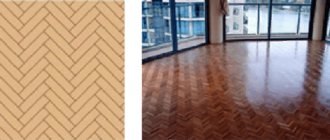
The direction of the laminate is herringbone or squares
This direction of laying laminate is not available in all models. Before deciding to purchase, it is advisable to consult a specialist about your choice. First of all, you need to find out whether it is possible to lay the laminate flooring that you like in the desired way.
Related article: How to choose weights for different types of curtains
The laminate can be designed in such a way that it will be possible to connect the planks at an angle of 90 °, as a result of which you can get fifty different installation methods.
Some models of German laminate can be laid in a herringbone pattern or in an English bond (the planks are laid in one direction). If the flooring has a glueless installation technology, then laying the laminate can be easily done by one person. In this case, the boards level themselves and errors are eliminated. After carefully studying the installation instructions, you can try to do it yourself. If you prefer the classics, you can use a new product - laminate with small slats. They can also be laid in one direction. This laminated plank has a beveled edge on all four sides with a V-shaped seam pattern. By connecting such slats without a gap, you will get a covering on the floor of your room that is similar to wooden parquet.
It should be noted that the laminate of some collections has a design that makes it possible to connect the planks at an angle of 90 degrees. As a result, you get at least fifty different ways to lay this flooring. Closed and open square, single and double herringbone, English binding - this is part of the list of all the possibilities of such a laminate. The material creates a unique combination of natural beauty and sophistication on the floor. One pattern alone can combine up to 50 different board options, which will allow you to lay them out in such a unique way that your wildest fantasies will come true. This will highlight your individuality and allow you to create the floor of your dreams. Laminate is also available in the form of mosaic panels. When assembled, floor paintings will appear in your room. When laying such a laminate, you must understand that this is a very expensive material, so it must be installed by specialists with many years of experience.
In any direction of laying the laminate, one should not forget that everything depends on the accuracy and thoroughness of the laminate installation work. As a result, you will be able to please yourself with the beautiful appearance of the monolithic coating. The correctly chosen direction for laying laminate will complement its external qualities and transform your room beyond recognition. A beautiful floor is one of the main indicators of the professionalism of an apartment renovation. Let your laminate installation be successful!
Laminate laying direction
Laminate manufacturers note that this coating is very easy to install and anyone can cope with this task. Yes, this is partly true, since the slats are equipped with special locks that allow them to be easily fastened together. If initially laminate flooring was on sale only with a Lock lock, which required certain skills to work with it, now a new type of connection has become widespread - these are Click locks, which anyone can actually connect. We'll talk about them a little later.
On a note! Technologies do not stand still and are developing, and therefore completely new lamellas with 5G and Megalock connecting systems are entering the market.
Types of Laminate Locks
Megaloc lock for Classen laminate
In reality, everything turns out to be much more complicated than laminate manufacturers kindly reported. This especially applies not only to the careful preparation of the base, but also to the orientation of the planks in the space of the room. Most often, laminate flooring in apartments is laid depending on the direction of light, as mentioned above. If the planks are laid along the light source, the floor will resemble a regular plank floor, and the joints will be practically invisible.
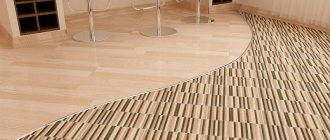
Diagonal laying of laminate
But sometimes it makes sense to lay the coating perpendicular to the direction of the rays of the sun or lamp. So, due to the covering, you can visually enlarge the room, which is important for narrow rooms with a window at the end. In this case, the light will highlight the joints, they will become more noticeable, but thereby visually make the room more spacious.
On a note! If the slats are laid perpendicular to the direction of light, their texture will be much more noticeable.
Diagram of the direction of laying laminate flooring in rooms
Also, the laminate should be oriented depending on the direction of movement along it. Sometimes there are rooms in which you can clearly mark the lines along which the people living in the house move. Most often these are corridors and halls. In this case, the priority when deciding on the orientation of the lamellas will not be the light rays, but the direction of movement - the laminate is laid along these lines. This method will reduce the rate of abrasion of the coating in the joint area, due to which the floor finish will last longer.
How to lay laminate flooring - along or across the room
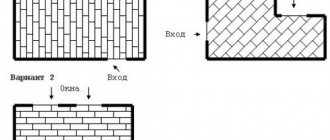
Where to start styling
Regardless of the type of lock, it is more convenient to work if you place the spike in the center of the room. Therefore, it is most often recommended to start laying laminate flooring from the far right corner from the entrance. The first plank is laid with a groove to the wall, a tenon in the room, and all the others in exactly the same way. But this is the right and convenient thing to do if you decide to lay the laminate “along the light,” that is, from the window, which is located on the opposite side of the entrance.
The same laminate with a chamfer. Not to say that when positioned along the light it is not visible
With the transverse method, start from the wall farthest from the entrance. When laying at an angle - from the far corner to the right or left. Here as you wish. But this is not the rule either. You can start from the entrance, if it’s more convenient.
There are some restrictions if you need to lay the laminate as a single sheet in two adjacent rooms or make an exit to the corridor without a joint. Then they begin laying, focusing on the middle of the doorway. Laminate flooring in an opening looks better if it is laid symmetrically. So the “starting” strip is placed in the center of the aisle. You can beat it off with a paint cord and focus on this line.
Where do they start laying laminate flooring if it is laid as a continuous sheet without joints? From the middle of the aisle
If you have no experience in laying laminate, it is better to nail strips along this line, which will serve as guides for the first row. Lay the covering in one direction - to the right, as is usually done. Then remove the guides and place them to the left. In this direction you will get a “reverse” installation - you will need to insert the tenon into the groove. But you can get used to it. Although this method takes a little more time.
Features of laying laminate in non-standard cases
Sometimes laminate flooring is installed in rooms that are non-standard in shape and lighting. It can be difficult to navigate and decide in which direction the covering strips should “look”. In this case, diagonal laying will save the situation. The covering is mounted relative to the walls at an angle of 40-60 degrees. Thus. You can not only enliven the interior, but also make the joints unnoticeable.
On a note! This method, although it is criticized quite often, is still used in rooms where windows are located on adjacent walls.
In this example the laminate is laid diagonally
Unfortunately, the method has certain disadvantages. Due to this installation, the abrasion of the joints increases, and the consumption of material also increases - too many scraps appear.
If the room has the shape of the letter “L”, then the slats are also laid diagonally or in a herringbone pattern. This way the floor looks quite interesting, the room will not seem narrow.
The correct direction for laying laminate flooring
What to focus on
However, in reality everything turns out to be not so simple. The fact is that the direction of laying the laminate will depend on many factors, and not just on light sources. Let's figure out what can affect the orientation of the slats in the room, and also decide, depending on what factors it is worth making this or that decision.
First of all, it is important to assess the number and location of windows in the room. If there is only one, then no special problems should arise - it is enough to lay the laminate, starting from the far corner of the room, so that the lamellas are oriented along the direction of the light. This way you can make the seams unnoticeable. If there are two or more windows in the room, then you should look at which one illuminates the room better, and guide you when installing the covering on it. If there are no windows in the room at all, and this is a fairly common occurrence in corridors, then it is recommended to orient the laminate depending on the direction of the light coming from the main source - for example, a chandelier.
Diagonal laminate
Advice! It’s a good idea to immediately evaluate the interior of the room, find out where and what furniture will be placed. This will allow you to imagine the overall picture of the finished room and figure out how to lay the laminate so that it looks better.
The shape of the room also matters. If the room is narrow, then it is better to discard the desire to hide the seams - here they can play a positive role, visually expanding the room. In rooms with particularly complex geometries, a diagonal installation method is used, although in this case it is recommended to invite specialists to help, since a newcomer to the world of renovations is unlikely to cope with the task.
Cross laying relative to the window
It is also important to consider the placement of furniture in the room. If you plan to install a lot of interior items in the room, and there will be carpets on the floor, then there is no point in observing the direction of the laminate joining lines.
Important! If the laminate is laid on wooden boards, then the slats should be laid perpendicular to the floorboards - then the floors will sag less. If wooden floors are covered with plywood, then laminate planks can be placed in a way that is more convenient.
Laminate installation process
Calculator for calculating the number of laminate boards per room
Go to calculations
Laying methods
When purchasing a laminate, it is important to choose the right class. Those that start with 2 are intended for rooms with a small load, so for passage rooms such as hallways and corridors it is better to take class 33; for the bedroom and guest room you can stop at class 31. Everything will depend on the price. The next step is to choose the direction of laying the laminate relative to the window and correctly implement the project.
Choosing a direction
The choice of direction for laying the laminate is determined by several factors:
- number of windows;
- location of windows;
- room parameters;
- laminate design.
If laying laminate flooring is being done for the first time, then it is better to choose the method of laying perpendicular to the window. The advantage of this type of laminate installation is that the light from the window falls on the slats parallel to the seams of the laminate. This allows you to hide their presence. Thanks to this approach, the laminate floor appears monolithic. This also allows you to hide some flaws that may be made when laying the laminate. At the same time, the laminate boards look monolithic, which creates a certain charm. If the laminate is embossed, then this incidence of light will further emphasize the texture of the laminate board. However, it is better not to use this installation method for low-class laminate. The reason is that it wears out at the joints, which will ruin its appearance.
Note! When choosing this method of laying laminate flooring, you should pay attention to the configuration of the room. If the window is on a larger wall and on a smaller one, then this approach will lengthen the room even more.
The next option for laying the laminate in relation to the window would be a parallel arrangement of the slats. The reason for its choice may be the location of the window in the room, as discussed above. This installation method is also chosen in narrow rooms where light comes from the next room. This method of laying laminate allows you to highlight the texture of the planks in a special way. This creates a feeling of an uneven surface. This option for arranging laminate boards is also suitable for laying mixed lamellas. Some may be glossy, while others may be matte.
Advice! For walk-through rooms, the best way to install laminate flooring is to follow the direction of movement. In this way, it will be possible to achieve a long service life due to minimal abrasion of the laminate planks at the seams.
If the windows are arranged in a mixed manner, then you can lay the laminate diagonally. At the same time, the room acquires elusive lines. The gaze goes along the laminate not up or down, but to the corner of the room. To further accentuate the corner, a table or fireplace is placed in it. The angle of laying laminate in this way is in the range of 40–60 degrees. Diagonal laying of laminate flooring is considered the most uneconomical, since a lot of waste remains from the laminate planks.
Installation process
The installation process requires due attention and skill, which is acquired as the work progresses. It is better to start from the far corner of the room and move towards the exit. Most often, laminate flooring is laid from left to right. The prepared surface is covered with a lining. If the laminate is laid on a concrete floor, then additional waterproofing in the form of a film is required, which is laid according to the pattern as described above. The lining can be made of foamed polyethylene or cork. An overlap is made between its individual sheets, and the joints are taped. The tenon of the first laminate strip is cut off to make it easier to place parallel to the wall.
A gap of 5 mm is made between the wall and the plank. To make it easier to store, plastic pegs are used. The first row is completely assembled and placed in its designated place. If it becomes obvious that the last plank will need to be cut by more than half, then it makes sense not to start with the whole part, but to divide the size of the final plank in half and lay the short one. The size of the first laminate strip in the second row should be selected in such a way as to ensure interlocking seams. After laying each plank, it must be tapped with a rubber mallet using a metal bracket. To get around pipes and other protrusions, you will need to make a hole with a jigsaw. A video about the installation technology can be viewed below.
Options for connecting laminated panels
Laminate, as mentioned above, can be connected to each other in two ways - Lock and Click locks. The covering can also be attached to the base of the floor using glue, but this method is already outdated and is practically not used.
Connecting laminate locks
If the slats are equipped with Click locks, then installation is quite simple, but the clearance between the individual slats is minimal. The coating connected in this way can be easily disassembled if necessary. During installation, it is important to ensure that the lines of the transverse joints do not coincide, that is, the material is laid in a checkerboard pattern.
Lock laminate is a little more difficult to assemble; the connection takes place according to the tongue-and-groove principle. In this case, the slats are located parallel to each other without shifting.
Lock options for connecting laminate flooring
The advantage of the adhesive method is that the joints of the coating will be reliably protected from moisture, which laminate is very afraid of. However, dismantling the material in this case is impossible without damaging the planks.
The technical side of the issue - installation of laminate flooring in the corridor
Before you begin laying the flooring, you need to prepare the base and select the underlay material.
Preparing the base
The main condition when laying laminate flooring is a perfectly flat base. If there are uneven surfaces, the load on the floor covering will be uneven, which will lead to divergence of the panels as a result of the destruction of the interlocking joints.
Preparation of the subfloor consists of the following steps:
- Removal of existing floor covering.
- Cleaning the base from dirt.
- Removing damaged areas of the base.
- Sealing irregularities, cracks, cutting off protrusions, leveling the base with special compounds.
If the floor is wooden, then you need to make sure, using a building level, that its surface is located in a single horizontal plane. The permissible height difference is no more than 2-3 mm on a surface 2 m long. Otherwise, the floor will need to be sanded. It is important that the plank base is strong and does not “walk”. If the boards sag, they need to be replaced or fixed more firmly.
Leveling a wooden floor
Advice! You can level a wooden floor using a mixture of sawdust and PVA glue applied to a board base that has been previously cleared of paint.
If laying is supposed to be on a concrete base, then if there are unacceptable differences, leveling is carried out.
Selecting a substrate
A waterproofing layer is first laid on a flat, prepared base, most often it is a polyethylene film. It is laid with an overlap (15 cm) with an overlap of 20 cm on the walls. The canvases are fixed with tape. A substrate is placed on top. The construction market offers many options, let's consider the most popular:
The “Steico Underfloor” substrate is made on the basis of natural fibers of coniferous trees. During the production process, the fibers are carefully crushed and natural tree resin is added as a binder. This substrate is produced in the form of rectangular slabs 59 x 79 cm with a thickness of 3.6 to 7 mm, 15 pieces per package.
Throughout their service life, the slabs retain their dimensions and do not dry out or deform. They have the ability to absorb excess moisture and release it back. This material evens out unevenness of the base with differences of up to 3 mm.
The advantages include: sound and heat insulation properties, simple installation, durable edges, biological passivity and lack of odor. The disadvantages include the fragility of thin panels, which must be taken into account during installation, high cost and difficulties during transportation.
Read more about the characteristics and types of coniferous substrates in our article. There you will also find instructions for laying the spruce underlayment.
Substrate "Steico Underfloor"
Cork backing "Tarkett" 2 mm is a natural, environmentally friendly material. Supplied in rolls of 10 m, but quickly regains its shape and levels out. This material is characterized by good thermal properties - it does not let the cold in from below and does not let it out of the room. A thickness of 2 mm is enough to create a rigid base. Suitable for laying on concrete base. Estimated service life is 25 years.
The advantages include 100% natural material, reasonable cost, sound and heat insulation properties, durability, elasticity, and easy installation. Among the disadvantages, the requirement for a flat base is noted, since 2 mm is not enough to smooth out defects;
Cork backing "Tarkett"
“Arbiton Cork” 2 mm material is recommended as a substrate This is also a natural cork material, produced in rolls 1 m wide and 10 m long. The base for the laminate is hard and warm. If this substrate is used in a heated floor system, it is necessary to lay a shielding layer. This substrate is not afraid of moisture, it does not mold. The advantages include affordable cost, the ability to create an elastic base, interaction with a heated floor system, and simple installation. The disadvantages include the presence of hard inclusions and fragility of the edges.
Cork backing “Arbiton Cork” 2 mm
If the apartment is located on the ground floor, then the Russian-made “Parkolag” 3 mm bitumen-cork substrate will save you from cold floors. Thick cardboard is used as a base, on which cork chips are fixed with bitumen. As a result, the elasticity of the coating is achieved. This substrate reliably protects the room from moisture, and thanks to the triple mixed structure, optimal air exchange is achieved, preventing the formation of mold and mildew.
The advantages include a thickness of 3 mm, moisture resistance, elasticity, versatility, wear resistance, air exchange, accessibility, and strength of the material. The disadvantages include the impossibility of using a heated floor in the system and a specific “bitumen” smell.
Bitumen-cork substrate “Parkolag” 3 mm
waterproof “Eco-cover” substrate has a wide range of uses and can be used not only in residential buildings. It has excellent leveling properties, strength and elasticity. The release form is slabs rolled into rolls, which makes it easy to transport the material. Thanks to its thickness of 3 mm, this material provides excellent sound insulation of rooms. It can be used on the first floors, as it has absolute moisture resistance and biological passivity. The advantages include elasticity, a wide range of sizes, ease of cutting and installation, dielectricity, and noise absorption ability. The disadvantages include high cost and the presence of a specific odor;
Waterproof “Eco-cover” backing
The substrate is based on foamed non-crosslinked polyethylene "Petroform" 5 mm and has a closed porous structure. The material is easy to cut, overlap and secure with tape. Positive qualities include vapor permeability, thermal insulation properties, low weight, biological passivity, elasticity, zero water absorption, and low cost.
Polyethylene foam backing
Laying laminate
Installing laminate flooring in a hallway is no different from installing flooring in other rooms.
Instructions for laying laminate flooring
What may be needed when laying laminate flooring? Look for the answer in a special article. There you will find everything: from tools to instructions for self-installation.
But there is one feature - the corridor is connected to all rooms. When laying laminate flooring in all rooms, the question arises - what to do with existing door frames? The instructions below will tell you what to do if it is not possible to remove the door frame during repairs.
Table 10. Instructions for laying laminate near the door frame
| Illustration | Description |
| A small fragment of the strip is fixed near the door frame. | |
| Cover with masking tape. | |
| Trim the door frame. | |
| Using a chisel or screwdriver, knock out the sawn part of the door frame. | |
| The opposite side of the door frame is filed in the same way. Then the bar of the required size remains to be placed under the box and inserted into the groove. | |
| The result will be a neat transition from one room to another without a threshold. |
The detailed video at the end of this article will clearly show the entire algorithm of actions when laying laminate flooring.
Basic principles for installing laminate floors
Before you begin installation, it is important to understand certain principles of working with laminate flooring.
- The coating must be installed only on a perfectly leveled surface. Otherwise, it will quickly become unusable, gaps will appear between the slats, and the material will creak when moving over it. The maximum height difference around the perimeter of the room should not exceed 5 mm.
- Under this type of coating, during installation work, a special substrate with a thickness of about 5 mm should be laid with a material thickness of 8-12 mm.
- The material should always be mounted only on a dry and smooth surface; it should also be free of debris and dust. Otherwise, the coating may lie unevenly.
- It is recommended to immediately select the color of the coating in accordance with the color scheme of the interior. It is worth remembering that light floors visually enlarge the room, while dark floors, on the contrary, make its volume smaller.
The color of the laminate should match the interior of the room
- Before installation, this type of finishing material must rest in the room for about 48 hours before starting work. This is especially important if the coating was transported from the store to the work site in sub-zero temperatures. The material must get used to the new microclimate, adapt to humidity and temperature conditions.
- The coating does not like moisture, so it cannot be installed in the kitchen, bathroom or toilet. Exceptions are coatings of a separate class that have additional protection against moisture.
- There should always be a small deformation gap of 10-15 mm between the wall and the coating. Otherwise, due to thermal expansion, the material may deform and go into waves.
Laminate laying diagram
Combined flooring - laminate and tiles
Laminate belongs to the category of finishing materials that combine economy and quality, but its vulnerability to moisture, of which there is a lot in the hallway, stops many from choosing just such a design solution. Ceramic and stone tiles, on the contrary, have proven themselves to be strong, moisture-resistant and durable materials, but quite expensive. The solution was the possibility of combining these two materials when creating a floor covering in the hallway, when the area of the floor most susceptible to dirt and moisture near the entrance door is finished with tiles, and the rest with laminate.
The combined floor covering performs the following functions:
- Visually divides the hallway space into “dirty” and “clean” zones.
- By choosing the right material, you can visually increase the area of a small corridor.
- The area of special stress near the front door will be reliably protected with the help of tiles.
- A wide range of tiles allows you to choose a covering for any interior. Considering that tiles always look elegant, the interior of the hallway will be stylish and original.
Combination of tiles and laminate
Advantages and disadvantages
The advantages of combined flooring in the hallway are as follows:
- This method of combination is universal and can be used in apartments, private houses, office, industrial or public premises.
- The right combination will be appropriate in an interior with any style – classic, modern, ethnic or country style.
- Combining tiles with laminate allows you to visually unite all the rooms in the apartment.
- This solution allows you to save money - you won’t need to purchase a large amount of expensive tiles for a small area near the door.
- The service life of the flooring in the hallway increases several times.
- The tiles allow for frequent wet cleaning, so the hallway will always look neat.
It is important to maintain the arrangement of materials in the same plane
The disadvantages of this solution include the following:
- To make a combined floor look organic, it is important to choose both materials correctly. While tiles come in a wide variety of textures and shades, laminate cannot boast of this. It is necessary to correctly select not only the shade and texture of the material, but also its thickness. Otherwise, the flooring will look tasteless.
- You will need to calculate the location of each piece of tile and how to trim it so that the design looks organic.
- It is important to maintain the symmetry of the pattern; for this you will need to complete the preparation stage - draw on a sheet of paper a “fit plan” for the tiles, taking into account the seams.
- And finally, the main disadvantage is the inevitable formation of a joint between the two materials. It is necessary to carefully consider the method of its design so that it reliably protects the space from dirt and moisture.
If the heights do not match, a threshold is formed
Joining laminate with tiles
There are several ways to design the joint between tiles and laminate. Let's look at the most popular ones.
Table 6. Options for joining laminate to tiles
| Illustration | Description |
| To design curvilinear bends, a flexible PVC profile is used, consisting of a base and a decorative element-nozzle. | |
| A flexible metal profile with powder coating can be used for both curved and straight joints. | |
| A standard aluminum threshold allows you to level out the difference in height between the two materials. They may have holes for screws, hidden fastening or an adhesive layer. | |
| A transitional PVC profile will allow you to smooth out the height of the transition from one material to another. | |
| An alternative solution for obtaining an even joint between the tile and the laminate is a cork expansion joint, which is inserted into the expansion joint. The downside is that such a joint is not protected from small debris. |
The instructions below will tell you how to cut tiles if you don’t have a tile cutter at hand, and there is no point in buying one just to trim several tiles.
Table 7. Instructions for cutting tiles
| Illustration | Description |
| The tools you will need are a metal ruler, a glass cutter, a drill with a Pobedit tip, or a utility knife. | |
| Method 1 – using a glass cutter. Using a ruler, draw a line, place the glass cutter under the tile and press on it from both sides | |
| Method 2 - using a drill, cutting the tiles is carried out according to the same algorithm as in the first case. | |
| Method 3 – cutting with a utility knife differs from the above methods only in that the fault line will need to be marked several times to make it deep enough. |
The lamellas are cut using a jigsaw or its manual equivalent.
Cutting slats using a jigsaw
Below we will consider two ways to finish the joints between laminate and tiles in the hallway when installing a combined floor covering.
Table 8. Installation of flexible PVC profile
| Illustration | Description |
| After the tiles and laminate are laid, an expansion joint remains between them. Its width should be sufficient for laying the fastening profile in it and organizing a temperature gap of 5 mm on the side of the laminate. | |
| Drill holes for dowels. | |
| A plastic dowel is placed in the resulting hole. | |
| The fastening profile is fixed to the base with self-tapping screws. | |
| Before proceeding with the installation of the flexible profile, it must be placed in warm water for 15 minutes to make it softer. The water temperature is 50 – 70 degrees. | |
| The flexible profile is pressed into the fastening element with little force. |
Table 9. Arrangement of a smooth joint
| Illustration | Description |
| To make the joint elastic, the last die near the tile is glued to silicone. | |
| A strip of protective masking tape is applied to the tiles and laminate flooring. | |
| The joint is filled with sealant of the same shade as the putty material in the tile joints. | |
| The seam is wetted. | |
| The sealant is smoothed using a small spatula. | |
| The masking tape is removed. | |
| The resulting joint is not afraid of moisture or dirt. It has sufficient elasticity and can be repaired at any time. |
Joining laminate to laminate
Such joining in the hallway may be required at doorways leading to adjacent rooms. For this purpose, joining strips are used to ensure that the temperature gap is maintained and protect it from moisture and small debris.
Read more about the features of laying laminate flooring near doors here.
There are different types of planks. A laminated profile made from wood chips pressed in a special way is covered with a laminating film. Its surface has a floor covering pattern, which makes the transition almost invisible. The metal connecting strip made of stainless steel, aluminum or brass has high strength and wear resistance.
It is recommended to use screws to secure the connecting elements so that they can be dismantled and reinstalled.
Docking the laminate
To avoid the formation of a threshold when moving from the hallway to adjacent rooms, there is a deck installation method. The installation diagram that must be followed in this case is shown in detail in the video.
Video - Layout of laminate flooring without thresholds
Laminate installation tool
For installation work when laying laminate flooring, various tools may be required.
What you need to install laminate flooring
Table. Tools for working with laminate.
| Tool | Purpose |
| Any sawing tool (hacksaw, jigsaw) | Used to give the lamellas the required length in accordance with the measurements taken. |
| Wedges | Will be required in order to maintain the correct deformation gap. Installed along the perimeter along the walls. |
| Roulette, square | Measuring instruments will be required to take measurements from the slats, as well as to create neat and even cut angles. |
| Pencil | Useful for marking. |
Using spacer wedges
In addition to the laminate itself, you will need a substrate for it. It can be made from different materials - cork, polyurethane, polyethylene or bitumen sheet containing a small amount of cork chips. Each of these types of substrate differs in price, quality and properties. The best and most expensive option is a cork backing, and the most budget-friendly option is regular polyethylene. The latter has excellent waterproofing characteristics.
Cork underlay for laminate flooring
On a note! The substrate is needed in order to increase heat and sound insulation, as well as compensate for the shock load on the material.
Preparing to lay the coating
Preparing the rough base is an important step when laying such a delicate coating as laminate. It includes cleaning the floor from debris and dust, leveling. If the height differences are large, it is recommended to fill the screed with a self-leveling mixture. If the base is made of wood, then it can be leveled using sheets of plywood or plasterboard, which will be fixed to the floorboards.
Next, be sure to sweep out all large debris and collect the sand with a vacuum cleaner. If necessary, wet cleaning of the base is also carried out. The main thing is that it is cleaned completely and perfectly.
Sweeping the floor
Laying laminate flooring lengthwise or crosswise
It doesn’t matter whether the laminate will be laid lengthwise or crosswise. In any case, the technology will remain the same, standard, which the manufacturers recommend adhering to.
Step 1. The purchased laminate is left in the room where it will be installed for 48 hours. During this time, the foundation is prepared.
The laminate must remain in the room for 48 hours
Step 2. The surface is thoroughly cleaned of all kinds of debris using a brush and a damp cloth, and if necessary, leveled.
Cleaning the floor from debris
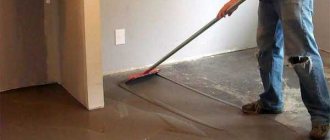
Step 3. The surface of the base is covered with a waterproofing substrate under the laminate. Its individual strips are laid overlapping each other, and also glued together with ordinary tape.
Laying a waterproofing underlay
Step 4. Next, the shock-absorbing substrate is laid. The sheets should be laid joint to joint; there is no need for overlap here, it will only make the base crooked. The edges can be joined using adhesive tape.
Shock-absorbing underlay is laid
Step 5. The first board is placed in the corner farthest from the exit of the room. It should be oriented in accordance with the selected laminate laying pattern.
Laying the first laminate board
Step 6. Wedges are installed between the first board and the wall to provide a deformation gap.
Installing spacer wedges
Step 7. Exactly the same as in point 6, lay the next and remaining boards in the row.
Installation of the remaining boards in the row
Step 8. The second row of boards is laid with the joints shifted; to do this, the outer boards will have to be trimmed. A peg is also installed between the first lamella in the second row and the wall. The board is placed in the groove of the previous board of the first row at an angle of 45 degrees, and then lowered to the floor with light pressure. A click will be heard indicating that the lock has latched. Next, the remaining planks are laid.
Laying the second row of laminate
Step 9. The entire base of the floor is covered in the same way. It is important to ensure that there are no gaps between the slats and that all locks are latched.
All slats are laid
Step 10. After finishing the work, the wedges at the walls are removed, and the gaps are closed with plinths.
The spacer wedges are removed
Prices for spacer wedges for laying laminate flooring
Spacer wedges for laying laminate flooring
What is laminate - material structure
Before going to the store, it is important to decide what characteristics the purchased material should meet. To do this, you need to know about the structure of laminate, its features and varieties. This information will help you make the right choice.
Laminate is a multilayer material. A standard board consists of the following layers:
- The load-bearing base is in the form of an HDF plate (extra strong fiberboard), on the end surface of which there is a lock. This is the thickest layer.
- A special paper layer with a pattern that determines the appearance of the product.
- The lamellas are covered on top with a durable, colorless protective layer based on acrylic or melamine resin. It is its thickness that determines the wear resistance of the product.
- The bottom of the panel is protected by a backing made of durable kraft paper.
Structure of a standard board
Manufacturers regularly improve their products, increasing their ability to withstand various types of loads. The structure of the lamellas does not fundamentally change, but new protective layers are added and the interlocking connections are improved. Thus, the Norwegian company Alloc has released a heavy-duty laminate with an innovative aluminum locking system and a protective layer thickness of 0.4 to 0.6 mm. Wear resistance class of the material is from 31 to 34.
Wear-resistant material from Alloc
Compared to standard 4-layer models, its structure has undergone significant changes:
- The top protective layer with a thickness of 0.4 to 0.6 mm is not afraid of temperature changes, moisture, and mechanical influences.
- A decorative layer in the form of paper with a pattern imitating natural wood or stone is baked together with the top protective layer during the manufacturing process.
- The high-density HDF board protects the lamella from mechanical damage and moisture.
- The bottom stabilizing layer is made of kraft cardboard impregnated with melamine resin.
The edges of the product are treated with wax, and the Aluminum Locking system ensures strong adhesion of the lamellas to each other and allows you to repeatedly assemble and disassemble the floor covering.
Advantages of laminate flooring in the hallway
Correctly selected material for the hallway has all the necessary performance properties:
- Strength, reliability and durability.
- The coating does not fade when exposed to direct sunlight, and retains its visual appeal for many years.
- Easy to care for and the possibility of frequent wet treatment.
- Environmentally friendly.
- Wide range of colors and textures.
- Simple but reliable installation.
High-quality laminate cannot be cheap, and you should not skimp on material for finishing the floor in the hallway.
To choose the right laminate, you must remember that the main criterion by which this material is distinguished is its abrasion class.
Laminate flooring in the hallway allows you to design all rooms in the same style
Coolness
Depending on the intensity of the load in the room, its trafficability, possible mechanical effects on the surface of the floor covering, a distinction is made between household laminate from 21 to 23 classes and commercial laminate from 31 to 33 classes. The higher the number, the more durable the protective face layer is, subject to abrasive loads. Thus, products of classes 21, 22 and 23 are used in residential premises with a low level of traffic - bedrooms, home offices, living rooms. Commercial coating is more wear-resistant, so it is recommended for kitchens and hallways. Products of class 32 are in greatest demand, so they are produced in a wide range of shades and textures.
The table below provides a brief description of the laminate depending on its class, where low load *, moderate **, total ***, high ****.
Table 1. Brief characteristics of household laminate
| Illustration | Load | Where is it used? |
| * | Bedrooms, offices, balconies, storage rooms. | |
| ** | Kitchens, living rooms, children's rooms, halls. | |
| *** | Kitchens, living rooms, children's rooms, halls, dining rooms, corridors. | |
| **** | Kitchens, hallways. |
Table 2. Brief characteristics of commercial laminate
| Illustration | Load | Where is it used? |
| * | Hotel rooms, bedrooms, conference rooms, small offices, home offices, lounges. | |
| ** | Classrooms, hotels, small offices, reception areas, boutiques. | |
| *** | Medical institutions, gyms, reception rooms, cafes, bars, restaurants, shops. | |
| **** | Multifunctional and waiting rooms. |
Moisture-proof or waterproof
An important quality that the flooring in the hallway should have is moisture resistance. Laminate, like all wood-based materials, is especially vulnerable to moisture. Therefore, during the production process, products are coated with a protective composition that prevents the lamellas from swelling and deformation when liquid gets on them.
Important! The moisture resistance of products depends on the degree of their impregnation with protective compounds. Some of them are processed only from the ends at the joints, others - over the entire surface.
Fundamentally, the material is divided into two types - moisture-resistant and water-resistant. The names are similar, but the characteristics of these two materials differ.
Moisture-resistant products are not afraid of high air humidity in the room; under such conditions they are not at risk of swelling and deformation. Thanks to their treatment with a water-repellent protective compound, this floor can be washed with a wet cloth. But if a puddle forms on its surface or liquid gets into the space between the lamellas, the material may deteriorate. Products from some manufacturers are afraid of exposure to hot water.
Moisture-resistant laminate, if liquid regularly gets into the joint, can swell and deform over time
Waterproof laminate does not have serious consequences if it gets wet, but the cost of this material is much higher. This type of coating is absolutely not afraid of moisture, even if a puddle on its surface remains for several days.
Waterproof coating recommended for hallways, kitchens and bathrooms
Which option to choose for the hallway? It is enough to objectively assess the upcoming operating conditions of the floor covering. If they are gentle, that is, there are no children or pets in the house, then you can get by with moisture-resistant material. If you are still in doubt, check out our special article. In it we will talk in detail about the criteria for choosing this floor covering and give a couple of tips.
Important! Another important quality is the presence of a non-slip laminate surface.
Laminate marking
When choosing a material, you should pay attention to the markings shown on the information sheet attached to each product package. Pictograms will tell you a lot of useful information about a product if you understand their meaning. Let's look at the most popular and useful icons.
Table 3. Pictograms for laminate
| Illustration | Index |
| Antistatic coating | |
| Surface dissipates static electricity | |
| Coating conducts current | |
| Coatings with a dynamic coefficient of friction μ> 0.3 | |
| Friction coefficient not determined | |
| Increased slip resistance | |
| Heat-resistant coating, can be used in a “warm floor” system | |
| Moisture resistance is weak, for residential premises | |
| Good moisture resistance, for commercial premises | |
| Strength of mechanical locking connection | |
| Footstep volume | |
| Scratch resistance |
Locking part and fastening methods
The shape and type of locking connection of the lamellas plays an important role. It is in this element that manufacturers invest a lot of money when improving it. A lock of the correct shape not only ensures reliable fixation of the lamellas to each other, but is also responsible for “pulling” them towards each other, being the place where physical tension is created. It is thanks to the optimal properties of the lock that the likelihood of gaps appearing between the planks throughout the entire service life of the laminate is significantly reduced.
Manufacturers offer different types of locks, but they all have the same goal - to make the floor covering reliable and to facilitate the installation process.
Important! The strength of the interlocking joint is influenced by the quality of the HDF board - its density and thickness. The higher these indicators are, the stronger the lock will be.
Among the most common lock connections are the following examples, presented in the table below.
Table 4. Types of locking connections
| Illustration | Description |
| The Lock type is obsolete. Works on the groove/tenon principle. The flooring assembly process involves hammering one lamella into another using a rubber hammer. This type of flooring cannot be further disassembled or reassembled. If liquid gets into contact, the products quickly become unusable. | |
| The Click type lock is the most popular - it is simple, reliable and durable. The tongue/groove technology is retained, but the lamellas do not clog. The panel is inserted at an angle and, with a slight rocking, gently snaps into place. A floor assembled in this way can be disassembled and reassembled up to 4 times. However, this should not be abused, since the quality of adhesion of the lamellas to each other weakens each time. An improved type of lock is the ClickExpress type mount. | |
| The T-lock type lock combines the positive properties of its predecessors. The lamellas are connected at a slight angle, almost horizontally. The connection is strong and reliable, and the installation process is quick. | |
| The 5G type lock ensures fixation of the lamellas not only along the length, but also from the end side. In this case, the panel snaps into place easily and is accompanied by a click. The lock system has a new element in the form of a latch tongue. It slides in when the panel is lowered and snaps into place, locking the lamella in the desired position. The disadvantage of such a system is the impossibility of repairing this tongue if it fails. | |
| A Megalock type lock with end joints on tongues provides strong, reliable adhesion, high maintainability of the coating, many cycles of assembling and disassembling the floor, and protection from moisture when treating joints with special compounds. | |
| The Unicklick fastening system is characterized by a convenient and fast assembly process, the strongest possible adhesion of the lamellas and the assembly/disassembly of the covering up to 4 times. |
Prices for Kronospan laminate
Laminate Kronospan