Home » Partition installation
Category: Partition installationAuthor: Avtor
The construction of an internal demarcation element made of brick is still popular. Although the installation of partitions made from this material takes longer than the installation of plasterboard, plywood or plank partitions, brick walls are much stronger and provide better insulation of heat and sound. The main practical advantage of such a bulkhead is that it is quite strong and can support hanging shelves, cabinets and other similar elements without additional support reinforcement.
- 1 How to make a brick partition in an apartment: brick laying
- 2 Construction of brick partitions: how to lay a brick lintel
- 3 Installation of a brick partition: installation of a reinforced concrete lintel
- 4 How to install beacons before plastering a brick partition
- 5 Construction of a brick partition: plastering
- 6 Finishing after installing a brick partition
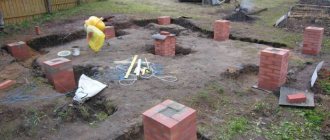
How to make a brick partition in an apartment: bricklaying
The technology for creating a brick partition depends on its mass - the floor slab must support the partition.
What masonry options are possible:
- On the edge. A similar method is used if the floors are not designed for a large mass. Such a bulkhead does not “eat up” square meters. But this option is not suitable for a high wall; it will simply fall apart.
- In one brick. A fairly robust design with a large mass. Used quite rarely. For such a wall, the load-bearing slab is additionally strengthened.
- One and a half bricks. Such a structural element has a significant mass and is erected only in industrial buildings.
- Half a brick. This option is perfectly resistant to load-bearing floors. Bulkheads are also built to insulate walls, most often in houses made of concrete panels. A false wall is erected with a gap, which is filled with insulation.
You also need to choose the right brick for the construction of partitions correctly. Two types of clinker are produced - silicate and ceramic. The first is obtained by mixing sand, lime and special additives in the required proportions with further processing in an autoclave. The second one consists almost one hundred percent of clay fired in kilns.
The standard, most convenient brick for laying has dimensions of 25x12x6.5 cm.
Clinker, depending on the area of use, can be: construction, facing and stove. The first is used for the construction of both main and interior walls. The second option is needed for external cladding work. Fireproof fireclay is used to create stoves and fireplaces.
The heat-protective and noise-insulating qualities of a building depend on the presence of cavities in the brick blocks. Since thermal insulation properties are not so significant for an interior bulkhead, when selecting material for the construction of false walls, it is better to prefer clinker without voids with excellent sound insulation properties.
When using used bricks for laying, you can always finish with facing clinker or special tiles.
The construction of a partition element made of brick is carried out in the following order:
- Mark the walls and floor taking into account the width of the bulkhead along with the plaster layer. Vertical lines are drawn on the walls using a level. This will facilitate subsequent work on the construction of the bulkhead.
- A layer of waterproofing material must be laid under the starting row, then a solution is applied to it. To control the evenness of the masonry, a rope is pulled between the intermediate walls. Since the bulkhead is covered with a plaster compound, the seams do not need to be particularly leveled, but vertical evenness must be constantly monitored. The reliability of a wall depends on the accuracy of its construction at a vertical level.
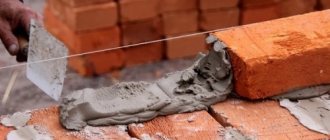
- The solution is applied to the previous row with a thickness of approximately 20 mm and a distance from the edges of approximately 30 mm. The clinker is placed on the mortar and pressed down, while moving it forward. The laid brick with its end edge removes part of the mortar, filling the vertical seam. Using a similar method, the seams are not completely filled, which is perfect for further plastering.
- A groove up to 50 mm deep is cut vertically in the load-bearing wall, into which the outermost blocks of the bulkhead are placed. This will help securely connect the structure to the main wall.
- The interior partition is not a load-bearing structure, so you need to leave a compensation gap of about 20 mm from the last row to the ceiling. The seam is covered with felt and coated with a plaster mixture. Usually the last row is filled with crushed clinker, due to the fact that a whole brick does not fit.
In one day, the bulkhead is erected to a height of no more than 1.5 meters. The mass of the brick partition is significant, and the mortar has not yet completely hardened, and doing large volumes at a time can cause deformation of the wall.
Masonry mortar
The composition and method of preparing the mixture plays a big role and affects the quality of the masonry. Cement or lime serves as a binder. The filler is sand. The sand must be clean and sifted. The amount of cement affects the elasticity of the mortar mass. There should be three to six times more sand in the solution than cement. It all depends on the loads and the degree of responsibility of the wall. First, prepare a dry, homogeneous mixture, thoroughly mixing the components. And then carefully add cold water, stirring well. The resulting solution must be homogeneous and elastic, and keep its shape. If the solution is prepared in excess, its premature setting can be slowed down by adding water and stirring.
To prevent the solution from shrinking, you should add shampoo or detergent to its composition, about 50 grams per concrete mixer with a volume of 150-200 liters.
Construction of brick partitions: how to lay a brick lintel
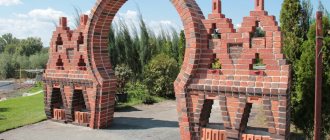
Brick partitions, if they are not built in the form of a ledge, are always equipped with a door or arched opening. To design it, you definitely need a jumper. It prevents the upper brick rows from collapsing and serves as an additional ligament that increases the strength of the bulkhead.
The lintel elements can be made of metal or reinforced concrete, but they can be made from the brick itself.
The laying of this element in a brick partition is carried out in such a way that it is able to withstand the pressing mass of the upper part of the partition.
According to the installation technology, lintels can be ordinary, wedge and arched. What is the difference:
- Privates. They are used when the width of the openings is no more than 2 m. The masonry is made in height in 6–9 rows, observing all the technological features of the dressing. To create such a lintel you need formwork. It is also necessary to reinforce it with a rod placed on its bottom and poured concrete. After the composition has gained the required strength, the brick wall continues to be built.
- Wedge-shaped. The construction of such jumpers requires V-shaped seams. The construction also requires formwork. The width of the lower part of the wedge is 0.5 cm, the upper part is up to 2.5 cm. Brick blocks are laid on both sides towards the center of the lintel element.
- Arched. Brick blocks are laid similarly to the wedge technology. The location of the top seams is at right angles to the arch and the outside of the bulkhead. All the others are shaped like a wedge: they taper downwards.
For brickwork of wedge and arched lintel elements in partitions, a mortar of grade M-10 and higher is used, for ordinary mortars - no less than M-25. Waste masonry is considered unacceptable. The seams must be filled with mortar. Only brick blocks of strength grade M-75 and higher are suitable for lintels. They must be carefully checked for cracks and other defects.
Laying rows of bricks between the edges of the wall
Mooring line
When laying bricks between the edges of a wall, use a mooring cord - a device consisting of two wooden or plastic blocks to which a cord is attached. If you didn't buy these pads at the store, make them yourself. Tie a nylon or other synthetic cord to the shoe by inserting it into the groove.
Hook the blocks onto the outermost brick of the first row, aligning the cord exactly with the top edge of the brick. Pull the cord to the other end of the wall, attach it to the second block and hook the block to the brick of the first row. Align the cord with the edge of the first brick.
Laying a row of bricks between the ends of the wall
Lay out the first outer course between the edges of the wall along the cord, which should be located at the level of the edges of the bricks and at a distance of one to two millimeters from the surface of the wall. Lay the masonry on both sides and place the closing brick in the center, with a layer of mortar applied to both ends. Then lay out the first inner row along the cord installed on the inside of the wall.
Masonry to the top of the wall ends
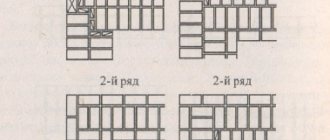
Always lay the masonry from the ends to the center and thus lay the next four rows of bricks of the outer and inner verst. After laying each row, move the cords up one row. On the second and fourth rows, lay row dressing strips with an interval of 450 mm between them. After installing the end bricks in the last row, the wall will be approximately 375mm high - the exact height will depend on the size of the bricks. If this height is sufficient, lay the closing row on top on edge and fill the seams between the bricks of the top row with mortar.
Continuation of brickwork
If you want to build a taller wall, make new edges of five rows and then lay rows between them from the ends to the center of the wall. As before, when laying the outer lighthouse bricks, check their height by ordering them, and lay the rows between the outer bricks along the cord. The next five rows will give a total wall height of about 750mm. Laying five more rows will give you a height of 1.125 m. Another row of bricks and you will have a wall with a height of 1.2 m.
Installation of a brick partition: installation of a reinforced concrete lintel
The installation of brick lintels in a partition is, from a constructive point of view, a complex process. An inexperienced person is unlikely to be able to assemble it on his own the first time. In terms of bending strength, such a structure cannot compete with a reinforced concrete lintel. They are usually used when constructing brick walls independently in houses and apartments.
You can purchase a ready-made element. But if it is not there, it is realistic to cast a concrete lintel in formwork with four pre-laid reinforcement bars, which must have a cross-section of at least 10 mm. The rods are connected using metal wire into a frame. It is necessary to ensure that the thickness of the lintel matches the height of the rows.
Brick classification
Before studying masonry technology, let's look at what the actual material for the walls is. Brick is divided into the following types:
- By manufacturing method:
- ceramic;
- silicate.
- By purpose:
- private;
- stove;
- facing.
- By filling:
- full-bodied;
- brick with voids.
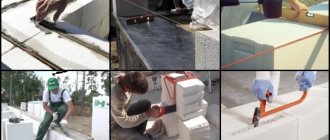
How to install beacons before plastering a brick partition
Such beacons are required to ensure that the partition is perfectly level. They are produced in thicknesses of 0.6 and 1 cm. If the wall is plastered with a thin layer, or if the beacon is removed at the end of the work, an element with a thickness of 0.6 cm is used. A similar option is used when preparing the partition for painting or wallpapering.
If the part is not removed, its anti-corrosion properties are lost over time, and rust emerging through the decorative coating becomes the reason for new repairs.
If the wall is supposed to be covered with ceramic tiles or plastic panels, centimeter-thick elements are used. They can be left in the plaster. They are more resistant to deformation and are very easy to install.
But it is important not only to choose the right beacons, you need to install them correctly. How to do it yourself:
- We fix the level on the rail with masking tape. This is necessary so that the instrument’s eye is located at a comfortable height, and you do not have to constantly bend down or stand on the stand.
- We prepare the partition for installation of the guide elements. Using a brush with stiff bristles or a broom, remove sand chips and dust from the surface, knock off the remaining solution and moisten with water.
- We check the verticality of the bulkhead with a rack with a level attached to it. This way you can identify exactly where you need to apply more plaster mixture under the lighthouse.
- We make vertical marks at the installation points. Using a spatula, we spread cakes of plaster mortar over them, the size of a handful and a diameter of about 30 cm. First, you need to install the lighthouse elements at a distance of 15 cm from the corners. The plaster cakes should adhere tightly to the surface of the partition.
- We apply a beacon to the plaster and press it down on each piece of cake one by one.
- We attach a rail to the beacon element and gently press on it, while simultaneously monitoring the level indicators.
- If a distortion is detected, press harder to ensure correct installation of the beacon. Once verticality is achieved, remove the lath and adjust the plaster mixture on both sides of the beacon element with a spatula to securely hold it after setting. Remove excess solution.
When checking the accuracy of installation, keep in mind that no deflections or gaps are allowed between the rail and the beacon element. Only if these conditions are met can correct installation be achieved.
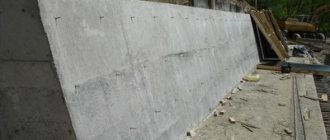
How to build a retaining wall?
The easiest way is to build a brick wall. When building a stone wall, the elements must be carefully selected to each other.
The largest stones should be placed in the corners and at the lowest level. For the stability of the structure, it is important that the vertical gaps between the stones are spaced apart, and if they are connected, then in a maximum of two adjacent rows. The wall thickness must be more than 1/5 of its height, but not less than 30 cm.
Between the slope and the wall you need to make a drainage layer of coarse gravel or crushed stone, especially if the soil is poorly permeable. At the bottom of the drainage layer along the entire length of the wall, it is necessary to place drainage pipes that will collect water and lead it to the drainage well or beyond the front side of the wall (at a level of 15 cm above the ground, it is necessary to insert plastic or metal pipes to drain water or leave it during the laying process cracks between stones).
For permeable soil such drainage is not necessary.
If the wall is low, it may be vertical. If its height exceeds 80 cm, the wall should be inclined in the direction of the slope by 10-15%. The top edge of the wall should be slightly higher than the surface of the ground - this will prevent water from overflowing over the wall.
The terrain at the base of the wall should always be formed with a slight slope outward. And if the structure borders on a lawn, the foundation or the first row of masonry must be made wider and at ground level. This will make cutting the grass easier.
Learn how to create a gravel bed
Construction of a brick partition: plastering
Before you start plastering, you need to clean the wall of dust and mortar protruding from the seams. Guide rails are installed on the wall to determine the thickness of the plaster layer. The distance between the beacons is taken to be slightly less than the length of the rule.
Before applying the plaster composition, wet the surface. And near the partition they spread a plastic film to make it easier to remove the plaster falling on the floor.
The dry mixture is mixed with water (the ratio is indicated on the packaging by the manufacturer). The solution is applied to the bricks as follows: using a trowel, scoop up the plaster and forcefully throw it onto the wall.
To level the surface of the plaster layer, a rule with a length slightly larger than the distance between the guides is used.
Applying putty will be the final stage of preparation for decorative finishing. After puttying, the partition structure can be painted or wallpapered. As an option, use plaster with a decorative effect.
What to build retaining walls from?
To reliably hold the soil, especially where its pressure is significant, you can cast a wall of reinforced concrete.
This is done locally, in formwork. Remember that you need to leave holes in the wall to drain water. Do not forget also about installing dilatation sutures every few meters.
The wall can be erected from ready-made concrete elements - solid or hollow blocks. Retaining walls made from wooden elements fit perfectly into the aesthetics of the garden.
Railway sleepers will last the longest.
They are already well impregnated. The walls made of boards laid horizontally look original. Such wood must be treated with a protective preparation, and at the point of contact with the ground it must be insulated - roofing material (on mastic or resin) is glued to the inside of the wall.
Find out more about impregnation
Walls made of round timber impregnated under pressure look good. You can buy logs or ready-made spans of logs connected with wire or metal tape. You can simply dig them into the ground.
Finishing after installing a brick partition
The clinker wall does not need to be finished at all. A partition without a decorative covering, with correctly selected interior details and lighting, creates coziness in the room, adds romance to the room and saves money.
But for all its originality and simplicity, such a bulkhead has a number of disadvantages:
- You cannot leave all the walls in the room unfinished. Otherwise, there will be no comfort - the room will resemble a basement.
- Untreated seams of internal brick partitions become clogged with dirt and dust, so it is better not to leave an unplastered wall on the working side of the kitchen.
- A brick bulkhead without plaster needs properly organized lighting.
If plastering is done, the finishing can be varied: wallpapering, painting with water dispersion and other composite compositions.
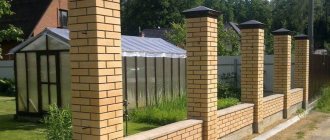
You can mount a frame for sheathing with plasterboard. Bulkheads made of silicate brick blocks, painted with thick white paint, look interesting and stylish.
According to master masons, the construction of interior partition structures, especially half-brick ones, is not the most difficult process. If you follow the technological rules of masonry and take into account all the nuances, even a beginner can handle the construction of a partition.
Specifics of the construction of the internal partition
The main disadvantage of a brick partition is its excess weight. To smooth out this shortcoming,
The masonry is done in half a brick (wall thickness - 12 cm) or on edge (wall thickness - 6.5 cm). It is also possible to build a structure from hollow bricks, but then some of the advantages of the wall are lost.
The arrangement of the internal wall is not carried out on a finished floor (any coating must be removed), but on a solid reinforced concrete base or ceiling. To ensure maximum stability and adhesion to the building, the seams of the partition are reinforced.
The following types of reinforcement exist:
- longitudinal;
- transverse;
- vertical.
Other walls of the building
In addition to the load-bearing support, the building also contains other walls; they are also made of brick and are installed inside and outside the building. For internal supports, a thickness of 0.5 bricks will be sufficient.
Do not forget that the evenness of the brickwork determines how stable the entire building will be. You need to start laying on a flat surface, which is checked using a building level.
Currently, in order to create good thermal resistance of walls, it is necessary to make several layers. The first layer, the inner one, will be brick. The second layer is an intermediate layer, it consists of insulation of your choice; any one will do. The third layer is the outer or facing layer. It is made from decorative facing bricks for walls or panels.
The insulation is usually laid in several layers. The number of layers directly depends on the weather conditions of the region where the building is located. The external cladding will depend on the thickness of the insulation. Decorating the walls with brick would be the best option.
Various types of masonry retaining walls
After major construction, we have another problem, the immediate finishing of the premises. And here, one can say in a well-known phrase, the ways of the Lord are inscrutable! Indeed, who knows what our new wall will be like, whether there will be wallpaper on it, whether it will simply be plastered and painted, whether tiles will be glued to it or another finishing technology you like will be applied!?
Each of these options has a right to exist, especially if we take into account the fact that there may be even more of our opinions and preferences than there are options themselves. This means that in this world we must, even if not try, see a lot. This option is also quite viable when brick-like plaster technology is used as wall finishing.
In fact, not a single brick was used here, and the wall, which looks so much like brickwork, is a kind of props. But there is nothing shameful or derogatory about this either, because in fact, these decorations do not provide a semantic background in the form of a brick, other than a visual appearance.
This means that the use of the brick itself is not at all necessary. Let's now try to figure out how you can make a brick wall with your own hands without tiles and bricks. This is exactly what our material will be about.