Structural elements of the external drainage system
When designing a drainage system, the following design elements must be taken into account:
Elements of external drainage.
- Gutters. They are the main element of the drainage system. Must be strong enough, because... not only serve to drain rainwater, but also retain large volumes of snow in winter.
- Pipes. The water coming through the gutters is discharged into special receivers or sewers.
- Funnels. They are used to collect water from gutters and supply it to pipes.
- Plugs. They are installed at the ends of gutters and serve to protect against water overflow during heavy rainfalls.
- Mounting brackets. They fix the gutters in the desired position and give the structure stability.
- Rotations of gutters and pipe bends. Necessary for directing water flows in the right direction.
- Sealing gaskets and rubber rings. Provide a hermetically sealed connection between the gutters.
- Connecting couplings and clamps. They are used to secure pipes together and fasten them to the walls of the building.
Installation on PVC windows
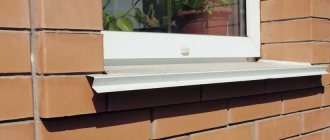
In this case, the product must pass under the window structure. The special profile of plastic windows allows you to securely fix the ebb with screws. The space remaining under it is filled with polyurethane foam to prevent heat loss in the room, absorb noise during rain, and protect against gusts of wind.
Let's not forget the importance of slopes. In order for the water flowing from them to fall precisely on the ebb, it must, due to the side bends, enter the wall under the slope area. Therefore, carry out installation before finishing the external slopes.
Roof flashing parameters
Installing ebb linings on the roof is the last stage of work; before that, you first need to select and buy them.
Materials
At the moment, buying roof flashings is not a problem; choosing them is more difficult. I’ll tell you about prices later, but now let’s briefly go through the materials.
What are roof drains made of?
Photo
Materials
Cink Steel
The thickness of the sheet here does not exceed 1 mm, so the design is quite light, plus the price of drainage is quite reasonable.
Polymer coated steel
Here the steel sheet is coated with plastisol, polyester and other similar polymers. The stability of such a coating is an order of magnitude higher than that of conventional galvanization.
Aluminum
The main advantage of aluminum gutters is their light weight, plus this metal is not subject to corrosion, so it does not require painting.
Copper
Manufacturers provide a guarantee of 70 years for copper roof gutters, but they last much longer.
Copper is not afraid of aggressive chemicals, corrosion and other troubles, the only problem is that the price of such structures is several times higher than the cost of plastic or galvanized drainage systems.
Plastic
Now every third developer chooses plastic molding. The design is light, elegant, plus modern polymers do not fade in the sun.
Envious people say that plastic gutters are fragile, but if you choose a proper manufacturer and install the roof flashings correctly, they will last for decades.
Gutter shape
The shape of roof drains can be semicircular, rectangular or shaped. Strictly rectangular gutters, frankly speaking, are not for everyone. Their figured counterparts look original, but are much more expensive.
Semicircular types of gutters are considered the most convenient, practical and popular. Their advantage is that such structures do not have internal corners where dirt and debris constantly collect, and cleaning the roof gutter without special equipment is very problematic with your own hands.
As practice shows, semicircular roof flashings are the best option
Gutter calculation
To calculate the amount of material, you need the length of the perimeter and the square of the projection of the roof onto the ground (the square of the area under the house). According to the instructions, the length of one gutter directed into one funnel should not exceed 10 m, but in reality it is better to start from 5, maximum 7 m.
On long spans of roofing, the gutters are cut from the center to the sides, where drain funnels are installed at the corners. The arrangement of funnels and cutting points of straight roof spans depends on the configuration of the structure.
Installation of the drip tide is planned at the rate of 5 - 7 m of straight gutter per 1 drain funnel
- After measuring the roof perimeter, you need to add 10 - 15% to the total footage; they will be used for trimming and overlap at the joining points.
- If possible, a funnel should be installed at each corner of the roof.
- On average, support brackets are installed at 600 mm intervals.
When calculating the width of the gutter, this is the case. According to the rules, for every square meter of the roof plane there is 1.5 mm of width. That is, a 150 mm gutter is installed on a roof of 100 m². But in reality, professionals usually make it simpler.
- On the roofs of residential buildings with a roof area of up to 100 m², a gutter 100 mm wide is installed.
- For a square area of up to 120 m², the gutter width is taken to be 120 mm.
- For a square area of up to 150 m², the gutter width is taken to be 150 mm.
As for drainpipes, brackets and other accessories, stores usually come with it all included. You tell the width of the gutter and they select the entire system for you. When selecting fittings, it is advisable to choose pipes with a large diameter, this way there is less chance of clogging.
Metal roof drains can have several fitting options
Price issues
No matter how beautiful the roof flashings are, their price depends on 2 things. Firstly, brand awareness, and secondly, the price level in the region. I have calculated the average cost of roof drainage; you can use it as a guide, but you should not make final calculations.
Average price of roof casting
Material
Price per 1 m (Russian rubles)
DIY installation
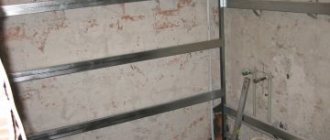
Installation of flashings is carried out after the completion of the roof, but brackets for the gutter must be installed before laying the waterproofing.
This procedure will ensure the sealing of the installation site and securely fasten the structure to the roof.
Preparation
Before starting work:
- The initial sheathing strip or cornice strip to which the brackets will be attached is strengthened as much as possible.
- The edge of the roof is leveled.
- Particular attention is paid to the section of the wall where the drainpipe will be located. The holders should be firmly fixed here.
- The point for draining water from the pipe is being prepared. It is usually directed into a drainage trench. If it is not there, then the platform should drain water from the wall of the house.
How to mark a lane?
The first stage is marking the strip on which the gutter will be fixed. For this:
- First, the locations of the drain funnels are determined. They are marked with a transverse line defining the center of the funnel. Its holders are located at a distance of 15–16 cm from the mark.
- Next, mark the installation locations of the brackets. The pitch of their fastening is 60 cm.
Marking the line for fastening the holders and tilting the gutter
The next step is to mark the ebb fastening line using a tracing cord. When it is carried out, the following conditions must be met:
- Ensuring a gutter slope of about 2–3 mm for every 1 m of length in the direction of the drain funnel to ensure gravity flow of water.
- The gutter is located below the roof plane to a depth of no more than 1/3–1/4 of its width.
- The distance between the edge of the gutter and the eaves overhang is no more than 10 mm.
Taking into account these conditions, the lower limit of the location of the gutter is marked (in the center of the drain funnel).
The highest point of its placement is in the middle between adjacent funnels. It is determined taking into account the required slope. For example, with a distance between funnels of 10 m, the upper border should be raised at the top point by 5 × 2 mm = 10 mm. After marking it with a marker, a tracing cord is stretched, which will determine the installation line of the gutter with the desired slope. It connects the lower and upper fastening points and is located at a distance of 10 mm from the edge of the roof. A building level is used to provide markings.
Installation of gutters along the length: how to fix them?
The brackets are installed strictly along the cable cord . They are attached using self-tapping screws to the sheathing. If heavy ebbs are used, then the edge of the sheathing is reinforced with a board (timber) measuring 15 × 5 cm. The installation step of the brackets is 50 cm, but at the junction of the gutters along the length, two holders are mounted (on both sides of the joint).
The gutters are installed in the bracket holders. If necessary, they can be slightly bent for a tight coverage. At the junction of the lengths of the gutters between the holders there should be a connecting insert. The distance between the edges of combined gutters should not exceed 8–10 mm.
The joint is treated with sealant and checked by running water. After assembling the joint, leaks are not allowed.
How to install the pipe correctly?
The drainpipe is led to the gutter through a drain funnel .
It, in turn, connects to the hole in it. The funnel is secured with holders on both sides. The drainpipe itself can be directly connected to the funnel or connected using an elbow, depending on the distance from the axis of the funnel to the wall surface. The pipe is mounted vertically, and its lower end is at a height of 25 cm from the ground or 15 cm from the blind area. For fastening to the wall using dowels, holders (brackets) are installed. Clamps ensure accurate coverage and retention of the pipe. The fastening pitch is usually 1 m. If it is necessary to join two pipes, couplings are used. Two holders are mounted at the junction. The clamps are tightened tightly, but do not deform the pipe.
If there are protrusions on the wall, then bends of 135, 90 or 60 degrees are used to go around them.
When attaching the holder, dowels of different lengths are used. For example, in the case of brickwork, dowels 10, 16 or 22 cm long are suitable. For a wooden wall, metal brackets secured with screws are used.
Gutter protection
For reliable operation of gutters, certain protective measures are required:
- Corrosion protection . This is achieved through the use of stainless materials or plastic coatings both inside and outside.
- Protection from leaves and large debris . When they get into the drain, strong plugs are formed that clog the pipe. The water cannot flow down and falls uncontrollably. To prevent this, special meshes are provided in the drain funnel. They must be cleaned periodically so that the drainage capacity does not deteriorate.
- Anti-icing . In cold regions, there is a risk of water inside the pipes freezing, which can rupture them when ice forms or block the passage of water from melting snow on the roof. One of the most effective methods of protection is a heating cable. To eliminate icing, it is enough to use a cable with a specific power of 17–20 W/m.
Protective measures for drains vary depending on the type of building and drainage system, and other specific conditions. The costs must be commensurate with the possible damage.
Roof drains are an important element. Saving on them can lead to great inconvenience in the operation of structures, and sometimes to a decrease in the durability of the foundation. The correct choice of design and strict adherence to installation recommendations allows you to independently install a reliable system. High-quality drainage will not only not disrupt the aesthetics of the house, but, on the contrary, will give it a finished look.
How to make drains with your own hands
Zinc drain
Without inviting a specialist, drainage is easy to do yourself and quite inexpensive. In their manufacture, plastic, aluminum or galvanized sheet metal are most often used.
The simplest thing is to cut lengthwise a thin-walled metal pipe with a diameter of about 150 mm. The result will be: two gutters for collecting water. To prevent corrosion, it is recommended to coat these parts with special compounds or varnish of the desired color.
The last stage of work will be the direct installation of gutters using fastening material in places where moisture accumulates.
The production of ebb and flow from galvanized steel sheets is not particularly difficult. For this you will need: a sheet of galvanized metal seven millimeters thick, a machine for bending metal structures. This can be done without a machine with a hammer and mallet, using a corner or a piece of rail, but the appearance of the drain will be poor.
The galvanized sheet is cut into strips of the required width and corresponding sheet length. The strip is then placed in a machine where a cast is made from it. The finished elements are coated with a protective compound, dried and prepared for installation.
Making a window sill with your own hands
To ensure water drainage from window openings, it is not at all necessary to buy expensive factory-made products. For technical structures and country houses, ebb tides are just as necessary as for other buildings, but you can make them yourself. Especially if you have confidence in your own skills, free time and a minimum of tools.
Materials and equipment required for making castings
- Metal sheet. For independent work, it is better to use galvanized steel or metal with a polymer coating with a thickness of 0.3–0.5 mm.
- Metal scissors. Will be necessary for cutting out the tide. If they are absent, you can use an angle grinder.
- Tape measure, square and marker for marking material.
- Mallet, pliers.
Window sill manufacturing process
First you need to measure the width of the opening. This is done with a tape measure. Add 4–5 cm to the resulting size to make it possible to bend the ebb to the slopes. It is better to make the rough workpiece 2–3 cm larger; the excess can be trimmed off later, during the installation process.
Then you need to find out the width of the future drainage. To do this, you need to measure the distance from the seat on the window to the edge of the wall and add 3-4 cm to it (the overhang of the tide) so that the water flows at a certain distance from the wall and does not contribute to its premature destruction.
The size obtained in this way will be an even part of the ebb, in addition to it you need to add the width of all bends:
Of course, neither plastic, nor acrylic, nor wood can be a worthy replacement for steel and iron. From the smallest screws to huge metal structures, metal parts are required everywhere
- 15 mm - a shelf that is screwed to the window;
- 25 mm – drip with rolling (5 mm).
The markings are carried out with a marker; pencil marks on the metal are very difficult to see. The lines should be on the outside of the bend corners, so that they can be seen while bending the metal. It is advisable to press a groove on the inside of the corner with a sharp object. This must be done so as not to damage the polymer coating or galvanized layer.
It is convenient to bend metal by clamping it with clamps along the bend line between two wooden blocks. If there are no clamps, you can twist the bars at the edges with self-tapping screws so as not to damage the metal. After the sheet is clamped, it is bent in the desired direction with light blows of a rubber hammer or mallet.
Having a sheet metal bending machine can greatly simplify the process, but not everyone has such a machine.
Calculation of materials for roof drainage
The required cross-sectional area of the groove can be established using SP 17.13330.2011. The document states that per square meter of roofing area there should be 1.5 cm² of gutter cross-section. Any competent installation of roof tides is also accompanied by a calculation of the average annual precipitation in the region. The procedure makes it possible to determine the cross-section of drainpipes in accordance with the recommendations of SP 32.13330.2012. It remains to determine their diameter in accordance with the instructions of SP 30.13330.
Some manufacturers provide their own tables for selecting an effective drainage system. Having decided on the standard size of the drainage system, all that remains is to select the elements of the kit. For example, on a straight wall for a riser you will need:
- Funnel groove.
- One elbow for lower outlet.
- Two elbows for connecting the pipe to the wall.
- One fastening for the funnel assembly and two for each pipe.
To get around the protrusions on the wall, you will need 4 more elbows and 2 pipes for connection. The ends of the gutter must be closed with plugs. The segments are arranged in such a way as to obtain a minimum of waste. Based on the number of joints, the number of connecting elements with seals is calculated.
Each gutter component is fixed with brackets at the ends with a 150mm offset. Along the remaining length, the fastenings are distributed at a distance of no more than 600 mm from each other, which corresponds to the pitch of the rafters. To install a 3-meter gutter, you need 6 brackets with a pitch of 500 mm.
Installation of ebb and flow on PVC profile windows
Regardless of the material - metal or plastic - the window sill is installed according to the same scheme. In the case of metal, gaskets are needed to reduce noise, but the general procedure remains the same.
There is a special protrusion in the frame profile for installing the ebb. The upper edge of the ebb goes under it. But this protrusion is only available if the PVC window was mounted on a stand (mounting) profile. Then installing the slope is a very simple matter. It must be cut to the width; if necessary, rubber or other material must be “planted” on the back side of the plank with universal glue for “silence”.
Correct installation of sills on PVC windows
Then all that remains is to insert the projection of the ebb into the groove, blow out the required amount of foam, and fix the ebb to the stand profile with three or more self-tapping screws. To prevent leaks from the sides, the areas where the ebb tide joins the window opening should be coated with silicone sealant. It’s better to take a transparent one - it will be less noticeable.
What if we play it safe?
To be on the safe side, before installing the ebb in the groove, you can apply the same silicone sealant. This will definitely prevent water from getting inside, even with a very strong wind directed at the window. The second “control shot” also concerns waterproofing. It is relevant for materials that are very susceptible to getting wet. For example, this is exactly what it is advisable to do when installing slopes on windows mounted in a frame house. In this case, before installing the window sill, a waterproofing tape is laid. It is advisable that the tape hangs over the wall - then even if some of the water gets on it, it will still end up outside the walls.
For those who like to play it safe
For waterproofing, you can use any rolled material that is suitable for outdoor use and can withstand frost and heat. Installing window sills in this way will prevent the area under the window from getting wet, even if the rain is very heavy.
If a plastic window is installed without a support profile
What to do if a plastic window is installed in violation of the technology and the groove is inaccessible? During installation, a plastic window is often leveled using triangular bars. After alignment, the window is attached to the opening, and the bars are left as is. If this is your case, you can secure the slope to these bars. If necessary, they can be trimmed. You just have to work carefully so as not to move them.
If everything is already installed and sealed, only the frame frame is available, you can screw the ebb to the frame. To seal, you can use a sealing gasket (rubber tape) and coat it with the best possible sealant. Additionally, you can screw some kind of flashing on top. Maybe he can save the situation a little.
Incorrectly attaching the sill to the window frame
But even with this approach, there is no certainty that water will not flow in. Maybe initially everything will be fine, but over time moisture will clearly get in. So, if possible, it is better to dismantle the incorrectly installed plastic window and install it again - according to the rules.
How to calculate the diameter of ebb tides
In order to correctly install ebbs on the roof, it is necessary to correctly calculate its dimensions, since ebbs of insufficient depth and width may not cope with the function assigned to it.
The following values are used for calculations:
- distance between drainage outlets and gutter turning points;
- roof area.
To determine the area of the roof, it is conditionally divided into elements in the form of geometric shapes (rectangles, triangles, etc.) and the area of each of them is calculated. Then the results obtained are summarized.
On each slope it is necessary to install two gutters with a slope towards the pipe intended for drainage. The diameter of the gutter can be 100 or 125 millimeters; it is selected based on the intensity of the expected load on the drainage system. If the building is small, you can install gutters of a smaller diameter.
Rules
The most important thing is to install the tray with the correct slope. The minimum slope is at least 3-5 mm per linear meter (according to SNiP, at least 1-2 mm per 1 rm).
To attach a gutter with the desired slope, use a simple method - first attach the outer brackets with the calculated excess of one of them. Then they stretch the fishing line or twine and attach the remaining brackets along it.
Typically, drainpipes are located near the corners of the building.
If the gutter is straight, and nothing interferes with its thermal elongation, and its length is up to 12 m, then it is enough to make one drainpipe.
If, under the same conditions, the elongation of the tray is limited, then a compensating funnel is installed at the end of its slope.
If the roof overhang has a length of 12 m or more, 2 funnels are installed, with a distance of no more than 24 m. And a compensator is also installed.
Provided that the roof gutter surrounds the perimeter, two compensators and two compensating funnels are installed in a paired position.
The design and shape of the tray is selected depending on the amount of precipitation.
The flashing should be installed immediately after covering the roof in order to protect the foundation of the house from rainwater as early as possible. After laying the waterproofing layer on the roof, access to the Mauerlat will also be closed. As a result, it will no longer be possible to attach fasteners directly to it.
Materials
Due to the constant impact of unfavorable environmental factors (precipitation, temperature changes, sun, wind), the correct choice of ebb material is extremely important.
Modern tides are made from different materials.
Cink Steel
. For the manufacture of castings, steel is used in sheets up to 1 mm thick. For additional protection against corrosion and to add aesthetics to the structure, a coating of polyester, pural or plastisol is used.
Aluminum
. The thickness of the original sheets is 0.8-1 mm. To protect against corrosion, a special multi-colored varnish is used, which also improves the appearance of the tides.
Copper
. Can be used both without treatment and with oxidation or brass plating. It is considered the most beautiful, high-quality and durable material for making castings. It has a significant disadvantage - a high price.
Polymers
. Due to their low cost, increased strength, noiselessness, ultraviolet resistance and durability, polyester and plastisol have become widespread in the manufacture of castings. Due to their light weight and ease of installation, it is quite possible to install roof ebbs.
Selection of drainage material
First you need to decide what material you want to install the drainage system from:
It cannot be said that one of them will be better or worse. Plastic usually attracts with its affordability and ease of installation, while metal attracts with its durability and reliability.
But it’s worth considering that there are serious requirements for the arrangement of a house’s drainage system in the Russian region:
Its practicality and durability depend on the material from which the drainage system is made. A high-quality drain should work properly even on days of heavy rain, and without any splashes on the walls. The material must be sufficiently resistant to gusts of wind, severe frosts and snow loads. So let's take a closer look at the pros and cons of each option.
Modern metal castings are made from galvanized steel, tin, aluminum, titanium-zinc, copper and polymer-coated metal. The most affordable of them are tin and galvanized steel, and they are also less practical, because... subject to mechanical damage and corrosion. When working with such elements, you will have to use a lot of sealant and protect all joints, but this may not save you from water, which will freeze in the pipes and explode them. Because of all this, the total service life of the drain does not exceed 15 years. Not everyone likes galvanized steel because over time it becomes covered with whitish and rusty stains. Therefore, such steel is protected with plastic on both sides; such technologies help to increase the warranty period of the drain to 15 years. And only in this case, the steel drain is not afraid of acid rain, sun, or scratches.
Much more durable castings made of zinc-titanium, aluminum and copper. These do not deform even under heavy snow loads. But they already weigh more, are difficult to install and place a lot of load on the cornice. For example, copper not only pleases with its aesthetic appearance, but also has high strength characteristics. A separate type of gutters, which are not much more expensive than zinc ones, is made of aluzinc. They have a rather beautiful metallic luster and crystallization pattern, and at the same time excellent corrosion resistance due to the presence of aluminum in the protective coating of the drain. This element forms a stable oxide film on the surface of the pipes.
Another type of drainage system is lead. They are distinguished by their remarkable resistance to temperature changes, especially sharp ones when frost occurs at night in the spring. At the same time, lead drainage systems are so easy to assemble that they are suitable for any complex roof configuration.
But the most popular are plastic drainage systems. They are light in weight, practical and silent, and at the same time much more affordable, unlike all other types. Plastic gutters are designed so simply that they are not difficult to install even for a completely ignorant person.
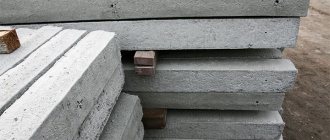
You will probably be surprised, but today even cement gutters are produced, and quite reliable ones at that! But they have a significant drawback: constant shrinkage, which requires constant repair work. Who then even buys drainage systems of this quality? Those who want to seriously save money, because such systems are cheaper than plastic ones.
Stages of installation of drip tides
Installing a low tide is considered a fairly simple process, but it, in turn, requires responsibility and care so that in the end the result suits not only you, but also everyone living in the house.
Preparation
First you need to prepare all the consumables and tools so that the installation process does not stop for a moment. You will need the following consumables and items:
- Brackets (special fastenings);
- Pipe according to the height of the house;
- Connecting inserts;
- Self-tapping screws that are suitable for fixing the material used;
- Clamps for fastening the pipe to the walls of the house;
- Funnel;
- Gutter
First you need to prepare the tools for work:
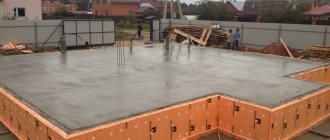
At the initial stage, you need to prepare the place where water drains from the roof. Draining the water should not harm the greenery growing in the yard, the foundation of the house, or the paving slabs. If sewerage is already installed on your site, then this problem in itself is eliminated.
Lane marking
Installation must be carried out from the marking of the strip where the low tide will be recorded. First, a water intake funnel is installed, so a transverse line is designated for it. The holders are installed at a distance of 15 centimeters from the edges of the funnel, on both sides.
The vertical line drawn from the edge of the roof must fall closer to the wall of the building, and not to the very center of the gutter; this must be taken into account when installing holders and funnels.
This design helps water not pass through the edge during heavy rainfall. To do this, you also need to give the gutter a certain slope angle.
Marking the line for fastening the holders and tilting the gutter
Take a long board and a building level, and use them to draw a “zero” line along the bottom edge of the holder all the way to the fastening area of the last holder.
You will need to calculate the difference between the mounting height of the final and installed holders. This distance is multiplied by three. The bracket must be secured, taking into account all the calculations made. This line is marked using a tracing cord. The holders are installed at a distance, this distance is approximately half a meter. First, markings are made for all the holders and only then are they fastened.
Installation of gutters along the length
Parts of the gutter must be installed in the holders so that there are spaces for connecting inserts directly between the holders. Correctly installed sections are secured with inserts that have boundary marks. The distance between the edges of the gutters should be 7-12 cm.
The assembled gutter is placed in the holders, and the inclination is checked using water. Even a large amount of liquid must pass easily through the chute; if this does not happen, it means that the system needs to be rearranged again.
Installation of a drainpipe
If there are no damages or deficiencies, then you can begin installing the drainpipe, which is installed from the funnel itself. You can secure the pipe using an elbow, this will depend on the distance to the wall
It is important to pre-prepare the required number of pipes and all fastening elements so as not to interrupt installation at its final stage
Properly installed drip linings will give your home an attractive appearance and protect your home from the negative effects of moisture.
But even roof flashings made from the highest quality materials require constant care. It consists of periodically cleaning the gutters from dirt and debris. This is especially true with the arrival of cold weather, since if there is water in them, then when it freezes it can damage the entire system. Constant maintenance of drainage systems will protect not only the structure itself, but also the walls of the house.
Roof flashings
Installation
Installation details can be seen in the presented photos to make it clearer how to properly install a metal drainage system.
Primary requirements
- To install and secure the tray, use the fastenings included with the drip tray. Depending on the specific conditions, they are screwed to the rafters, fascia board or roof board. (If the roof has no overhang or has a very small overhang, it is allowed to screw them directly to the wall).
- When installing the brackets, it is important to ensure that at the highest point of the tray, its outer edge is at least three centimeters lower than the plane of the roofing. Therefore, installation of fasteners should begin from this edge of the roof.
- The distance between the brackets affects the rigidity of the tray, so the installation step is taken to be 50-70 cm. Fasteners installed at the corners are never superfluous.
- The edge of the roof should be above the longitudinal axis of the gutter, or at a distance of 1/2 the width of the gutter. Otherwise, storm water will splash out beyond its boundaries.
- The distance between the wall of the building and the walls of the tray is 5-8 cm, so that the wall does not become damp or moldy.
- When installing and fastening tray parts, use a 1-2 mm rubber gasket to protect the paint or varnish layer of the parts.
- Gutters are installed taking into account the drainage of water into the storm drain. Therefore, they are placed opposite the storm drain. The distance from the ground to the bottom of the drain is 15-30 cm.
Carrying out work on a pitched roof
Step 1. First of all, you need to mark the axis of the funnel. If the location of the storm drain inlet is already available, then the axis of the drain (ideally) is located directly opposite its center. Otherwise, the location of the pipe is 20-30 cm from the edge of the building (see step 6.) Using a vertical level, mark the axis of the drain. The distance from the funnel to the bracket closest to it should not be less than 5 and more than 15 cm. From the outermost bracket to the end of the cornice or front board - at least 5 cm.
Step 2. Installation of fastening parts. All attention here is to maintaining the slope. The outer brackets are installed first. Having screwed one, the second is installed with a difference in height equal to the product of the slope and the distance between the brackets. For example, with a distance of 8 m and a slope of 0.005 (this is 0.5 cm/1 pm), we have a difference of 4 cm. The second bracket is screwed on, taking this difference into account. A fishing line is stretched between the fastenings, along which all intermediate fastenings are installed with the required pitch. It is necessary to install two fasteners at the junction points of the trays so that one of them supports one gutter, the second supports the other. Also, a bracket is placed on both sides of the funnel (no further than 15 cm from its edge).
Step 3: Preparing to install the funnel. The number of funnels is calculated in advance. To do this, determine the projection area of the roof surface (area) from which rainwater will flow into the tray. One drain pipe can receive sediment from an area of no more than 120 sq.m or from a slope length of no more than 12 m (the number of drains is taken according to the minimum parameter). The tray marks the location for installing the funnel. After this, a V-shaped hole with a diameter of up to 11 centimeters is cut out with a hacksaw. The edges of the hole are slightly bent outward using pliers. After this, a funnel is put on the gutter (in the lock) and attached to it on the other side with clamps. A plug is installed at the end of this tray. Before installation, the joint is coated with silicone sealant (transparent).
Step 4. Installation of drain elements begins with the installation of the first element with a funnel. Next, the gutter is assembled. When you start installing the tray elements from the bottom point, make sure that the edge of each next one lies on top of the previous one. Water flowing down should not go under the edge of the overlying element. The main thing here is to correctly position (without turning over) the tray elements and ensure that the joints are made correctly.
Step 5. The contours are mounted on the bottom of the funnel.
Step 6. The drainpipe is installed vertically. If the location of the storm sewer inlet has not yet been determined, then they usually do this: a vertical line is drawn along the vertical level at a distance of 20-30 centimeters from the corner of the building, on which clamps are installed to attach the pipes. The installation step of the clamps is 1 m. The clamp, intended for fastening the bottom of the pipe, is installed and secured at a height of 30 centimeters. At the top, the pipe may have several elements that deflect its progress. This is necessary to accurately position the top of the pipe under the funnel. For this purpose, corner elements – contours – are used. Important detail. The smoother the change in the course of the pipe, the less likely it is for debris to be retained in it. Therefore, it is advisable to use contours with a 45-degree angle.
Step 7. Water is supplied to the roof away from the funnel and from the system with a hose or a bucket of water is poured out. If water did not get past the drain and did not flow through the joints, then everything was done correctly.
If the roof is covered with bitumen shingles, it is necessary to install a drip line. The drip line is placed in a gutter so that drops bouncing off it do not fall under the roofing material.
Types of roof flashings
Roof flashings can be made of various materials - plastic, metals (galvanized steel, copper). They have different shapes. The purpose of ebb tides is to collect water from the roof and drain it into the drainage system using special devices. This drainage element must have such characteristics as: increased strength, resistance to loads and mechanical stress, the presence of an anti-corrosion coating, and an attractive appearance.
The galvanized steel casting has a thickness of no more than 1 millimeter. Such products are additionally coated with polyester, pural, and plastisol. If the steel does not have such a coating, the house will not be very comfortable to live in: the sound of raindrops is greatly enhanced.
The aluminum casting has a thickness of 0.8-1 millimeters. To protect against corrosion, it is coated with varnish on all sides. To improve the appearance of the product, varnishes of various colors can be used.
Copper castings are subjected to brass plating or oxidation. Elements made of this metal are durable and have an attractive appearance. They will last a long time, but their cost is quite high.
Features of tides for wooden windows
A groove must also be made in the frame of a wooden window for installation. In this case, there are no problems and installing window sills is no different. To be on the safe side, you can also lay a strip of waterproofing under the tide, tucking it into the same groove. When using a sealant, you need to look for one that has good adhesion (adhesion) to wood and metal or plastic - depends on the type of casting chosen.
External tides on wooden windows
If there is no ebb groove in a wooden window, you can make one yourself. The groove is not made too deep and wide. This may be a narrow cut into which only thin metal can be inserted. To prevent wood destruction, treat the cut with protective agents before installation. As a last resort, you can apply paint.
Design and purpose of drainage
The drainage system is a combination of main and auxiliary components of the structure. The main ones include gutters, funnels and pipes, and the auxiliary ones include plugs and fasteners.
Based on placement, a distinction is made between internal and external drainage systems. Internal is used for buildings with a flat roof. In this case, the roofing material is laid with an inclination towards the funnel. Water flowing down the roof is collected in a funnel, then enters a pipe located in the wall of the building or in a technical channel.
External drainage system is used for pitched roofs. All structural elements are installed on the outside of the building.
The main purpose of drainage is to drain melt and rainwater from the roof of a building to a designated place.
If there are no ebb tides, water falling from the roof will destroy the concrete blind area or paving slabs around the building.
The accumulation of excess water in the soil around the house will lead to flooding of the basement and basement floors. Absorbing into the soil, the water will wash away the foundation of the house. As a result, it will begin to sag and cracks will appear on the walls. The operation of such a building will become unsafe.
General installation requirements
Violation of the installation process will sooner or later make itself felt, and correcting errors will require time and money. Therefore, immediately follow the installation rules listed below.
- It is important to seal all points of contact between the product and the wall, window frame and side slopes. The sealant acts as an auxiliary material: a few years later it will lose its properties. It is also important to use high-quality polyurethane foam .
- The width of the ebb should be at least 2 cm greater than the width of the slope, which is necessary to prevent water from flowing from the glass onto the walls.
- The location of the ebb should be strictly horizontal so that moisture does not accumulate in one of the corners, and characteristic unsightly spots do not form on the wall. Uniform distribution of moisture is the key to its rapid evaporation.
- If the products are mounted on windows where you intend to stand with your feet in the future, the base for them is made of cement-sand mortar. Foam is not suitable here, as it cannot withstand heavy loads.
- If the slopes are plastered, the outer edges of the product can cut 1 cm into the solution, which prevents leaks into the structure.
Materials for low tides
The drainage system consists of a set of standard products. Before making a choice of a particular material, you need to familiarize yourself with the parameters of this system.
Correctly determine how well the unified elements fit the facade of the house. The main elements of the drainage system are gutters and pipes.
The video below shows the design of a roof drainage system.
Today there are various types of these products on the market for free sale. The kit necessarily includes brackets, plugs, clamps and other elements.
When planning to install ebb tides yourself, you need to carefully familiarize yourself with the parameters of the products that are offered for sale.
Galvanized castings
Until recently, galvanized steel was widely used for the manufacture of moldings.
The main advantage of products of this type is their low price.
The destruction of zinc coating occurs under the influence of acid rain, which has become increasingly frequent in recent decades.
Aluminum ebbs
Aluminum products have a longer service life.
You can make them yourself or buy them ready-made and paint them in a color suitable for a particular building.
The gutters are secured using rivets or aluminum glue.
Sealing the joints can be done with silicone or a special paste.
Copper casts
Copper tides are considered the most durable.
The products are made from pure metal and do not have additional coatings.
The elements are connected to each other by soldering or folding.
Installation of copper gutters must be done in such a way as to avoid contact with other metals - copper or steel.
PVC sills
Today, plastic products are most widespread.
To install such systems, couplings, latches with rubber seals and special glue are used.
Plastic castings are not subject to corrosion and retain their characteristics even with maximum temperature changes.
Tips for system design
It is necessary to stretch the cord at the correct angle, and then install the brackets along it, then you will be able to make the required slope of the gutters. When the installation of the system is completed, its effectiveness should be checked. To do this, you need to feed a large volume of liquid into the upper part of the chute. If the installation is done correctly, the water will quickly flow into the drainpipe.
Plastic roof flashings are budget products. Special connections are required to secure them together. Soldering is required for the installation of metal structures. It is advisable to install a mesh over the drain pipe, then it will not become clogged with debris.
The durability of the drainage system depends not only on proper installation. Don't forget about regular maintenance and cleaning. A properly functioning drainage system will extend the life of the roof, as well as the rafter system. It will protect the walls and foundation of the building from damage. Installing a roof drip system with your own hands is simple and convenient, and such a design will look aesthetically pleasing.
Types of tides
Low tides can be made from absolutely any materials, as well as in any forms. The main task of this design is to collect water from the roof surface and then transport it to the drainage or sewer system.
Differences between casts by material:
- Flashings made of galvanized steel. The thickness of this structure does not exceed one millimeter. For these ebbs, a coating using plastisol or polyester is provided, this is done in order to muffle the noise of falling raindrops, otherwise the steel surface will only amplify this sound;
- Aluminum castings. The thickness of this structure is also about one millimeter. Aluminum castings are treated with a special varnish on both sides in order to protect the product from possible corrosion;
- Raw copper is also a material for making castings. These structures are additionally processed with an alloy of zinc and copper. They are characterized by an attractive appearance and high quality, although the price of ebb tides can be very high for some consumers.
- Moldings made of plastisol and polyester have high durability and strength. In addition, they are characterized by resistance to ultraviolet rays and low weight. Due to these characteristics, they are very popular today. Also pleasing is the convenient installation of products, which you can do yourself;
- Plastic ebbs will help highlight the individuality of your home, offering a huge range of colors for the construction. These products do not require special care and are not afraid of temperature changes. The enormous popularity of plastic sills is also explained by the fact that they create almost no noise when it rains and have an affordable price.
Factors that influence the choice of tide
All roof flashings must perform the following functions:
- high resistance to external factors, including precipitation and sudden temperature changes;
- an aesthetic function that provides a beautiful appearance to your home;
- protection of the roof and walls from moisture.
The choice of tide depends precisely on the absence or presence of these basic characteristics. Each of the above materials has its own special advantages, but some of them are more pronounced, others are not so visible.
At the moment, preference is given to ebbs made of plastic and metal. Such products are coated with a special layer that protects them from corrosion. The quality of the product depends significantly on the grade of steel and its thickness.
Castings made from non-ferrous metals are also popular due to their high quality, attractive appearance and durability. But their price is an order of magnitude higher than conventional products, so they are available only to those people who are willing to allocate the necessary (considerable) amount of money for the installation of this system.
Plastic casts
These ebbs will serve perfectly if the attic of the house is used as a living room.
The main advantages of installing plastic ebbs include:
- Ease of use and speed of installation are achieved due to the light weight of the product;
- Affordable price;
- The size of the ebb is equal to the length of the perimeter of the structure;
- A convenient connection method is a clamp lock;
- Corrosion resistance;
- Several types of material - polyethylene and PVC;
- Resistance to temperature changes and weather conditions;
- Plastic ebbs are varied in color and design, this makes it possible to choose the desired option specifically for your home project.
It should be noted that ebbs made from polyvinyl chloride are a little more reliable, this is due to their heat resistance. But they still cannot withstand low temperatures. Also, during installation, a pipe with a cross-section of at least 45 mm will be required as an addition.
Calculation of the required drainage diameter
Before starting work on installing the ebb, you need to make calculations of its dimensions, otherwise you risk building a structure that will not perform its main functions.
The roof area can be calculated according to this principle: the area is equal to the length of the roof, including the height of the roof plus the length of the slope, this value is divided in half.
It is necessary to take into account the distances between drainage systems and between the turning points of the gutter. Gutters must be located above the drainage system.
For each roof slope, it is necessary to consider installing two gutters; the diameter of one structure should be no more than 125 millimeters.
Window sill installation
This procedure requires the presence of a casting of suitable sizes, a minimum set of tools and materials.
Tools and materials required for installing window drainage:
- metal scissors or grinder;
- tape measure, marker, square, construction knife;
- construction level (can be water);
- drill or screwdriver;
- mounting foam, roofing or silicone sealant;
- You may also need cement mortar and a trowel;
- plugs for the ends of the ebb.
Drainage installation
The sequence of actions for installing a metal sill is also suitable for products with zinc or polymer coating:
- Trimming the casting to size with a hem allowance. For example, if the window opening is 90 cm, then the ebb needs to be cut 94 cm (2 cm per side).
- At the ends of the drainage system, cuts are made to the amount of the allowance (in this example, 2 cm) and bent upward at a right angle.
- The ideal option is if the treatment of the slopes will be carried out after the installation of ebb and flow and the bends will subsequently end up under a layer of plaster.
If during the operation of the tide there is a possibility that people will walk on it, for example, to wash windows, then to prevent its deformation the base should be prepared accordingly. To do this you will need a cement-sand mortar. They lay out the base in such a way that the drainage line is adjacent to it along the entire plane, and if this plane is stepped on, the entire load will fall on the cement, and not on the thin metal drainage.
In most cases, no one does such complex foundation preparation. The empty space between the drainage system and the bottom of the window opening is filled with polyurethane foam. It is applied in a sufficient layer: one strip directly under the window, the second - on the edge of the wall, in the place where the tide overhangs.
Without waiting for the mounting foam to harden, the ebb is screwed onto self-tapping screws of the “press washer” type. Silicone sealant is first applied to the seat.
You need to screw the ebb so as not to block the drainage holes at the bottom of the window. The drip tray must be set clearly in level, this is necessary for uniform drainage of water. Otherwise, water will drain from one edge of the ebb, a drip will form on the wall, and the finishing material will prematurely become unusable and crumble.