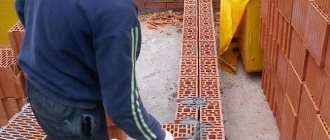
Red and white brick is perhaps the oldest known building material other than wood and stone. In central Russia, brick houses occupy about 50% of existing private housing, one- or multi-story. For individual amateur developers, methods of laying bricks when building their own home or long-term outbuildings are of interest. There are many laying schemes, and one of them, used in many cases, is laying bricks on an edge. This method is used both when laying internal partitions and when constructing external walls of different thicknesses.
The bricks used to lay the walls of construction projects can be hollow or with voids inside - hollow. In terms of strength, there are reinforced, regular, ceramic, and silicate. In the construction of wide load-bearing walls, the brick is laid on the bed (the wide side of the product), but if thermal conductivity calculations show that the width of the external walls of the house can be narrower than when laying two, two and a half or three bricks, then you can use the scheme in which one row is laid out in a quarter of a brick, that is, brickwork on an edge (on a spoon) is possible.
Arrangement of brick partitions
Brick is characterized by strength, moisture resistance, fire resistance and durability, and its different types allow the construction of walls of different types of structures.
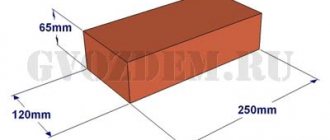
Brickwork used in modern construction can have different thicknesses, from 0.5 to 2.5 bricks. For the construction of small partitions that do not experience load-bearing loads, and the internal walls of stoves and fireplaces, masonry with a thickness of a quarter of a brick is often used. When using a single brick of standard size 65x120x250 mm, the construction of 1 meter of wall with this type of masonry requires 31 bricks, while the wall thickness is 65 mm. The given parameters indicate that this type of masonry is economical, and the erected structures occupy a small amount of usable space.
In addition, the use of quarter brick masonry is common when cladding panel or frame houses, fireplaces and stoves, when constructing multi-layer walls and constructing internal and external walls.
The construction of such thin structures is quite complex because it requires not only the careful installation of each individual brick, but also constant instrumental monitoring.
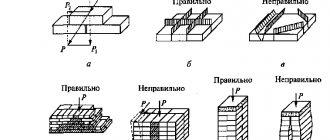
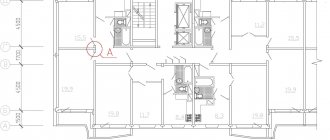
Scheme of laying walls of different thicknesses.
In addition, it is also possible to reinstall the bricks if the partition is not vertical enough. The complexity of this type of work comes from maintaining a certain thinness of the seam and a possible deviation in the verticality of the structure of no more than 1 cm over the entire height. The work of tying the partition, made using the quarter- or half-brick method, to the load-bearing structures of the building: floor, walls, ceiling, is also quite labor-intensive.
All of the above operations significantly increase the cost of constructing thin brick partitions, so many owners of suburban areas, when starting to build houses, prefer to do it themselves.
Preparation of the solution
In order for the quarter masonry to be reliable, you should prepare a solution of the correct consistency
In order for the quarter masonry to be reliable, you should prepare a solution of the correct consistency. To do this you will need the following components:
- Cement grade M-400;
- Clean river sand (it is advisable to sift it, otherwise debris impurities will deteriorate the quality of the solution;
- Superplasticizer;
- Hydrated lime.
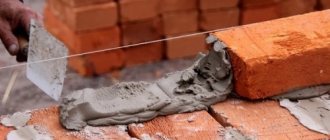
Taking into account the fact that the masonry seam when installing a quarter wall should be thin, the mortar should be mixed with special care. Because if the mixture is hard, it will be difficult to distribute over the surface of the block. Conversely, if the solution is too liquid, the wall may “leak” and collapse as a result of the excessive amount of water.
So, to prepare the solution, you need to mix sand, cement and lime in a ratio of 9:2:1. All bulk ingredients are first mixed with a mixer.
Now the plasticizer must be diluted with water, the amount of which will be equal to 1% of the total mass of cement. The finished suspension is poured in small portions into the bulk mixture and the solution is stirred for 7-8 minutes until smooth.
Do-it-yourself brick laying: types and masonry techniques
Important: the presence of a plasticizer in the solution reduces the percentage of water in the mixture, and this in turn improves the quality of the cement mixture for masonry.
Advice: if possible, you can buy a ready-made dry masonry mixture, which is simply diluted with water. It is worth remembering that it is undesirable to mix a large volume of solution at once. A portion of the finished mixture must be consumed within 2.5-3 hours of work.
For reference: for 1 m2 of quarter-brick masonry there are about 5 liters of ready-made mortar.
Organizing tools
For the construction of brick structures, as well as brickwork and stoves, a certain set of tools is required. These are devices that allow you to mix mortar and lay bricks, and tools designed for control and measurement. With their help, the mason controls the construction process and monitors the accuracy of the masonry geometry.
Before starting work, you should prepare the following tools:
Work operations for preparing partial bricks and cutting its edges.
- A trowel is the main tool of a mason, which is a steel spatula with a plastic or wooden handle. The trowel is used to fill vertical joints with mortar, as well as to level the joints and remove excess mortar.
- Mortar shovel – designed for feeding and leveling mortar on walls.
- Joints - used to process seams. In this case, the dimensions and cross-sectional profiles of the joints must correspond to the thickness and specified shape of the seams.
- Hammer-pick - necessary for cutting stone or brick into quarters, halves and their further trimming.
- Squeegee - the tool is a rubber plate fixed between the flanges, with the help of which the process of cleaning and smoothing the seams of the brickwork is carried out.
The tools needed to control the construction process of masonry and furnace construction include:
Masonry tools.
- Plumb line - allows you to check the verticality of partitions and masonry corners. Depending on the complexity of the tasks, plumb lines having different masses can be used.
- Building level - designed to check the verticality and horizontality of brickwork.
- The rule is a duralumin strip up to 1.2 m long. It is used to check the quality of the front surface of the constructed partition.
- Wooden square - necessary for checking the squareness of the laid corners.
- Folding m or tape measure.
- Mooring cord - allows you to determine the correct position of each brick in a mile.
- Wooden ordering is a notched strip used for marking rows of masonry.
Solid and lightweight masonry
Solid masonry . Bricks are laid along the outer edge of the wall. Rows of bricks are called versts, and the filling between them with mortar is called forgetting.
Lightweight masonry. Widely used in the construction of low walls. It consists of two walls half a brick wide, parallel to each other. Be sure to take whole bricks. And you can’t lay out the whole wall like that. A row of pins is required at least a meter in height. The wall is filled with heat-insulating material.
Rules for the construction of interior partitions
When starting work on installing a brick partition made by laying a quarter or half brick, you should know the basic rules dictated by the established standard.
Scheme of construction of a thin partition.
Thus, all brick partitions or furnace linings must be erected only in the presence of reinforced concrete floors, which will prevent distortion and subsequent collapse of the structure. If work is carried out in one-story buildings without a basement, shallow foundations with a sand cushion should be installed. The cushion must be buried until it reaches stable ground. The height of brick partitions, made of a quarter or half a brick, should not exceed 3 m, and the length – 5 m.
Bricks for this type of masonry must be selected with smooth edges, without cracks and deviations in linear dimensions of more than 3 mm. To ensure high-quality vertical ligation of seams, three-quarter and half bricks will also be needed. Cement or lime-cement mortar should have medium hardness. To carry out masonry work taller than a person, a walkway with trestles should be installed.
Laying and fastening of partitions from gypsum boards.
Partitions made of gypsum boards
arranged inside residential buildings and other buildings:
- inter-apartment partitions made of gypsum boards
- made double with an air gap; - Interior partitions made of gypsum boards
are made single.
Partition slabs
installed on a gypsum mortar with offset vertical joints in adjacent rows by a quarter or half of the slab.
The base for the partitions
must be made and leveled in advance.
Installation of partitions
They begin by installing orders, securing them to the walls, between which a partition will be laid out.
The mooring cord is fixed at the height of the first row of slabs
from the base leveled with mortar so that its edge is in the plane of the partition.
After this, the slabs of one row
along the partition and a gypsum solution is prepared directly at the workplace.
Solution
do as follows:
- plaster is poured into the box in the amount necessary to prepare a solution for one row of slabs
; - then water is poured along with the retarder
; - then this mass is thoroughly mixed.
ATTENTION! Ready solution
should have the consistency of thick sour cream.
It must be used within 15...20 minutes
, as the gypsum sets quickly.
If the solution has set, then diluting it with water and using it again is PROHIBITED, since it will no longer have the necessary astringent properties and strength
.
When installing slabs, the mason first spreads the mortar on the bed, then takes the slab, places it end up, scoops the prepared mortar out of the box using a plaster spatula and spreads it in an even layer along the side edge of the slab.
.
Method of applying a solution to a gypsum partition board
shown in Fig. 5.
He then turns the slab 90° and places it on the mortar bed, pressing it firmly against the wall or against the previously installed slab.
Installation and alignment of gypsum boards in partitions
shown in Fig. 6.
Squeezed solution
cuts with a trowel, aligns the slab along the cord, then installs the next slab. Having installed the first row, he checks the correct installation of the partition, fills the empty seams with mortar and cleans them with a trowel.
Second and subsequent rows of slabs
installed in the sequence described above, observing the ligation of the sutures.
To level
the installed slabs
in a vertical plane,
if necessary, use wooden wedges that are placed in the seams.
When cleaning the seams between the slabs, the wedges
are removed.
Until the solution completely sets, the surface of the slabs
cleaned of accumulated solution and smoothed.
This operation is performed with a steel scraper
measuring
150x80x1.5 mm
, on one of the long sides of the scraper there are teeth
2.5 mm
with a pitch of
2 mm
.
When working, the cycle is held across the seam, supporting it simultaneously on two plates. DO NOT press hard on the scraper, so as not to displace already installed slabs
.
If there is an opening in the partition
After installing
the second row of slabs,
the door frame
is installed .
It is secured during the process of laying the partition with wooden plugs
, which are placed between the slabs
in three places along the height of the box
.
The gap
between the slabs and the frame, as well as the installation sites
for wooden plugs,
are filled with gypsum mortar.
Lintels
over doorways
are made of gypsum boards. The slabs are laid symmetrically relative to the axis of the opening, observing the rules for bandaging the seams.
Upper rows of partition slabs
installed from inventory portable scaffolds.
15...20 mm
is left between the ceiling and the top of the last row of slabs (to compensate for possible precipitation of the structure).
Subsequently, it is caulked with tow soaked in gypsum mortar
.
READ ALSO: Equipment for tire recycling
Partition mates
carried out in compliance with the rules for bandaging the slabs, placing
connections and anchors
from steel rods
d = 4...6 mm
, pre
-coated with bitumen or asphalt varnish,
.
The partition
is attached
to the outer wall with ruffs in 2…3 places along the height
of the wall.
wire d=4 mm
is placed in the horizontal seams of the partition along the entire length of the partition to ensure
its stability
.
When installing partitions from gypsum boards indoors,
templates are used.
Scheme for installing partitions made of gypsum boards according to a template
shown in Fig. 7.
Sample
consists of two tubular posts (item 1) and a horizontal rail (item 3), the length of which can be changed depending on the size of the partition. The rail rests on two metal brackets (item 2), which can be moved along the tubular posts, securing them at the required height with locking screw jacks (item 4), which secure the template during installation.
Installation of partitions
start by installing
template posts
, which are placed at a distance of
250...300 mm from the walls
, and marking the location of
the doorways
.
After the slabs of one row have been installed and aligned, the horizontal rail is raised to the height of the slab ( 300
or
400 mm
the slabs of the next row
are installed on it .
Laying the partition on the foundation
There are methods for laying a brick partition in a quarter or half a brick, equally suitable for attaching to both brick and concrete walls. One of the most used is the construction of a partition on the floor (or foundation).
Before starting work at the construction site, it is necessary to lay waterproofing from glassine or roofing felt, spreading a layer of lime-cement or cement mortar over it. Since the layer is both underlying and leveling, its thickness should ensure strict horizontality of the first row of brickwork.
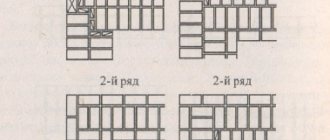
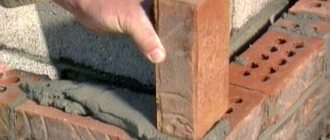
Filling vertical joints is done with a poke: apply the mortar to the end face of the brick and install it so that the edge is pressed against the back poke of the previously laid brick. Then the position of the bricks in the first row is carefully checked, and if it corresponds to the norm, the fixture board (wooden order) is raised so that its edge is 13 cm higher than the row of bricks. The mortar is applied with a trowel and evenly distributed on the top of the previous row. The next row is laid so that the bricks overlap the vertical seams by at least a quarter of the brick.
If the surface of the partition being installed will not be plastered, all masonry joints, both horizontal and vertical, must be filled with mortar. The most convenient methods for performing such an operation are to lay reinforcing wire mesh or rods with a diameter of 5-6 mm in the seam of every fourth row along the entire length of the brick partition.
The laying of the two upper rows under the ceiling is carried out simultaneously. That is, the bricks of both the penultimate and last rows are laid together. It must be remembered that all bricks of the last row, like the first, must be intact and not have cracks or chips. After the masonry mortar has set, all the bricks in the top row should be wedged under the ceiling with metal pins or brick fragments. The use of wooden wedges is not recommended.
Preparatory work and tools
It is better to lay blocks on edge using cement of a grade not lower than M-400
It is better to lay blocks on edge using cement of a grade not lower than M-400. This will strengthen the low load-bearing capacity of the finished wall.
Laying bricks in winter
In addition to cement and sand, you should prepare the following tools:
- Trowel or trowel for applying the solution;
- A mallet for adjusting blocks horizontally and vertically;
- Jointing before forming a decorative joint in the masonry;
- Building level;
- Roulette, plumb and rule;
- Orders and mooring line;
- A corner template made from two boards knocked down at an angle of 90 degrees.
- Intermediate lighthouses and mooring brackets.
It is most convenient to control the evenness of the walls using a mooring cord. If you have no masonry skills at all, then it is better to use a mooring board.
Important: quarter masonry is carried out only using the bonding method, that is, by mixing the top brick relative to the vertical seam between the two lower blocks.
Advice: before carrying out work, it is better to mark with a scriber the places where the anchors are attached and the parameters of the partition. And for better adhesion of the blocks, it is best to completely fill the seams without saving mortar.
Using bricks to install a stove
Kiln masonry, as the established standard states, must be made as durable as possible and have thin seams, strictly vertical corners, horizontal rows and a smooth surface. Permissible vertical deviations should not exceed 10 mm.
The basic rule when constructing stoves is to create a high-quality inner wall of ducts and chimneys. It is usually done using the same method of laying as a quarter or half brick. This wall thickness allows smoke and gases passing through the channels to heat them. The heat is then gradually distributed throughout the room, warming it.
When laying a quarter brick, the thickness of the seams should be up to 5 mm. Seams when laying refractory or refractory bricks are allowed no more than 3 mm.
During the construction of stoves or fireplaces, all internal surfaces must be cleaned with a trowel or by hand from the clay mortar squeezed out by bricks. This operation should be carried out regularly, after laying three to five rows. The masonry must be mopped with a special brush or a wet cloth. At the same time, small pieces of clay fall off and the seams become smoother.
For stoves made with a quarter- or half-brick-thick masonry, an indentation open on both sides should be used. In this case, the distance between the wall of the stove and the partition of the building should not be less than 32 cm. The floor in the indentation where the stove is located, made of combustible material (wood, plastic), is recommended by the established standard to be protected with bricks laid flat. In addition, ceramic tiles or other fire-resistant materials can be used as protection.