The most popular technology is laying 1.5 bricks, the thickness of the finished row is 38 cm.
Start working from the corners of the building. At the preparatory stage, it is recommended to waterproof the base. Each first stone laid in a new row must form a perpendicular along with the first brick of the previous row.
Do not forget that the level is one of the most important assistants to the builder, so use it during construction. An experienced worker will hammer nails into the seam at the corners, which will connect the 1st and 2nd highest stone. A mooring cord will stretch between them, which will indicate the level of the initial row.
Key Recommendations
Professionals pull out the moorings every 500 cm so that it does not sag.
If you pull the cord over a distance twice as long, make beacons every 5 m, otherwise the rows will not be horizontal or straight. When installing, maintain even lengths between the cord and the element along its entire length. Perform the starting row, focusing on the stretched cord.
The butt plane of any brick block should face the outside of the wall. In the initial row, the brick should be turned with the spoon part inward. It turns out that the front side of the wall is made using the half-brick technique, and the inner side is made of one brick.
The starting row is laid out on a layer of solution applied to the intended surface. When laying the next block, move it backwards to move the mortar.
As a result, the solution will be distributed evenly under the “bed”. To obtain an even layer and proper placement, move the brick back and forth slightly. Of course, it is important to be able to work correctly with mortar, but the strength of the 1.5 brick masonry is created due to the specificity of the entire structure.
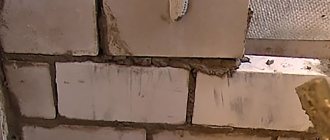
Monitor the uniform thickness of the seams: the appearance of thickenings serves as a signal of the beginning of deviations from the original direction of the masonry. In this case, urgently level the structure before the solution has time to set.
Features of masonry
To align a brick with other bricks, it must be pressed firmly. Do not forget to tap the trowel handle on the surface - this will ensure good adhesion of the mortar to the brick block. Tapping should be done in the center, otherwise one of the corners will be skewed.
Remove excess solution with a trowel. Thus, raise 4-5 rows, and lay the reinforcing mesh on top of the last one. Then raise five rows again.
Strengthening the walls is a necessary measure, especially in case of serious loads on the building. Reinforcement can be done either using mesh or using double steel wire with a diameter of 5-6 mm.
Wire with a larger diameter is more difficult to lay along the seam; problems may arise in aligning the wall along the stretched cord. The inner and front sides of the masonry are leveled along the cord, and the verticality is controlled by a plumb line. This will make the walls perfectly smooth.
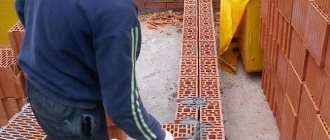
When constructing the external walls of a house, brick laying “one and a half bricks” is most often used. It is slightly different from the usual arrangement of elements with a pronounced bandaging of the seams.
On the facade you can see a characteristic pattern of long and short sides of bricks, alternating through 1 row.
Requirements for partitions
Before laying a brick partition, you should ask what requirements the structure must meet. Construction work is carried out in accordance with SNiP 12-03-2001 and 3.03.01-87. The most important rules concern fire protection. So, during the work, fireproof bricks should be used, and the lower part of the structure should be strengthened to the concrete floor.
If there is a ventilation duct in the wall, the fire resistance limit of the wall near the stove should be 150 minutes. This requires masonry in 2 layers. A brick partition must be reinforced, and doorways must also be strengthened. The total area of the latter in partitions with fire protection characteristics should not be more than 25% of the wall area.
Main types of suture dressing
Brickwork in 1/2 brick (spoon)
Laying 1 brick (cross) - option 1
| View from the facade | Dressing sutures |
| View from the facade. Bandaging 2nd and 3rd rows of masonry | Inside view. Bandaging 2nd and 3rd rows of masonry |
Laying 1 brick (cross) – option 2
| View from the facade | Dressing sutures |
| View from the facade. Bandaging 2nd and 3rd rows of masonry | Inside view. Bandaging 2nd and 3rd rows of masonry |
1-brick multi-row masonry
| View from the facade | Dressing sutures |
Laying 1.5 bricks option 1
| View from the facade | Dressing sutures |
| View from the facade. Bandaging 2nd and 3rd rows of masonry | Inside view. Bandaging 2nd and 3rd rows of masonry |
Masonry of 1.5 bricks. Option 2
| View from the facade | Dressing sutures |
| View from the facade. Bandaging 2nd and 3rd rows of masonry | Inside view. Bandaging 2nd and 3rd rows of masonry |
Laying 2 bricks
| View from the facade | Dressing sutures |
| View from the facade. Bandaging 2nd and 3rd rows of masonry | Inside view. Bandaging 2nd and 3rd rows of masonry |
Laying 2.5 bricks
| View from the facade | Dressing sutures |
| View from the facade. Bandaging 2nd and 3rd rows of masonry | Inside view. Bandaging 2nd and 3rd rows of masonry |
How to lay bricks correctly
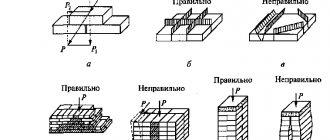
Feature of the material: it is excellent in compression and terrible in bending. This is the basis of all brick structures - they function in compression. This can be easily achieved by following the cutting principles:
- Principle No. 1 - the plane of the first row must be horizontal and perpendicular to the compressive force, located parallel to the other plane.
- Principle No. 2 - the plane of the second and the plane of the third row must be perpendicular to the plane of the first row and be perpendicular to each other.
- Principle No. 3 - the weight from the top stone must be distributed over 2 bricks below it. This rule ensures the overall performance of individual bricks and does not allow the presence of bending forces in single stones.
There are 3 main types of suture dressing (see picture):
- Chain (in one row)
- In 3 levels,
- Multi-tiered.
When laying chains, the first level of stones is placed with a spoon, the next - with a poke. The tie levels are placed so that every second stone covers the seam of the second cutting plane of the row below it by 25% of the brick in relation to the tread row. With this method, the masonry seams overlap along each row. And this allows you to make the styling seamless. Similar techniques are used to restore the solidity of dilapidated brickwork.
Before building walls, you need to build a foundation; read how to do this here.
And here you can learn how to insulate the foundation of a house from the outside.
Standard length, width and thickness of bricks
Brickwork can take up a lot of free space, especially if the room has a meager area. In order to understand how much space the partition will take up, you should ask about the size of the brick. Standard length, width and thickness are 250 x 120 x 60 mm respectively. In this case we are talking about a single product. The thickness of the double brick will be 138 mm.
The partition in a brick bathhouse is usually made of half of the product, which is placed on a spoon. Sometimes a whole brick is used, but the mass of such a wall will be much greater. The advantage of a half-brick partition is that a reinforced foundation is not required, even if we are talking about a wooden floor. The work will include dressing the stitches.
Calculation
A standard brick is a product 25 centimeters long, 12 centimeters wide and 6.5 centimeters high. The proportions are quite harmonious. Knowing the dimensions of one brick, it is easy to determine the quantitative need for its use. It is believed that if the mortar seam is 1.5 centimeters, at least 112 bricks will be used for each square meter of masonry. However, the brick that is available after production and transportation may not be ideal (with chips, etc.), plus the layer may not have very good skills. In this case, it is appropriate to add 10-15% of the required amount of material to the calculated quantity.
The thickness of the brick internal partition of the house
The brick for the partition is selected taking into account the thickness of the partition. Increased thickness can be obtained by using one-and-a-half and double products. It is more advisable to use single or half brick indoors. Brick partitions are usually calculated taking into account the height of the floor. This value is 1/25. If the floor height is 3 m, then the thickness of the new wall will be 15 cm.
Which brick to choose
Brickwork of walls must be carried out in accordance with SNiP. They allow the use of hollow bricks, which reduces the weight of the structure, but worsens sound insulation. Brickwork of walls can be done in 1 piece, half and quarter. In the latter case, the masonry is done on edge, and the wall thickness will be 65 mm. By erecting a half-brick partition, you can get a wall 120 mm thick. It can be installed in a bathhouse or any other room in the living space.
Brick partitions are built from different products, which have their own composition and sound insulation strength characteristics. The walls of a house, for example, can be built from white silicate brick, which, however, has quite an impressive weight. The most common is red ceramic brick, which is distinguished by its versatility. With its help they build baths and private houses. But for stoves in the bathhouse and chimneys, fire-resistant fireclay bricks are used.
In a bathhouse, you can build not only a partition from brick, but also a wall, which will be located next to the stove. It is best to build a brick partition from solid brick, which does not have thermal insulation properties. They are not needed when you have to lay interior walls. Work can be carried out in half a brick or in a whole product. It all depends on what characteristics the partition should have. A fire wall, for example, is most often made as thick as possible in order not only to contain the flames, but also to reduce the temperature in adjacent rooms. The thickness of the wall in this case is important for fire protection properties.
The size of the bricks is usually standard, but before starting work it is important to decide which brick to use to build a partition in a bathhouse or indoors. Consumers often decide which products to choose: silicate or ceramic. At this stage, you can ask what composition the blocks have. The first ones have 10% lime and 90% sand. But ceramic ones are mainly made from fine-grained clay. This largely determines the characteristics of both options for building materials. For example, the density of hollow bricks of these two types is different; it is higher for sand-lime bricks. This also applies to thermal conductivity, but the water absorption of bricks is at the same level. If the consumer cannot decide which brick to build a partition in the bathhouse from, he can also pay attention to the weight. For silicate products the mass is 3 kg, while for ceramic products it is 2.6 kg maximum.
Attention! According to SNiP, walls in bathhouses near stoves must be built from fireproof material. Solid ceramic bricks are just right for this.
Another type of brick is facing, but of course it won’t be possible to use it to build a partition. This material can be used if the wall is not very aesthetically attractive, but you still want to complement the interior with masonry. Facing bricks are good because they are thin, light in weight and easy to install.
How to do it yourself?
A wall, plinth and any other structure can be made using brickwork of 1.5 bricks without the involvement of professionals. Of course, the result will largely depend on the quality of the work performed. It is necessary to rely on step-by-step instructions to achieve the desired result. Let's get acquainted with all the stages of such work using the example of making a wall of 1.5 bricks.
Preparatory stage
As with any other construction work, the manufacture of a brick structure according to the above scheme involves a number of preparatory steps. You will need to buy high-quality building materials and prepare a suitable binding solution for it. In addition, you will definitely need to purchase a number of tools and accessories:
- trowel (otherwise called a trowel);
- hammer;
- jointing;
- mopping;
- plumb line;
- level;
- square;
- cord;
- order;
- roulette;
- rule;
- pendulum.
Before proceeding with installation, you will need to familiarize yourself with a number of nuances (let's look at them using the example of wall construction):
the thickness of the specified masonry usually reaches 380 mm (this parameter is the sum of the width of one part, the width of the element attached to it and the thickness of the seam); you will need to pay special attention to the correct layout of each corner and bandaging of rows; for a sufficiently good dressing of 1.5 bricks, it is necessary to use full-size, half-size, and three-quarter-size products; You will first need to mark the location of row 1 (of course, after choosing the laying technology).
Dressing options
Typically, masters turn to the following types of dressings:
- single-row (or chain);
- multi-row.
Single-row dressing is considered simple. With it, they alternate between tie and spoon rows on the outside of the planned base (if it is a wall). In this case, large quantities of non-full-size bricks will be needed.
Multi-row dressing is done like this:
- the starting row is laid out “spoon-poke”;
- the second is the opposite;
- Rows 3,4,5,6 are laid out in spoons with a bunch of seams in half a brick.
Laying corners
Corners are the basis for the construction of brick structures such as walls. Even small flaws in the layout here can lead to a serious violation of the geometry. Because of this, the load-bearing capacity of the structure can be significantly reduced.
This is required so that it becomes possible to establish orders and to be able to stretch a special cord between them. It will help to monitor the evenness of the rows during the laying process. The technology of laying 1.5 bricks is more complicated when compared with the technique of 1 block. This is explained by the fact that in the first case it will be necessary to use building materials of various formats (meaning fours, three-quarters and halves).
Masonry work
First, you will need to waterproof the foundation by laying sheets of roofing felt on it. After this, using a building level, masonry is made in several rows in the corners of the future construction. Corner orders will then be attached to them using special brackets. You will need to stretch a special cord along the orders. It is recommended to place it every 5 m. If the length between the constructed corners is greater, then in order to avoid stretching the cord, a beacon made of bricks is placed in the middle. After this, it is possible to move on to arranging brick rows.
Using a trowel, lay out the prepared masonry composition. The step from the edge of the wall should be about 20 mm. If the seam begins to be filled entirely, then no more than 10-15 mm. The thickness of the layer should be maintained within 25-30 mm. Based on the consistency of the solution, you will get seams of 10-12 mm.
Masonry techniques
There are three types of masonry of 1.5 bricks. Let's get to know them.
- Press it in. This method of laying bricks is recommended if you are working with a solid binder. In this case, the seams are completely filled and jointed. The remaining mortar is moved to the vertical of the previously placed block with a trowel. Then they place the next brick that needs to be pressed against the trowel. The trowel must be pulled out sharply. The laid out part settles.
- Suck it. This method is relevant when working with a plastic composition. At the same time, the brick is slightly tilted, one of its faces touches the laid mortar, moves it towards the previously fixed part and sets it down.
- Butt with trimming. This technology differs from the above-mentioned only in that the binder must be laid at a small distance from the edge of the wall. The mortar protruding beyond the joints is then removed with a trowel.
A layout of 1.5 blocks can be done with insulation. It is simply attached to the load-bearing wall base and then covered with plaster.
Construction of a brick wall
The construction of buildings requires specialized equipment. The lack of necessary tools will slow down the work, so you need to purchase them at the same time as the material. Laying the walls begins after clearing the area of unnecessary objects and debris. First of all, a foundation is laid, which is checked for horizontal and vertical deviations. Adaptations that will be needed during construction:
- Fork beam - A lifting device equipped with a pallet. Used for loading and unloading materials.
- Iron containers (barrels, buckets) - Used to supply cement mortar.
- Templates from slats - They are used to mark door and window openings.
- Flexible cord - Helps to check the horizontal level of walls.
- Clamp (clamp) or row (2 m long strip) - A clamp is used to fasten the rod; a row is necessary for marking the row.
- Shovels (bayonet, scoop) - Used for mixing cement and transferring the solution into iron containers.
- Pickaxe, hammer - With their help you can split the material and, if necessary, give it the desired shape.
- Plumb line - Used for vertical adjustment of partitions, walls and masonry.
- Level - It is used to check the vertical and horizontal level.
- Tape measure (from 10 m) - Allows you to control and mark partitions and walls.
- Metal square with division - Helps to check the angle.
- Trowels, spatulas, trowels - With their help, the mortar is cut and leveled.
- Construction trestles, scaffolding - Necessary if you plan to lay a wall taller than human height.
The following types of bricks (dimensions) are distinguished:
- With horizontally located voids - KG.
- Ceramic porous large format - KK.
- Double - K.
- With horizontal voids, thickened - UG.
- One and a half - U.
- Construction modular single - M.
- Eurobrick - E.
- Single - O.
Masonry is carried out in several ways, each of which involves the use of schemes specially developed by builders.
Brick laying technology
For those who are taking on such work for the first time, we can recommend laying a trial (“sighting”) row without applying mortar to the bricks. This way you can clearly see the calculation of brickwork, how much material is consumed per row and how it is located in the row.
Advice! Bricks should be laid out intact, paying special attention to vertical seams. The seam between them can be made using a wooden block of small thickness: brick - block - brick. In this case, the distance between the bricks will be the same, and if necessary (already during laying on the mortar), you can adjust the thickness of the seam. Another block will allow you to adjust the thickness of the horizontal seam.
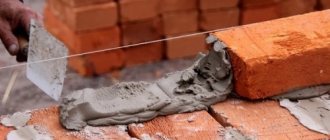
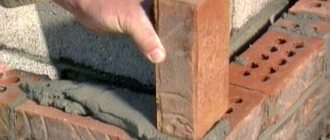
First row
Let's assume that the foundation of the house is perfectly level. A brick is placed in the first row, and bars are applied to its edges (see photo) (two to a “poke”). Then a cement mortar is placed in the middle of the brick and distributed along the entire edge of the “bed”. To make the mortar adhere more firmly to the edge of the brick, you can tap the masonry.
Excess mortar will “come out” through the open sides; it can be collected with a trowel. After this, the bars are removed and placed on the next brick. If the level and rule are applied, then the seams on the front side will look more than perfect.
Angles
After laying out the first row, the corners are completed.
Important! At this stage, you should lay the brick especially carefully and carefully, since the next fences will be built with a focus on the corners.
To lay out the corners you will need a level, a plumb line and a wooden strip - very strong and even, which will act as a “beacon”.
One end of the beacon is installed vertically in the ground, the second is fixed at the beginning of the future corner. All four beacons should be secured in this way, making sure to control the verticality of the slats with a plumb line. If all the beacons are installed perfectly straight, you can safely lay out the corners.
Brickwork corner in 1x1/2 bricks:
How to join bricks
If the butt seams are made poorly, the result will be poor sealing of the seams and large heat losses. In addition, you will need a lot of mortar to fill the joints, which means additional consumption of cement and sand. What can you do to get neat little seams?
Use the bars again. With their help, the brickwork of the external walls will not only be perfectly smooth, but will also have the same gaps. It is advisable to tap masonry bricks with a hammer after applying the mortar.
Selecting masonry type
The thickness of the brick partition is selected taking into account external conditions and the purpose of the structure. In everyday life, half-brick masonry is usually used, which allows you to get a 12-cm wall. This value doubles if a whole brick is laid. This technology is relevant if the room is not limited in free space, and the wall should be quite strong. The thickness of a brick partition is rarely more than 25 cm, as this leads to excessive consumption of material, a reduction in the usable area of the room and longer masonry work. And for a wall that does not bear a load-bearing load, such a thickness is simply not needed.
Required materials and tools
While it is easy to calculate the amount of brick, the volume of masonry mortar also depends on the characteristics of the brick.
Theoretically, these are the same correction factors that must be subtracted from the volume of the masonry when determining the number of bricks. That is, for 1 m3 of single brick you need about 0.23 m3 of mortar. If we take into account technological losses, we can round up to ¼ m3.
When using slotted bricks, it must be taken into account that part of the mortar will be used to fill the voids. In this case, the volume is increased to 0.3 m3.
But as mentioned above, less mortar is needed per 1 m2 of masonry in one brick. Therefore, instead of 70-75 liters of cement-sand masonry mixture, 60-65 liters are sufficient.
In addition to bricks and mortar, before starting work you need to prepare the following tools:
- trowel (trowel);
- bushhammer;
- tape measure, plumb line, level;
- mooring cord, plus beacons so that it does not sag;
- order.
How to prepare the solution
You will need:
- Sand
- Cement
- Lime
- Water
The solution is prepared at the rate of 1:4 (cement consumption for brickwork according to the cement-sand scheme). The powdered mixture is poured with water, gradually stirring until a creamy consistency is obtained. You can add lime to make the solution more flexible.
Advice! If masonry is a quarter of the width, then instead of preparing cement mortar, you can use regular tile adhesive. In this case, the seams will be much smaller and thinner.
The mortar should be distributed evenly over the surface, then the bricks will be at the same level, without protruding beyond the wall.
Important! If bricks are reused, they should be thoroughly moistened. This is necessary because dry bricks “pull” all the water out of the mortar, quickly drying it out, and this reduces the quality of the mortar and has a bad effect on the masonry itself.
Brick partitions: secrets and subtleties of masonry
- If a brick partition is being laid in a private house, a separate foundation must be provided for such a heavy structure.
- It is possible to delimit space in an apartment in a multi-storey building using a brick interior partition only by installing it on a reinforced concrete floor.
- Given the overall dimensions of the wall in height, special requirements are placed on it. If this value is more than 6 m, the structure is self-supporting.
- If construction is carried out in half a brick, the maximum height of the brick partition can be 3.5 m. This is true provided that it is additionally reinforced.
Brick height
Most often used in construction:
- single (ordinary, standard) brick, which has a height of 65 mm;
- thickened brick with a height of 88 mm.
When planning the size of a building, the height of a horizontal joint in brickwork is generally considered to be 12 mm, but in practice this number varies from 10 to 15 mm.
When electrically heating brickwork or reinforcing it, electrodes or a metal mesh are placed in the horizontal seams, respectively. In this case, the seam size should not be less than 12 mm.
Knowing what kind of brick (single or thickened) the structure is planned to be built from, you can easily calculate the height of the future structure:
Height of 10 rows of thickened brick = Height of 13 rows of single brick = 1000 mm
In order not to calculate and reduce the sketch dimensions to the constructive ones each time, the designer uses a table of brickwork dimensions. © www.gvozdem.ru
Types of masonry depending on the method of laying bricks
Poking ceramic brick laying
If a row is made of bricks laid on a bed (the wide part), and the smallest part (the end of the brick) is visible, such a row is called a bonded row.
Laying ceramic bricks with a spoon
This ceramic brick laying is done in horizontal rows. The bricks are laid on the mortar with a wide pastel edge. When brick blocks are laid so that a long edge is visible, such a row is called a spoon row.
Masonry technology
Before starting brickwork on the plinth, it is necessary to insulate it. To do this, a layer of roofing felt or other insulating material is laid around the perimeter of the masonry under the brick.
Using a level, several rows of bricks are laid in the corners of the plinth. The orders are attached to the corners using staples. The distance between the divisions in the order is 77 mm (65 mm height of a single brick + 12 mm height of the mortar). According to established procedures, mooring cords are pulled, which help maintain the straightness and horizontality of the erected rows of brickwork. It is advisable to place the cord every 5 m to prevent it from sagging (if the mooring is stretched by 10 m, then after 5 m a beacon is made in the form of bricks to tension the cord). The mooring cord for external walls is fastened in order, and for internal walls using staples.
Using a trowel, a mortar is placed on the brick, the thickness is 30 mm and the distance from the outer part of the wall is 20 mm. The first row of brickwork is bonded. The brick is laid using the “press” or “butt” method.
Butt method
Using the “end-to-end” method, the brick is laid on a plastic mortar (cone draft 12-13 cm).
The sequence of actions when laying bricks “back to back”:
- At first:
- take the brick in your hands and tilt it a little,
- rake a little of the spread mortar onto the brick with the edge (with a spoon - for the butt row, with a poke - for the spoon row),
- move the brick with the raked mortar towards the brick that was laid earlier.
- Then the brick is laid on the mortar.
Press method
Using the “press” method, the brick is laid on a hard mortar (cone draft 7...9 cm) with mandatory jointing and full filling of the seams.
The sequence of actions when laying bricks “pressed”:
- A portion of the mortar is raked and pressed against the vertical edge of the previously laid brick with a trowel.
- Then they lay a new brick, making sure to press it against the trowel.
- With a sharp upward movement, remove the trowel.
- They lay down the brick.
Detailed instructions for laying bricks from marking the foundation to laying the wall are on our website www.gvozdem.ru in the article “Do-it-yourself bricklaying”.
Types of reinforcement
A brick partition in a wooden bathhouse, as in a room for any other purpose, must be reinforced. Depending on the location of the elements, such strengthening can be:
- vertical;
- longitudinal;
- transverse.
In the latter case, a mesh is laid into the brick partition. The grille can be purchased or made independently. For this purpose, rods are used, which are connected to each other by the principle of welding or using wire. The side of the cells should not be more than 120 mm. There is also no need to increase the size of the mesh itself too much, as this will reduce the strength of the brick partition.
In order to protect the reinforcement, it is first placed in cement mortar, which will increase the thickness of the rod, as well as the width of the seam, which can be 14 mm. Partitions erected in 2; 1.5 or half a brick, must be reinforced every 4 rows.
Attention! It is not recommended to use a rod cross-section that is too large, as it artificially increases the thickness of the seam, and therefore reduces the strength of the masonry.
Even if the partition is two bricks thick, but the structure is being operated in a region where there is a seismic hazard, internal reinforcement should be carried out vertically or longitudinally. Strengthening the wall using the latter method can be done outside or inside the structure.
Types of bricklaying
There is a wide variety of types of bricklaying, often depending on the final goals, the required strength and thickness. By wisely selecting possible dressing options, as well as the construction method, you can reduce the time and effort for construction. Also, depending on the type, the necessary strength can be achieved earlier than by using more complex masonry and ligation in construction.
Spoon dressing
Spoon masonry with an offset of 1/2 brick
Spoon ligation is one of the simplest and most frequently used, this is the usual masonry of 1/2 brick. As a rule, the seam occurs with a slight offset of half or a quarter of the brick, relative to the vertical between the rows. Despite its simplicity and ease of construction, it is more often used only for the construction of partitions, or in acceptable climatic zones.
Chain dressing
Chain ligation system, in which splice rows alternate with spoon rows.
Chain ligation is used for the construction of objects requiring high strength. Increased strength occurs due to overlapping seams, laying the spoon row in parallel with the spacing of the seams . This method is necessary for tall buildings or buildings carrying large interfloor loads. Using this dressing, the strength of the walls increases significantly.
Multi-row dressing
A multi-row dressing, as mentioned earlier, can be considered the location between the butt rows, from three to six spoon rows . As a rule, in construction, a splice row begins and ends a multi-row dressing. This is a fairly strong and good combination used in many houses.
Lightweight masonry
Lightweight well masonry with wall insulation with expanded clay
Lightweight masonry is a special type of lightweight structure that looks like two walls, the thickness of the walls is mainly 2 bricks. The space created between the walls is filled with some special material , most often expanded clay. This type is used where it is impossible to build another type of masonry or where some factors do not allow it.
Reinforced masonry
Reinforcement of brickwork is recommended to be done starting from the very base of the walls.
Reinforced is more often present in the construction of houses, all because it significantly increases the overall strength . Reinforcement is also possible during the construction of thermal insulation walls. Reinforcement has gained the greatest popularity in seismic zones. Also, the use of reinforcement is inherent only in cases where increasing the grade of mortar and material does not fully provide sufficient strength properties. If you just need to increase the grade of cement or use a more durable type of brick, reinforcement will not be required.
Decorative masonry
Types of decorative brickwork
Decorative brickwork, as the name implies, is used to decorate facades or certain parts of a building . Nowadays, decorative masonry is also actively used indoors, both residential and non-residential. Thanks to the use of bricks for decoration, you can recreate a truly beautiful appearance. It is advisable to entrust this matter to a master, since creating decor is a complex and labor-intensive process. However, if you do everything right, you will get a facade not only of excellent quality, but also of excellent appearance.
Bavarian brickwork
An example of a house and a fence made with Bavarian brickwork.
This is a special method for wall cladding. In addition to cladding, fencing, certain architectural elements, gazebos, etc. are laid using this method. The important point is that this is not any special design, first of all, it is a special type of brick. In essence, this is the same ordinary masonry, without any special innovations, but the use of special bricks gives a new shade to the facade. Mixed bricks of different shades are used for masonry. This allows us to achieve unusual façade masonry. Such masonry can be seen in ancient brick houses in Europe. However, in Russia this type of masonry was used both in ancient times and in modern society.
Face masonry
Facing brick masonry
Facing brick masonry is the usual masonry of the façade side of a building . For this, facing bricks, either silicate or ceramic, are often used. This type of masonry is an integral part; using unusual combinations or additional architectural elements, it is possible to create a unique appearance of the front side of the building. The overall appearance of the entire building depends on the quality of the facing masonry. Therefore, you should not neglect this masonry, and not follow the rules, or rush where this can lead to a deterioration in the appearance of the facade.
Openwork masonry
Openwork masonry
Openwork masonry is often used to decorate the external sides of a building. In a single color scheme with the facing masonry, the individuality of the building and sophistication are emphasized. Openwork masonry is used less often than others , since it is no less labor-intensive and expensive in terms of time and effort. These types of masonry are for reference; more details on masonry can be found in specialized literature.
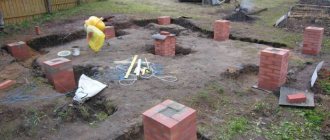
Laying fence posts: technologies
In most cases, fence posts are made of 1.5 or 2 bricks, the cross-section is 380*380 mm and 510*510 mm, respectively, and the height is up to 3 meters.
The masonry is carried out with bandaging (offset) - the seam of the bottom row is overlapped by the “body” of the brick lying on top. The standard seam is 8-10 mm. The diagram for laying columns of one and a half and two bricks is in the photo below.
Brick pillars of 1.5 and 2 bricks
Laying pillars: work order
Cut-off waterproofing is spread on the finished foundation. It can be roofing material in two layers, but it is better to use waterproofing with bitumen mastic. This layer is necessary so that the brick does not “pull” moisture from the soil. If wet brick freezes, it will quickly begin to crack and crumble. Therefore, waterproofing is necessary. Rolled waterproofing can be replaced - coat the foundation twice with bitumen mastic, and in areas with high humidity it is better to do double waterproofing - coat it with mastic, and then lay “Gidroizol” as well.
According to the size of the pillar, a layer of mortar a little more than 1 cm is applied to the waterproofing. Bricks are laid on it, according to the diagram. They are leveled in vertical and horizontal planes by tapping with a special rubber hammer. Craftsmen can use the handle of a trowel, but in this case, the remains of the mortar can fly off the surface of the trowel, staining their hands and the brick, and it is difficult to wipe off the cement.
Ceramic brick absorbs moisture very quickly, so if you hesitate a little, it will be difficult for you to “put” it in place. To ensure that the solution retains its plasticity longer, the brick is dipped in water for a few seconds before laying. The same maneuver makes it easier to wipe the solution from the surface (it is removed immediately with a dry cloth).
We hit with a hammer
The second row is laid in the same way: the mortar is spread on the bricks, the bricks are placed on it, but with a bandage - unfolded so that the seam is blocked. Level again. Then take a tape measure and check the dimensions of the laid rows. Even a small displacement of 1-2 mm is eliminated. Tap the end of the brick (called a “poke”), moving the bricks closer. Then, if the side edges were not coated, fill the vertical seams. All subsequent rows are placed similarly.
Half-brick masonry
When laying half a brick, the most important and crucial moment is to lay out the first row correctly.
What is half-brick masonry?
Half-brick masonry is considered the easiest to construct. It is used in the cladding of buildings, the construction of internal walls, in the construction of sheds, gazebos, fences, and so on.
With this method, the bricks are laid in a row with a tape, on the mortar, touching with the butt side. The front side of the walls consists only of the spoon part. Therefore, the thickness of the walls is equal to the width of the brick itself, namely one hundred and twenty millimeters.
Each subsequent row is laid out with a shift of half a brick. As a result, the middle of the top brick coincides with the connection of the bricks of the previous row. This creates a strong bond between the brick rows.
Mason's tools
Naturally, in order to beautifully lay out a half-brick wall, you need to prepare. First of all, check that you have the necessary tools for the job.
You will need:
- Concrete mixer;
- Bucket for solution;
- Mortar shovel;
- Master OK;
- Rubber hammer;
- Hammer-pick;
- Mason's Corner;
- Cord-mooring;
- Pencil or felt-tip pen for marks;
- Plumb;
- Level and others.
And other materials means that each mason can have his own set of tools that are convenient for him.
These can be various devices for laying mortar, for fixing seams, and so on. Of course, you can do without them, although their presence will speed up the work several times.
Preparatory work
As mentioned above, the most important point is laying out the first row. In order for the wall to be smooth, neat and beautiful, an even, almost perfect foundation is required.
If it is far from ideal, has large horizontal discrepancies, and a wavy surface, then it will be very difficult to achieve good results.
Therefore, the preliminary work consists of leveling the surface for the masonry. When the foundation is properly prepared, tightened, strengthened, you can begin waterproofing.
Calculation of the first row of masonry in 1/2 brick
So, let’s imagine that the surface for laying is completely ready. There is no need to rush to lay out the first row correctly.
You don’t want to have to redo everything all over again later. The first row of bricks is laid out without mortar, with vertical joints measured.
For example, you took a steel rod with a diameter of 8 millimeters. They laid the entire row of bricks, from the starting point to the ending point, fixing the distance between the bricks.
You will never be able to lay out a row perfectly the first time; in the end you will definitely end up with a mismatch. And here you need to look at the circumstances.
If there is a gap of two or three centimeters, then you can move the bricks apart a little. For example, instead of 8 millimeters of vertical seam, make 9 millimeters.
And vice versa, if the last brick does not fit in a little, then make all the seams narrower by half a millimeter.
That is, your task is to lay out the first row of bricks as evenly as possible, with equal spaces between them. When the desired result is achieved, make marks on the foundation.
Laying the first row
Laying the first row should begin from the corners. Or rather, from the highest corner of the foundation.
A corner brick is laid on the mortar and leveled strictly. Next, its height is fixed using a water level.
After this, the brick is fixed in the same way in its previously marked place on the other corner of the building. The brick is fixed to the same height using the water level.
And so all 4 corners pass. Then, between the corner bricks, a mooring cord is pulled using a corner.
Only after this can you begin laying the first row on the mortar. At the same time, be sure to look at the marks made so that the brick lies in its place.
Second row
The second row is laid out, as mentioned above, in a checkerboard pattern. Also, first the corners are secured and the mooring cord is installed.
When laying bricks, you need to ensure that the vertical seam of the previous row is strictly in the middle of the brick.
Step-by-step instruction
The brick partition is placed along the cord to regulate the evenness of the walls. The latter are connected to the partitions with conventional fittings. In order to attach it to reinforced concrete without damaging the material, you should make a hole to install the pin. It should be located 25 cm from the floor where the second row will pass. The brick partition in this place is connected to the side wall with a rod with a diameter of up to 8 mm.
Before laying bricks, a layer of waterproofing should be laid on the floor. Roofing felt or glassine are suitable for this. A layer of mortar is placed on top. It will allow you to level the surface for the ideal position of the bricks in the first row.
We should also not forget that the masonry scheme should provide for the presence of a lintel in the brick partition. It can be made of metal or reinforced concrete, and is necessary to strengthen the doorway. Metal elements are used if it is not possible to use prefabricated ones. Although the masonry itself is quite strong, and the solution is capable of holding the products, a jumper will still be needed until the liquid mixture gains strength. The advantage of prefabricated structures is the speed of their installation, reliability and ease of selection.
Preparing for the masonry process
When the master has already decided on the thickness of the brick partition, he can begin preparatory work. At the first stage, you need to take care of the availability of tools and materials, namely:
- trowels;
- containers;
- building level;
- jointing;
- hammer;
- plaster spatula.
A container will be needed for mixing the solution.
Interior partitions cannot be laid on a surface made of old concrete. The process can only begin if the base is in satisfactory condition. Laying on any screed cannot be carried out if it is filled with:
- perlite;
- sand;
- dropouts;
- expanded clay;
- inorganic bulk materials;
- fine-grained slag.
Before making a partition in a bathhouse whose floors are made of old wood, the base is disassembled.
Before erecting the partition, markings are carried out. The boundaries of the future wall are drawn on the floor and walls. Vertical marking is carried out using a building level and a plumb line. You can make a partition out of brick by first clearing the floor of debris and dust. In the place where the partition will be located, a cord is stretched along it, which will act as a guide.
Construction and ligation of half-brick walls
The thickness of a half-brick partition will be 120 mm. Such a structure will not have load-bearing capabilities. In order for the wall to be able to take on impressive loads, it should be built in 1 brick, which will give a thickness of 250 mm. Half-brick masonry is carried out on the most even foundation, which is covered with roofing felt-type waterproofing.
Work begins with laying out two products along the edges of the first row. If the installation of a brick partition is carried out on a not very flat surface, it is necessary to start from the highest point. The material is soaked in water before masonry work. In this case, the spoons of the products should be facing outward, and a layer of solution should be applied to the bonded surface. The second brick is installed end-to-end. Vertical seams must be filled. In order to ensure reliable fastening of the products to each other, you need to perform a dressing - you need to start laying each even row with half of the product.
How to lay a half-brick wall
When laying out a half-brick thick partition, before forming the first row it is necessary to lay out 3 cm of mortar. In order for the brick partition to be as level as possible, you should check the position of each row using a building level. A brick wall can be built from decorative products. This will not only save usable space due to the reduced thickness of the structure, but will also reduce finishing costs. The masonry can be left in its original form, then it can become part of a modern style called loft.
Before laying a half-brick partition, you should take into account that such a scheme does not allow your imagination to run wild. But the wall can still be made original by providing an oblique displacement of the brick. Each next row of the partition should be started not from half, but from a quarter of the product. Such a displacement must go in one direction. You can change it when the bricks are laid in one ladder from one wall to another.
Additional expressiveness of the effect can be achieved if you use bricks of different colors and textures. Half-brick masonry may include another variation of the dressing: the work will be carried out not according to the principle of oblique masonry, but with a variable quarter-spread offset.
Rules for strengthening openings and problem areas
It’s not enough to know how to make a partition in a bathhouse. You also need to inquire about how to strengthen the structure at the doorway. The construction of a brick partition at this stage will involve the use of reinforcing elements, such as:
- corners;
- channels;
- I-beams
They are connected into a single structure and cover the perimeter of the opening. When building a partition, it is important to indicate the location of the lintel; its ends should extend beyond the edges of the opening by 250 mm or more. This element is fastened to intercept the load. Afterwards you can continue masonry work. The jumper should not protrude beyond the surface, therefore, before installing the product, double-sided grooves are carried out in places above the future opening.
If the brick partition will include a channel, its number must be determined at the design stage. Tightening is carried out through the hole using studs or bolts. A partition that has an opening reinforced with a channel must have a metal plate located at the bottom of the lintel. The reinforcement element is attached to the brick partition by filling all voids with cement mortar. Its grade must be M100 or higher.
If the thickness of the partition is insignificant and amounts to 120 mm, you should think about the question of how to make problem areas of the structure non-hazardous. Areas of stress arise in those places where sections of the building with different heights adjoin the partition. To resolve the issue, you need to familiarize yourself with the features of reinforcement. A reinforcement mesh is suitable for the partition, the rods of which can be less or more than 10 mm. Typically, light fittings are used for partitions in bathhouses or other rooms. The thickness of its rods does not exceed 8 mm.
Attention! The partition may involve the installation of a mesh made of basalt or composite. These options are lightweight and offer superior performance. Thus, working with them is accompanied by the possibility of reducing the thickness of the seam between bricks. In addition, these materials do not rot and are easy to install. They weigh little and have reduced thermal conductivity with proper temperature stability. Another bonus is that such reinforcing mesh is resistant to corrosion, which cannot be said about their metal counterparts.
What terms do you need to know when laying a brick wall?
Any specialist, like any job, has a number of terms that are used not only to describe work in textbooks, but also in conversation. In order to understand what we are talking about, we suggest you familiarize yourself with some terms.
There are terms “half a brick”, “laying one and a half bricks” that are more or less clear, but there are others that will be quite difficult for an inexperienced person to understand. I would really like to emphasize that the process of creating brickwork is done in horizontal rows. You need to understand that there are methods such as laying bricks on a spoon or on a bed.
A horizontal seam is one that appears during the laying process between horizontal adjacent rows of the future wall. Vertical seams are transverse, or, as everyone says, longitudinal - they serve as a separator for the side edges of the contacting parts.
Spoon rows - when brick laying occurs with long edges, in other words, spoons, towards the outer surface of the wall.
Bonded rows are when short edges of bricks come out.
According to the type of masonry, they can be as follows: bonded and spooned. The type of masonry is when, alternating the seams in a certain way, a meaningful system emerges. When laying “one and a half bricks” inward, the walls are interlocked, and in front they are covered with bricks that are laid with a spoon outward.
The thickness of the wall will depend on what type of brickwork is chosen.
The wall thickness for such masonry is 38 cm, it is obtained from one length of 25 cm and also from a width of 12 cm of ordinary brick, between which a binding mortar is laid.
Laying ceramic bricks with reinforcement and cladding
Reinforced masonry . It is used in cases where structures experience significant loads. The reinforcement is located in vertical and horizontal joints. The thickness of the seam should be 4 mm greater than the diameter of the reinforcing cord. Transverse reinforcement is used using metal mesh of rectangular or zigzag shape. The grids are laid in 3-5 rows of masonry.
bricks
Laying ceramic bricks with cladding. When, simultaneously with the erection of the wall, the outer wall is faced with facing (very smooth, with clear shapes and even color) brick. The ligation of the facing row and the masonry itself is carried out at the level of the bond row.
Stages of work and masonry scheme for one and a half products
The construction of the wall takes place in several stages:
- The cement mixture is applied to the foundation (roofing felt).
- A brick block is laid parallel to the surface.
- Excess mortar is squeezed out using a mallet and trowel.
- Another block is laid parallel to the foundation.
- The joints of the blocks are coated.
- The solution is applied to the surface behind the laid brick.
- A block is placed perpendicular to the rest of the brick and pressed tightly.
- A second one is placed next to it, the seams are coated with the solution.
- The solution is applied to the laid out row.
- The next row is laid according to the same pattern, but perpendicular to the laid product with an overlap of half a brick.
After construction in 1-2 rows, the brick laying pattern will become clear. To align the front and inner sides of the wall, pull the cord. To level the vertical corner and the wall, a plumb line is used. When there is a large load on the structure, reinforcement is used - reinforcement is placed horizontally and vertically in the seams. The mortar is not applied to the edge of the brick to avoid leakage from the joints. Yandex