Brick is a safe and environmentally friendly material used for construction.
Masonry with 2 stones allows you to erect buildings of varying complexity, but in terms of strength they will be superior to houses with traditional masonry of one and a half or one brick. To lay such walls yourself, you need to understand the nuances of construction, as well as understand how to properly prepare the mortar for masonry. Read about the technology for laying 2 bricks further in the article.
What it is?
Masonry became widely available only in the 19th century : before that time, walls made of brick or stone masonry were built only by people from the elite class of society. Over time, the material became more accessible, and due to its safety and environmental friendliness, it became widely used in civil engineering.
In terms of its physical properties, brick is durable and resistant to chemical influences. Typically, brickwork is made with 1 or 1.5 stones, but sometimes double brick technology is used.
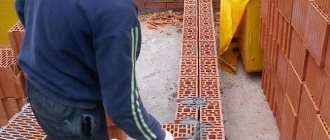
This technique looks like this: one stone after another is placed on the mortar, while the width of the wall consists of 2 bricks. This allows you to strengthen the structure and make it reliable.
Masonry with 2 stones is:
- chain,
- artistic,
- multi-row,
- single row,
- crusade.
Laying walls with two bricks - how thick is it? Regardless of the masonry method, the width of the wall will remain the same and be about 60 cm. If bonded masonry is used, the width of the wall will be 55 cm, since a smaller amount of mortar is used there.
Brick height
Most often used in construction:
- single (ordinary, standard) brick, which has a height of 65 mm;
- thickened brick with a height of 88 mm.
When planning the size of a building, the height of a horizontal joint in brickwork is generally considered to be 12 mm, but in practice this number varies from 10 to 15 mm.
When electrically heating brickwork or reinforcing it, electrodes or a metal mesh are placed in the horizontal seams, respectively. In this case, the seam size should not be less than 12 mm.
Knowing what kind of brick (single or thickened) the structure is planned to be built from, you can easily calculate the height of the future structure:
| Number of masonry rows | Structure height, mm | |
| single brick | made of thickened brick | |
| 1 row (height of 1 brick + height of 1 horizontal seam) | 77 (65+12) | 100 (88+12) |
| 2 rows (height of 2 bricks + height of 2 horizontal seams) | 154 (65+12+65+12) | 200 (88+12+88+12) |
| 3 rows (height of 3 bricks + height of 3 horizontal seams) | 231 (65+12+65+12+65+12) | 300 (88+12+88+12+88+12) |
| 4 rows (height of 4 bricks + height of 4 horizontal seams) | 308 | 400 |
| 5 rows (height 5 bricks + height 5 horizontal seams) | 385 | 500 |
| 6 rows (height 6 bricks + height 6 horizontal seams) | 462 and further through 77 mm | 600 and then every 100 mm |
Height of 10 rows of thickened brick = Height of 13 rows of single brick = 1000 mm
In order not to calculate and reduce the sketch dimensions to the constructive ones each time, the designer uses a table of brickwork dimensions. © www.gvozdem.ru
When and why is it used?
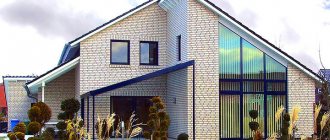
Double-brick masonry is often used for the construction of walls in residential premises , where it is necessary not only to physically strengthen the structure, but to protect the building from heat loss.
Laying 2 bricks solves this problem. In addition, if the house is too massive and the walls are under heavy load from weight, such masonry will also be relevant.
This type of wall is also suitable for construction in areas with cold climates.
When and where is its use inappropriate and why?
It is not recommended to use 2-stone masonry in the following cases:
- warm climate in the region;
- multi-storey construction;
- arrangement of internal partitions of the house;
- arrangement of internal load-bearing walls.
If there is a stable above-zero temperature all year round, it is not advisable to build a house in double brickwork. A masonry of 1.5 stones will be enough.
If you plan to build a tall multi-storey building, where the number of floors is at least 6, double masonry will also be out of place . In this type of construction, this technique is used only when constructing the 1st floor. When building subsequent floors, the thickness of the walls decreases: this is necessary for normal weight distribution.
It is not advisable to build internal partitions of a house with a thickness of 2 stones. It is better to make them in 1 stone: this way you can save money on material, as well as time on construction.
Construction of buildings and structures
Most often, such brickwork is used for the walls of residential buildings, whose thickness should not only physically protect, but also prevent temperatures from penetrating inside. Here you will also have to monitor not only the masonry and the correct system used in all areas, but also the correct consumption of bricks.
Fence laying diagram.
For single-story construction, you can use a multi-row system, because it will allow you to organize an extremely fast process. Thus, 2-3 people can rebuild a small house 8*10 in just 2 months, after which all that remains is the installation of the roof and interior decoration.
But people, especially wealthy people, do not always like mono-story buildings. Therefore, with the same width of the walls, it is necessary to build a more massive and high-quality structure. Here you will have to purchase the highest grade material for the base, although with an increase you can give a little relaxation.
For the lower level, exclusively cross masonry is used, because it ensures maximum reliability of the entire structure, although it is the most complex. On the 2nd floor (assuming there are 2-3 floors in total) you can use a chain option, and on the top floor you can use any one you like. In this case, the walls must also be built to be extremely reliable, because the massive structure of the house will put pressure on them no less than on the outer walls.
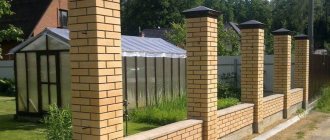
Working with fences
Some people believe that this thickness is unnecessary for fences, which is why they build them 2-4 times thinner. But after 5-10 years they are convinced that even their corner segments turn out to be quite weak when exposed to heaving soils (the impact on the foundation is reflected by the stress at the walls) or random physical impacts. It is for this reason that everyone ends up installing thick protective structures.
A fence is not only reliable protection for the house, but also its face, so you need to create the most reliable structures possible, while maintaining an ideal appearance. For this reason, brick chain ligation is almost always used, but sometimes dilutions are made with a cross version. Jointing is always used to emphasize the neatness of the design.
Sometimes it is necessary to form additional branches, the thickness of which is identical, but the maximum safety margin is needed. Most often they are used to create security points and garages, i.e. places with an increased likelihood of an accident. Strengthening the structure will only add work to your hands and take up time, but will not have any financial impact.
Side structures
Few people limit themselves to building a house on their own territory, because... there is still a lot of land and it needs to be used. Thus, after some time, a barn, a chicken coop, a cowshed, a stable, hay and firewood sheds, a garage and a great many other options that can be organized with your own hands appear on the site. Not every building needs such thick walls, because... they sometimes serve only to delimit zones (even cracks coming from the foundation will not affect the performance characteristics in the future).
When designing buildings for livestock and domestic animals, it is still better to make reliable walls that will not collapse suddenly even from a strong earthquake (this is especially true for stables, since horses often break walls with their hooves). In bathhouses, only single-row masonry can be used, because they are the strongest of the existing ones, and the load here will not only be physical, humidity and elevated temperatures will also have an impact. Each of these buildings, after the foundation has completely hardened, is erected in a few days, and delays can be solely due to dimensions.
In contrast to the generally accepted opinion, it is necessary to pay all attention to the side structures being erected, because it is in them that incidents most often occur. Thick walls and a good foundation will easily prevent most of them.
Features and rules of creation
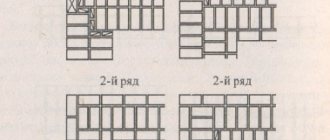
During the laying process, do not forget about bandaging the brick rows. There are several methods for this:
- Single row. Also called chain. During the laying process, spoon and tie rows are alternated sequentially. This option is suitable when there are no plans to cladding the wall in the future.
- Three-row. Suitable for the construction of columns and pillars. The thickness of the structure should be no higher than 100 cm.
- Multi-row. In this case, the spoon row is ligated with a splint row. The repetition occurs every 6 rows.
A spoon row is a row where the stones are laid with long edges to the surface of the wall. In a butted row, bricks are laid with butts - short edges.
Dimensions and parameters of walls made of two stones
Depending on what brick will be used for masonry and what scheme will be used, the size of the wall will be determined.
For example, according to the standard, the height of a two-brick wall should not exceed 1-2 floors .
If you continue to lay the wall with 2 stones on the 3rd and subsequent floors, too high a load will be placed on the foundation. That is why it is recommended to make only the first floors with two-brick masonry. Therefore, the height of the wall will be about 250 cm.
The wall thickness will be 510 mm .
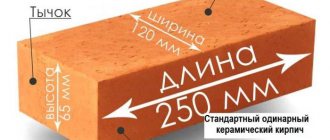
Such indicators can be obtained by knowing the exact dimensions of the brick. A standard brick has dimensions of 250x120x65 mm. If the masonry is carried out with 2 stones on the long side, then 250 + 250 = 500 mm. Another 10 mm is added to the seam made of cement-sand mortar.
Laying fence posts: technologies
In most cases, fence posts are made of 1.5 or 2 bricks, the cross-section is 380*380 mm and 510*510 mm, respectively, and the height is up to 3 meters.
The masonry is carried out with bandaging (offset) - the seam of the bottom row is overlapped by the “body” of the brick lying on top. The standard seam is 8-10 mm. The diagram for laying columns of one and a half and two bricks is in the photo below.
Brick pillars of 1.5 and 2 bricks
Laying pillars: work order
Cut-off waterproofing is spread on the finished foundation. It can be roofing material in two layers, but it is better to use waterproofing with bitumen mastic. This layer is necessary so that the brick does not “pull” moisture from the soil. If wet brick freezes, it will quickly begin to crack and crumble. Therefore, waterproofing is necessary. Rolled waterproofing can be replaced - coat the foundation twice with bitumen mastic, and in areas with high humidity it is better to do double waterproofing - coat it with mastic, and then lay “Gidroizol” as well.
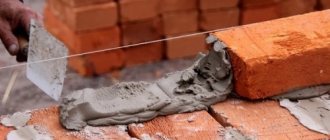
According to the size of the pillar, a layer of mortar a little more than 1 cm is applied to the waterproofing. Bricks are laid on it, according to the diagram. They are leveled in vertical and horizontal planes by tapping with a special rubber hammer. Craftsmen can use the handle of a trowel, but in this case, the remains of the mortar can fly off the surface of the trowel, staining their hands and the brick, and it is difficult to wipe off the cement.
Ceramic brick absorbs moisture very quickly, so if you hesitate a little, it will be difficult for you to “put” it in place. To ensure that the solution retains its plasticity longer, the brick is dipped in water for a few seconds before laying. The same maneuver makes it easier to wipe the solution from the surface (it is removed immediately with a dry cloth).
We hit with a hammer
The second row is laid in the same way: the mortar is spread on the bricks, the bricks are placed on it, but with a bandage - unfolded so that the seam is blocked. Level again. Then take a tape measure and check the dimensions of the laid rows. Even a small displacement of 1-2 mm is eliminated. Tap the end of the brick (called a “poke”), moving the bricks closer. Then, if the side edges were not coated, fill the vertical seams. All subsequent rows are placed similarly.
If there is a void between the inner reinforcement pipe and the brickwork, it is filled. If the distance is small, you can use masonry mortar; if the void is significant, to save space you can fill it with crushed stone, compact it, then pour it with liquid cement-sand mortar.
Masonry under the rod
The masonry of pillars described above has long been tested, but for beginners, when making it themselves, it is difficult to maintain an even seam. Another problem is that the solution comes out of the seam, staining the surface. It doesn't turn out very nice. To make the work easier, we came up with a laying under the rod. Take a square metal rod with a side of 8-10 mm, cut it into pieces, 10-15 cm longer than the dimensions of the post.
Bar layout
Having laid the first row, a rod is laid on it along the edge of the brick. Fill the area with a small amount of solution, with a larger layer being made closer to the pipe. Then, running a trowel along the rod, remove the excess, clearing the rod of the solution. But at the same time, the slope of the solution is maintained. They place a brick and level it. At the same time, the rod prevents it from settling too much, and we control the position of the other end with a level.
Apply the solution to the side edge under the rod
Then take a short piece of rod about 10 cm (for a vertical seam), place it along the butt, apply the mortar with a trowel to the side of the laid brick, also removing the excess along the rod. The second brick is placed and leveled. After the level is set, the seam is pressed from above with a trowel, and the vertical rod is removed.
We take out the rod, holding the seam with a trowel
This is how all the bricks are laid out in a row. Then the rods are removed and proceed to the next row. This technology for laying brick pillars allows you to control the seams and make them neat. Even a novice amateur mason can fold a pillar this way with his own hands.
It is only important to control the parameters of each row during the process (so that the column in the cross-section is the same size)
Video lessons
A more complex version of a brick pillar - twisted with a screw
Features of working with ceramic bricks
Requirements for building materials
A standard brick with dimensions of 250x120x65 mm is suitable for the work. This is a traditional ceramic brick, and deviations from the size can be 4 mm in length, 3 mm in width and up to 2 mm in thickness.
For rough masonry of the wall, construction or ordinary brick is suitable. It has a rough, rough surface, suitable for the construction of partitions and load-bearing walls, followed by plastering and cladding.
Facade stone is used for facing masonry . This stone is painted or may have a natural color. It is suitable for finishing buildings. According to the requirements, bricks for building walls may have chips, but their area should be no more than 1 sq.cm. For load-bearing walls, the grade of stone should be M100 or M125.
Construction scheme
There are several construction schemes with 2 bricks:
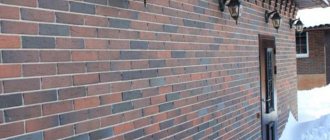
- Cross. In this case, the stud and spoon arrangement of stones in a row alternates. This option is suitable for facing masonry, as it creates a beautiful pattern. With the spoon method, you can lay out only one side, and make the second in compliance with the schematic drawing. This scheme is considered one of the most durable.
- Artistic. Ceramic brick has excellent decorative properties, so when laying facades with 2 stones, you can experiment with artistic design. You can also use trimmed bricks for this, but it is better to calculate the strength of the structure in advance.
- Corner. In any building it is necessary to lay out the corners. According to this scheme, the first row is laid out using the butt method, and several bricks are placed on the corner with a spoon. In the next row, the stone is placed with a spoon, then the material is laid clockwise.
There is also a chain diagram - it is best used if the master is performing work for the first time.
The correct layout of walls in two bricks - in the video:
How many pieces will you need?
If it was decided to make continuous masonry, then calculating the amount of required building materials is simple . For example, if one-and-a-half bricks are used, then the mortar consumption per 1 square meter is 0.113 cubic meters. you will need 156 bricks.
One-and-a-half bricks have increased dimensions, so their quantity will be less than in the case of a single stone. If you use a single stone, then at a consumption per 1 sq.m. mortar 0.122 cubic meters, you will need about 204 bricks.
These calculations are given for construction of 2 bricks per 1 square meter.
1 brick masonry
1 brick masonry is suitable for the construction of fences, garages, gazebos, wells and other one-story structures. A structure of this kind is not able to withstand heavy loads, so experts recommend adhering to some recommendations and rules to extend the life of the facility being built:
- The final and first rows are laid out crosswise, with the butts (ends) facing outwards. The main masonry is performed alternately: one row is parallel, the other is perpendicular.
- To increase strength, the masonry is reinforced by laying iron mesh every 4-5 rows.
- When constructing a building according to this scheme, you need to ensure that the vertical seams of adjacent rows do not coincide. Otherwise, the wall will quickly collapse.
- During construction, special attention is paid to connection, alignment and construction of corners.
A properly prepared solution ensures a high-quality result. Main components:
- sifted clean sand;
- cement;
- water.
The brand of cement plays an important role. When using M200 (low quality), sand is taken in equal quantities with cement. If it is intended to use a material of a higher grade, then 3 times more sand will be needed. The solution is mixed in a concrete mixer or other iron container. Water is added gradually. The resulting mass should not be liquid or thick. A large amount of the mixture is not prepared immediately: it completely loses its plasticity after 30-35 minutes.
Masonry schemes
A wall is laid in 1 brick in 2 ways. The main difference between the schemes is the thickness of the cement mortar:
- In the press. Suitable for buildings whose walls will not be plastered. A fairly thick mortar is laid on the surface, a brick is placed on it and a vertical seam is formed. The cement mortar sets quickly, so it is impossible to correct the masonry. In most cases, the thickness of the seam varies within 1-3 cm, the vertical seam - no more than 1-2 cm. The thickness value must be observed throughout the entire masonry.
- Back to back. The solution used in this case should be more liquid. Seamless masonry is used when constructing walls that will need to be plastered. The mortar is spread on the bottom layer of brick with a trowel, leveled with a trowel, a new layer of material is laid and pressed to the surface. If necessary, the brick can be moved and leveled. After it has taken the desired position, the row is tapped with the handle of a trowel. The mortar does not remain in the vertical joints.
When using the clamping pattern, you need to pay attention to the thickness of the seams: this will help calculate the approximate material consumption. Most often per 1 sq. m. takes up to 400 bricks. The corners are laid first; they are secured to the bricks with staples. The cord is pulled according to the marks made in advance. The bricks are laid out in a row one by one. The stones are laid out on the mortar, each subsequent row is shifted by half a brick. The cement that comes out is picked up with a trowel. The reinforcing mesh is shifted every 5-6 rows.
Laying technology
To work you need to prepare:
- shovels: shovel, bayonet, sapper;
- putty knife;
- building level;
- Master OK;
- buckets for mixing the solution;
- cement;
- sand;
- clean water;
- a drill with a mixer attachment or a concrete mixer;
- scaffolding.
Scaffolding may be needed if you plan to build a brick wall taller than human height. A metal square for checking the angle, a tape measure and a rule will also be useful.
After all materials are prepared,
start work:
- Checking and preparation. The construction site must be cleared of debris. Before starting work, it is necessary to check the level of evenness of the foundation. To do this, use a building level.
- It's better to work together. A technological map must be drawn up in advance, according to which the work will be carried out. First, the order is established on the base and the cord is pulled - this is necessary for the evenness of the masonry. Then the solution is prepared and handed over to the mason. The first and second rows are laid out; upon completion of the laying, the seams must be unstitched.
- If the construction is carried out on a spoon, the mortar is first applied with a shovel on the side to obtain a line of 8 cm. With a stud pattern, it is better to lay the mortar along the wall by 20 cm. Then the mortar is leveled, the brick is laid and pressed in the center.
The masonry of 2 stones is laid out only according to the order. Excess mortar must be removed from the sides and placed on top of the brick for the next row. The corners are formed according to the angular row pattern described above.
Types of dressings
The most common dressing system:
- multi-row;
- chain (single-row).
Single-row ligation involves installing stone over vertically located seams, moving transverse seams and alternating spoon and butt methods. To use single-row dressing technology, it is necessary to prepare a large number of chopped stones in advance. When cutting, part of the material becomes unusable, so chain ligation is considered the most expensive method, despite the high strength and reliability of the erected walls.
Multi-row dressing involves the installation of 4-6 spoon rows. They are connected to each other by a single line of stone. Short bricks are placed separately or combined with the spoon masonry method. The five-row technology has one distinctive feature: the vertical transverse seams are overlapped on the 4th row with brick halves, and the seams of the 5th and 6th rows are covered with a quarter of a stone.
Multi-row technology has several advantages:
- Almost all material is used during the construction process;
- installation is carried out quickly;
- The thermal insulation characteristics of the building are improved.
Dressing sutures in several rows at the same time has the following disadvantages:
- it is impossible to apply the technology when installing poles;
- Compared to chain ligation, the multi-row method provides less strength to the building.
To carry out quality masonry work, you will need:
- rules;
- brick fragments;
- plumb line;
- tape measure up to 30 m;
- shovels or bayonet shovels;
- iron containers;
- trowels.
To prepare the solution I use sand, cement, water and various strengthening additives.
How and with what to insulate a brick structure?
Wall insulation is necessary when construction takes place in regions with a cold climate. Since red ceramic brick has low thermal conductivity, in temperate climate zones the masonry thickness is 51 cm.
Often, such walls are insulated using:
- mineral wool,
- fiberglass wool,
- polystyrene foam,
- bulk foam glass.
Insulation of a brick wall always occurs from the outside: if you do it from the inside, there is a risk of condensation. It is important to understand that when insulated with foam plastic, a brick wall will become vapor-tight.
Construction in 1/4 brick
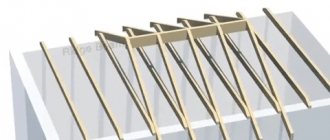
A 1/4 brick wall is erected during the construction of two- or one-story residential premises. The thickness of the masonry is 33 cm. When laying the outer walls, the brick is installed edgewise. Dressing is performed by alternating several layout patterns. The connection between the longitudinal walls is carried out with pins, which are laid between the spoon rows of the outer and inner walls.
The pokes form small wells up to 10 cm wide. Subsequently, they are filled with loose insulation (expanded clay or slag). To increase the level of thermal insulation of the walls, a small hole called an air cushion is left between the longitudinal and adjacent pokes. Vertical joints are filled with cement mortar to a depth of 12 cm. For the same purposes, plastic lime mortar is used, which can be poured into the joints and immediately covered with formwork.
Bonding of brickwork
Bandaging brick walls is a mandatory procedure in construction. A high-quality process ensures the strength of the structure and extends its service life. By bandaging the seams we mean the sequential installation of stones relative to each other. There are several main types:
- longitudinal;
- transverse;
- vertical.
Bricks that are close to each other are connected vertically. Bandaging the longitudinal row prevents delamination of the masonry and ensures uniform distribution of the load over the entire structure. The transverse type of bundle solves the problem of overloading adjacent rows. This method reliably fixes individual bricks and prevents their deformation; the butt and spoon methods are equally acceptable.
Possible difficulties and errors in the process
Difficulties may arise when choosing a complex scheme. If the master does not have experience, then it is better to use simpler scheme options.
Also, do not forget about the correct preparation of the solution : if it is too liquid or thick, the masonry technology will be violated.
Don’t forget about proper calculations of the material for the wall: to do this, find out the size of the brick and calculate how many raw materials will be needed to build 1 square meter of wall. Then this amount is multiplied by the square footage of the entire wall and the desired value is obtained.
Summarizing
When purchasing materials, you should always take exactly as much brick as would be needed when working dry (without mortar). The reason for this is quite simple - the solution reduces the consumption of materials, but for each row you will have to cut down several pieces so that they fit perfectly, and along the way, part of the material goes into battle. Thus, the saved few units of 1 m3 will serve to compensate for the material wasted.
Before starting work, you should always at least estimate the load that the walls will give.
This will allow everything to be worked out correctly down to the smallest detail, and the resulting structure will stand for more than 1 century.
Advantages and disadvantages
Laying 2 bricks has a number of advantages:
- the ability to strengthen the walls of the first floors;
- the ability to use different masonry patterns;
- in warm regions, you can refuse to insulate your home.
Among the disadvantages are the complexity of the work and the increase in its cost. Since you will need 2 times more bricks, more money will be spent.
Also, difficulty may arise when constructing corners in such a scheme : this may require the work of a specialist.
Laying a wall of 1.5 bricks
Laying one and a half bricks helps prevent premature delamination of the walls. The base or any other structure can be made independently, following the diagram. The process requires compliance with a number of basic rules:
- the optimal masonry thickness of one and a half bricks should not exceed 380 mm;
- special attention is paid to laying out corners and connecting rows;
- when dressing, three-quarter, half and full-length products are used;
- The first row is laid out only after choosing a pattern.
Laying begins with the construction of corners. If the geometry is violated, the stability of the building will be reduced. After setting the order, you need to pull the cord as tightly as possible to avoid sagging. The foundation is first waterproofed - sheets of roofing material are laid on it.
Using a building level in the corner, lay the walls in 2-3 rows. The bricks are attached to the rows with staples, the cord is pulled every 5-6 cm.
To prevent the lace from stretching, a beacon is placed in the middle of the row. The solution prepared in advance is laid out using a trowel. From the edge part the step length should not exceed 20 mm. If the seam is filled completely, the thickness of the indent will be 15 mm, the thickness of the layer will be about 20-30 mm. The technique for laying one and a half bricks is the same as for the 1 brick scheme.
Buildings can be erected using the butt-cut method. In this case, the binding solution is placed at a short distance from the edge of the wall. If the cement mass has protruded beyond the row, it is removed with a trowel. Masonry of one and a half blocks is made with insulation; it can be attached to the supporting base and covered with plaster. The pre-insulated structure is finished in different ways; plaster is considered a rough version.
When making a solution, you need to remember that cement makes the mass more plastic, so experts recommend adding more of it. If the constructed wall is to be plastered, then you can do without jointing. The building level is used at every stage: all bases, rows and corners must be correct and level.
Cost of work in the Russian Federation
Contractors often set prices depending on the square footage of the laid wall, but some indicate both the layout and the thickness of the wall. For example, for double laying of rough load-bearing walls they will ask from 1350 to 3000 rubles per cubic meter. At the same time, if the wall is front, the cost will increase and range from 2,500 rubles.
If the contractor additionally prepares a scheme that he will adhere to, they will also take money for this.
All the most important and useful information about the types of brick walls is presented in this section.