Preparation and selection of one of the methods
After acquiring all the necessary materials and tools, they move on to the initial stage. In order to do everything correctly, there are small secrets, namely, these are the masonry rules and preparatory stages that cannot be missed. Before laying the wall with silicate or ceramic bricks, choose a masonry method. When building the outer layer of the wall, if plastering or other decorative finishing is not planned in the future, the mason lays the bricks pressed or butted together with trimming. If the master has good skills and construction experience, this is a serious plus, but every person can master the basic simple masonry techniques. The main thing in work is accuracy. Learn how to lay bricks correctly from online resources or learn from an experienced developer.
Before laying the bricks, you need to learn how to make the mortar correctly so that it can be easily applied to the wall in an even layer of the required thickness, and also master the techniques of hemming or cutting bricks of the required shape and size using a pick or grinder. You should remember the need to soak building materials prepared for work in advance. Dry brick sucks the liquid out of the cement composition too quickly.
Waterproofing
After we have sorted out the foundation measurements, we move on to the next stage: waterproofing the upper part of the foundation. It is performed using 2 layers of roofing material. The second layer is laid overlapping the seams of the first by 10 - 15 cm. Ruberoid can be laid in several ways:
- dry, I temporarily press the roofing felt to the foundation with bricks (so as not to be blown away by the wind);
- on bitumen mastic or heated bitumen;
- gluing by heating the surface of the roofing material with a burner.
Modern roofing felt has several modifications: rubemast, glass roofing felt (stekloizol), euroroofing felt. In terms of their characteristics, they are superior to ordinary roofing felt, but their price is higher. The TechnoNIKOL company offers a wide selection of roll waterproofing.
Why do you need to waterproof the foundation before brickwork?
? It’s simple - so that moisture from the foundation does not move into the basement or brick walls. Moisture can be not only due to rain and melting snow, but also simply from capillary suction of water from the ground by our foundation. Moreover, if we have a brick base and brick walls, then we will need to waterproof it twice:
- between the foundation and the plinth;
- between the plinth and the brick wall.
Laying lighthouse rows at the ends of the wall
Installation of the first bricks of the outer mile (front row)
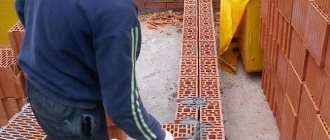
Hose down approximately 25 bricks and allow surface moisture to evaporate. (Always do this procedure before laying bricks.) Prepare 0.01 cubic meters of mortar. Remove the soil from the surface of the foundation, moisten about a meter of its length with water and wait until the moisture from the surface evaporates. Place a strip of mortar next to the chalk line, then place three bricks on top of the mortar. (below in the image) These bricks will be the start of the corner or edge of the wall.
Carefully check the position of these three bricks relative to the chalk line, as well as the height relative to the foundation (10 mm). To do this, you can use level and order. Check the order of the height of each brick when laying subsequent rows.
Laying the inner verst (inner row)
Lay a strip of mortar parallel to the three bricks you have laid in the outer row, missing them by about 10mm. Place the brick at the end of the mortar strip at a distance of 10 mm from the first brick of the front row or at the distance determined during test laying. Lay down two more bricks. Using a level, level the row of three bricks, ensuring that the surfaces of both rows of bricks are in the same horizontal plane.
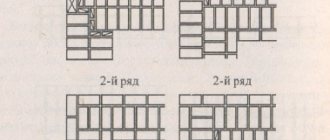
Lay the second row of the front and inner versts, starting the laying with interlocking bricks. (Every second row starts with the outermost interlocking brick). Lay two bricks of spoon rows so that a step is formed between the first and second rows of masonry.
Laying the first metal strips
Accordion-shaped metal strips to connect the rows are laid along the entire wall on every second row. Place a layer of mortar on the second row and lay strips in it at a distance of about 450 mm, pressing them down with the end of a trowel. Then place two spoons on the strips, which will begin the third row of the front and inside versts.
Completing the laying of the first edge of bricks
Lay five rows of front and back versts, making connections between the fourth and fifth rows. The end must be stepped with a step width equal to the width of the brick. Check the masonry with a level. When you find a protruding brick, tap the level with the end of a trowel handle to force the brick into place. If the brick is too deep in the wall, knock it forward. Do not pay attention to minor inaccuracies; correct them only if they are serious enough.
Laying the second edge
At the opposite end of the foundation, repeat steps 1 to 4 to create an end of five rows
At this stage, it is especially important to carefully check the level and order of the masonry. The two ends must be completely identical, otherwise the wall will be unstable and the only way to correct the problem will be to dismantle the wall
Half-brick masonry
When laying half a brick, the most important and crucial moment is to lay out the first row correctly.
What is half-brick masonry?
Half-brick masonry is considered the easiest to construct. It is used in the cladding of buildings, the construction of internal walls, in the construction of sheds, gazebos, fences, and so on.
With this method, the bricks are laid in a row with a tape, on the mortar, touching with the butt side. The front side of the walls consists only of the spoon part. Therefore, the thickness of the walls is equal to the width of the brick itself, namely one hundred and twenty millimeters.
Each subsequent row is laid out with a shift of half a brick. As a result, the middle of the top brick coincides with the connection of the bricks of the previous row. This creates a strong bond between the brick rows.
Mason's tools
Naturally, in order to beautifully lay out a half-brick wall, you need to prepare. First of all, check that you have the necessary tools for the job.
You will need:
- Concrete mixer;
- Bucket for solution;
- Mortar shovel;
- Master OK;
- Rubber hammer;
- Hammer-pick;
- Mason's Corner;
- Cord-mooring;
- Pencil or felt-tip pen for marks;
- Plumb;
- Level and others.
And other materials means that each mason can have his own set of tools that are convenient for him.
These can be various devices for laying mortar, for fixing seams, and so on. Of course, you can do without them, although their presence will speed up the work several times.
Preparatory work
As mentioned above, the most important point is laying out the first row. In order for the wall to be smooth, neat and beautiful, an even, almost perfect foundation is required.
If it is far from ideal, has large horizontal discrepancies, and a wavy surface, then it will be very difficult to achieve good results.
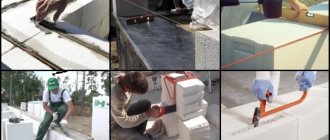
Therefore, the preliminary work consists of leveling the surface for the masonry. When the foundation is properly prepared, tightened, strengthened, you can begin waterproofing.
Calculation of the first row of masonry in 1/2 brick
So, let’s imagine that the surface for laying is completely ready. There is no need to rush to lay out the first row correctly.
You don’t want to have to redo everything all over again later. The first row of bricks is laid out without mortar, with vertical joints measured.
For example, you took a steel rod with a diameter of 8 millimeters. They laid the entire row of bricks, from the starting point to the ending point, fixing the distance between the bricks.
You will never be able to lay out a row perfectly the first time; in the end you will definitely end up with a mismatch. And here you need to look at the circumstances.
If there is a gap of two or three centimeters, then you can move the bricks apart a little. For example, instead of 8 millimeters of vertical seam, make 9 millimeters.
And vice versa, if the last brick does not fit in a little, then make all the seams narrower by half a millimeter.
That is, your task is to lay out the first row of bricks as evenly as possible, with equal spaces between them. When the desired result is achieved, make marks on the foundation.
Laying the first row
Laying the first row should begin from the corners. Or rather, from the highest corner of the foundation.
A corner brick is laid on the mortar and leveled strictly. Next, its height is fixed using a water level.
After this, the brick is fixed in the same way in its previously marked place on the other corner of the building. The brick is fixed to the same height using the water level.
And so all 4 corners pass. Then, between the corner bricks, a mooring cord is pulled using a corner.
Only after this can you begin laying the first row on the mortar. At the same time, be sure to look at the marks made so that the brick lies in its place.
Second row
The second row is laid out, as mentioned above, in a checkerboard pattern. Also, first the corners are secured and the mooring cord is installed.
When laying bricks, you need to ensure that the vertical seam of the previous row is strictly in the middle of the brick.
Mortar for brickwork
The brick is laid on a cement-sand mortar. Cement is used not lower than M400, sand is clean, gully. The proportions for the specified brand are 1:4 (for M500 - 1:5). Mixing is done manually or using a concrete mixer, but the order does not change.
First, the sand is sifted, a binder is added to it, everything is mixed in a dry state until a uniform color is achieved. Then add water. Its quantity is 0.4-0.6 parts, but it is determined by the plasticity of the solution. It is more convenient to work with plastic mortar than with rigid mortar, but when laying hollow bricks, in this case the consumption of mortar greatly increases: it fills the voids. In this case, it is more practical to make a rigid solution.
To improve plasticity and more convenient work, add lime, clay or liquid detergent to the composition (you can use hand soap, available in large flasks). The amount of additives is quite small - no more than 0.1 part, but the characteristics of the solution improve significantly: it is easier to install, it does not delaminate longer.
It’s worth warning right away: do not mix large volumes at once. The mixture must be used within two hours. And in the last half hour it can be difficult to work with it: water may begin to separate, or it may begin to set. It depends on weather conditions and the quality of cement, on the thoroughness of the batch. If laying bricks with your own hands is your first experience in this area, it will be slow. Therefore, it is better to make small portions of the solution.
Often, beginners who plan to lay bricks themselves have a question: at what temperature can they work. Without special additives you can work at positive temperatures. In the best case – not lower than +7°C. This is the threshold at which cement sets normally. At lower temperatures, the hardening process practically stops; as a result, the solution may crumble and the strength of the wall will be low. To lower the bar, there are special antifreeze additives, but the cost of such a solution is already high: the price of these additives is considerable.
Types of bricks
In addition to knowing how to lay brick, it is worth getting acquainted with the varieties of this building material. But humanity has been familiar with these blocks since ancient times! Traces of buildings built from primitive materials have survived to this day.
Modern production of bricks is strikingly different from the ancient technology of their manufacture, but the fact remains that they have been used in construction for a very long time. And in addition to the different ways of laying this building material, there are several types of bricks.
Silicate
It consists mainly of purified quartz rock (sand). A small percentage (no more than 10%) is due to lime and moisture. The main condition for production is the purification of components from manganese, clay and impurities of organic origin. If there is too much calcium oxide in the lime or it is burnt, then this component is unsuitable for use.
Among the disadvantages of silicate blocks are the following disadvantages:
- low strength;
- heavy weight - this makes work difficult;
- thermal insulation properties at a low level;
- moisture resistance leaves much to be desired.
Manufacturing technology involves placing raw materials under high pressure. The material itself is suitable for the construction of walls, including partitions. But such bricks should not be used for the construction of foundations, chimneys, or structures with high humidity levels.
Ceramic
Do-it-yourself brickwork can be done well using this material. For its production, high-quality clay without sulfates and marl impurities is used. First, the blocks are shaped, then they are dried and fired in a kiln (1000 °C). In this case, it is important to observe the measure, otherwise the material will be burned or underburned, which negatively affects its quality.
In the first case, the products will be closer to a black shade, in the second, they are too light. The surface of normal bricks is semi-matte red; when struck, a characteristic sound can be heard, and a porous structure is visible at the fracture.
Clinker
To produce this material, refractory layers of clay are used, which are sintered until a homogeneous mass is formed. The choice of raw materials is of great importance - the clay should not contain chalk, unnecessary minerals, alkali metal salts, and the composition itself should be purified and plastic.
After heat treatment, the blocks acquire a high degree of strength and density. This also makes it possible to make the material hygroscopic and resistant to negative temperatures.
Since such bricks have a wide range of shades and textures, they can be used not only for the construction of main walls, but also for facing work.
Hyper-pressed
Brick laying can also be done with this material. It consists of screenings of limestone, marble, shell rock, and dolomite. As a rule, they are formed during the development of open pits. These components represent 90% of the total mass of raw materials. High-quality Portland cement is the second component (6-8%) that has astringent properties.
The quality of water also matters - it acts as a chemical agent. Bricks are produced by pressing raw materials into special molds. The result is that the products have almost ideal shapes. Their surface can be smooth or have a “ragged stone” structure.
Often hyperpressed products are used for cladding buildings.
Chamotte
Differently kiln, this material has good fire-resistant qualities, and also has the correct geometry with a granular base. The color of the bricks is the usual straw shade interspersed with brown or reddish tones.
These are excellent products that are suitable for the construction of objects that are constantly exposed to high temperatures - stoves, fireplaces.
Heat resistance, low thermal conductivity, high cyclicity - in addition to these necessary qualities, fireclay blocks must withstand high heat for a long period of time.
Also, their quality should not be affected by large cycles, and up to a temperature of 1000 °C. Fireclay bricks are made not only in the correct shape, but also in non-standard versions.
Types of bricks and their characteristics, video:
Brick laying technique
Before use, the solution is stirred, since heavy particles can sink down and water can rise to the top. The mixed solution is placed in buckets and transported to the masonry site, where it is distributed. Immediately lay a strip of mortar - a bed - for one row. For a bond row the bed width is 200-220 mm, for a spoon row - 80-100 mm. If the seam is filled completely, about 10-15 mm are removed from the edge, the height of the mortar is 20-25 mm, which, when laying, provides a seam of 10-12 mm. Before installing the brick, the mortar is leveled with a trowel.
There are three techniques for bricklaying. On hard, low-plasticity mortar, the “squeeze” technique is used. In this case, the seams are completely filled. If the solution is plastic, use the “butt” technique.
Back-to-back bricklaying technique
As already mentioned, this method of laying bricks is used with plastic mortar. It should be mobile, easy to apply and move. This is achieved by adding additives. You can spread the solution over the entire surface of the wall at once: additives allow you to extend the time before setting begins.
The bed is laid with a thickness of about 20 mm, with a gap of about 15-20 mm left from the edge. This indentation allows you to avoid squeezing out the mortar onto the front surface, but at the same time the edges of the seams often remain unfilled. This significantly reduces the strength of the wall, therefore, in regions with seismic activity, laying milestone courses (external and internal) using this method is prohibited.
When laying a spoon row, take a brick, holding it with a slight slope. Approaching what has already been laid, at a distance of 8-10 cm they begin to rake up the solution with the edge (poke). When joining, it turns out that the seam is already partially filled. The brick is pressed down a little (settled), pressing it to the bed. The excess is removed with a trowel and sent either to a bucket or to the wall.
With this technique, it often turns out that the vertical seams are only partially filled. That’s why this method is also called “wasteland”. They are filled in when laying the bed for the next row. If the technique is not yet well developed, it is better to fill the seams before laying the next row: voids reduce the strength and thermal insulation characteristics.
When laying a bonded row, everything is exactly the same, only the mortar is raked with a spoon edge. The zabutka is laid, like the bonded rows, and then pressed with the palm of your hand. It is necessary to ensure that all the stones are at the same level. This is done using a building level, and the verticality of the wall is checked with a plumb line every 3-4 rows.
"Press" technique
When working with hollow bricks, hard mortars are usually used. In this case, bricks are laid using the “squeeze” technique. In this case, you also have to work with a trowel.
The bed is laid at a distance of 10 mm from the edge, the thickness is still about 20 mm. Since such a composition does not stretch well, it is raked to the edge of the laid brick with the edge of the tool. With your left hand, take the brick and press it against the trowel, while simultaneously pulling it up. At the same time, they continue to press with bricks, achieving the required seam thickness (10-12 mm).
Excess mortar is picked up with a trowel. Having laid several fragments, take a level, checking the horizontality of the row, tapping the trowel handle to straighten the position. The solution that has been squeezed out is picked up. The result is a dense masonry, but the process takes longer: more movements are required.
Butt-together with trimming
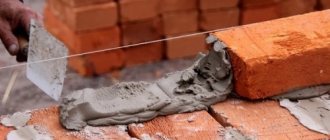
The average method in terms of productivity is butt jointing with cutting of seams. With this method, the bed is laid out close to the edge (10 mm), as when laying pressed, and the laying technique is flush: the mortar was raked with brick, placed, pressed down, and the excess was removed. If the wall is not subsequently planned to be finished with anything, after several rows it is necessary to take a jointer - a special tool and give the seams the required shape (convex, concave, flat).
As you can see, this is a kind of symbiosis. To make it more convenient to work, the solution is also made with “intermediate” plasticity. If it is too liquid, it will flow down the wall, leaving streaks, so it needs to be kneaded a little more tightly than when laying end-to-end.
Main stages of facing masonry
To describe the process of cladding the facade, we took a building made of and insulated with a mineral wool slab. This option of two-layer masonry is very popular among private developers.
Wall finishing with facing bricks can be done in two ways. We have shown each of them in a separate diagram.
The first option is easier to implement. Here the cladding is a continuous strip, ½ brick thick. In the second case, protrusions-columns are made at the corners. They decorate the wall, but at the same time tear the insulation layer, creating a “cold bridge”.
We also note that it is easier to build internal walls than to make external finishing with bricks. Here, deviations in the thickness of the seams are allowed within 1 cm. When facing, the size can “walk” in a very narrow range (2-3 mm). The deviation of the wall from the vertical should also not exceed 2-3 mm per meter of height.
Since the thickness of the facade cladding at a high height is small (12 cm or half a brick), it must be securely connected to the load-bearing wall.
You can do this in two ways:
- lay reinforcing mesh or wire loops in the seams of the inner wall (during the process of laying it);
- Drill holes and install anchors in them after completing the masonry of the main wall.
The first option is simpler and more reliable. Experienced masons make the cladding of the facade in parallel with the laying of load-bearing walls, placing anchor ties every 3-4 rows.
Having made this important note, we will continue to describe the process of preparing for work.
Before you start laying, you will need a building level. They check the horizontality of the base and level it with strong cement mortar. After it hardens (at least 1 day) and the waterproofing is laid, the “horizon” is checked again.
Hand tool
Most often, when making brickwork, hand tools are used; without a mason's kit, it is impossible to perform this type of work. Brickwork Tools:
A trowel (trowel) is a metal flat blade, triangular in shape, attached to a plastic or wooden handle. A trowel is necessary for a mason to apply cement mortar for masonry to the surface of a brick, then level it. This tool is also used to grout and fill the joints between bricks, followed by removing the remaining plastic cement mass.
It is very convenient to use a hand trowel when leveling laid bricks by tapping with the back of the handle. A hammer-pick differs from a standard tool in the shape of its metal striking surfaces. On the one hand, there is a striking part, shaped like a standard chisel or chisel; on the other side of the striking part, there is a striker in the shape of a rectangular block. The blunt end of a hammer is used to split a brick or block into two parts or to level the masonry.
But the sharp end of the hammer serves as a convenient device for breaking off small parts from bricks. The jointer acts as a special device for decorative design of brickwork seams. The use of jointing mainly involves working with facing bricks. Depending on the type of brickwork, jointing of various sizes and shapes is used.
There is another group of tools that is actively used in the construction of brickwork, which can be called measuring.
Row dressing system
Now it’s worth touching on an equally important point - how to lay brickwork correctly ? To avoid delamination of the masonry and its destruction under the influence of its own weight, bricks should be laid with a certain bandaging of the seams.
The main principle is to comply with the general and mandatory conditions for any type of masonry. Each top brick should be located on both previous ones in a certain way - the smallest depth should be a quarter of the entire length of the brick. This is the only way to ensure proper strength of the entire structure.
And regardless of which block laying scheme was chosen, there are several suture ligation systems:
- chain;
- multi-row spoon;
- three-row cross.
The essence of chain ligation is the sequential arrangement of the butt and tongue sides of the brick. The system is relevant in case of construction of walls without cladding.
With multi-row ligation, the joints are buried asymmetrically into the brick floor. This system is relevant in relation to masonry with several walls.
Cross dressing is used in the construction of piers and pillars. Here, after each row with the butt side of the blocks, there are three rows of spoon laying.
Joining seams
In order for the building to be strong and stable, you need not only to know how to lay bricks correctly, but also to fill the seams with mortar with high quality. When building walls, part of the mortar (if there is too much of it) will inevitably be squeezed out, forming sloppy and uneven outlines, then jointing is performed. This operation allows not only to give the masonry a pleasant appearance, but also seals the seams, which is to their benefit. It is advisable to do the cutting of sections between brick blocks of internal or external surfaces as the walls “grow”.
There are several types of jointing, each of which has its own subtypes:
1. Rectangular - it is divided into the following subtypes:
- undercut or flush - the protruding mortar is cut flush with the surface of the bricks. In order to seal the seam, a flat tool (trowel) is used, which is passed along it without applying much effort. This is the most accessible method, so it is used most often.
- recessed - the formation of such a seam creates an interesting effect - as if the upper blocks are hanging above the lower rows of bricks. Visually, the design does not look so bulky. The technology involves removing the solution to a depth of 6 mm. After this, the seams are compacted and smoothed using a round dowel.
2. Semicircular jointing of brickwork can also be different:
- concave - the most common type of jointing. In cross-section, the seam looks like a semicircle. The operation itself is performed with a special tool that allows for high-quality compaction. Neither a rubber hose, nor wire, nor other similar tools can achieve this.
- convex - this is a mirror image of a concave seam, which protrudes beyond the surface of the walls by 3 mm (no more). But since the mortar, even after drying, is less durable than brick, the risk of damage to the seam increases. Therefore, builders resort to it extremely rarely.
3. In the form of a slice - it also has two subtypes:
- double-cut jointing - if you look at the cut of the seam, you will notice an isosceles triangle with a vertex in its center. It looks quite attractive, and a metal corner is used to implement it.
- single-cut design (beveled jointing) - excess mortar is cut off at a certain angle to a depth of up to 4 mm. Moreover, it is the lower part of the seam that is removed. If you cut off the bottom, sediment and dirt will accumulate in the resulting recess, which threatens to destroy the solution.
The jointing procedure itself must be carried out in strict accordance with the rules - first, vertical seams are formed and only after that can you move on to horizontal ones. As for the sizes, the dimensions of the “horizontals” range from 10 to 15 mm, and the “verticals” - from 8 to 12 mm.
Laying rows of bricks between the edges of the wall
Mooring line
When laying bricks between the edges of a wall, use a mooring cord - a device consisting of two wooden or plastic blocks to which a cord is attached. If you didn't buy these pads at the store, make them yourself. Tie a nylon or other synthetic cord to the shoe by inserting it into the groove.
Hook the blocks onto the outermost brick of the first row, aligning the cord exactly with the top edge of the brick. Pull the cord to the other end of the wall, attach it to the second block and hook the block to the brick of the first row. Align the cord with the edge of the first brick.
Laying a row of bricks between the ends of the wall
Lay out the first outer course between the edges of the wall along the cord, which should be located at the level of the edges of the bricks and at a distance of one to two millimeters from the surface of the wall. Lay the masonry on both sides and place the closing brick in the center, with a layer of mortar applied to both ends. Then lay out the first inner row along the cord installed on the inside of the wall.
Masonry to the top of the wall ends
Always lay the masonry from the ends to the center and thus lay the next four rows of bricks of the outer and inner verst. After laying each row, move the cords up one row. On the second and fourth rows, lay row dressing strips with an interval of 450 mm between them. After installing the end bricks in the last row, the wall will be approximately 375mm high - the exact height will depend on the size of the bricks. If this height is sufficient, lay the closing row on top on edge and fill the seams between the bricks of the top row with mortar.
Continuation of brickwork
If you want to build a taller wall, make new edges of five rows and then lay rows between them from the ends to the center of the wall. As before, when laying the outer lighthouse bricks, check their height by ordering them, and lay the rows between the outer bricks along the cord. The next five rows will give a total wall height of about 750mm. Laying five more rows will give you a height of 1.125 m. Another row of bricks and you will have a wall with a height of 1.2 m.
How to lay bricks correctly - step-by-step instructions
Now let's start describing how to lay bricks correctly. For this purpose, several step-by-step instructions have been created, each of which is included in a separate subsection.
Important! Before starting construction, it is advisable to “practice” making brickwork and its individual elements, such as corners and pillars. This will give you basic mason skills and will save you from some mistakes in the process of building your own house, barn, garage or any other building.
Dry laying on the plinth
Work begins with laying out the first row of bricks “dry”. It is necessary to calculate how many blocks will be needed in this case, and to give an approximate idea of how to make the correct masonry.
Step 1. Unpack the bricks and check the bricks from different pallets. Due to certain characteristics of the raw materials and technological process, they may differ from each other in shade or size. Identify these features in advance. When laying walls and other structures, it is advisable to use bricks from the same batch and the same shade.
Checking unpacked bricks
Step 2. Spread and secure roofing felt on the base or foundation - it is necessary for waterproofing. Without it, the brick will “draw in” water, which will not have the best effect on its durability. Then lay out the first row of blocks without mortar and careful adjustment. Prepare a pin or piece of reinforcement with a diameter of 8 mm - it corresponds to the thickness of the mortar layer between the bricks.
Laying the first row of bricks on top of roofing felt
Step 3. Now lay the bricks on the edge of the plinth, carefully aligning them and maintaining the required gap using a pin of the appropriate diameter. In this way, dry laying is done around the entire perimeter of the building being built - pay special attention to the corners.
Laying out the second row
A pin is used to maintain the gap
Step 4. Measure the length from one corner to the other and write down the results. Also take diagonal measurements to see if everything is correct and if the project numbers are being met.
Measurements are being taken
Step 5. At the corners, mark the plinth with a pencil in the places where the edges of the bricks will be located. If you wish and have time, the same marks can be placed along the entire length of the walls - this will require additional effort from you now, but will greatly facilitate the work in the future.
Marking with a pencil
Laying out the first row
One of the most critical stages in laying bricks is working with the first row. The quality of the subsequent masonry and the entire structure as a whole depends on how correctly it is laid out. Take this into account and carry out this work as carefully as possible.
Step 1. Using the marks made during the dry laying stage, lay the first bricks on the corners of the plinth. In this case, a reinforcing mesh of wire was laid on top of the roofing felt.
First brick laid
Step 2. Having placed the corner bricks of one of the walls on the mortar, carefully adjust them to their height using the handle of a trowel or very light and careful blows with the blunt part of a pickaxe hammer. In this case, be sure to use both a water level and a building level - you need to make sure that the blocks on the two edges of the walls are located at the same height.
The process of fitting corner bricks
Step 3. Using the same principle, lay out the first row of bricks at all corners of the future building.
Laying the second corner brick
Step 4. Stretch a mooring thread between the corner bricks, which will be used to align horizontally and vertically all the other blocks of the first row. The cord is secured either using corners (as in the photo below) or in a row. Please note that the mooring thread should not sag and that when laying it, it is not advisable to “push” it towards one of the edges of the brick.
The mooring thread is stretched
Step 5. Proceed with laying out the remaining bricks of the first row. Using a trowel, lay the mortar on the plinth, level it to a height of about 1.5 cm, lay the brick, level it horizontally and vertically, using a mooring thread. If this is your first time working as a mason, check with a building level. In this case, it is allowed to adjust the brick by lightly tapping it with the handle of a trowel or the blunt end of a pickaxe hammer. After this, the thickness of the horizontal seam should be approximately 8-10 mm, and the vertical seam - 8 mm. Remove excess solution with a trowel.
The second brick of the first row has been laid
Step 6. Using the same principles as stated above, lay all the bricks of the first row.
Laying the first row of bricks
Step 7. After laying the last brick in the first row, check again whether the height of all the blocks is the same, whether there is any bulging forward or backward relative to the base. If everything is in order, proceed to laying out the corners of the second row, moving the berth and further construction work.
You can start laying out the corners of the second row
Laying bricks end to end and pressed together
After laying out the first row, it is necessary to begin creating subsequent layers of brickwork. In this case, the actions are carried out according to a similar algorithm - corners are created, the thread is stretched, blocks are laid. In this subsection we will focus on the last operation. There are two main techniques for laying bricks - end-to-end and pressed. Let's consider both in turn. Let's start with laying bricks using the end-to-end method.
Step 1. Stretch threads along the upper edges of the laid out row. It is advisable to do this both from the outside and from the inside. Then pour cement mortar onto the bed of the previous row of bricks.
The threads are stretched along the upper ribs
Step 2. Using a trowel, spread the mortar over the surface of the previous row of brickwork. Its thickness should be slightly greater than the thickness of the horizontal seam you plan. Also make sure that the mortar completely fills the vertical longitudinal and transverse joints on the previous row of brickwork.
The solution is spread over the surface of the previous row of brickwork
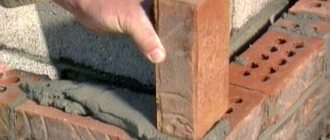
Step 3. Take a brick, tilt it down a little with a spoon or a poke (depending on how you need to lay it) and, immersing it in the solution, move it so that a layer of the mixture floats onto the tilted edge. As a result, you have horizontal and vertical seams at the same time.
Laying bricks
Another photo of the process
Laying bricks end-to-end with the tongue edges adjoining each other
In the illustration you can see how the bricks are laid in place, both for spoon and bonded masonry
Step 4. Using the same principle, lay the remaining bricks. If they deviate in height from the boundary established by the mooring thread, adjust them by lightly tapping them with a trowel or hammer. Cut off the excess mortar from the outside with a trowel, and partially fill the vertical seams where there is not enough mixture.
Laying the remaining bricks
Now let's look at laying bricks against each other.
Step 1. As in the previous instructions, stretch a mooring thread along the upper edges of the row, and lay out and level the mortar on the bed of the underlying layer of bricks.
Laying bricks pressed
Step 2. Then turn the trowel on its side and, with a gentle movement over the mortar, rake part of it to the vertical edge of the brick next to which you are going to lay the new one. As a result, you should have an even side seam.
Part of the mortar is raked to the vertical edge of the brick
Step 3. Holding the mortar on a vertical edge with a trowel, lay the brick in the desired place and press it to the bed of the previous row and to the spoon (or poke, depending on the type of masonry) of the adjacent block. Carefully pull out the trowel.
The brick is laid in the right place
Step 4. Using the same principle, lay the next brick. Adjust them in height with light blows with the handle of a trowel, if necessary.
Laying the next brick
Adjusting brick height
Step 5. Cut off the excess mortar that has flowed out of the horizontal and vertical seams with one movement of the trowel. The mixture can be sent to a bucket to its main part or placed on top (in the case when the joint of the pokes or spoons of two bricks is not sufficiently filled with mortar).
Removing excess solution
The diagram shows the principles of installing bricks using spoon and butt laying.
Step 6: Repeating the previous steps, lay out all the remaining bricks in the row.
The remaining bricks are laid out
Prices for cement and basic mixtures
Cement and base mixtures
Video - Brickwork for beginner masons
Video - Mistakes of novice masons in brickwork
Do-it-yourself brickwork tools, order and features
Now that you have an idea of how to lay bricks with your own hands, you need to talk about the procedure as well as some technical nuances.
Let's start with the tool. You will need:
- mason's trowels - apply and level the mortar onto the bricks;
- concrete mixer or container for mixing mortar;
- mortar shovel - for kneading and periodic mixing;
- two or three buckets for the solution;
- plumb line - check the verticality of walls and corners,
- building level - to check the horizontality of the row of masonry;
- cord-mooring - for beating rows;
- jointing (for molding seams);
- hammer-pick for breaking incomplete bricks (halves, 3/4 and checks - 1/4);
- The rule is a flat metal or wooden strip to check the plane of the wall.
Next we will talk about the features of the technology. First: it is advisable to soak the brick before use. This is especially true in hot, dry weather. Then it will “pull” less moisture from the solution. If there is not enough moisture, the cement will not be able to gain the required strength, which will affect the strength of the building.
Second: the corners are driven out first. First the first two. They are connected with 2-3 rows of bricks according to the chosen masonry pattern. Then the third corner is kicked out. The second and third are also connected in several full rows. Afterwards the fourth corner is placed and the perimeter is closed. This is how walls should be built, going around them around the perimeter, and not pushing walls out one by one. This is one of the most common mistakes.
Third: there are two row control technologies. The first is that nails are inserted into the seams of the corners, to which strings are tied. It needs to be pulled so that it marks the top edge of the brick, and also limits the outer (and, if necessary, inner) surface of the wall.
The second way is to use wooden or metal orders. This is a flat strip or corner on which marks are applied every 77 mm - marks on wood or cuts on metal. They mark the required row thickness: brick height + seam. They are installed using flat mounting brackets that are inserted into the seam. If necessary, they are then simply removed and rearranged higher.
There is another way - a mason's corner. It has a slot on one side, into which there is a solution at an angle.
The disadvantage of this method is the same as just using a nail in the seam: the height of the row must be controlled “manually” when drawing out the corners. If you lack experience (and where can you get it if you are doing bricklaying with your own hands for the first time), this is difficult. Having (having done it yourself) everything is easier.
Fourth: preparation of incomplete bricks. As you have seen, when laying, they use halves, three-quarter bricks and checks - 1/4 parts. To ensure that the work does not slow down, it is necessary to prepare them before starting masonry. This is done using a hammer-pick. When preparing, high precision in size is required, otherwise the dressing will go wrong. To make it easier to control the length, marks of the appropriate length are made on the handle. By placing the pen on the brick, marks are made on both sides of the spoon. Then, placing a pickaxe blade on the mark, they hit the reverse side with a hammer, making notches. Having made notches on both spoons, they break the brick with a strong blow of the pick.
Types of masonry
Brick walls can serve different roles. In some cases it is only finishing, in some it is partitions, and sometimes it is load-bearing walls. Based on the purpose, as well as the required thermal conductivity of the walls, the type of brickwork is selected:
- Half a brick. Most often this is how cladding is done. The thickness of such a wall is 125 mm. To save money, you can put the material on a spoon, then you will get a wall the size of a quarter of a brick. When installing these (in 1/2 or 1/4), a reinforcing mesh is laid in every 4-5 rows. It is necessary to increase the rigidity of the wall and create additional connections that increase the strength of the masonry.
- Into the brick. These can already be partitions or two load-bearing walls of small buildings. Wall thickness - 250 mm.
- One and a half, two and two and a half bricks are already load-bearing walls.
Types of brickwork: half a brick, one brick, one and a half and two bricks
Dressing and names of rows
Although a brick wall is made up of many small elements, it should work as a monolith. To provide increased strength, the seams, which are the weak point in this system, are made offset. Experts call this technique “bandaging.” It seems to connect different elements into a single whole, allowing the load to be redistributed over large surfaces.
Spoon and tie rows in brickwork
To ensure the necessary displacement of the seams, the bricks are placed in different ways:
- if they are turned to the front side by the smallest part - a poke, such a row is called a poke row;
- if turned with the long side - a spoon - the row is called spoon .
Moreover, the first one in the masonry - on the foundation - is the bonded one, which is also used to finish the masonry. Moreover, it is mandatory to use solid bricks.
Single row dressing
Alternating such rows gives a very good result. This method of ligation is called single-row or chain ligation. It is practiced on walls that are not planned to be finished: it looks neat. Using this system, both external and load-bearing walls can be built.
Wall masonry schemes
Examples of a single-row brick wall of 1.5 and 2 bricks are shown in the photo below.
Single-row dressing in the wall from 1.5 and 2 kripich
In the case of laying a wall with two bricks, two more terms appear. The two outer rows of spoons are called versts - the outer verst is directed towards the street, the inner verst is directed into the room. For them, they use smooth, good material, especially carefully selecting those that are directed outward. The space between them is called backfill . Since this element is closed on all sides, you can use lower-grade material, for example, used.
Please note that this type of masonry also requires sawn bricks: half and three-quarter. The three-quarters in the diagram are crossed out crosswise, the halves are crossed out with one diagonal stripe. How to connect partitions to walls made using this technique is shown in the photo below.
Joining walls with single-row ligation
Corner schemes
Laying the corner in this case is very important. According to the method, the corners are first driven out, a cord is pulled between them, and then the wall is laid according to the diagram. But the corners are placed first; how evenly and correctly they are set determines how level the entire building will be. The scheme for laying a corner of 1 brick with a single-row dressing is located as follows. The laying begins with the installation of two 3/4 pieces, followed by whole ones.
One-brick corner with single-row dressing
See the video for the sequence of actions. Very detailed explanation with step-by-step demonstration of the procedure.
The same system, but in a wall of 1.5 bricks. In addition to whole pieces, 3/4 pieces and quarters are required. The spoon row alternates between the inner and outer miles.
Scheme: an angle of one and a half bricks with a single-row dressing
See the video to see how this scheme is put into practice. When laying a corner of 2 bricks in the first row, the same two three-quarter pieces are required, as well as another 6 quarters or, as they say, checks. In the second, one 3/4 and two checks are already required.
Scheme: corner of two bricks with single-row dressing
Multi-row dressing
With multi-row dressing, several spoon rows - 6 (for a single brick) or 5 (for a one-and-a-half brick) - are interspersed with one bonded one. The first and last ones are also placed with pokes. This method is also suitable for laying external and internal walls. Only they are usually planned for insulation or finishing.
Wall masonry schemes
To prevent such a system from creating free-standing columns, the spoon rows inside are also tied up. To ensure displacement of the seams, crushed bricks are used.
Do-it-yourself brickwork: multi-row ligation scheme of 2 and 2.5 bricks
The joining of walls with this method also occurs with bandaging. This ensures increased strength of the junction of the walls. The diagrams are in the photo below.
Layout schemes for adjacent walls
Schemes for laying corners
And again about how to place corners, but with multi-row dressing. If the wall is one brick, the even and odd rows (except the first) are the same.
Scheme for laying a corner of 1 brick with multi-row dressing
You will see all this in the video.
If the wall is 1.5 bricks long, in the first and second rows with bonded bricks, but located either in the outer or in the inner verst. The third and fourth rows are exclusively placed on spoons.
Scheme for laying a corner of 1.5 bricks with multi-row ligation
The fifth row is placed similarly to the third, the sixth - to the fourth. Then the system is repeated. At times, not a multi-row system (with 5 spoon poisons) is required, but a three-row system. Then from the fifth row the clacking is repeated.
Features of corner forcing
Scheme of ligation of longitudinal seams.
First, two bricks are taken (or a brick and an insert) and placed in the corner, pressed against the mortar. When laid, they should form a right angle. Use the handle of a trowel to lightly tap them, and then fill the gap between them with mortar. Be sure to check the horizontal lines using a level.
Then the masonry is carried out according to the chosen scheme. The thickness of horizontal joints between rows after hardening of the mortar should not exceed 10-15 mm, vertical joints between individual bricks - 6-8 mm. You need to place 3-4 bricks on each side of the corner, making sure to control the evenness of their horizontals and verticals. Then, following the dressing scheme, row 2 is laid on top, then row 3, etc.
We should not forget about aligning the seams. This is done by scraping and jointing while the solution is still soft. The easiest way is to slightly recess the seams into the masonry, for which you just need to run a jointer over them and wipe off the excess mortar from the wall.
The direction of the work does not really matter; do it the way that is most convenient for you. For right-handed people, it is better to build a brick house from right to left, for left-handed people - vice versa. If a team of masons is working, then 5-6 rows are simultaneously driven out in all 4 corners, and then the walls are built up row by row, observing the initial gap (the corners should be 5-6 rows ahead of the wall) until the work is completed.
Well brick masonry walls according to the A.S. system. Vlasova.
But you can’t cope with such a volume of work at the same time. Therefore, use the following order: first, drive out 2 corners to the desired height, then place 1-2 rows of bricks between them, drive out the 3rd corner and connect it with the same number of rows to 2, then drive out the 4th corner and connect it to 3 and 1 corners. And so continue to work, after each circle raising the brick walls of the house along the entire perimeter by 1-2 rows until the masonry is completed.
When forcing corners, you will inevitably have to make stepped cliffs, the so-called. fines. Partly this will be due to the fact that it will be necessary to use cut-down bricks - inlays, partly - to ensure a more durable connection of corners and walls in the future.
For a future brick house, it is extremely important that the corners are straight and strictly vertical. The angle is checked with a square, the brick should fit tightly to it
The verticality of the corners, especially above 7-8 rows, is controlled using a plumb line, and the horizontal - using a building level. Professionals take measurements every 4-5 rows, but if you do not have enough experience, do not be lazy to take them more often.
Laying in 2 bricks scheme
For laying 2 bricks, the mortar is mixed according to the standard scheme: 1 part cement to 3 parts sifted sand. When erecting structures made of ceramic bricks, you will need additional equipment:
- cutter;
- trowel;
- building level;
- hammers;
- plumb lines;
- construction mixer;
- shovels;
- spatulas.
Cement-lime mortar is not used in the construction of high-rise buildings. With its help you can create decorative elements inside or outside the building. The thermal conductivity of the mass is low, the plasticity is average. To increase the fire resistance of a building, fireclay clay is added to the cement. It is more convenient to mix the solution in a concrete mixer.
Parameters of typical brick dimensions (according to GOST):
- the width of the masonry will be 500-510 mm;
- height (including blocks and seams) - about 155 mm.
Before starting construction, experts recommend calculating the width and height of the future building in order to draw up a cost estimate for the material.
Type of masonry
Each of the methods of laying 2 stones is distinguished by the edges of the blocks. There are 3 main surfaces:
- poke;
- spoon;
- pastel.
Pastel is the largest face of the block, another name for it is working. The surface can be upper or lower, much depends on how it is placed inside the masonry. The spoon is understood to be the second largest perpendicular side. The poke is located perpendicular to the other two faces in the brick block. This surface is the smallest in size.
There are several main types of 2-stone masonry:
- Cross. Lay out 3 tie and 3 spoon rows. The scheme is repeated the required number of times.
- Double row (chain). The simplest way to construct buildings. First, lay out 2 rows parallel to each other and strengthen them with cement mortar. During the laying process, a ladder is formed with a shift of 3-4 cm.
- Art. This type of masonry allows you to form the design of the facade through the design, coloring of the joints and laying of brick blocks. The facade is not a perfectly flat surface, but an angular architectural relief with slopes, columns, protrusions or niches. Another name for masonry is patterned-relief.
- Single row. It is based on a stepwise alternation of spoon and butt rows. This method is suitable for building a fence.
- Multi-row. The wall is laid out in even layers of 6 lines. Every 6th row is a splice row, all the rest are spoon rows. Vertical seams are tied longitudinally in 6 rows.
Laying is carried out horizontally. During the construction process, the purpose of the structure, the possible load on it and geometric characteristics are taken into account.
During the period of laying stones, attention is paid to the thermophysical properties of the material. Dimensional parameters of brick and cement make up the total thickness of the walls
The strength of the building directly depends on the chosen dressing scheme: it is carried out transversely or longitudinally. Masonry often involves a lot of pressure on the foundation of the building, so experts recommend pouring a reinforced base.
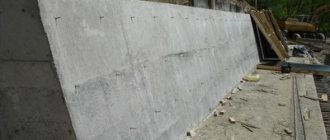
Brick wall design
The brick wall shown here is a combination of several simple designs. Like all walls, it rests on a foundation - in this case, a concrete strip 250 mm deep and 400 mm wide. The top of the foundation is 100 mm below ground level so that soil can be laid next to the wall and plants can be planted. Some walls consist of a single course of brick; for increased strength and better proportions, this wall consists of two parallel rows of bricks, separated by a narrow air gap and connected by metal strips. Both rows are spooned, that is, the bricks are laid end to end with seams 10 mm thick. The upper butted row of bricks laid on edge ties both rows together.
How to lay a brick plinth correctly?
The construction of a brick plinth differs little, regardless of the thickness of the wall and the number of rows.
Step-by-step instructions on how to lay a brick plinth:
- The foundation is treated with bitumen mastic.
- The base is waterproofed by laying roofing material and treating the side surfaces with penetrating compounds. The rolled material is laid with an overlap of 10 cm, the waterproofing should protrude beyond the foundation by 3-4 cm.
- Final check of the correct location of the angles and plane.
- Prepare a working solution of grade M100 (M75-M125).
- The solution is laid on the foundation to a thickness of up to 2 cm, and a 4 mm wire with a cell size of 4 cm is inserted inside.
- Laying the first row is carried out; work should begin from the corners.
- After the first layer, check the level of the plane to adjust the thickness of the seam.
- When laying subsequent rows, bandaging is performed; the pattern is selected individually, most often occurring after 1-3 rows.
- Reinforcing mesh is laid every 4 rows.
- In the last layer of the plinth, holes may be required for laying the floor with the installation of rails or channels.
- Insulation of a brick basement from the inside or outside with extruded polystyrene foam.
- Covering the base with decorative stone, plaster or ceramic tiles.
1 brick
Laying a base of 1 brick is used for lightly loaded structures: garages, agricultural buildings, workshops, etc.
If you do everything yourself, you can simplify the task a little and lay the bricks one next to the other
The installation procedure is carried out according to a single system, but it is important to adhere to the basic rules:
- during the laying process, the seams of one row and another should not be allowed to coincide;
- the wall must be reinforced to prevent cracks from appearing;
- It is recommended to cover the brick base with cladding.
In 2 bricks
Laying a plinth with 2 bricks differs only in the technique:
- dressing is performed infrequently, once every 2-3 rows is enough;
- It is better to perform reinforcement once every 2-3 rows;
- acceptable brick displacement in each row is 25%, ideal is 50% of the brick width.
Basic terms
Let's start with general concepts. Everyone knows exactly what a brick looks like, and that it is ceramic and silicate, too. But not many people know how the edges of this material are correctly called. And in the description of masonry technology they appear very often.
The largest edge is called “pastel”, the middle side is called “spoon”, and the smallest is called “poke”.
The dimensions of the brick are, in principle, standardized (250 * 125 * 66 mm - single and 250 * 125 * 88 mm - one and a half), but the technology of its production is such that they can differ significantly from different manufacturers: by 2-3 mm in each edges, and this is quite a significant difference, considering the number of pieces in one row. Therefore, before ordering a batch, it is advisable to measure samples from several firings in order to determine how accurately the technology is maintained.
It is also important to pay attention to the geometry: the edges must be positioned strictly at 90°. Otherwise, bursting loads will occur and the wall may crumble.
Marking masonry
Test laying of the first two rows
Mark a line for the outside surface of the wall using the wall of your home, a walkway, or a red line as a horizontal reference line. Drive stakes at the ends of this line and stretch the cord between them. Then place the first front (front) row of bricks on the ground along the cord with 10 mm gaps between them. If necessary, move the stakes so that a whole number of bricks fit exactly between them.
Lay the inner (back) row of bricks with a gap of 10 mm between it and the front row. After laying several bricks, place one brick on edge across parallel rows. If it doesn't fit exactly on both rows, change the gap between them. Lay out two rows of bricks completely, checking the gaps.
Summarize
As you can see, making bricklaying devices with your own hands is very simple and inexpensive. Although it will serve you for a very long time.
Brickwork is a job that should be done with at least some experience. If you do it haphazardly, then the strength of the walls will not be sufficient, and this is risky, as you yourself understand. In addition, the quality of the masonry will determine how the house will look from the outside.
It is necessary to use various devices and tools to control the work being carried out. It is not reasonable to think that if you can do without them, then you are a professional. Mechanical devices are designed to make our lives easier.
The device is designed for laying bricks in order to maintain the same thickness of the seam. Thanks to this very simple and uncomplicated design, you can easily make beautiful and very even masonry while maintaining all the distances between the bricks. Moreover, the device greatly facilitates and speeds up the work. The device consists of:
- two horizontal strips 11x25 mm; two horizontal strips 19x40 mm; four vertical strips 19x40 mm; two studs with a diameter of 10 mm with wings, bolts and nuts, with which the vertical strips are connected; two screws with heads with a diameter of 20 mm with nuts and washers; finishing 40 mm nails for fastening parts (the ends of the nails on the inside will need to be bitten off with wire cutters).
The total length of the structure is 850 mm. Horizontal strips are attached in the shape of the letter G. The areas from the edge to the vertical strips are 130 mm. The height of the vertical strips above the level of the entire structure is 100 mm. This height was chosen so that when laying bricks, the thread would pass 15 mm above the vertical strips and would not interfere with the use of the device. To install vertical strips on the inside of the device, you will need to select two grooves in a horizontal 11x25 mm strip using a chisel. All wooden parts are made of laminated pine timber. To prevent the absorption of moisture from the solution, the surface is varnished. Note: using the thumbwheels on the studs, you can adjust the width of the structure and work with wider or narrower bricks. The inner part is tightly fixed, only the outer side of the device can move.