Content:
- Basic rules of frame construction
- Choosing a place to build a house on the site
- Fasteners
- Construction order
- Stage 1. Foundation
- Stage 2. Bottom trim and floor
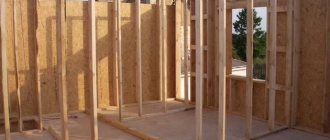
- Stage 3. Frame
- Stage 4. Interfloor ceilings
- Stage 5. Roof
- Stage 6. Insulation and sheathing of the frame
- Stage 7. Internal partitions
- Stage 8. Interior decoration
- Conclusion
In Russia, the technology of constructing lightweight frame houses is gaining popularity, relegating traditional construction made of bricks and cinder blocks to the background. This is due to the advantages of the prefabricated technique: cost-effectiveness, speed of installation, light weight and strength of finished structures, compatibility with any architectural solutions. The construction of frame buildings is carried out in several stages.
Specifics of frame technologies
Frame-and-fill structures have been used in construction for a long time. Previously, the walls were covered with improvised materials that had thermal insulation properties. They used sawdust and slag, but such houses were less durable and comfortable. With the advent of new technologies, the situation has changed dramatically. Now such buildings have many advantages over timber houses.
Frame walls in such houses are durable, reliable, have a good percentage of heat transfer, and retain moisture.
The buildings themselves are affordable, durable, easy to install, and lightweight.
Basic rules of frame construction
Figure 2. Frame construction technology
When constructing frame-panel buildings, you need to pay attention to the following nuances:
- Selection of lumber for the frame . To prevent the wood from deforming due to drying out, it is better to choose timber with transport humidity. Wood with a high percentage of natural moisture will not provide a high quality building frame.
- Protection from biological influences . This refers to wood rotting, the activity of wood-boring insects, as well as rodents that live in the insulation. To combat pests, the base of the house is treated with antiseptic.
- Quality of materials . You should not skimp on insulation, moisture and vapor barriers, window and door units, fasteners connecting frame elements. The strength and safety of the structure depends on the quality of these materials.
- Laying electrical wires . Poor quality wiring is the main cause of fires in wooden buildings. Electrical communications in frame houses must be well insulated, and all sockets and switches must be certified.
It is important to strictly follow the technology for constructing panel houses. To avoid serious mistakes, it is better to entrust the installation to a construction organization that performs such work. In St. Petersburg and the Leningrad region, he is professionally engaged in frame construction.
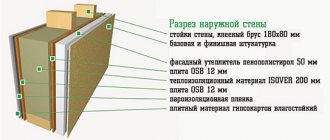
Wall thickness of a frame house
The structures of frame houses are conventionally divided into the following facets:
- Vertical racks;
- Horizontal straps;
- Insulation;
- External and internal finishing materials.
Thanks to their versatility, the walls retain heat well.
External finishing materials are façade finishing materials. They use plaster, siding, hanging structures, PVC plates, and lining. The choice of material depends on the financial situation and preferences of the owner.
The finishing is fixed on slabs or a separately installed frame. Panels are attached to it, which provide free space between the trim and the wall. The gap protects well from the wind and improves thermal protection.
OSB boards serve as an additional frame and protect soft materials from external influences.
There are two types of waterproofing: film, membrane. The membrane is more expensive, but it allows air to pass through well, removes steam and excess liquid from the walls. The waterproofing membrane must fit tightly to the insulation, this will prevent liquid from the outside world from penetrating into the walls.
Insulation is the main element of the frame. The thickness is determined by the selected insulation. Therefore, when purchasing a timber, you need to decide on its thickness; the larger it is, the larger the cross-section of the timber.
The interior wall finishing is made of plasterboard. This material eliminates imperfections and roughness, and is very convenient for decorating walls.
Choosing a place to build a house on the site
You should think about choosing a place to build a residential building at the stage of purchasing a plot. Not only the relief matters, but also the distance from the highway, power lines, neighboring buildings, the presence of nearby reservoirs, ravines, and green spaces. You also need to place the house correctly on the site itself. There are mandatory standards here. This:
- Sanitary building codes . They stipulate the standard distance to the road, power lines, underground utilities, neighboring houses, outbuildings, wells, trees.
- Fire safety restrictions . Fire safety standards regulate the distance to fire hazardous objects and between building buildings. At the same time, they take into account what the house is built from.
The location of the future home is chosen during design. To put a building into operation, the project must be agreed upon with the responsible services.
Figure 3. Scheme of a pile-screw foundation. Project Vsevolozhsk D-15
In addition, there are more general recommendations that will help improve the comfort of your future home. When choosing a construction site, take into account:
- orientation to the cardinal points - affects the illumination of rooms;
- wind rose - on the windy side it is better to reduce the degree of glazing;
- the presence of noise sources (roads, playgrounds) - it is better not to make windows on this side.
When choosing the location of rooms, it is advisable to think in advance about the view that will open from the windows.
Insulation
When building a frame, it should be taken into account that the thickness of the wall directly depends on the type of insulated material chosen. There are three types of insulation:
- Mineral foam;
- Styrofoam;
- Polyurethane foam.
Let's look at each type separately.
Mineral wool
Mineral wool is a traditional insulating material for frame houses. The material has good thermal insulation. This mineral heat retainer has different degrees of hardness, on which the quality depends. Rigid slabs are used for plastering. This form is denser and has greater thermal conductivity.
Mineral insulation in the form of compressible mats has a more porous structure. The indicator of such a material corresponds to the lower limit of temperature conductivity. Mineral wool with low thermal conductivity insulates more effectively. When building a house using mineral wool, attention should be paid to waterproofing, since the material, when wet, loses its thermal insulation properties.
The thickness of the insulating material can be selected according to a special table, which indicates the width of the material depending on the air temperature outside. The choice of the value of the thermal resistance of the wall depends on the region. The thermal conductivity coefficient is indicated on the packaging.
Styrofoam
Expanded polystyrene sheets are used in the construction of frame-panel structures; they are light in weight and have a high heat resistance. Some developers use this material together with mineral wool to insulate a house.
To insulate walls with foam plastic, it is recommended to purchase sheets with a density of 25 kgm3 or more. The width of the polystyrene foam insulation board for the walls of a frame house depends on the choice of material density. The thermal conductivity coefficient at this density is 0.03-0.05.
The thermal conductivity characteristics of polystyrene foam and mineral wool are almost the same. The thickness of the insulating material is calculated in the same way. To do this, find the product of the characteristics of thermal conductivity and thermal resistance in the region.
The thickness of expanded polystyrene is also important when choosing slabs, since they are used to insulate floors. This characteristic has an impact on the ability to retain heat inside the material. The lower the outside air temperature, the thicker the insulation will be.
When working with polystyrene foam, it is important to remember its flammable properties. During installation work, fire safety rules must be observed.
In buildings, it is necessary to protect the walls from fire.
Polyurethane foam
This insulation appeared recently. It is applied using a special installation in which chemicals are mixed to form foam. A layer of 8 cm of polyurethane foam hardens for about an hour. After hardening, the substance is a strong, porous structure. This coating is more effective than sheet and roll materials.
Among the advantages of polyurethane insulation, a high thermal insulation rate is noted, which is higher than that of expanded polystyrene. And also the ability to create monolithic layers, without seams or joints. The only disadvantage of polyurethane insulation is its high cost.
Fasteners
When building a prefabricated house, nails and profiled metal fasteners are used to connect frame elements:
- Mounting corners . They are installed at corner joints: floor frames, vertical beams, wall corners, roof rafters. Corners differ in size, type, and design. Products with additional stiffeners can withstand bending loads.
- Mounting plates . Used for butt joints. The plates are placed on both sides of the slabs being connected, and then secured with bolts and nails. Such fasteners can withstand high tensile loads.
- Beam holders . They are used when installing floors and attic floors. The holder fixes the beam to a wall or other structure, preventing it from moving. Withstands significant tensile loads.
- Beam support (shoe) . Designed for installing beams on a wall or column. There are supports for open installation or for finishing, right/left or universal.
- Shoe of a supporting post or column . The element is installed in the foundation and has a high load-bearing capacity.
- Mounting profiles . Needed for installation of sheathing and installation of sheet sheathing.
Fastening elements securely fix the frame, giving it rigidity.
Walls of a frame structure: the importance of calculations
Summer house
It is important to know exactly for what specific purposes the structure is being built.
Maybe this is a neat country house exclusively for summer living. Then the requirements for it will be unique, its walls may well be lightweight.
If it is a solid structure, then the size and thickness of the walls are calculated in accordance with the load-bearing load of the frame.
If you are planning a solid structure for year-round use, or a two-story cottage, or a house with an attic, then in addition to its strength qualities, it is necessary to take into account the mandatory need for insulation. In such a case, the thickness of the walls will depend on the massiveness and size of the timber, and on the thickness of the insulation used.
How to correctly determine the thickness of the walls of a future structure? The calculations must take into account such an indicator as the thermal conductivity coefficient of the materials used.
There is another interesting option for the design of a frame house - using Canadian technology. Its meaning is that for the construction of such buildings, industrially manufactured sip panels are used. When using this technology, the thickness of the load-bearing walls will be determined by the size of the finished panels themselves.
Each frame structure is based on a thoughtful engineering calculation, on the basis of which the specific structure of the wall and the material from which it will be made are determined.
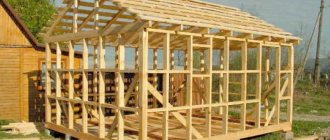
Construction order
After developing the project, selecting materials and completing preparatory activities, construction of the house begins. Let's consider the algorithm for constructing a frame house in stages.
Stage 1. Foundation
Figure 4. Pile foundation
Compared to stone or brick buildings, wooden frame-panel houses are very light in weight. This allows them to be erected on any foundation. In frame buildings and houses made of SIP panels, the following types of foundations are used:
- Shallow tape – buried 30-80 cm from the surface level;
- slab - slabs with a thickness of 30 cm or more are used for it;
- columnar - the house is built on supports tied with mortar;
- pile - on driven, screw or bored piles, burial depth 2-12 m.
If the soil allows, you can make a strip-type base with a slight recess. But most often, pile or columnar foundations are chosen for light buildings. These are relatively inexpensive structures that form a ventilated space under the building.
To correctly select the foundation, geodetic surveys are carried out at the construction site before starting work. During their implementation, the type of soil, the height of groundwater, and its seasonal fluctuations are determined.
Refusal to study the soil on the site can lead to errors when constructing the foundation: choosing an insufficiently strong foundation or, conversely, an unreasonable waste of materials.
After installing the foundation, it must be waterproofed. This protects the wooden piles from dampness, rotting or mold, which is possible due to contact of the wood with groundwater. As insulation, bitumen mastic or rolled materials are used: roofing felt, waterproofing.
Stage 2. Bottom trim and floor
Figure 5. Scheme of the first crown of the lower trim.
Project Vsevolozhsk D-15 Piping is required for all types of foundation. It is laid on top of the waterproofing layer, positioned above the ground level. The wood used for strapping must be carefully treated with an antiseptic.
In frame houses, timber with a cross-section of 150x150 mm is usually used for the bottom frame; they are laid along the perimeter of the entire foundation. If the foundation piles are located at a distance of more than 3.0 m relative to each other, more powerful lumber is required. For greater strength of the strapping, the boards are laid in two layers. In this case, the upper row overlaps the joints of the lower one.
To perform the strapping, you can also take a beam with a section of 100x150 mm.
Wooden logs with a cross-section of 150x40 mm are placed on top of the frame and placed on edge. The logs serve as the basis for the subfloor. They are attached to the frame beams with nails and fastening angles. The pitch for them is chosen based on the length of the boards - the longer it is, the more often the logs need to be laid. Usually the distance is taken to be 60 cm. This is enough to give the structure rigidity and prevent the boards from sagging.
At this stage, it is imperative to insulate the lower part of the house. You can use polystyrene foam, extruded polystyrene foam or mineral wool sheets. When laying fiber insulation, it is necessary to lay a layer of waterproofing underneath it. The insulation is cut into layers, then placed between the joists.
The final step of this stage is the installation of the subfloor. There are two variants of its design:
- load-bearing – used with pile, columnar or strip foundations;
- lattice – used with slabs or concrete screed.
Figure 6. Floor diagram The
subfloor is made from a board 2.5-3.0 cm thick or a sheet of plywood 1.5 cm thick. Sometimes both materials are used (plywood is placed on top of the boards). In this case, you can take sheets about 0.5 cm thick.
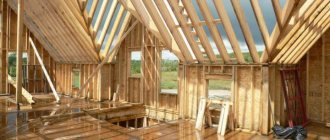
Stage 3. Frame
Figure 7. Wall frame design diagram
Figure 8. Scheme of a house wall pie
The procedure for installing the wall frame depends on the chosen technology. There are two methods:
- Assembly of all elements directly at the site of their installation.
- Assembly on a horizontal surface followed by installation of the finished structure.
The second option is simpler and installation is faster. This is exactly how houses are assembled from factory-made SIP panels. But this method may require the use of special equipment or the participation of several people to lift and install the wall due to the significant weight of the finished structure.
You can assemble the house directly at the installation site yourself. Installation of the frame of a panel house begins with the installation of corner vertical posts. Typically, double boards with a section of 100x40 mm or 150x40 mm are used for this. A larger cross-section is required for the construction of two-story houses. Also, the increased size of the board is convenient for laying insulation with a thickness of 150 mm - this is exactly the layer required for the North-West region of Russia.
To ensure the rigidity of the house structure, the frame beams are fixed with metal corners and also reinforced with inclined slopes.
The remaining simple vertical posts are installed between the corner beams at a distance of 1.0-1.5 m from each other. For them, boards measuring 100x40 mm or 150x40 mm are used - the width must match the standard size of the beam of the corner posts.
Next, horizontal beams are mounted on top of the vertical posts, thus creating a rigid frame for the building. In this case, openings for window/door blocks are immediately provided. The openings are reinforced from below with crossbars that evenly distribute the load across the foundation.
To create finished panels, OSB boards with a thickness of 12 mm are usually used. The final thickness of the wall of a frame-panel house is equal to 180-250 mm. The dimensions of boards made of oriented strand boards are 125x250 cm. It is advisable to install supporting columns for them (vertical posts) at a distance of 62.5 cm - along the edges and center of the board.
Stage 4. Interfloor ceilings
Figure 9. Scheme of the interfloor floor
After the frame assembly is completed, the top frame of the house is completed. Here the installation technology is similar to the lower trim. For it, timber or double boards are used.
The ceiling beams of the first floor are attached to the top frame. The cross-section of lumber is selected based on the chosen layout of the house:
- For two-story houses and buildings with a residential attic, beams of the same cross-section as for the floor of the first floor are used to construct the floor.
- For one-story buildings with an attic for service purposes, lightweight ceiling beams are used.
In two-story buildings, the frame of the walls of the second floor is assembled on top of the interfloor ceiling. The principle is the same as on the lower floor. The topmost ceiling is made slightly larger than the perimeter of the house - it should protrude about 30 cm on all sides. In the future, this protrusion serves as a support for the rafter system of the house.
I install the floor beams in 60 cm increments. A subfloor is laid on top of them for the convenience of constructing a second floor or roof. For it you can use wooden boards 2.5 cm thick or board materials - OSB, plywood.
When installing the upper attic floors, it is necessary to lay insulation, a layer of wind protection, and a vapor barrier. And for interfloor ones they perform sound insulation.
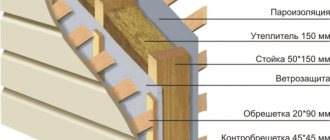
Stage 5. Roof
Figure 10. Frame house with hip roof.
Construction according to the Peterhof D-2 project Various roofs are made in frame-panel houses: single- or double-slope, hip, hipped, broken. The choice depends on the configuration and style of the building. The easiest way is to make a regular gable roof, so this option is most common.
In order for snow to easily slide off the roof, the slope of the slopes must be at least 28-30°. But it is not recommended to make the angle of inclination more than 50°, otherwise the wind load on the roof will increase.
To form the slopes, a rafter system made of wooden boards with a section of 150x40 mm or 200x40 mm is used. Installation of a gable roof begins with two pairs of outer rafters. They are installed on opposite sides of the roof, reinforced with a wooden crossbar in the shape of the letter “A”.
The installation pitch of the rafters depends on the wind and snow load in the construction region, the area of the roof (span), and the selected beam section. The support for the rafters is the top frame of the house.
The roof sheathing is mounted on top of the rafters. Its type depends on the selected roofing material. This can be corrugated sheeting, metal or soft tiles. It is better to choose light coatings that minimally increase the load on rafters, floors, and load-bearing walls. Under the roofing material, insulation and a layer of vapor and waterproofing are laid.
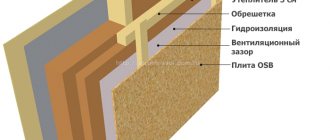
Stage 6. Insulation and sheathing of the frame
Figure 11. Insulation of walls
In frame houses, all enclosing surfaces are insulated: external walls, floors, ceilings. Thermal insulation is laid in the spaces between the vertical and horizontal beams. The following is used as insulation:
- mineral wool - in rolls or mats;
- ecowool - it is laid dry or wet;
- fibreboards;
- extruded polystyrene foam (EPPP) in slabs;
- Styrofoam.
Fiber insulation is more environmentally friendly; it allows steam to pass through well. They are laid between the frame beams in two layers, offset by about 15 cm relative to each other. To prevent the mineral wool from getting wet, it is covered on the outside with a layer of hydro-wind protection, and on the inside with a membrane vapor barrier or polyethylene.
Rigid insulation (foam plastic, EPP) does not allow air to pass through. They ensure complete tightness of the fences and give the walls additional rigidity. This type of insulation does not break down and is easier to install in vertical structures.
A typical multi-layer wall pie of a frame house contains the following materials: OSB boards for external and internal cladding, insulation, wind protection, vapor barrier.
Factory-produced SIP panels consist of 3 layers: two OSB boards and insulating polystyrene foam between them. There is no need to additionally insulate such houses.
To finish the house from the outside, external cladding is performed. Here they apply:
- siding (vinyl, metal);
- fiber cement panels;
- wooden lining;
- decorative brick;
- plaster.
External finishing gives the walls strength and protects them from mechanical damage and precipitation. It serves as additional sound and thermal insulation and also determines the appearance of the building.
Stage 7. Internal partitions
Internal partitions are used to zone rooms in the house. With their help, living rooms, office spaces, and arches are formed. There are board and frame-sheathing partitions. By device type they are:
- simple single-layer;
- double-layer with an inner layer of insulation.
The presence of insulation between the rigid layers slightly increases the cost of the partition design. Installation of multilayer partitions is more difficult; they slightly reduce the internal usable volume of the building. But this design option provides insulation and soundproofing of rooms, and generally reduces the echoing sound of the building.
In terms of installation method, internal partitions differ little from external walls. For them, choose vertical racks from edged boards about 10-15 cm wide and 3-5 cm thick. The pitch of the racks is taken as for external walls. Horizontal struts are also made from boards. This frame is sheathed on top with OSB sheets, plywood, chipboard or plasterboard.
Basalt wool or wood fiber boards are usually used as sound insulation. The main requirement here is the non-toxicity of the material, simplicity and safety of design, and low weight.
Stage 8. Interior decoration
The interior decoration of the floor, walls, and ceiling of the house makes the room suitable for habitation. It includes the following stages of work:
- Installation of finished floor . First, a base of wooden boards 50-150 mm wide is laid, waterproofing, insulation, and vapor barrier of the floor are performed. OSB boards or slabs and flooring - laminate, parquet, linoleum - are placed on top.
- Ceiling lining . A sheathing of wooden beams is attached to the support beams, between which thermal insulation is laid. The inside of this structure is covered with plasterboard.
- Wall decoration . The easiest way to finish the interior walls of a house is with plasterboard. In this case, there will be no restrictions on the final finishing: you can lay tiles, apply decorative plaster, paint the surface or cover it with wallpaper.
Utilities (heating pipes, water supply) are usually installed in the cavity of multi-layer walls under the cladding. Electrical networks are laid openly in boxes or inside walls in special corrugated hoses.
Ventilation gap
The ability of a material to transmit water vapor indicates the presence of ventilation. If its indicator is low, it becomes necessary to build a forced hood. Walls made from natural materials naturally allow steam to pass through. Artificial ones do not have this characteristic.
When exclusively mineral wool is used as insulation, such a building will allow moisture to pass through well. To protect the wall from external condensation, a membrane film is installed from the street. It prevents steam from penetrating into the insulating material and removes it well.
When constructing the frame correctly, mineral wool is used as an insulating material with a mandatory gap for ventilation. The gap prevents the formation of liquid on the lining.
Its thickness is determined by the location, the length of the wall, the width is 25-50 mm.
Vinyl siding
Facade cladding in the form of PVC panels that imitate cladding with boards, logs or stone. This is a lightweight, inexpensive, and therefore accessible material with a completely understandable cladding scheme.
The color range of panels is varied. There is both wall siding and panels for cladding foundation plinths with imitation brickwork.
Siding advantages:
- light weight;
- wide color palette;
- affordability;
- resistance to ultraviolet radiation and temperature changes;
- year-round installation of panels.
Among the disadvantages are the following factors:
- low mechanical strength;
- brittleness at extremely low temperatures.
Considering the disadvantages of such cladding, it cannot be called a universal option.
Features of the plating process
Regardless of what material you choose for the cladding, there is a certain technology for fastening it.
- With lathing
This method is chosen when the slabs serve as the basis for finishing with decorative plaster or tiles. We attach a layer of waterproofing to the frame. Then we move on to the slabs.
- Without sheathing
This option answers the question: how to properly sheathe a frame house when installing a ventilated facade? Here a layer of waterproofing is placed on top of the finishing slabs.
Installation of isoplat sheets
The panels begin to be attached from the corners of the house. It is preferable to mount the sheets horizontally. To do this, we use self-tapping screws, screw them in every 1.5 cm, retreating a centimeter from the edge of the slab. There should be a gap between the wooden plates, approximately two to three millimeters. Otherwise, when the temperature jumps, the plates may begin to layer and rest against each other.
Try to use as many solid sheets as possible so that there are fewer joints, then the house will keep warm better. After the “constructor” is assembled, we attach it on top of the special one. stapler membrane.
It will protect the building from the winds. The seams are overlapped. For reliability, they can be taped on top. Well, then, if necessary, comes the lathing for decorative finishing.
Why is frame cladding necessary?
The technology for constructing such a building includes constructing a skeleton of beams and laying insulation. To make a building look complete, exterior cladding is necessary. It performs several functions that are equivalent in meaning:
- Cladding gives the building an aesthetically unique look.
- The facade receives an additional coating that improves thermal insulation.
- Finishing a frame house extends the service life of all structures.
The outer coating is the first to take on the negative effects of the environment: temperature changes, increased and decreased humidity, ultraviolet radiation, mechanical stress. As a result, the integrity of all structural elements and communications of the building is maintained.