Solving the question of how to lay out a circle of brick may be necessary in a variety of situations - from constructing a well to creating complex architectural and design forms of a house. Let us consider in more detail the methods of circular masonry and specific examples of the construction of round structures.
Where are round brick structures used?
Round brick structures are quite common.
The most common:
- Wells for water or technical communications.
- Completely brick ovens or lined with bricks.
- Arches of various types.
- Bay windows are round or oval.
Well made of ceramic bricks
Laying a round stove
Arched openings will be an excellent decoration for any building
Veranda window openings with arches
Round bay windows can often be found in private house projects
An extension in the form of a tower can be round in shape
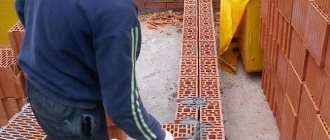
Therefore, questions often arise related to the technology of laying structures of non-standard shape, for example, how to lay facing bricks along a curved wall?
Features of a brick well
Almost all brick wells have wall thicknesses from 250 to 370 mm. It all depends on the depth of the well - the deeper it is, the thicker the walls.
To build a brick well, the following tools are used:
- Shovels with short and long handles;
- Rope with hook;
- Buckets for raising soil;
- Pump;
- Ladder;
- Tripod and chain winch that is installed on it.
The bottom of the well must be horizontal. Make three round frames in advance. Their diameter should be from one meter and increase progressively.
The bottom frame is made of metal, and the other two are made of wood. The diameter of the main frame should be 50 mm larger than the auxiliary ones, the width should be equal to the installation dimensions.
On the outside of the frame, install a steel knife that will follow the shape of the frame.
Auxiliary frames are made of 80 mm thick wood.
In order to make the brick well more durable, the frames are strengthened by inserting anchors into them (diameter - 15 mm). These anchors are secured with nuts and washers. Then lower the mounted and leveled frames into the well and check that the frame is installed horizontally.
You need to put an intermediate frame on the horizontally installed main frame, then fasten them with nuts and washers. Please note that the anchors must be strictly vertical.
The last stage is securing the entire structure with poles, logs and boards.
How to lay a brick in a circle?
There are many different ways to lay bricks in a circle. You can stack elements on any of their faces.
But the most commonly used schemes are:
- Longitudinal - bricks are laid along the wall with spoons.
- Transverse - masonry elements are placed across the wall with butts.
- Combined masonry on a die and edge.
- Laying of halves of elements on a die.
- Installation of bricks hewn at the required angle.
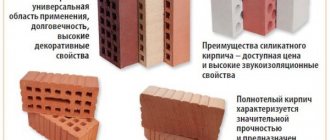
Main characteristics of brick
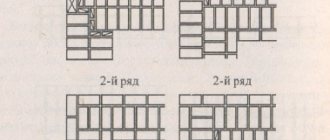
Longitudinal single-row masonry
Options for round masonry: a – transverse, b – combined
Laying bricks on the end
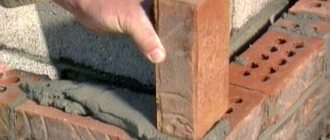
The first row of bricks is usually laid out along the drawn line. How to lay the brick of the next row evenly - all elements should be oriented towards the internal boundaries of the first row.
Constant control of the verticality and horizontality of the masonry using a plumb line and building level is required. Wide external joints are filled with a mixture of cement-sand mortar and crushed stone.
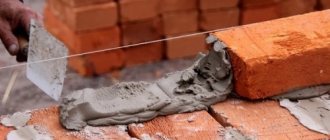
Trimming bricks for masonry
Consideration of the question of how to lay out a circle of brick can be solved by cutting off each element of the masonry. To do this, first of all, you need to decide on the number of whole bricks that will be needed for a full circle.
- A circle is drawn the size of the outer edge of the masonry.
- At a distance of 25 cm from it inside, it is necessary to describe another circle.
- We measure the length of the outer circumference and divide it by 12 cm. This will be the number of bricks that need to be laid without mortar.
- The length of the inner circumference must be divided by the resulting number of bricks - this will be the size of the narrow part of the element.
This way it’s easy to understand how many centimeters need to be cut off from each brick. Processing of elements can be done one-sided or two-sided. To do this, one brick is cut to the required size and a template is made from it.
Using this template, you can process all other elements. But since mortar will still be laid between the bricks, their number can be reduced.
Use of other materials in brickwork
In the past, brick walls were not so uniform. They were laid from bricks of different thicknesses, and the seams between the bricks were much wider. In some areas it was customary to fill the joints with small stones or broken tiles. Instead of cutting or grinding bricks to lay the shaped arches, roofing tiles or old floor tiles were used to fill the gaps. In some coastal areas it was customary to decorate seams with shells. Some builders used specially shaped bricks in their masonry.
fireplace.su
Construction of round furnaces
Let's take a closer look at the laying of a circle using the example of building a stove:
- The foundation for such a structure can be made round or square - it doesn’t really matter. A circle with a diameter of 106 cm is drawn on the surface of the base.
- A plinth is placed on the base, which should protrude above the floor level. The first row of masonry is made in a circle from brick halves installed on a die. The second row is laid from whole elements, which are cut together at a certain angle on one or both sides.
- The laying of the stove itself begins from the third row. It is necessary to draw a circle on the base with a diameter that will be 3–4 mm smaller than the size of the future casing. This row is performed similarly to the first.
- The outer part of the stove consists of iron rings with a diameter of 100 cm. They are installed on the base so that there is a protrusion of at least 2 cm around it.
- The first ring is placed on the third row of masonry. The gap between the brick and the ring is filled with mortar.
- Further placement of the elements is carried out inside the metal casing. Bricks are displayed standing up or in halves. Internal masonry is carried out on a die made of whole elements. A bandage is made around the rings.
Important! It is necessary to constantly monitor that the corners of the overlying elements exactly coincide with the surface of the lower row. Periodic checking of the masonry using a plumb line and building level is also required.
Round brick stove: 2 – basement row. 3 – protrusion.
Types of furnace in section along the axes
Laying 1 - 3 rows of stove
Masonry 4 – 12 rows of construction
Masonry of the 28th and 29th rows
Orders 30 - 31 rows
For round structures, it is necessary to purchase curved doors, since ordinary rectangular products will protrude beyond the edge of the masonry. To install them, holes are pre-cut in the rings. Such a stove can operate on any type of solid fuel, with the exception of peat.
But sometimes there is no need to build a completely brick oven. The stores offer a wide variety of ready-made fireboxes for various purposes. In this case, it is often only necessary to solve the question of how to line a cast-iron firebox with bricks if it is made in a round shape?
Round cast iron firebox lined with brick - photo
The main nuances here are:
- The presence of a gap between the firebox structure and the facing layer.
- It is necessary to provide holes at the bottom for cold air to enter.
- It is necessary to make openings at the top for the exit of warm flows.
Brick cladding can retain heat for a long time. Therefore, its use for cast iron fireboxes is quite common.
Types of masonry
There are different types of brickwork depending on the shape and texture of the material. When choosing, you need to calculate the thickness of the wall and the weight of the structure. This process must be carried out at the design stage of the building. The formation of an appropriate foundation depends on this.
Main types of masonry:
- A quarter of a brick. Masonry is used to form partitions, stoves, and fireplaces. The wall thickness is 65 mm.
- Half a brick. The masonry option is the simplest and most economical of all available types. Even a person who has never built brick walls can master it. It is used for the construction of interior partitions, as well as for finishing the facade. The wall thickness will be 125 mm using standard material. For the construction of load-bearing walls, the type of masonry is not used, since its width should be from 250 to 380 mm.
- Into the brick. The width of the wall with this type of installation is 250 mm, so it can be used for the construction of partitions, plinths, load-bearing walls of a one-story house, second floors and outbuildings. When forming a load-bearing wall, it is necessary to additionally strengthen the stones with reinforcement. Brick rows are formed alternately: the first - two stones along, the second - across.
- One and a half bricks. This type is used for the construction of load-bearing walls in the construction of houses from one to three floors. When using it, there is no need to additionally decorate the facade of the building. The width of the wall is 380 mm.
- Two bricks. This type of installation is used to form walls that will experience heavy loads: ceilings, household appliances, etc. It is used for the construction of external, load-bearing walls and interior partitions, if necessary. The width of the masonry will be 510 mm.
- At two and a half. The wall thickness is 640 mm. Brick laying is used to form any types of walls that will withstand heavy loads.
The width of the masonry includes the thickness of the mortar. When planning, it is usually considered equal to 10 mm. In practice, it may differ by 2-3 mm.
Dressing and names of rows
To create a strong and monolithic wall, you must follow the basic rules of masonry. The seams between the stones are a weak point, so to strengthen them, the bricks are laid offset. This method of work is called “ligation”. Thanks to it, individual stones form a monolithic wall and the load is evenly distributed.
In construction practice, two types of dressing are used: single-row and multi-row, which includes an additional type - three-row dressing.
Row names:
- tychkovy - a row of bricks is laid forward with a small side part;
- spoon - the front side is lined with a long narrow part.
The beginning of masonry begins with the formation of a bonded row. When the construction of the wall is completed, a butt row is also laid out. A prerequisite is that the bricks must be intact.
Single row dressing
This method consists of alternately laying rows of poked and spooned rows: the first row - “poke”, the second - “spoon”, etc. The dressing has an additional name - chain dressing.
Key Features:
- when erecting a building, the first and last rows are placed with pokes forward;
- in each subsequent row, the transverse seams are shifted by 1/4 of the brick, the longitudinal seams by 1/2;
- the stones in each subsequent row should be positioned so as to overlap the seams of the underlying ones.
The single row ligation method is used to construct the main walls. The masonry looks neat, so there is no need to additionally decorate the facade when using it.
The chain method allows you to evenly distribute the load, but is a labor-intensive process. The difficulty lies in the fact that a large number of incomplete bricks have to be formed. Material consumption increases due to chips and leftover quarters.
Wall masonry schemes
Single-row wall laying is formed in one and a half or two bricks. When using the second option, the outer mile - two rows of spoons - go out onto the street, and the inner mile - inside the building. To lay these rows it is necessary to use high-quality and even stones.
Model of the connection of internal partitions to walls.
Corner schemes
The corners are the basis for the construction of the walls of the building. Brickwork begins with the removal of corners. After this, a rope or fishing line is stretched between them, and work continues according to the chosen pattern. To form the corners, you will need not only whole products, but also halves, quarters and thirds of quarters of bricks.
To form corners, ligation patterns of one, one and a half and two bricks are used.
Multi-row dressing
This type of method is a masonry structure that consists of several walls. The width of each wall is equal to half a brick. Step-by-step steps when performing this type of installation:
- the first row is formed by alternating the spoon and butt parts of the material;
- second row - the sequence of installation is the opposite “poke” - “spoon”;
- from the third to the sixth - rows are laid only with the spoon part with bandaging of the seams into the floor of the brick. Then the masonry is repeated.
To form a part of the wall between doors and windows, pillars, it is recommended to use a three-row dressing: for one butting row - three spoons.
When using a multi-row ligation scheme, the consumption of incomplete bricks is reduced. Masonry is faster than single-row bonding, but the strength of the wall is lower.
Wall masonry schemes
The formation of walls with your own hands is carried out in two or two and a half bricks. Small pieces of brick are used to ensure the seams are positioned correctly.
Wall masonry model
Model of ligation of adjacent walls
Schemes for laying corners
Rectangular corners in construction practice are drawn using a special metal square - ordering. This tool simplifies the procedure for aligning corners. Use it to make marks in all corners. Beginners need to use this device when doing work.
For the correct formation of corners using multi-row dressing, diagrams of one and one and a half bricks are presented below.
Construction of technical wells
The need for technical underground structures arises quite often.
They may be intended for:
- Sewage communications;
- Communication equipment;
- Placement of the water column;
- Equipment for swimming pools.
Instruction diagram for the design of a technical well of a round shape.
Such structures are usually made in a round shape. Moreover, the brick version can be quite easily made with your own hands. Let's look at an example of how to lay out a brick in a ring to create a technical well.
In a private house, small-sized structures are most often laid out. Usually they have a depth of up to 3 meters with a diameter of up to 1.5 m. The price for such a structure will be significantly lower than for the purchase and installation of concrete rings.
Brick and concrete structure for technical purposes
Construction instructions:
- First of all, you need to dig a pit. It should be slightly larger in size than the expected size of the well.
- The bottom is carefully compacted and covered with sand to a height of 5 cm.
- The sand is spilled with water and crushed stone is poured on top. This is a cushion for a concrete base.
- A concrete solution with a thickness of at least 10 cm is poured on top. For greater strength, it can be reinforced with masonry mesh.
Tip: for a round structure, it is advisable to try to make the base of the same shape. You can use ready-made reinforced concrete circles.
- Next, the center of the well is determined. The circumference of the future structure is drawn according to the required size.
- The laying method is selected. The best option for underground structures is to lay bricks transversely. The main thing is that the horizontal seams of each row overlap the elements of the next one.
The transverse arrangement of the elements creates a strong and reliable structure
- Every four or five rows, reinforcement of the walls with reinforcement is required.
- For subsequent communications, it is necessary to provide the necessary openings in advance.
- To ensure safe descent into the well for its maintenance, metal brackets in the form of a ladder are embedded into the wall.
The part of the structure protruding above the ground is usually plastered. If necessary, the bottom and walls of the structure are additionally waterproofed.
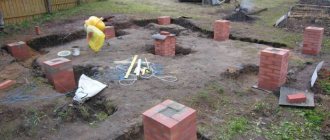
DIY brick pillars
Laying brick pillars with your own hands has certain features. For example, a brick needs to be impregnated with a special agent that will prevent the appearance of white spots (efflorescence). Required materials: brick, mortar, 4 metal rods with a diameter of 8-10 mm (15 cm longer than one side of the support), level, trowel, hammer and small stone (crushed stone can be used).
DIY brick laying steps:
- A layer of insulation needs to be laid on the foundation. Next, lay out the first row of 1.5 or 2 bricks.
- Then an offset of half a block is made. This is necessary to create a dressing.
- Pieces of rod are laid on the solution. This is necessary for the evenness of the seams. Once the block is level, the rods are pulled out.
- Excess solution is removed with a trowel. Every two or three rows, crushed stone is poured into the void of the post. It is recommended to use wire reinforcement.
- Each row must be laid carefully. If necessary, trim with a hammer and check with a level.
Well masonry with insulation
Each method of insulating a brick wall has its own advantages and disadvantages, since different types of materials can be used.
With expanded clay
The outer and inner layers are built in a standard way for well masonry. For expanded clay, the distance between the walls should be about 10-30 cm. Expanded clay is poured on every 5th row, while it is compacted and filled with cement mortar. A rigidity diaphragm made of solid brickwork is laid on top.
The disadvantage of using expanded clay may be its shrinkage inside the layers of walls. At the same time, it is impossible to fill the empty space with additional material.
With polystyrene concrete
External and internal brickwork when using polystyrene concrete serves as permanent formwork. Using a concrete pump, the solution is transferred through a hose into the wall and laid in accordance with the standards of the technological process. The concrete solution corresponds in density to grades from D-150 to D-300, in strength - M2.5 - M3.5. Fiberglass or metal reinforcing mesh with a diameter of 4 mm is recommended as flexible connections.
With foam concrete
All voids and cracks that have arisen will be filled by pouring liquid foam concrete, which will protect the structure from moisture and subsequent rotting. 120 mm is left between two layers of brickwork. In this case, the density of foam concrete should be 250 kg/m3. The material has a low price and can reduce construction costs. It is able to accumulate heat, has good vapor permeability and frost resistance. Foam concrete is fire-resistant and provides excellent sound insulation of the home.
With sawdust concrete
The material has sufficient strength and is not subject to combustion. To produce such a solution, wood processing waste is used. When filling the space between parallel rows of brickwork, concrete of a grade not lower than M10 is used. As in the case of polystyrene concrete, the solution is pumped into the space between the walls.
The disadvantages of using this insulation are the low bending strength of the material.