Rafter system - powerful roof frame for holding roofing and other elements.
The strength of the roof as a whole depends on how well the roof frame is constructed
Otherwise, its functionality, ability to protect the building from external influences and provide heat in the house may deteriorate.
Therefore, you need to correctly approach the choice of rafter systems and correctly draw up a plan for the rafters of a gable roof.
You can read how to calculate the rafter system here.
What is a gable roof?
From the name it becomes clear that the roof structure consists of two slopes having a rectangular shape in the plane. More often, the slopes have the same dimensions, but there are so-called asymmetrical designs in which the slopes differ in size from each other.
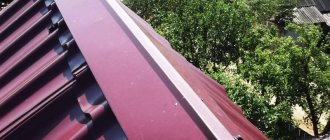
In this case, the slopes are installed to each other at a certain angle, which is called inclination. The line of contact is the ridge beam, which is part of the rafter system. Simply called the ridge, it is the highest point of the roof.
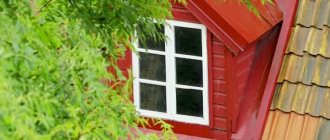
The side planes formed by the slopes are called pediments. They have a triangular shape. After constructing the roof, the sides are lined with sheet or panel materials: plywood, OSB, even boards, etc.
What is a gable roof rafter system?
The basis of the structures of the slopes are the rafter legs, also known as rafters. They are made either from lumber (timbers, boards) or from a steel profile (angle, channel). Wood is used in private house construction. It’s easier to work with, plus the lumber is cheaper.
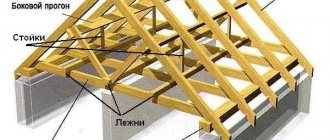
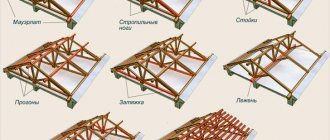
The construction of a gable roof rafter system is not only about rafters. In addition to these, there are several more required elements. The photo below shows all the elements of a gable roof. Let's label them.
Each roof element has its own purpose
Elements of a gable roof rafter system
Mauerlat
. Essentially, this is a beam on which the rafters rest. Its purpose is to evenly distribute the loads from the rafter legs onto the walls of the house. If the Mauerlat is not used, then the rafters will put pressure on the walls pointwise, that is, large stresses will arise at the installation sites, which will lead to cracking of the walls.
Rafters
installed at an angle.
Horse
, aka ridge beam or purlin. Its task is to form the joining point of the rafter legs. Ridge beam is an optional element of a gable roof. There are designs in which it is not installed. But more on that below.
Puffs
. They are not always used, but only on hanging rafters or if the rafter system is installed on a wide house.
Floor beams
, which form the ceiling in the room and the floor in the attic.
One of the floor beams, which is called a floor beam
. It additionally serves as a base for the support posts that support the rafters. Not always used.
Support posts
, they are also the headstocks that support the rafter legs. They are installed only if the span of the house is at least 6 m.
Struts
, they are also diagonal supports. They are used only if the support posts cannot ensure the overall reliability of the rafter system.
There is one more element that is clearly visible in the photo below. These are support posts for the ridge girder. They are installed if the structure of the rafter system is heavy. That is, the entire structure is assembled under heavy roofing material, for example, ceramic tiles.
Layered rafters with support posts under the ridge girder You might be interested in this!
A warm roof is an important detail when building an energy-efficient house. From the article at the following link you can learn how to properly insulate the roof of a house.
Installation of rafters and crossbars during roof construction
Question:
Hello! When building the house, we installed rafters on the roof without crossbars, simply nailed them at the top, and nailed the lower parts with one nail to the ceiling joists. Those. it turned out to be just a triangle. The rafters alternate 150 by 100 with 150 by 40. The width of the house is 6 meters. The height under the ridge is about 3 meters. The roof is asymmetrical. The axis of the ridge is offset by about 1-1.5 meters from the center of the house. What could this mean? How can you strengthen it? Is there no way to change it? Thank you !
Andrey, Moscow.
Answer:
Hi Andrew!
Those guys who built your roof must have been in a hurry, not so much to build as to get paid.
Because in the vast majority of similar structures, crossbars are still installed.
As far as I remember from the theoretical mechanics course, a triangle is a rigid structure and the additional crossbar in it should not bear the load. According to theory, the crossbar is a zero rod, that is, a waste of material.
But in practice this is not entirely true. Due to any inaccuracies in practical spatial geometry, the crossbar is loaded. If any of the theorists wants to verify this, then let them install tensor sensors on similar roof crossbars and they will show it.
Yes, and the crossbars may later be needed as a basis for the ceiling of the future attic, which you will most likely build in the place of your attic. Because not using this space under the roof would simply be a crime.
The crossbar is usually located at a height of about 2.3 - 2.5 meters above the level of the floorboard. The height of 3 meters at the ridge, which you write about, fully satisfies this principle. In any case, the tallest member of your family or guest, after the attic-attic is lined from the inside with clapboard or some other material, along the lower planes of the rafter pairs (legs) and crossbars, should not reach his head to the ceiling.
The crossbar is usually nailed on each side with a couple of nails. Moreover, they stitch through both the crossbar and the rafters, and the exposed tip of the nail is bent with a hammer. It will be stronger.
I hope that the rafter pairs at the top are not overlapped? Hasty people sometimes do this to simplify their lives. If this is still done this way, then the crossbar on one side is nailed onto one rafter with an overlap, and its other end is sawed down at the angle of inclination of the second rafter.
That is, ideally, all your crossbars will be about 1 meter long (the 40 millimeters you mentioned is sufficiently thick) and overlapped on one side of the rafter pair, without cutting down their corners or with minimal cutting. And the joint itself at the ridge of the rafters is still sawn at an angle.
However, during my construction practice, which began in 1993, several times I came across attics without crossbars. The roofs did not collapse. Especially if it was just outbuildings like a barn.
As for the bottom of your rafters, fastened with just one nail, this is clearly not enough.
Therefore, the fastening of the bottom must be strengthened. For which, most likely, you will have to use metal plates made of galvanized iron sheet with perforations. They are sold in a wide range at construction markets in pavilions with fasteners.
That is, the shape of the plate can be either a triangle or a rectangle with several dozen holes. Apply such a plate on both sides of the bottom of your rafters. Approximately half of their area should be adjacent to the rafters and to the base of the rafters (matitsa).
Nails are either driven into the holes or self-tapping screws are screwed in with a screwdriver, at your discretion. Do whatever is easier. It all depends on how accessible these places are. You didn’t write whether the sheathing boards were installed on the rafters.
According to normal construction technologies, metal strips are now additionally sewn onto the internal surfaces of rafters. Which are also sold in rolls in the same pavilions mentioned above.
That is, along each roof slope such a tape is sewn crosswise from the ridge to the bottom of the rafters. It turns out to be the spitting image of a “St. Andrew’s cross”, like on a naval flag or jack.
Personally, I prefer to do this. Although many shabashniks are critical of this, considering it a useless undertaking.
So you can use some of my recommendations. Everything will be stronger.
Good luck to you!
Construction in Moscow and Moscow region
We work with a guarantee! Wide range of construction services.
Foundation, walls, ceilings, roofing, turnkey! +7 (905) 797-20-34
luxurycomfort.ru
Other questions on the topic of roofs:
- Height of the ridge of the house - CALCULATION
- Estimate for a gable roof for a house 9 by 12 m
- Log house and frame under a common roof
- Do I need a transom under the ridge beam?
- The slate on the roof gets wet
- Mauerlat for the common roof of the garage and annex
- Common roofing for log and frame
- Budget roof for a bathhouse 4 by 4 meters
- How to fasten the waterproofing of a roof pie
- Calculation of metal beams for a garage roof
- Calculation of roof ridge height
- Base for a metal greenhouse
- Warming veranda with a roof made of corrugated sheets
- Insulate a slate roof from the inside with mineral wool
- Repair of garage roof made of asbestos-cement pipes
- Gable roof 12 by 12
- Beams for the roof on a log house lined with bricks
- Roof on a house with a mixed foundation
- Install a valley roof on a new frame
- The thickness of the reinforcement for the crossbar is 6.8 m
- Cost of replacing slate with metal roof tiles
- Calculation of rafter length
- How to connect the roofs of two adjacent balconies
- Half-hip (hip) on a chopped pediment
- Temporary roof for a log house made from banners
- Fastening the rafters of a pitched roof and a gable roof
- Insulation of the attic roof
- Didn't put film under the roof insulation
- Roof on a log house with outriggers
- The roof rafters squeeze out the top crown of the frame
- Extension of a veranda with a gable roof
- What roof shape to choose for a one-story house
- Roof across floor beams
- When to put a roof on a freshly assembled timber frame
- Armobelt for the roof of the house and extension
- Replacing the roof of an adobe house with room equipment
- Replacing slate roofing with corrugated or soft sheeting
- Common roof for a log house and a garage made of a twin block
- How to attach rafter legs to a sliding valley
- House with a mezzanine for children's rooms
- How to fix a chopped pediment
- Insulating the attic with sawdust
- Brick gables swayed, what to do
- Is it possible to put a roof on a log house for the next year?
- Roof for a house made of hand-cut logs
- The roof is pushing up the walls
- Thermal insulation of a slate roof of an old house
- Which roof to choose for an extension
- Gable roof for a house 10 by 10 m
- Repair of reinforced concrete soft roof slabs
- How to close the gap between the roof and the top log of a log house
- The roof of the veranda is leaking, which is also the floor of the open terrace
- Slab roof structure on stone gables
- When and from what to make a roof on a fresh log house
- Slate or metal tiles
- Replacing the ceiling and roof of an adobe house
- How to seal the joint between a chopped pediment and a roof
- Which roof to choose for a house 14 by 10 m
- Choosing a roof for an extension to a house
- Calculation of the connection between the roof of the house and the veranda with a step
- Roof of the yard supported by the house
- Is it possible to remove bows at home?
- Roof with inspection hatch for caisson
- Soft roofing or metal tiles, what to choose
- The junction of the porch roof and the log wall
- Removal of beams in a log house under a canopy and a common roof
- Roof insulation if the rafters are made of logs
- Completion of a timber house and erection of a roof
- Repairing the roof of an old village yard
- Rafters and log gable
- Roofing pie of an open veranda
- Attaching a protective fence to a slate roof
- Living in a house while the roof is being replaced
- Fastening rafters in a timber house
- Convert a shed roof to a gable roof
- Economical arrangement of gables
- Rafter system of a pitched roof
- Roof of an extension to a house with a mansard roof
- Corrugated sheet for the roof without gap and waterproofing
- Joining the roof of the extension and the walls of the house
- Metal profile on old roofing felt
- Place ondulin on old ondulin
- How to fix the roof of a balcony on the 5th floor
- Section of rafters for the roof
- What to put under a soft roof
- Roof over an old house on supports
- Covered with slate without roofing felt
- How to straighten a collapsed roof gable
- Rafter system for a house made of timber 9 by 12 m
- Fastening the lower ends of the rafters
- Connection between the roof of the attached veranda and the house
- The height of the roof of the house is 10 by 10 m
- New roof on an old brick house price
- Warps the roof when the frame shrinks
- Old and new house under one roof problems
- How to make slanted rafters in a log house
- Installation of a crooked roof
- Roof on attached veranda
- Do-it-yourself half-hip roof
- Construction of a carport
- Timber extension to a brick house under a common roof
- Garage roof sheathing 5 by 7 meters
- Rafter spacing for a gable roof
- Shed between veranda and barn
- Rafter system for a house made of 6 by 9 timber
- Sealing the ceiling in an underground passage
- Roof geometry
- Waterproofing the floor of an open balcony
- An alternative to tiles
- Replacing ondulin with metal tiles
- Roof insulation in a production area
- Option of a rafter system for a 10 by 10 house
- Roof trusses
- New roof on a panel house
- How to cover ondulin or ceramic plastic
- How to insulate a slate roof
- How to attach Volna corrugated sheeting to the roof sheathing
- Slate on sheathing without waterproofing
- Raise the roof and make an attic
- Converting the roof to a pitched roof
- Metal tiles on a non-shrunken log house
- Cover an adobe house with slate
- Drainage system and snow retainers for the log house
- How to lift slate onto a roof
- Temporary roof for an extension
- Does slate get wet?
- Workshop roof 8 x 6
- How to properly re-roof an extension
- Canopy project 8 by 14 meters
- Slate - front and back
- Supports for rafter legs
- Construction of an attic roof
- Profile for garage roof
- How to Level a Shed Roof
- Garage roof repair
- How to attach wave slate to a roof
- Roofing felt RPP 300 installation
- Calculation of the length of rafters for the roof
- Roof - galvanized or painted corrugated sheet
- About lumber for floors and roofs
- Extension of a log house when replacing the roof
- Log roof with frame veranda
- Analogues of roofing felt when covering a wooden roof
- Material for the construction of an attachment
- Rafter system for a large log house
- Is it possible to put rubemast on rubber?
- Barn and gazebo under one roof
- What kind of wood should be used for the roof?
- How to straighten a sagging roof
- Remodeling a gable roof
- Slope of a corrugated roof onto a garage
- Insulation of the junction of the roof and the wall
- Flat roof on a log house
- Roof shape for a garden house 6 by 4.5 m
- Uncovered roof in winter - risks
- Installing a roof on a log house
- How to increase roof box releases
- Partial roof repair at sub-zero temperatures
- Temporary roof for a house using Canadian technology
- Calculation of the roof for an extension made of aerated concrete
- Roof for garage - floor beams and rafters
- Roofing on a fresh frame and ridge height
- The rafters are installed crookedly
- How to Attach a Galvanized Wind Board
- Roof sheathing pitch for flexible tiles
- Place a terrace and a house under one roof
- Installation of an attic roof and windows in a log house
- Temporary roof for winter
- Repairing an old slate roof
- Common roof or separate for an extension to the house
- Balcony roof fastening from the inside
- Metal siding as a roofing material
- Arrangement of the roof on chopped gables
- Shed roof for garage made of slabs and rails
- Connection between roof and gutter
- Roof of Sudeikin
- Connecting the roof of the timber building and the house
- Extension to a sloping roof
- Rafter system for a log house
- Converting the roof from hip to gable
- How to make a roof and cornice for an extension
- How to sheathe the roof on the top floor balcony
- Permanent roof on a newly assembled log house
- How to make a 10 by 8 m canopy without internal supports
- Attic roof for a house 13 meters wide
- Common roof for a new log house and its extension
- We made a mistake when laying the film under the roof
- What is profile for roofing
- Is a counter-lattice needed for the roof of a summer cottage?
- Metal roof and its insulation
- One roof per house and new extension
- Installation of rafters in a log house
- The height of the attic roof of a 6 by 7 house
- Solarium on the country roof
- Raise the roof of the house to increase the height of the ceilings
- Blowing snow under the roof
- Condensation in roof insulation
- Installing a roof on a non-shrink log frame with gables
- How to attach a roof adjacent to the wall of a house
- Roof with four gables
- Joining the roof of the house and the extension
- Installation of the rafter system
- Moving the crossbars to increase the attic
- Inserting one roof into another
- Insulation of a roof laid without film from the inside
- Should I remove roofing felt when installing a permanent roof?
- How to temporarily close the gables after installing the roof
- Cover metal tiles on broken roof geometry
- Replacing roof insulation without removing metal tiles
- Roof on only installed log house
- How to build a roof on an extension and insulate it
- Replacing a slate roof sheet
- When is the best time to install a roof?
- Galvanized roof rattles on the balcony roof
- How to make a roof on an extension to a house
- Roof over the balcony
- Hip roof sheathing
- Roof on the top floor balcony
- How to attach rafters and crossbars in an attic roof
- How to eliminate rattling balcony roofs
- Height of a gable roof of a house
- Rest area on the roof of a foam block house
- Roof repair
- Roof insulation without removing the roof
- Insulating a slate roof
- When to put a roof on a log house
- Wind board installation
- Repair of an old slab roof in a workshop
- Roof for a bathhouse in oriental style
- About proper garage roof sealing
- Roof on the balcony
- Mansard roof
- Glassine and metal roof
- Fastening slate on the almost vertical side of the roof
- How to cover a roof with rubemast?
- How to properly cover a hip roof with slate?
- Rafter system for the roof of a house
- Roof over the top floor balcony
- How to build a wooden roof 30 m long and 24 m wide?
- Slate roofing
- Questions about arranging an attic roof
- Installation of rafters and crossbars during roof construction
Construction in Moscow and Moscow region
We work with a guarantee! Wide range of construction services.
Foundation, walls, ceilings, roofing, turnkey! +7 (905) 797-20-34
luxurycomfort.ru
Roof arrangement
Scheme of the roof of an Old Slavonic hut
All questions to Semenych about construction
Semenych (author of materials)
Our site is regularly updated with interesting and unique materials and articles on the topics of lumber, building materials and works, the author's opinion and knowledge of a real coven with more than 15 years of experience are provided. There is a section - funny stories of shabashniks. If you would like to receive information about this, subscribe to our website's newsletter. We guarantee that your address will not be shared with third parties.
Apartment renovation in Moscow and Moscow region
We work with a guarantee! Wide range of repair work.
Professional craftsmen. +7 (905) 797-20-34
luxurycomfort.ru
| Country house | Bath |
| For the dacha | Tool |
| Materials | Tales |
| Foundation | Log houses |
| Roofs | Insulation |
| Walls | Siding |
| Floors | Cellars |
| Attics | Doors windows |
| Stairs | Extensions |
| Wells | Toilets |
| Balconies | Loggias |
| Condensate | Flooding |
| Fences | Kennels |
| Sidewalk | Birdhouse |
| Adobe | Carts |
| Garages | Barn |
| Greenhouses | Bath |
| Swing | Brazier |
| Shower |
| Horizontal bar |
Types of rafters
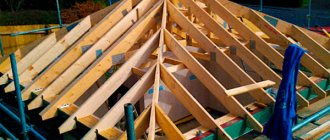
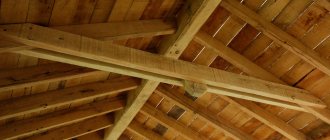
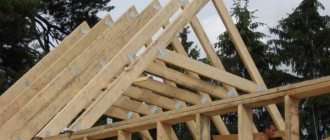
The roof rafter system (gable) can be assembled from layered or hanging rafters.
They got their name because their lower ends rest on the walls of the house, and their upper ends rest on the ridge girder. In this case, the rafter elements are subjected to loads that bend them. The design is reliable, durable, with high load-bearing capacity.
The photo above just shows a layered rafter system. It is clearly visible that the legs rest on the ridge at the top. In this case, there are two types of fastening of the rafters themselves in the upper part:
fastening is done to the ridge:
fastening is done to each other with emphasis on the ridge (photo above).
It is necessary to immediately indicate that this type of rafter system can be used if the distance between the walls of the house does not exceed 12 m. Because the rafters rest with their lower ends on the walls, and their upper ends only with each other (there is no ridge girder in the design). Hence the low load-bearing capacity with a large spread.
Hanging roof rafters have one purely design drawback - a large support load on the walls of the house. To reduce it, strings are installed between the legs to form a rigid triangle. Often the functions of tie bars are performed by load-bearing floor beams.
If it is necessary to strengthen the hanging rafters, racks and struts are installed under them.
Hanging rafters of a gable roof
Installation of a gable roof rafter system
Two types of rafter systems determine two types of assembly technology. Let's look at each one separately.
Installation of layered rafters
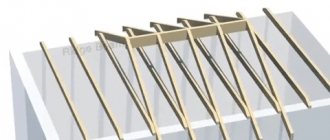
There is a certain sequence for assembling layered rafters.
Two outer support posts are installed under the ridge beam. They will not only support the timber, but will also be the elements that form the gables of the building. They are attached at the bottom to the Mauerlat. In this case, they are strictly aligned vertically, and the upper ends are in the same horizontal plane. To do this, stretch a strong thread between the posts and check it with a level to ensure it is horizontal. If there are deviations, then one of the supports (low) is raised using wooden supports.
Intermediate support posts are mounted along a horizontally stretched thread in increments of 2-2.5 m. To prevent the beams of the posts from moving, they are supported with temporary fasteners: supports or tie-downs.
A ridge beam is placed on the racks, which is also attached to them.
Gable roof rafters are installed in pairs
. Installation can begin from any side. The fastening is carried out immediately to the Mauerlat and to the ridge. The main thing is to maintain the distance between the legs, which is determined depending on the weight and load-bearing capacity of the roofing material. Usually this parameter is indicated in the house design.
If necessary, intermediate support posts and struts are installed.
Installing rafters on a ridge along a tensioned thread
Installation of hanging rafters
The technology for installing hanging rafters is different. To do this, the entire structure, assembled from two rafters and a tie, is assembled on the ground. That is, roof trusses are prepared in the required quantity, which are then lifted onto the roof. Sometimes craftsmen assemble roof trusses. They assembled one, installed it, and assembled the next one.
It should be noted that such farms have a significant mass. Lifting them manually is difficult and dangerous, so they use the services of a crane. And this increases the cost of construction.
Hanging roof trusses assembled on the ground
The most difficult thing is to display the farms. All of them are installed at the installation site with a planned step, where they are temporarily secured with jibs and supports. Then a thread is stretched between the outer trusses. It must be positioned so that, firstly, it is stretched strictly along the horizon, and secondly, along a structure that is higher than the rest.
All that remains is to raise the rafter structures that are below the tension level. And the last thing is the installation of the sheathing, which will secure all the trusses into one rafter system. Please note that in the lower part of the rafters will be fixed to the Mauerlat.
This might interest you!
When the installation of the rafter system is completed, the turn of roofing work comes. From the article at the following link you can find out how to cover the roof of a house.
Construction of layered systems
The design of a hanging rafter system implies that there are no internal capital load-bearing supports in the structure being covered. In this case, the rafters only have a support point at the point of attachment to the mauerlat, and with the other end of the leg they simply rest against each other without the use of a ridge beam. A hanging type truss is an isosceles triangle with a base equal to the width of the facade. It consists of the following elements:
- Mauerlat. This strong, even beam of healthy hardwood with a cross-section of 100x100 mm or 150x150 mm is laid on the upper surface of the last tier of load-bearing walls where the rafter legs will rest on them. This device distributes the weight of the rafters, transferring the load to the foundation.
- Rafter legs. These are supporting elements that form the plane of the roof slopes, which are made of straight boards measuring 50x150 mm or 100x150 mm. They are installed in pairs with increments of 60-120 cm, depending on the weight and size of the finishing coating.
- Puff. A tie is a horizontal frame element that tightens the lower ends of the rafters, compensating for the expansion load that affects the main roof components.
- Rigel. The crossbar is an upper tie that tightens the rafters in pairs at a short distance from the ridge. Since the expansion load in this area is greater, it is made from timber of a thicker section.
- Grandma. The headstock is the suspended element of a hanging rafter frame, which supports the central part of the tie under the ridge, preventing expansion of the load-bearing external walls.
- Strut. Struts are horizontal supports that support rafter legs in the upper or middle part, preventing sagging of long elements.
Types of hanging rafters
Note! Very often, a hanging rafter system does not include a Mauerlat, since its functions are successfully performed by a low-mounted tie. Experienced craftsmen believe that a frame design without this element loses nothing in strength or reliability.
Calculation of rafters
What parameters need to be calculated so that the roof of the house is assembled exactly according to the design:
length of rafter legs;
step of their installation;
cross-section of the lumber used.
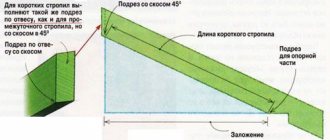
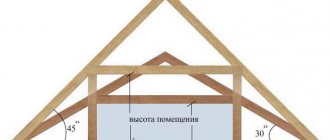
With length, everything is simple; for this you will have to use the Pythagorean theorem, which is based on the formula: c 2 =a 2 +b 2, where c is the hypotenuse of the triangle (this is the rafters), a and b are the legs. The latter are the height of the roof and half the width of the house. All parameters can be easily measured.
The length of the rafter is l 2 +H 2
The installation pitch is more difficult, because much will depend on the weight of the roofing material and the loads from natural precipitation. The greater both loads, the smaller the installation step. But, as practice shows, this parameter varies from 60 cm to 2 m. The latter indicator is used if corrugated sheeting with large corrugation parameters, for example, H75, is used as a roofing material.
As for the cross-section of the rafter legs, here, as in the case of the installation step, the loads are taken into account, as well as the length of the legs and the step of their installation. Here the relationship is as follows: the greater the load, pitch and length, the larger the cross-section.
And one moment. Rafters for a gable roof are laid at a certain angle (indicated by the letter “a” in the photo). The slope is selected based on the choice of roofing material. That is, some coatings cannot be laid on roofs if the angle of inclination is less than the required one. Here are some ratios:
the minimum angle of inclination of the rafter system for slate is 22°;
for corrugated sheets – 12°;
for metal tiles – 14°;
soft tiles – 15°.
The ratio of the roof slope to the type of roofing material On our website you can find contacts of construction companies that offer turnkey roof design and repair services. You can communicate directly with representatives by visiting the “Low-Rise Country” exhibition of houses.
What elements does a gable roof truss system consist of and what types are there?
The rafter system is a powerful roof frame for holding the roofing covering and other elements.
The strength of the roof as a whole depends on how well the roof frame is constructed
Otherwise, its functionality, ability to protect the building from external influences and provide heat in the house may deteriorate.
Therefore, you need to correctly approach the choice of rafter systems and correctly draw up a plan for the rafters of a gable roof.
You can read how to calculate the rafter system here.
Types of rafter systems for a gable roof
Depending on the purpose of the room, the size of the gable roof, the structure of the rafter system of the gable roof is classified as follows: hanging system and layered.
Hanging system
The hanging rafter system of a gable roof is supported only by the load-bearing external walls of the building.
Depending on the width of the span and the design of the roof, the installation of hanging systems has features.
For small houses
It is advisable to erect a hanging structure for buildings where the distance from one wall to the opposite does not exceed 6 meters. The frame has the shape of a triangle.
To strengthen the load-bearing capacity of the faces of the frame triangle, several methods are used:
- The bases of the rafter legs at the top are secured with overlays;
- Use bars of a larger cross-section on the side parts;
- The bars are secured by cutting them into the ridge element;
- The slopes for the canopy equipment are increased by cutting out an opening for the frame beams in the extended boards so that they converge behind a line running from the edge of the inner wall to the slope of the rafters.
Using these methods, it is possible to distribute the load throughout the entire structure.
Strengthening the frame triangle
For mansard roofs
When arranging the frame for the attic, you should pay attention to some points:
- Mandatory installation of a mauerlat on which the frame beam is installed by cutting;
- Installation of the crossbar - the base for the ceiling canopy of the floor. The most effective fastening option is to cut the crossbar into the rafter half-square;
- The length of the bevel board should be longer than the wall line;
- The cross-section of the frame bars should be maximum;
- The tie should be secured with a pendant. If the string is long, it needs to be strengthened in the center with nailed boards at the top and bottom.
In addition, the rafter system of a gable roof with an attic is equipped with insulation, which increases the load.
Rafter frame for mansard roofs
For large houses
When spanning more than 6.5 meters, installing a hanging system requires installing more fastening elements to prevent sagging of the tie, which is caused by its own weight.
Points to consider:
- It is advisable to make the tie from two beams by cutting and secure it with metal plates;
- A headstock should be installed in the central part of the frame;
- To reliably distribute weight to the headstock and rafter boards, it is better to attach struts, as well as other retaining elements.
When installing a suspended system, sometimes you can do without installing a Mauerlat and limit yourself to installing boards on a waterproofing film. In addition, the hanging system is characterized by the absence of complex components, which facilitates the work on arranging the roof frame.
Layered system
The difference between a layered structure and a hanging one is that the structure has additional support points inside the room. A prerequisite for installing a layered system is the installation of a Mauerlat.
The system design provides for the installation of both spacer and non-spacer frames.
Spaceless frame
A non-thrust frame should be installed in houses with log walls. When installing rafters, their bases must be attached to the Mauerlat.
Options for attaching the system base to the Mauerlat:
- By beveling the sole of the rafter leg so that its area with the mauerlat is the same, and the cut does not exceed 0.25 cm of the height of the beam. In this case, the rafters, without connecting to each other, are attached to the ridge element on both sides;
- By connecting the rafter beams at the ridge with one nail - at the top, and hinged with a flexible metal plate to the mauerlat - at the bottom.
When attaching rafter legs without connecting them at the ridge part, special attention should be paid to the accuracy of the calculations.
Even with minor discrepancies in the design , expansion pressure will act on the walls of the building, which can lead to the destruction of the walls.
With contractions
To strengthen the structure and give it stability, contractions are mounted to the racks of the structure. You should use timber of the same cross-section as for the rafters. To increase strength, the screeds are nailed on both sides of the beam.
The same fastening option is effective in firmly fixing the ridge element, which prevents the roof from moving in the horizontal direction.
Frame with contractions
With struts
The struts enhance the load-bearing capacity of the wooden frame and ensure the strength of the rafter board.
An important requirement when installing a strut is a correctly measured cut angle, which makes it possible for the strut to fit tightly to the elements being connected.
It is advisable to erect a frame with struts in places where there is a possibility of the foundation settling, or in wooden buildings where slight shrinkage of the walls is acceptable.
Frame with struts
With two indoor supports
When there are two supports in the form of internal walls, then when arranging the rafter legs, beams are placed under them. If the beams are not installed, then a post resting on the internal support is nailed to the base of the rafters.
Rafter beams are installed on load-bearing supports. On the supports inside the room, beds are installed, onto which the load from the rafter beams from the racks falls. The rafters are cut so that they fit snugly against each other and secured.
With this design, the ridge girder is not installed.
To ensure that the structure is non-thrust, tie downs are attached.
The stability of the structure is ensured with the help of racks that are installed horizontally from the inner base to the rafter leg, and joints - wooden beams that connect the bases of the racks diagonally.
If the structure is spacer, then a beam is attached above the purlin, connecting the frame legs - a crossbar.
Types of rafter systems
Construction of a gable roof step by step
Installation of the Mauerlat of a gable roof
The Mauerlat takes on the entire load from the roof and transfers it to the walls, so a fairly thick and strong beam is chosen as the Mauerlat.
The thickness is chosen based on the thickness of the wall on which it rests. As a rule, they tend to choose the thickness of the mauerlat beam equal to or close to the thickness of the wall. The Mauerlat must be laid flush with the outer part of the wall, firmly connecting them together. To connect the Mauerlat to the wall, anchor bolts or wire are laid (poured into the reinforced belt) even at the stage of wall construction. If wire is used as fastening, then after laying the timber it is tightly tied with this wire around and remains firmly fixed in this form. If anchor bolts were walled into the wall, through holes are pre-drilled in the mauerlat, with which the beam is placed on the bolts and tightened from above with nuts and wide washers.
It is also important not to forget to lay a layer of waterproofing material in the form of a gasket between the wall and the Mauerlat. As a rule, roofing felt or similar materials are used as waterproofing.
More information about securing the mauerat is described in this video.
Installation of gable roof rafters
After the base has been prepared, we begin to assemble the rafter system of the gable roof. Installation of rafters can be done in several ways: install the rafters directly on the roof or perform some structural elements on the ground and then lift them to the installation site using special equipment. Correctly placing the rafters on a gable roof with your own hands without the help of a partner is quite problematic, so it is better to get help so as not to make a mistake and not nullify all your efforts.
To make it easier to attach the beams, it is worth marking the attachment points on each wall and connecting the opposite walls with beams (beams), on which racks will be installed to support the rafters. A ridge beam is installed on the racks, which serves as a guide for installing the rafter system. In order to connect the rafters as accurately as possible so that the entire skeleton of the rafters is the same, templates are used. This way you can avoid dips and distortions in the roof.
After installing the ridge beam, proceed to the most important part - the installation of rafters (already fastened together or separately)
It is important to constantly monitor the level and evenness of the installation. The rafters are fastened together, usually with nails or using iron staples.
Common schemes for placing rafters on a gable roof and attaching them to each other are shown in the figure below.
After completing the roof frame, it is necessary to install auxiliary fasteners to improve the rigidity of the roof. To do this, install struts and middle skates.
We invite you to watch a video that clearly shows how to install rafters with your own hands for a gable roof.
Gable roof sheathing
Sheathing a gable roof in the simplest case involves installing transverse boards on the rafters for laying roofing material on it. But, as a rule, modern roofing is a more complex pie of various layers.
After installing the sheathing, the roof is covered with a layer of waterproofing, the layers of which are mounted overlapping each other, and the joints are fastened with tape.
The next step is to secure the counter-lattice - strips fixed at an angle of 90 degrees to the main sheathing. This is necessary to provide a ventilated gap in the roof pie to get rid of moisture.
At the final stage of installation of a gable roof, the roofing covering is laid, the choice of which, as mentioned at the beginning of the article, depends on several factors, including the financial component
External work on installing the roof ends with filing the eaves and arranging the gables, if they are not part of the walls. After this, they move on to interior finishing work and roof insulation, if necessary. We will talk in detail about roof insulation in the following articles.
It is worth noting that building a gable roof with your own hands is not so difficult, the main thing is to make the calculations correctly and follow the instructions step by step so as not to miss important points during installation.
A brief video instruction on installing a gable roof is presented in the video:
Installation of rafters for an attic roof
Before installing the rafter system under the attic, it is necessary to correctly calculate the roof load and take into account other factors that may affect its functionality. All wooden elements must be treated with antiseptics.
Installation of the rafter system is carried out in stages:
- Install the Mauerlat on the waterproofing layer. The board is fastened to the walls with staples or nails and tied with metal wire to hooks prepared in advance in the wall;
- Frame elements are cut out;
- The main rectangle is made from tie rods and racks;
- Two middle purlins are mounted, to which the lower rafters are attached;
- The structure can be raised to the roof, where the upper rafters can be installed, connecting them at the upper base, securing the ridge beam and the side purlin;
- The structure is reinforced with the necessary elements: tightening, racks, struts, additional stops.
After installing the frame, a vapor barrier film is laid on it, the sheathing, elements of the roofing pie and covering material are installed.
Mansard roof installation
Mauerlat fasteners
The frame structure of rafters is fixed to the floor beams. However, in this case, the load on the rafter structure is distributed at the points where the beams are attached. This approach to installing roofing structures is possible for small and light buildings. Mauerlat is needed to evenly distribute the roof load in the upper part of the walls. The Mauerlat is mounted parallel to the ridge of the future roof. This is how the main frame is formed. The manufacture of the Mauerlat requires a wooden beam with a section of 150x150, 100x100 or 100x150 mm.
There are different ways to attach the Mauerlat to the wall
- For installation, special metal studs are used, which are embedded in a metal beam (it is cast along the entire length of the wall). The fastening step in this case is up to 120 cm. Fastening is done in a checkerboard pattern. In this case, the M12 stud thread is selected. The element can protrude up to 30 mm above the concrete. The height of the Mauerlat beam can be exceeded taking into account the waterproofing layer of roofing felt. Holes must be drilled in the wooden beam through which the material is attached (attracted) to the beam (with nuts and washers).
- If you plan to install a gable roof with an area of less than 250 square meters. m, then the studs with which the Mauerlat is attached to the wall are laid into the walls themselves during construction. To ensure greater strength and reliability, the future wooden frame is secured with studs walled to a sufficient depth (more than in a concrete beam).
- The rolled wire, which is mounted into the brickwork, allows for the installation of the Mauerlat. This method is good because when installing the roof, a small area is taken into account.
An important part of the roof structure - the pediment - is a continuation of the wall with roof slopes. Pediments in the form of a triangle are erected on a gable roof. Installation of the rafter system in this case involves the installation of outer trusses, which will serve as their frame. For proper construction of the frame, the verticality of structures with the same height must be checked. The gables are attached to the ridge (purlin) at the top, then the remaining elements of the rafter structure are installed.
The installation of the rafter system is carried out on the sheathing with a step designed for the installation of a specific roofing material (dimensions, degree of rigidity, installation method are taken into account). For flexible materials (bitumen shingles, PVC film, rolled bitumen roofing material), an even flooring is made in a continuous layer. Insulation of the roof is an obligatory stage when constructing a structure, since care must be taken to minimize possible heat loss. This can be sheet material, which is laid on the frame with a certain step based on calculations.
Installation of rafters for the attic
The attic of a gable roof has the simplest hanging system.
For the attic floor, it is advisable to make ready-made trusses on the ground, and then lift them to the roof, after installing the Mauerlat.
Trusses consist of rafter legs, firmly secured with a tie at the lower base. You can additionally use struts or headstocks.
Securing the tie rods to the rafters is of great importance. It is recommended to install the tie rods so that their beams are located half a meter behind the wall line, then there will be no need to additionally install an overhang.
You can read how to make rafters yourself here.
The trusses are secured using upper and lower purlins.
Rafter system for the attic
Gable roof rafter system: elements
When arranging the frame of a gable roof, the following elements are used:
- Mauerlat. An element that is attached to a load-bearing wall. The entire structure of the rafter frame is mounted to it;
- Run. Beam connecting the rafter legs on the sides and in the ridge element;
- Puff. A beam attached to the rafter legs, preventing them from diverging;
- Grandma. A beam located vertically and secured at the ridge and tie;
- Strut. A plank connecting the beam and the rafter at an angle;
- Rack. Vertically rests on the bed and rafters;
- Skate . Beam connecting the upper bases of the rafters;
- Filly. Extensible part of the rafter for overhang;
- Overhang. An additional structure serves to protect the outer wall from rain;
- Lathing. A lattice installed on the rafter frame to attach the covering layer.
The combination of several elements (rafters, racks, braces) in one plane is called a truss.
Rafter system of a gable roof, drawings and photos below:
Drawing of rafter system elements
Knots of the rafter system of a gable roof
Reliable fastening of structural components ensures the strength and durability of the structure and helps to increase its service life.
The strength of the base of a gable roof depends not only on proper fastening.
It also consists of the correct calculation of all frame elements, from a verified determination of the type of structure at the project stage.
Rafters for a gable roof are connected to different structural elements.
Main structural components:
- With a beam: fastened with either a tenoned tooth or a tooth with a stop. Additionally, corners are used. They are mounted to the beam by cutting out a stop for the tenon in the beam with a socket. A single tooth is attached with a tenon and a stop. If a notch is made, then the distance from the edge of the block should be 0.2 - 0.4 m;
- With a Mauerlat: with a rigid fastening, angles are used or a cut is made, which is secured with nails or staples; with a hinged fastening, a moving metal fastener is used; when a cut, a nail or staple is used;
- With a ridge: cutting the edge at an angle, fasten it end-to-end with nails, securing it with a bracket or overhead board. Overlapping boards are fastened with a bolt or studs.
Depending on the span, the elements are attached:
- Grandma. Top - with staples and a clamp, bottom - with a clamp;
- With a brace. The top is attached to the rafter, the bottom to the headstock;
- Stands. They are secured with wooden or metal plates or studs.
The diagram of the gable roof rafter system is presented below:
Diagram of rafter system components
Types of fastenings
The roof, the frame of which is made of wood, undergoes thermal expansion and also slightly changes its size depending on humidity. To prevent these slightest changes from leading to deformation, a special system for fastening structural units is used. Hanging rafters have 2 types of fastenings:
- Movable. Movable fastenings are called special devices - sliders, made of metal. With the help of them, rafter legs are attached to the Mauerlat, as a result of which they can move slightly when the size of the elements changes and humidity fluctuations. Such devices prevent deformation of the roof frame, allowing it to “breathe.”
- Tough. Rigid fastening of the rafter frame elements is carried out using nails, self-tapping screws or metal plates. This method provides reliable fixation, but does not compensate for thermal expansion and changes in wood size due to humidity fluctuations.
Experienced craftsmen say that it is prohibited to cut holes in the mauerlat for attaching rafter legs, as this violates the integrity of the beam and reduces its strength. With movable fixation, the legs are attached with sliders, and with rigid fixation, notches are cut out in the rafters for the Mauerlat, and then nailed in place.
Elements of hanging rafters and factors influencing their choice
Residential buildings mainly have internal supporting load-bearing walls in their construction, so the use of hanging rafters in them is directly related to the future arrangement of the attic. A hanging rafter system, compared to a layered one, is more complex. The manufacturing operation of not only the rafters themselves is complex, but also their installation on the wall. When using layered rafters, the structural components are assembled manually from lightweight elements. In the case of hanging rafters, the assembled, bulky structure is conveyed to the roof by a crane, or disassembled at the bottom, manually conveyed to the top and reassembled.
The simplest rafter truss is a triangle consisting of two rafter legs resting against each other and tightening. The resulting structure is a thrust structure, but the thrust is not transferred to the outer walls of the structure due to its neutralization by tightening. Thus, in a hanging rafter system, only vertical forces are transmitted to the walls of the structure, there are no horizontal ones, which makes the design of the support units for the walls quite simple.
The tie is constructed either from wooden beams or from metal strips, and the location depends on the type of roofing structure. For example, when constructing a mansard-type roof, tie rods are installed at the base of the truss structure and act as floor beams. The Mauerlat in such a system is not a necessary part of the structure. It can be replaced with a board, which is placed on a waterproofing base and serves to level the trusses relative to the horizon, as well as to prevent the wood from collapsing in the area of the truss support unit.
Before designing a hanging rafter system, the following important factors must be taken into account:
- climatic region, this includes taking into account snow and wind loads, as well as the total amount of precipitation;
- type of roofing system (single-pitched, double-pitched, hipped, hip, etc.);
- roof slope angle;
- type of roofing (slate, metal tiles, corrugated sheets, etc.).
Knowing the above load factors, the cross-section of the rafter legs and the span width of the hanging rafters are calculated. The design of hanging rafters largely depends on the design used and is characterized by the presence of additional elements such as: struts, crossbars and headstocks.
The design of hanging rafters largely depends on the length of the span in the structure and the presence or absence of an attic space in the attic.
Stages of construction of the rafter system
can be divided into several stages. If we assume that the frame of the house is already ready, then at the first stage you need to make a foundation on which the rafter system will rest. Such a support can be a beam. Its cross-section is, as a rule, 10x10 cm. The beams are laid on waterproofing. Roofing felt can act as a waterproofing material.
The second step is to make the racks. They are installed on a beam or on the upper crown. A beam with a cross-section of 10x10 cm is used as racks. When installing racks, it should be remembered that the maximum distance between them should not be more than 2 m. The optimal distance can be considered to be 90 cm. The construction of such a rafter system entails high costs, but is more reliable.
The racks should be made strictly vertical. A plumb line or level will help with this. In the future, these elements will become the frame of the walls of the attic room. In addition, the racks must be in the same plane so that the wall is not only vertical, but also level along its entire length.
The posts should be secured to the beam with metal brackets or using a tenon joint. To ensure that the racks remain vertical throughout the process, they are reinforced from below with slopes, which have floor beams as their base.
The third step is the manufacture of the cross beam. A 10x10 cm beam is used. It is attached to two opposite and opposing risers at the highest points. You can attach it in any convenient way. At the end of this work, a structure is obtained that is called a rafter frame. Actually, this frame will determine the dimensions of the attic, that is, its width, length and height.
The next step is to make the Mauerlat. This roof element is a beam, which is . The Mauerlat can be made from boards with a thickness of 40 mm. You can use a similar size beam.
The Mauerlat is installed to the sub-rafter frame along the entire length of each slope. It not only serves as a support for the rafters, but also serves to give greater rigidity to all sub-rafter frames, fastening them together, as well as to transfer the load that the rafter system exerts on the walls.
To protect the Mauerlat from getting wet, a waterproofing layer is placed under it. Since the Mauerlat imparts rigidity to the entire rafter system, for greater stability it is also secured with annealed copper wire. A thickness of 3-4 mm for the wire will be enough.
When the base for the rafters is ready, you can begin its installation. To do everything correctly, you need to apply markings. Markings are applied to the mauerlats on both sides, which show the installation step of the rafter legs. As already mentioned, the optimal step will be a distance from 90 to 120 cm. First of all, you need to do the outer pair. It is installed so that the upper point of contact of the two rafters is projected exactly in the middle between the two corresponding risers. In this case, this point should not extend beyond the pediment line.
You can use 10*15 beams as the material for the rafters, but they need to be installed on the edge. You can also use a board 50 mm thick and 15 cm wide, but it should be straight and free of knots.
After installing the outer pair of rafter legs, proceed to install the second outer pair. Next, twine is stretched between them, which will mark the plane of the slope, thereby simplifying the installation of the remaining pairs of rafter legs.
After the entire rafter system has been installed with your own hands, all pairs should be connected to each other at the top point, that is, near the ridge itself. This can be done by nailing boards to them.
It should be noted that when the length of the rafters is more than 8 m, a ridge beam is installed on top, which will serve as a support for the rafter pairs.
Varieties of hanging rafter designs
The following typical designs of hanging rafters are distinguished:
- Three-hinged triangular arch
Hanging rafters with a tightening are made in the shape of a closed triangle. In such a system, the rafters work in bending, and the tightening works in tension. The minimum lifting height of a ridge girder is at least 1/6 of the length of the arched span. This design is used for attic attics, where the tie plays the role of the attic floor. In order to reduce the bending moment, the ends of the rafter legs rest with eccentricity (small displacement, distance) relative to their longitudinal axes.
Triangular three-hinged arch with headstock or pendant
With a span length of more than 6 meters, the use of solid timber becomes problematic, and a significant deflection from the own weight of the tightening also occurs. In this case, it is suspended from the ridge, and the pendant is made of wood and is called a headstock, or iron and is called a cord. The required tightening length is achieved by joining smaller elements that are attached to the suspension clamp using an oblique or straight frame and bolts.
The most common mistake when installing a suspension is to install it according to the rack pattern with emphasis on the tightening and the cornice assembly. The principle of operation of the suspension is based on tension, and the strut on compression. Therefore, the bottom of the suspension (headstock) should not reach the tightening. The pendant (headstock) should hang on the cornice corner and be attached to the tie using wooden plates, nails and bolts. Triangular three-hinged arch with raised drawstring
Raised hanging rafters are often used when using an attic space as a loft. In this scheme, the tie is not attached at the bottom of the rafter legs, but moves upward, and the greater the height of the rise of the tie, the greater the tensile stress it experiences. In the attic room, such a tie plays the role of a ceiling beam and does not carry a payload. This tie can be protected from sagging by installing a hanger.
Triangular three-hinged arch with transom
In this scheme, the lower support unit changes from a slider to a pivotally fixed support. The rafter leg is made with a cut into the mauerlat, which makes the entire arch a stable structure. In such a system, a raised tie changes the direction of its work from tension to compression and is called a crossbar.
Triangular three-hinged arch with suspension and struts
As the length of the rafters increases, their deflection also increases. To prevent deflection, the rafters are supported by struts. Since, unlike the layered system, there is simply nowhere to rest the bottom of the struts, they are rested against the headstock. The result is a fairly strong structure with a circular transfer of loads: the rafters press on the struts, the struts stretch the suspension, the suspension pulls down the top of the rafters and the ridge girder, the struts are compressed by the rafters.
The cornice assembly (the place where the rafters are connected to the tie) has several implementation options: an orthogonal frontal notch (with a single or double tooth), plate and plank fastening.
Rules for installing a hanging rafter system
The procedure for installing hanging rafters, conditionally, is divided into the following step-by-step operations:
- Notches are cut on the right and left rafters for stable and reliable fastening to the Mauerlat
- The right and left rafters are marked with conventional marks depending on their future location
- In the upper part, the rafters are connected using the previously chosen method (overlapping, butt) or to the ridge girder using: a metal plate, board, plywood
- After installing the first two rafter legs and checking the accuracy of their installation, templates are made for the right and left rafters
- The second pair of rafter legs is prepared on the ground using previously made templates
- A second pair is installed on the other edge of the structure
- A string is stretched between the resulting gable pairs to control the level of the remaining rafters
- The remaining rafter pairs are installed at a distance specified by the project
- The height of the rafter legs is regulated by previously stretched twine and if it is not enough, then it is possible to use wooden pads
- The distance between the rafters from below is adjusted according to the markings on the Mauerlat, and at the top, according to the markings on the temporary board
If the distance between the outer walls is sufficiently large, the hanging rafters are installed using tightening to make the structure stable. The distance between the puffs must be equal to the distance between the rafters and must be constantly monitored. To prevent deformation of the tie under its own weight, it should be secured to the ridge of the rafter pair. This procedure must be carried out with each rafter pair.
Compliance with the order of installation of hanging rafters and the correct choice of design scheme will provide the roof with the necessary durability, strength and stability.
Basic roof elements
The rafter system of the gable final part of the building consists of many elements. Installation should begin with a detailed study of each of them and the selection of their sections.
Mauerlat
When installing elements under metal tiles or other coverings, it means using timber with a cross-section of 150x150 or 200x200 mm. It is this size that allows for the most optimal distribution of the load. Next, you will need to choose a fastening method; it depends on the material of the walls. There are several options:
Scheme for attaching the Mauerlat to the wall
- Frame, timber or log walls do not require the installation of a Mauerlat. In the case of a frame building, the support for the rafter legs is the upper frame of the walls. When building fences from timber or logs, the upper crown becomes the Mauerlat. It is important to properly secure these elements in the wall structure.
- When using lightweight concrete for construction, additional reinforcement will be required. Lightweight concrete includes materials such as foam concrete, slag concrete, and expanded clay concrete. They can collapse if the roof is not placed centrally on them. To distribute the load evenly, a monolithic reinforced concrete belt is poured along the edge of the walls. During work, special wire, pins or bolts are placed in it, onto which the Mauerlat will be attached.
- For brick structures, a reinforced concrete belt may not be provided. In this case, to connect to the strapping beam, a wire is inserted into the masonry, which is then wrapped around the mauerlat and twisted. The second option is to place wooden blocks impregnated with an antiseptic into the masonry from the outside one row before the walls are cut. Such plugs and Mauerlat are fastened with staples. It is also possible to use studs and bolts, the fastening of which will require pouring a monolithic belt.
An important point is waterproofing.
When installing, it is important to provide roofing felt, linochrome or waterproofing at the junction of concrete or brick with wood. This is required to prevent wood from rotting upon contact with material of a different moisture content.
Rafters
After securing the Mauerlat, the rafter legs are installed. Their cross-section is selected depending on the pitch of the load-bearing beams, their span, snow load and type of coating. When installing a frame under metal tiles at a pitch of 60 cm, it is recommended to follow the following recommendations depending on the span:
- 3 m – 4x15 cm;
- 4 m – 5=15 cm;
- 5 m – 5x17.5 cm;
- 6 m – 5x20 cm.
Table of average values of rafter legs
These are average values; to perform a more accurate calculation, it is better to contact a specialist or study additional literature.
There are two ways to attach the rafter legs to the mauerlat:
- with a notch;
- without her.
Attaching rafter legs to the mauerlat with and without a notch.
In the first case, a notch is made on a strapping beam; in the second, a special board is nailed to the rafters, which becomes a thrust block. Further, for both methods, the work is performed in the same way. Using metal corners, the inclined beam is fixed so that it does not move relative to the design position along the mauerlat. Additionally, nails are driven in at an angle.
Scheme of fastening rafters using wire and staples
In addition, you will need to fasten the rafter to the wall. The implementation of this activity is provided for in regulatory documents. You can do this in two ways:
- on brackets (suitable for wooden buildings);
- using twisted wire (a more labor-intensive option, but the only one possible for stone houses).
You can perform fastening according to the norms through one leg. This is necessary to more securely attach the roof to the frame of the house.
If the work is done correctly, you won’t have to worry about its condition even in the strongest winds.