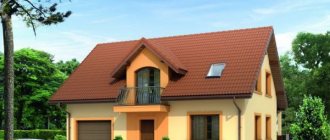
Mansard roof: options
The main types of mansard roof structures for a private house:
- Single-pitch . A pitched roof is an inclined plane fixed to a load-bearing wall.
- Gable . Gable - two planes that are supported by load-bearing walls and each other.
- Four-slope (half-hip gable, half-hip gable) . Hip and half-hip roofs are hipped roofs with additional planes in the form of triangles and trapezoids.
- Attic classic . A flat mansard roof is also a possible option, but in this case you will have to pay a lot of attention to draining rainwater, strengthening the structure due to possible snow load, etc. Experts do not recommend installing such a roof in residential buildings.
- Multi-pincer . Multi-tongs are the most complex structures, having many inclined planes intersecting each other.
DIY mansard roof
Design selection
The choice of the type of construction depends on several factors: whether the attic space is planned to be residential or non-residential, the climatic features of the area where the house is built, the expected natural lighting of the attic, the supply of communications, the shape of the house box.
If homeowners are satisfied with a simple form, then a gable mansard roof is suitable, the design of which is quite simple and durable. Disadvantage of the design: due to the shape, there is little usable space.
To create a full-fledged room for living, the classic form is best suited: gable (as an option half-hip) with additional slopes. Such a roof will provide maximum space for interior decoration, furniture, installation of windows, supply of communications, etc.
With the right approach, the attic floor can be converted into a cozy living room
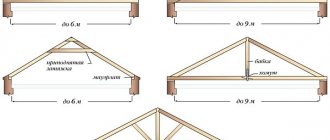
Types of attics
Types of gable roofs: options for the purpose of the structure
The shape of the attic space depends on the type of roof. The attic can cover the entire building or only part of it. Rooms with it can be symmetrical or asymmetrical. The shape is often triangular or broken. True, not every roof is designed for the construction of an attic.
Attic roofing comes in the following types:
- 1-slope;
- 2-slope;
- broken line;
- hip;
- tent (pyramidal, round, conical).
Let's consider in detail:
- A pitched roof is erected very rarely. Due to the high difference between the heights of the walls, such an attic will become asymmetrical and it will be difficult to install windows.
- A gable roof often involves arranging the attic symmetrically. It will have sloping internal walls. When constructing this roof, elongated boards are used, which is not cheap. True, the performance indicators of this roof are quite high. A serious advantage is that with such a roof it is possible to install full-fledged windows and doors, along which there is an exit to the balcony.
- Broken roof. The attic will have vertical walls. The structure itself reaches a width of more than 5 m. The material consumed for this type of roof is much less than for a gable roof.
- A hip roof makes it possible to create a comfortable and small attic. It includes 2 slopes, shaped like a trapezoid and a triangle. The windows are on the ceiling slopes.
- Hip roofing is also used for the construction of an attic. Windows must have a special shape and are made according to individual projects.
All of the above types of structures have their own advantages and disadvantages. Symmetrical structures have a more straightforward design; the project does not involve complex calculations, compared to the installation of asymmetrical coatings.
Where to start building a roof
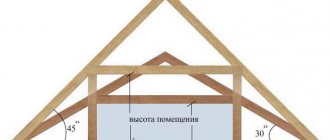
Any construction begins with a project. Especially if you are planning a do-it-yourself attic roof, the drawings should be prepared in advance. Let's consider the most acceptable option - the classic form.
There are several clear requirements:
- The height of the attic room must be at least 2.2 meters.
- The height of the wall before the break (additional slope) is more than 1-1.2 meters.
- Possibility of installing windows either on slopes or on end walls.
- Installation of high-quality insulation and waterproofing of the roof.
- Installation of the rafter system taking into account wind and snow loads on the future structure.
- Calculation of the heating system.
After drawing up the project, you can begin building the frame - the rafter system. This is actually the “skeleton” of the future structure, and the quality and duration of operation of the premises depends on it.
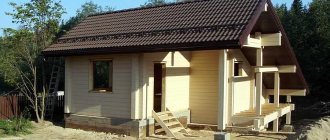
Attic floor without insulation
What is an attic
An attic is a living space resembling an attic, which is formed on the upper floors of houses with an attic roof. Anyone with special skills in the construction process can build an attic on their own.
The attic floor is understood as a floor in the attic, the façade of which is formed entirely or partially by the surfaces of a sloping or sloping roof. In fact, it is a full-fledged living space inside the building.
To reduce the load on an already erected structure, lightweight materials and structures are used during construction of the attic floor. Wood is indispensable in these matters. The attic is often built independently from wood; beams, logs or frame-panel technology are used for this purpose.
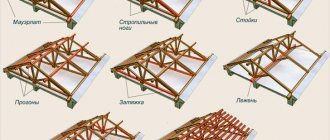
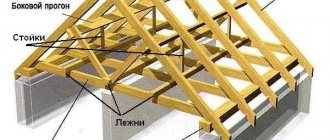
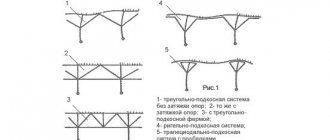
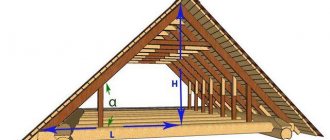
Mansard roof rafter system: instructions
If the height of the attic allows, you can make a flat ceiling instead of a broken one. However, as a rule, this option is the most optimal. You can install window units in such a way that the natural light in the room will be maximum.
The design of the rafter system consists of the required elements:
- Rafters.
- Mauerlat (bearing beams).
- Racks.
- Lathing.
- Metal fasteners.
- Ridge beam.
- External covering.
- Insulation and steam/waterproofing.
The rafter system looks approximately as follows as in the photo:
Mansard roof rafter system
Mauerlat is the base of the rafter system. In fact, it is a beam fixed along the perimeter to the load-bearing walls of the building. If the house is built of logs, then the Mauerlat is considered the last crown.
Advice! To ensure that the attic roof is secured as firmly as possible to the frame of the house, the Mauerlat is additionally reinforced with metal elements.
Mounting the Mauerlat
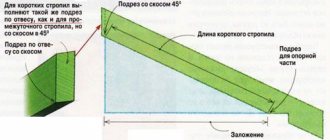
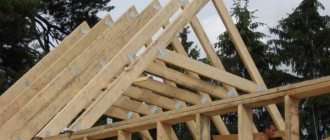
So, the installation of an attic roof of a private house begins with the installation of a Mauerlat. In this case, it is advisable to lay waterproofing material between the beam and the wall. Next, the rafters are attached to the Mauerlat as follows:
To relieve the rafters of the lower slope, side internal purlins are installed. The main rafter system is called a “truss” (templates). There are two ways to install it: assemble it on the ground and lift it onto a box, or assemble it at the top.
The most time-consuming activity is to make and mount the first template and the last one. Next, the following structures are installed according to the given dimensions using a building level and stretched threads. When installing a classic attic, you need to focus on 3 points: the mauerlat, the junction of the slopes and the ridge.
Attaching the rafters to the support beam
Naturally, all lines must be clearly aligned and located at the same angle. The pitch of the templates is calculated based on future wind and snow loads and the capabilities of the house frame. The more often the better, but the final weight on the load-bearing walls of the building should be taken into account.
After the installation of the trusses is completed, they begin lathing, as shown in the video in this article. These are cross bars that give rigidity to the system.
Next, a “roofing pie” is placed on the sheathing, consisting of several layers:
- Vapor barrier.
- Insulation.
- Waterproofing.
- Duplicate (counter) battens.
- Roofing material.
The vapor barrier material is nailed or “targeted” to the rafter sheathing. Next comes the insulation, waterproofing is attached on top, a counter lath and the last stage is the roofing material. The interior of the attic also needs to be insulated and insulated. Next, you can begin finishing the walls and ceiling.
Roof pie
Advice! Before installing the rafter system, you need to think about where the windows will be located so that you do not have to subsequently compromise the integrity of the structure.
It should be taken into account that the rafter system is made of boards and is therefore subject to the destructive influence of humidity, fungi, and insects. Therefore, it is imperative to treat the wood with antibacterial compounds and primers.
You also need to pay attention to good ventilation . Especially if there are no windows planned in the attic. The easiest way is to install wall supply valves. Or, if there are windows, use a modern air exchange option: install double-glazed windows with built-in ventilation ducts.
Ventilated window design diagram
Attic finishing
Finishing work of the attic with plasterboard
First, the roof slopes and gables are sheathed, then the ceiling is finished. To sheathe the roof slopes, beams are mounted horizontally on the rafters in increments of 1 m, then horizontal beams are mounted in the gaps.
The next step will be to measure the drywall according to the given dimensions and its subsequent installation on the base. Installing drywall is quite simple, but at the same time quite a labor-intensive process. When everything is completed, all gaps and cracks should be sealed.
Finishing work of the attic with clapboard
Wood-look finishing work is quite in demand for attics, and the installation of the lining itself is simple. It is cut to the required height and nailed onto a wooden base using nails at the joints, so the cap will not be visible.
After each sheet of lining it is necessary to inspect its position using a level, otherwise there will be a risk of a large distortion at the end of the wall. When the installation of the lining is completed, it should be covered with several layers of varnish.
Selection of materials for attic construction
Proper roof design is half the battle. An equally important role is played by the competent choice of materials.
Timber for rafters and sheathing
Typically, softwood is used for rafters - pine, cedar, etc. This material is quite durable, easy to install and process. The thickest timber is used for the mauerlat - the minimum section is 100 * 100 mm, for serious loads 200 * 200 mm are taken.
The section of timber for rafters is usually 50*100mm, 50*150mm. The choice of beam section for the structure should be based on taking into account the final load on the load-bearing walls and foundation. If an attic roof was not initially planned for the construction of a residential attic space, then it is necessary to install the lightest possible rafter system.
Arrangement of counter-lattice and sheathing
Vapor barrier material
The purpose of a vapor barrier is to prevent fumes from inside the attic from penetrating into the “roofing pie.” Today, the most popular material is multilayer foil film. The vapor barrier is placed with foil inside the room, which allows internal heat to be reflected and retained.
Insulation
You should look at materials for roof insulation in more detail. Several types are used:
- Expanded polystyrene (foam plastic).
- Mineral wool.
- Polyurethane foam (PPU).
Polystyrene foam is not the best choice for insulating a rafter system, despite the fact that the price of the material is the most attractive. Firstly, it is inconvenient to attach it to the sheathing. Secondly, its thermal insulation properties are significantly inferior to mineral wool and polyurethane foam.
Mineral wool has excellent insulation properties and is easy to work with. But the material has one significant drawback - it absorbs moisture. As a result, the structure becomes heavier, the wood is exposed to the destructive effects of moisture, and heat is poorly retained inside the attic.
Application of polyurethane foam using a special high-pressure unit
Polyurethane foam is the most modern and undoubtedly the best option. Polyurethane foam is a two-component sprayed material, the structure of which consists of 98% gas cellular phase and 2% solid composition. To apply it, a special high-pressure installation is used.
PU foam comes from the gun in liquid form, practically sticks to any surface, hardens in a minute and grows several times in volume. Polyurethane foam has the lowest thermal conductivity coefficient, high adhesion, non-flammable, and a service life of more than 30 years.
Waterproofing
Waterproofing protects the roof from the penetration of rain and melt moisture. It also protects the insulation from condensation, which inevitably occurs as a result of temperature changes inside and outside the attic.
Films with micro-holes for steam escape are most often used as waterproofing materials. This material prevents moisture from getting inside the “roofing cake”, but at the same time ensures good air exchange.
Roof waterproofing is an important stage in its construction.
Roofing material
Main types of roofing:
- Sheet metal tiles.
- Profiled sheeting.
- Galvanized steel sheets.
- Flexible tiles.
Sheet metal tiles are widely used for roofing due to their ease of installation and low cost. The disadvantage of this material is that it is very noisy. Wind, hail, and rain will be clearly audible inside the attic.
Corrugated sheeting is also easy to install and will last a long time. But due to the structural features, it requires very high-quality waterproofing and additional sealing of sheet joints.
Galvanized steel sheets weigh little, and the laying system prevents moisture from getting between them. Disadvantages: it requires special installation skills and is considered a rather “cold” material.
Flexible tiles are made from fiberglass impregnated with bitumen. It has a wide range of colors, looks very presentable, practically does not allow condensation to accumulate, and is silent. The disadvantages of this type of roofing material are flammability and poor “interaction” with severe frost or heat. It is also necessary to cover the sheathing with plywood or OSB before laying the flexible tiles so that the base is continuous.