For a roof, the rafter system is something like a skeleton. It also has basic elements that hold the entire frame, and additional ones that provide strength and the presence of internal space under the roof. Without knowing the names of all these elements, it is quite difficult to understand the roof construction process. But you need to figure it out! The minimum is to control the quality of the work taking place when you hire a team, and delve into the intricacies of design. And self-confident craftsmen even take on the installation of the roof on their own, being well-versed in theory.
We invite you to consider the basic concepts: what a rafter system is and what elements it consists of. Now there will be no unclear terms left for you!
Shapes and types of roof: complexity of the device
First of all, let's understand the basic concepts. The greater the load on the roof, the more complex its shape, the more likely such a rafter system will contain many internal elements. For example, the simplest design of a rafter system is for a roof with one slope, and the most complex is for a multi-slope or unusual roof.
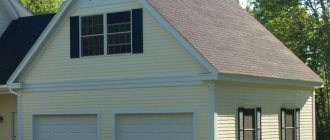
Depending on the number of available slopes, the roof truss system is called single-pitch, gable, hipped or multi-pitch. So, a pitched roof has only a plane - in the form of a rectangle. And with a gable roof, both planes rest on two outer walls. In this case, two triangles are formed on the end sides of the house, which are called gables (therefore, a gable roof is also called a gable roof).
Typically, such a roof is equipped with a slope of 14 to 60 degrees. It consists of a row of two rafter legs resting on a horizontal beam. In the simplest version, these two rafter legs are connected by a bar, which is called a tie, but it is rich in additional elements. These are beds, racks, purlins, struts and much more.
And here is a more complex hipped roof. This rafter system does not have gable walls; they are replaced by additional slopes. To some extent, this saves building materials, but it is already more difficult to design and build such a roof. To do this, you will need layered rafters or integral trusses:
In addition, the hipped roof also has subtypes. So, if all the slopes are identical triangles, such a roof is called a hip roof. In this case, the vertices of the triangles always converge at one point. If two roof slopes are trapezoids, and the other two are cut triangles, then these are half-hip roofs: Danish or Dutch.
Another type of roof is sloping or mansard. Usually such slopes are steep, up to 60 degrees, and near the ridge they are flatter. Thanks to this structure of the rafter system, the attic area allows you to arrange quite comfortable rooms there. This roof is especially good for houses with a width of less than 10 meters.
Often today you can also find a multi-pitched roof with a complex architecture, which is becoming more and more fashionable every day. But its rafter system is also intuitive, because anything complex can be visually divided into several simple segments. Therefore, looking at the unusual roof, you will see that it effectively combined several of the most typical structures at once.
Types of rafter systems - how they differ from each other
This or that type of rafter system is not chosen spontaneously, but depending on the design of the house being built and its size. Next, about each type of rafter systems.
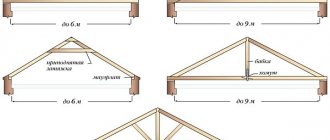
Hanging rafter system
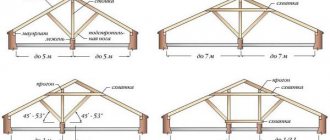
They are good for roofs with two slopes, where the span is no more than 6 meters, and there are no walls inside. At the bottom, the rafters are supported by the mauerlat, and at the top they rest on each other. There is also a tightening that reduces the spread of the rafters on the walls of the house. The beam ties are located at the very bottom of the rafter legs - they simultaneously serve as floor beams. By the way, the ceiling of the upper floor, made of reinforced concrete, can also play the role of tightening. If the tightening is made higher, it is already called a crossbar. If the span between the external walls is more than 6 m, it is necessary to use support posts and braces to support the rafter legs. In this case, the length of the lower part of the rafters, i.e. the part after the support, should be no more than 4.5 m.
Here are a few important facts about their design:
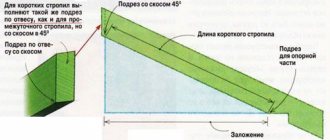
- There is no point in resting the roof overhang on the bottom of the rafters extending beyond the wall. A filly is much better for supporting such roof truss systems (in this case, the width of the overhang is made up to a meter). And then the entire leg will rest on the Mauerlat. The cross-section of the fillies is usually smaller than the cross-section of the rafter legs.
- On the slope you need to nail a wind board, from the ridge to the mauerlat. The slope is made from the attic. This is necessary so that the roof becomes rigid, does not wobble and is not destroyed by the wind.
- If the moisture content of the wooden rafter material is more than 18%, be prepared for the fact that the rafter system may become shaky after the wood dries. Therefore, connect such a tree not with nails, but with bolts - they can be tightened if something happens. Better yet, use screws or rough nails.
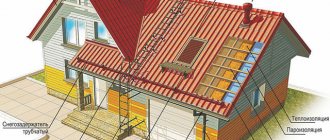
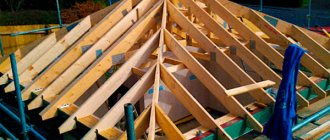
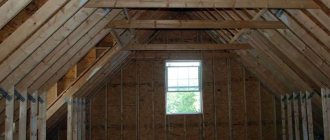
Roof skeleton: rafters, ridge and additional elements
Now let's move on to examining the individual elements. So, when you look at a well-designed and tastefully executed roof, you probably suspect (or know for sure) that it has some backbone inside. And this is true: like a living organism, the roof has a real skeleton, and the skeleton has a spine (ridge), ribs (rafters) and everything else:
Let's start with the most important concepts: what are rafters or rafter legs? These are metal or wooden bars or beams on which the entire structure rests. Basically, the rafters are connected to each other by hinges, i.e. movable or static, and take on all dynamic and static loads.
The rafter leg is the main functional element of the rafter system. It determines the angle of inclination of the slope, the general structure of the roof and serves as something like “ribs” that are attached to the “spine” - the ridge of the roof:
But if you lay the roofing directly on the rafters, between which there is a sufficiently wide step, then it will sag or even fall down. Therefore, the sheathing is placed directly on the rafters, perpendicular to them - boards, bars or metal strips. A separate element of the sheathing is called sheathing . The minimum section of the beam is 30 by 50 mm, and the rest of its parameters depend on the chosen roof.
Let's immediately define such a term as counter-lattice . It is made with a cross-section of 30x50 mm and installed along the rafter legs. They are necessary to secure the waterproofing film and create a ventilation gap under the roofing. Moreover, the counter-lattice is installed earlier than the sheathing itself.
Let's move on. A building with walls made of concrete, foam concrete or brick also has an additional element of the rafter system called a mauerlat . This is a wooden beam that takes on the entire load from the roof and carefully distributes it along the entire length of the walls. This element is necessarily separated from the wall by a dense layer of rolled waterproofing:
To prevent the rafter legs from moving apart, they are fastened at the bottom with a tie , and struts and racks give the rafters additional stability.
The overhang of the roof is the extension of the rafters beyond the wall to divert the rain flow away from the house. If the length of the rafter legs is not enough, fillies .
There is also such an important element as a beam , which is prepared from wooden beams or rolled products. This is an important part of the structure, which is designed for bending.
But a rarer element of the rafter system is the headstock . Essentially, this is a wooden beam that supports the rafter legs. It is installed perpendicular to the tie to connect the rafters.
Here's what all these elements look like:
And finally, in that place. where two slopes intersect in an internal bend, an internal angle is formed, which is called a valley . Where the slopes intersect on the outside, ridges (or ribs) are formed, but they should not be confused with stiffeners - these are special structural elements in the form of grooves and plates, which are sometimes used in roof construction. The sloping surface of the roof itself is called slope .
And the rafter system is the totality of all the listed elements that are included in it.
Criterias of choice
The design of the rafter system is characterized by a large number of auxiliary elements and increased complexity. It is compiled according to the calculation of permanent and temporary loads acting on the structure, a project that takes into account the selected roofing material, as well as environmental factors. When choosing the type of rafter frame, the following criteria are taken into account:
- Climatic conditions in the region where construction is taking place. In order for the roof to withstand the weight of snow and water during heavy rainfalls, the average annual precipitation in winter and summer is determined.
- Wind load. To select the optimal roof structure, the prevailing wind pattern in the construction area is determined, and the average speed of air gusts is also taken into account.
- The nature of the use of space under the roof. At this stage, it is determined whether a residential attic will be equipped in the under-roof space or an unheated attic.
- Type of finishing coating. For each material, the optimal angle of inclination of the slopes is calculated, taking into account its shape and method of fastening.
- Developer's budget. The rafter system is one of the most expensive parts of the roof structure in terms of material and work, so the type is determined by the financial capabilities of the developer.
Experienced craftsmen believe that it is useless to fight nature, you will still be a loser, therefore, when choosing the type of rafter frame, the climatic conditions in the area where construction is taking place are at the forefront. If the region is windy, then the angle of inclination of the slopes is made flat, and if it is snowy, it is steeper.
Dependence of attic height on slope
Influence of climatic factors
Influence of roofing material
Rafter material: which one is better?
Depending on what loads are planned and what the fire requirements are, the roof frame is made from a variety of materials. Here's what a classic wood and metal roof system looks like, for example:
We propose to dwell briefly on the features of the materials used for roof rafters.
Wooden rafters: advantages and disadvantages
For many, erecting a roof seems like working with wooden boards, which are sawed and fastened in the right place. This is partly true, of course:
The wood used is usually dried coniferous or glued if the rafter elements must withstand increased load. But working with wood is actually no easier than working with metal, although many people think so.
Thus, when making wooden rafters, only high quality wood is suitable. These are dry boards and beams with a moisture content not exceeding 25%. They also carefully ensure that such boards and beams do not have large knots, wane, cracks or unnecessary bending of the fibers.
What's the point? Any serious defect can lead to the rafter leg simply cracking under load. If it is not possible to buy good quality dry lumber, then it is dried directly onto the lens in a special ventilated stack. But this takes more than one month, and even after drying, about 30% of the boards have to be rejected.
Therefore, it is more rational to purchase ready-made boards for the manufacture of a rafter system, with a margin of width. And that is not all. Typically, lumber looks perfectly smooth only by eye, and for a rafter system, geometry is an extremely important parameter. And just having a margin in width, the master gets the opportunity to straighten the rafters independently using planing equipment. This is the only way the slopes turn out to be truly even, and absolutely any roofing covering can be successfully placed on them.
Steel beams: for special loads
Today, the rafter system is often assembled from galvanized steel beams. You've probably come across their name: I-beams, channels or tees. Such elements turn out to be much more expensive than wooden or ordinary metal ones, but it’s worth it.
Yes, they are much more difficult to install, but they are valued for one important advantage - their high resistance to bending loads. Thanks to this, in the construction of the roof it is possible to do without any vertical supports and other elements. But in residential building construction, beams are not often used today, although such practice exists, and now we will explain why.
For example, the complexity of the rafter system and the presence of internal elements directly affects the planning solution of the attic. After all, the more different jumpers and crossbars between the construction legs, the lower the attic ceiling will be.
Moreover, all this is important not only for arranging another living space under the roof. The fact is that today the so-called attic roofs are popular, under which the most ordinary rooms of the house are located. And any additional elements simply won’t fit there.
But there is a fly in the ointment: metal beams often serve as cold bridges, and therefore a roofing pie must be installed for them. Basically, the filling here is oriented strand boards and extruded polystyrene foam as insulation. This is a great alternative to traditional hanging rafters!
LVL beams and combined I-beams have shown themselves to be the best in this regard in practice. I-beams are relatively inexpensive, but have not yet been tested by time, but LVL timber is three times more expensive than conventional lumber. Whether or not you should give preference to such a rafter system is up to you to decide.
Materials
The rafter system is an essential element of pitched roofs of any shape and configuration, consisting of vertical supports, horizontal ties and rafter legs that provide support and reliable fastening to the roofing material. The material used to make the frame must be light in weight, high strength, load-bearing capacity, and also resistant to moisture. The most suitable options are:
- Wood. Wood is a natural, environmentally friendly material that is lightweight and durable. For the manufacture of the frame, square bars of 100x100 mm or 150x150 mm, and hardwood boards with a section of 50x150 mm are used. A significant disadvantage of wooden frame elements is that they bend under their own weight when they are long, and also have poor resistance to moisture.
- Metal. Metal rafter systems are more expensive than wooden ones; they are used mainly when there is a large area of slopes and a large weight of the roofing material. The high load-bearing capacity of a metal profile or corner allows you to increase the pitch between frame elements without losing the strength of the structure. To reduce the likelihood of rust spreading, corrosion-resistant types of metal are used.
Note! Wood is considered the most suitable material for the manufacture of rafter frames for the roofs of residential buildings, as it has 3 important qualities: light weight, strength, and breathability. To increase the resistance of wood to moisture, it is necessary to treat the elements of the rafter system with a deeply penetrating antiseptic.
Calculation of the total loads on the rafters
Now we move on to the most difficult issue - designing the rafter system. Let's be clear right away: dynamic loads include falling snow from time to time, the lifting force of the wind, and people working on the roof. Static loads mean the pressure exerted by the weight of the roof covering, a satellite dish installed on the roof and other similar equipment, as well as a snow cap that lies motionless all winter.
The main task of the rafter system is to correctly transfer all this load to the walls and foundation of the house. And also to protect everything that is below on the ground from avalanche-like snow, a continuous wall of rain and other manifestations of bad weather.
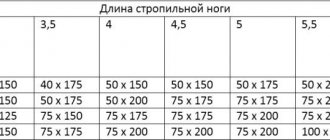
The cross-section and pitch of the rafters are never chosen by eye: for this there are strict building codes and regulations, briefly referred to as SNiPs. For these reasons, the calculation of the rafter system is quite complex and, according to the rules, it is trusted only to professionals.
By the way, today many organizations are engaged in designing rafter systems for any type of house. Of course, it makes sense to turn to specialists, because the roof is officially recognized as an object of first importance in ensuring the safety of a home.
To independently make an accurate calculation of such a rafter system, you need to have the necessary skills and even education. Here are some features of this calculation:
So, it is necessary to take into account not only the desired slope of the slope, but also snow and wind loads, the weight of the selected roofing and other possible moments of pressure such as people working on the roof. That is why the roof truss system is always built with a certain margin of safety.
For example, the pitch and cross-section of beams are always no less than 25% larger than calculated. At the same time, the costs themselves increase slightly, but the roof will last much longer.
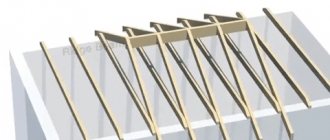
Arrangement of rafter system elements
The lower parts of the rafter system are fastened to the Mauerlat, which, in turn, is installed and attached to the upper surface of the load-bearing walls. To firmly fix the Mauerlat to the wall, threaded rods are installed in it, onto which it is mounted, secured with nuts. Instead of studs, anchor bolts are sometimes used to mount the Mauerlat.
The diameter of the timber for the Mauerlat is usually 18-20 centimeters. It is important to note that waterproofing must be present between the walls and the Mauerlat.
Another important element for installing the rafter system is the ridge girder. The rafter structures are attached to it in their upper part. The girder itself at the end parts is most often fixed to the end walls of the building. In fact, through the ridge girder, the rafter legs are connected at the top into a single structure. Therefore, its strength is especially important, and installation must be carried out on the basis of accurate calculations, in compliance with all technological rules.
If, in accordance with the design, there are some intervals in the transverse walls of the building, then there is a need to use additional supports, such as struts, trusses and racks.
When arranging the roof truss system, significant attention should be paid to the force of wind loads falling on the roof gables. Since the gables take on quite a significant load when directly exposed to strong gusts of wind, this can to a certain extent affect the strength of the roof structure. Therefore, it would be appropriate to reduce the wind pressure on them by installing diagonal connecting elements. Their function can be performed by boards with a cross-section of 3-4 centimeters, which are installed at the base of the rafter legs.
Particularly careful attention is required when arranging rafter structures for raw wooden log houses, since in this case the material requires shrinkage. One possible option is to wait the necessary time for the wood to dry, however, in the wet season this may require quite a significant period of time, and delaying construction is not always possible. The optimal solution in this case may be the installation of sliding support structures or shrinkage compensators - screw jacks.
The installation of sliding supports is technologically simpler and can be carried out on one’s own, while the installation of screw jacks should only be carried out by highly qualified specialists (requires high accuracy of calculations and work).
Types of rafters according to load distribution
We’ve sorted out the concepts, now let’s look at how the rafter system is structured from the inside.
Rafters of layered and hanging type
The roof structure, depending on its internal structure, can be spacer or non-spacer. Depending on this, the rafters themselves are divided into two main types: layered and hanging.
Layered ones are easier to make, but hanging ones will require some tinkering. They are quite difficult to design, repair or change, but this is the design that will have to be resorted to if the entire rafter system will rely only on the outer fence:
The main advantage of hanging rafters is that they work well in compression and bending. But such a rafter system creates considerable horizontal bursting forces that act on the walls.
In order to reduce this physical phenomenon, an intermediate metal or wooden tie is installed that will connect the rafter legs. Most often this is a crossbar - a special element that is used in the construction of attic roofs. And the higher it is located, the higher the ceiling in the attic will be, and the larger the cross-section of such an element should be.
Layered rafter systems are more economical and simpler in design, but they are used only when the building already has two or even several rows of vertical supports, between which the span does not exceed 8 m.
Roof on purlins: for log buildings
The choice between layered and hanging rafters matters when we are talking about an ordinary roof of a residential building, but a bathhouse or a cottage made of rounded logs is built differently, according to its own laws. For example, the basis of such a roof is often slabs, or purlins.
These are special long boards that are parallel to the ridge and rest on log gables. This makes sense!
The fact is that logs tend to shrink, and a conventional rafter system simply warps on them. It will be almost impossible to correct this, and in the above method, with the shrinkage of the gables, the angle of inclination of the rafters will change. That is why movable fasteners are used for everything on the rafters, and the roofing covering is only allowed to be laid after one and a half to two years.
Of course, installing such a roof will require both time and expense, but the technology itself is quite reliable and time-tested:
Although, it is worth noting that quite often roofers use a different technology for such buildings. They take dry logs in advance and tighten them with spring-loaded capercaillie (the so-called special elements). In this case, classic purlins are abandoned, and trusses are installed with vertical supports or struts.
As a result, any shrinkage of the gables no longer affects the geometry of the roof, and those gaps that appear over time are closed with decorative strips. This is how beautiful Russian baths and country houses in the appropriate style are obtained.
Main fastenings of the roof rafter frame
To know how to properly make a roof frame, you need to understand what the main components of the rafter system are. The main nodes are as follows:
- Attachment point to the beam. The rafter leg must be attached to the beam using a tooth with a tenon (in the rafter) and a socket (in the beam). In this case, the nest should have a depth that will be 25-30% of the volume of the beam. If we are talking about a roof with an angle of less than 35°, a knot with two spikes is used. To create the structure, metal screws, nails, angles, bolts, as well as wooden scarves, tenons and beams are used.
- Mounting point to the Mauerlat. For fastening, a cut or saddle is made on the rafter, then the connection is fixed using nails, staples and wire. Two nails are crossed together, and the third is forgotten between them in the center. This is how the rafters of the gable roof and the Mauerlat are fastened.
- Ridge connection unit. Can be mounted end-to-end, overlapping and on a ridge beam. Most often this is done with an overlap, in this case the rafter legs touch each other not with their ends, but with their planes. Fastening occurs using a pin, nails or bolt.
attachment point to the beam
attachment points to the mauerlat and ridge
Video with errors during the construction of the rafter system. You can't build like this:
Integral roof trusses: for extra strength
The rafter system, like an ordinary construction set, can be assembled right on site during the construction of a house, or it can be ordered in the form of ready-made rafters at the factory, and only then installed on the roof. In a word, solid elements rise to the top, which only need to be secured. This is more convenient in terms of rafter work, because at height many manipulations with tools are not convenient.
Today, many companies are engaged in similar production. They adapt the client’s project to the required technology, accurately calculate what the structure of the rafter system should be, and calculate down to the millimeter all the cross-sections of the elements for the chosen type of roof, slope and covering. Time is also devoted to calculating the planned loads on the roof, of which there are many. But with certain knowledge and skills, it’s possible to do all this on your own.
Let's take a closer look at the design of such rafter frames. They represent a triangle, which is quite rigid in its structure and does not deform under pressure or thrust force:
Thanks to such trusses, the roof is provided with the necessary stability, and for many modern projects this is the main reliability criterion.
Connections
Before you make a rafter system with your own hands, you need to carefully study the nodes. To build your home, you shouldn't save time or money. Only in this case the result will please you for many years.
Main rafter connection units
The fastening points of the roof truss system, which deserve special attention, are represented by the following:
- fastening the Mauerlat to the wall;
- fastening the rafters to the mauerlat;
- fastening the rafters at the top point;
- splicing rafters along the length.
Mauerlat to the wall
This node can be performed in several ways. The choice largely depends on the wall material. The construction of a building made of brick, block or concrete allows the use of the following methods:
- on the wire;
- on staples;
- on stiletto heels;
- on anchors with the installation of a monolithic belt along the edge of the wall.
The connection of the Mauerlat to the wall during the construction of brick buildings is carried out using anchors.
In wooden construction, the upper crown of the wall acts as the Mauerlat. It is connected to the previous ones using a dowel. In a frame house, the mauerlat is the top frame of the walls. It is fixed to the frame posts using a notch and metal corners with holes for self-tapping screws. Read more about attaching the Mauerlat to the wall.
Rafters to the mauerlat
Fastening is carried out in two ways:
- rigid for buildings made of brick, concrete or concrete blocks;
- hinged for wooden houses.
Rigid fastening can be with or without a notch. It is recommended to do the cutting on the rafters, and not on the mauerlat, since this weakens it . In both cases, the leg is rigidly fixed with nails, screws, staples or metal corners.
With rigid fastening, it is better to make a notch on the rafters and fix the structure with fasteners
For hinged fastening, a special part is used - a slide. They allow the beam to move without obstacles when the walls of the building shrink.
The hinged connection allows the beam to move
Additionally, the rafter legs are attached to the wall. This is necessary to prevent the roof from being blown off by the wind. For fastening, use a twist of two wires with a diameter of 4 mm, fixed to the wall with an anchor or a ruff. In a wooden house, twisting can be replaced with staples. Fastening is carried out on each beam or through one.
At the ridge level
The layered elements rest on a ridge girder with a notch . Additionally, a board overlay is made on both sides. An overlay is also needed for hanging elements. It can be wooden or metal with holes for screws.
The ridge girder and rafters are connected using a notch
Splicing rafters
There are several methods for splicing roof rafters with your own hands. The choice between them largely depends on the experience of the master. The splice point is located at a distance of 0.15 span lengths from the support. In this case, not only the ridge girder and the Mauerlat are considered supports, but also the struts and racks.
Splicing rafters along the length
There are five ways:
- butt joint;
- oblique cut;
- overlap;
- compound legs;
- paired legs.
To build a high-quality roof, you need to carefully study the technology, choose the right type of rafters and methods of connecting elements at important nodes. This is especially important when building a rafter system with your own hands.
Roof and roofing
It is very important to distinguish between the words “roof” and “roof”. Roof - consists of rafters, roofing, insulating parts, encloses the house from above. Rafters are a beam that creates a slope, the load-bearing system of a pitched roof.
Roofing is the top shell of the roof, which is made from various building materials. The reliability and practicality of using a house depends on the roof.