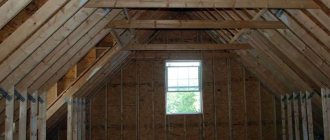
General information about the roof ridge
By ridge, roofers mean a whole system of structural elements that interface with the rafter system. Its basis is formed by a horizontal rib of transverse slopes. This is the highest point of the house and can serve multiple purposes. The main purpose of this unit is to securely close the slopes and roofing. The ridge connects several rafter elements, also acting as a regulator of the microclimatic parameters of the roof in the under-roof space. In particular, it ensures the circulation of air flows, removes moisture from the attic and removes combustion products from boilers and furnaces. But to perform these functions, the ridge assembly must initially be provided with appropriate engineering devices. The ridge is mainly used in gable roof systems, but a broken four-slope configuration when laying the roof in several levels can use this element.
Technical and structural design of the ridge
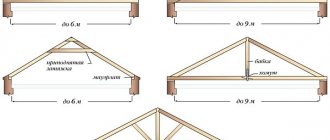
As already noted, the central link in the node is a horizontally located rib - this is a wooden beam made of timber, on which the slopes rest on different sides. In turn, the rafters for the slopes on the lower tier at the points of the ceiling rest on the Mauerlats. Vertical supports - the so-called headstocks - act as elements of power support for the skate itself. They can also have side supports that increase the stability of the structure.
It is also possible to design a roof truss system without vertical supports, but subject to increased horizontal support. In such structures, the function of vertical posts is performed by ties and ties with struts, directly connecting two slopes below the level of the ridge itself. The central beam in this case is supported only by the force of two slopes, which in turn give even more load to the mauerlat beams. In other words, part of the weight is shifted from the center of the floor to support along the perimeters of the outer walls.
Rafter truss
On large slopes you cannot do without trusses. This design differs from an ordinary roof in that there are posts and braces that increase the maximum load on the wood several times. Often the farm is installed throughout the roof, but sometimes it can also occur locally.
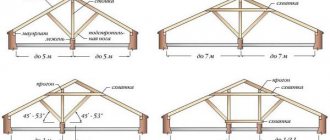
It is advisable to install a roof truss if the width of your house is in the range from 12 to 24 meters. As a rule, trapezoidal or segmental trusses are installed on buildings with large volumes. When the width of the building is even greater and this value does not exceed 36 meters, then a polygonal one is suitable. Standard designs with a width of 9 to 18 meters are content with a triangular one.
Types of roof ridges
The ridge system can be made in different versions. As for the material of manufacture, in addition to timber, metal profile rods can be used. Another thing is that they have many disadvantages (from heavy weight to difficulties in installation), so lumber is more often used. The main differences are determined by the shape and design of the roof ridge unit, which can be made in the following options:
- Ridge profile. The traditional version of the junction of two slopes. This is the same wooden beam that allows you to equip the top point of the rafter system with all the necessary functional components.
- Semicircular bar. Actually, this is a variation of the classic wooden profile, but in a more aesthetic form. You can notice the external features of this solution from the gables of the house.
- Mortise ridge. A non-standard rafter support unit, which is used for hip, that is, hipped roofs. The central supporting bar literally cuts into the slope, forming, in some way, a branch of the ridge from the main rafter system.
Types of ridge roofing
If on the back side the ridge is connected to the elements of the rafter system, then on the outside it is covered with a roof, the choice of which is also important. Today, the following ridge covering options are relevant:
- Metal tiles. The material is good both for its durability and aesthetic advantages. If you choose the type of external polymer treatment correctly, you will get comprehensive protection from precipitation, sunlight, wind and other negative factors. The only disadvantage of metal tiles is the high price.
- Profiled sheeting. Metal sheets made of galvanized steel, which are also famous for their high service life (30-40 years) and mechanical reliability. But when choosing a profiled sheet for a ridge assembly, it is necessary to take into account possible load restrictions. For 1 m2 this roofing gives from 5 to 10 kg on average, which is not suitable for every rafter system.
- Slate. A budget solution that is beneficial for its versatility and practicality. But due to low strength and lack of decorative qualities, this option is more often used for utility block construction.
As an alternative, you can consider a roof based on ondulin, bitumen and flanges, but in conjunction with the ridge, these coatings rather serve as a base rather than as an addition. Such systems are supplied in special kits, which may also include devices for snow protection, gutters, chimneys, etc.
How to fasten the rafters: end-to-end or overlapping?
Unlike hanging rafters, layered rafters can be attached either end-to-end or overlapping.
Butt fastening is considered more reliable, since the rafters rest on their ends and the compressive load is transferred to the entire board. But it is more difficult to do: you need to precisely trim the rafter legs so that their ends are in close contact over the entire area. This method of fastening rafters is optimal for houses made of brick, aerated concrete, shell rock and other similar materials.
Overlapping fastening also has its advantages. There is no need to adjust the rafters to each other, which makes installation of the rafter legs easier. In addition, the fastening of the rafters to the ridge girder with an overlap is movable, not rigid. Therefore, this method is well suited for houses made of timber or rounded logs - for them, a rigidly fixed rafter system is contraindicated. But it must be taken into account that the load on the fastenings of the rafter legs increases when they are overlapped. And this solution is not suitable for gables: if the rafters are installed offset, then it is necessary to fill in more timber in order to obtain a flat plane for cladding the gable or for installing a wind board.
To simplify, fastening the rafters with an overlap is a good choice if the house is wooden or you will be installing the rafter system yourself. In all other cases, it is better to fasten the rafters end-to-end.
Calculation of the ridge unit
During the design process, the roofer must determine the optimal height for the ridge. This requires the technical parameters of the purlin located in the center of the rafter system. These data will depend on the width of the house. The calculations also take into account the angle of the slopes, which varies from 5 to 60 degrees. Knowing the width of the house (the distance from the opposite mauerlats from which the slopes extend) and the angle of inclination of the roof, you can determine the height from the attic floor to the top point of the roof. For example, in designing the ridge unit of a pitched roof with an angle of 30 degrees for a house 6 m wide, the height will be approximately 3.5 m. In the calculation process, a standard coefficient of 0.59 will be used (used for roofs with a 30-degree slope), which must be multiplied by 6 m.
Skate equipment
In private houses, roofs have many functions related to the engineering of the entire building. It is obvious that the skate will have to interact with individual systems to varying degrees. The expanded list of additional elements covers the following devices:
- Plugs. Required for installation of additional roofing elements and protection of pitched joints.
- Snow holder. A barrier for snow masses that minimizes the load from precipitation on the roof and rafter system as a whole.
- Wind bar. A metal overlay designed for lateral protection of the ridge assembly of a rafter roof from precipitation, wind and accidental mechanical shocks.
- Cornice. Also a variant of a protective element that is installed on a wooden cornice board under hydro- and heat-insulating coatings.
In addition to the main function, when choosing additional skating devices, it is advisable to take into account the stylistic nuances of the choice. Moreover, designers advise not only to give preference to elements with the same texture and structure, but also to create an overall composition in a single material. This nuance is also important from the point of view of installation reliability.
Self-production of the rafter system
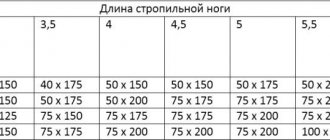
Before the installation of the rafter system begins, the mauerlat must be secured to the longitudinal walls with anchors. Next you need to decide on the required leg section for the rafters, depending on the distance and their length. If there is a need to increase the length of the rafters, then connect them with various fasteners.
When using different insulation, you need to choose the ideal distance between rafter elements in order to reduce the number of thermal insulation scraps.
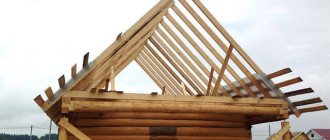
Installation of the rafter system must be done in the following order:
- A template is made according to which the truss is assembled. Take 2 boards corresponding to the length of the rafters and connect them together at just one edge with a nail.
A template for rafters called “scissors” will help you quickly assemble the entire roof rafter system - The result is a design called “scissors”. Its free edges are placed on supports at the points of contact between the rafter legs. The result should be the final angle, that is, the angle at which the roof slope will be inclined. It is fixed with several long nails and transverse boards.
- A second template is made, thanks to which the cuts are installed on the rafters. It is made from plywood.
- Special mounting cuts are cut on the rafters (a prepared template is used for these purposes) and connected at an angle of inclination of the slope. You should end up with a triangle going up the stairs to the roof. Next, it must be attached to the Mauerlat.
- Initially, two side gable rafters are installed. Their correct installation in the vertical and horizontal planes occurs due to temporary struts attached to the rafters.
For proper installation of the entire rafter system, the first pair of rafters is installed on the roof - A cord is stretched between these tops of the rafters. It will indicate the future ridge and the level of other rafters located in the gap.
- Raise and install the remaining rafters at the initially calculated distance, which should be at least 60 cm from each other.
- If a bulky rafter structure is envisaged, then it is additionally strengthened with struts, supports, and so on.
The bulky structure of the rafters is additionally strengthened with struts and supports - A ridge beam is installed on special supports, to which not only short, but also diagonal and intermediate elements of the rafters are attached.
Proper fastening of the ridge beam ensures the reliability of the entire rafter system
Typical components of a standard rafter system
The strength of the rafter structure depends on the ideally selected section of the boards, as well as on the high quality of the rafter assemblies. The connection of parts for the roof structure is done according to established rules.
The main typical units in the rafter system:
- rafter support assembly on the mauerlat;
- ridge;
- unit for combining the top ties and the entire rafter system;
- securing the strut, rack, as well as rafters and beams.
After the design of the rafter system has been chosen, it is necessary to draw up a plan in which to highlight all the nodes. In each design they are made differently, since it depends on various nuances: the type of roof, its size, angle of inclination.
Rafters from a profile pipe
Rafters made from a profile pipe are a metal structure that is assembled using lattice rods. The production of such farms itself is a very labor-intensive process, but also more economical. To make rafters, paired material is used, and gussets are connecting elements. The structure of the rafters from profile pipes is assembled on the ground, using riveting or welding.
Thanks to such systems, any spans are blocked, but the correct calculation must be made. Provided that all welding work is done efficiently, in the future all that remains is to transfer the structural elements to the top of the building and assemble them. Load-bearing rafters made from profile pipes have many advantages, such as:
- endurance to stress;
- durability;
- insignificant mass;
- knot strength;
- thanks to them, structures with the most complex geometry are built;
- financial savings, since the prices for the manufacture of metal rafters are quite cheap.
A roof truss made from a profile pipe is designed for roofing small buildings and structures
Crossbar in the rafter system
Crossbar is a fairly broad concept, but in the case of roofs it has a certain meaning. The crossbar is a horizontal beam that connects the rafters. This element prevents the roof from “expanding.” It is made of wood, reinforced concrete, and also metal - it all depends on the type of structure. And the crossbar serves to distribute the load exerted by the rafter system.
It can be fixed in various places between the legs of the slings. There is a direct pattern here - if the crossbar is fixed higher, then the timber for its installation must be selected with a large cross-section.
There are many ways to fix the crossbar to the rafter system:
- bolts;
- nuts;
- studs with washers;
- special fasteners;
- nails;
- mixed fastenings, when different types of fastenings are used in parallel.
The fastening is available with a mortise or overhead. In general, the crossbar is a design unit, as is the entire system of roof slings.
The crossbar in the rafter system is designed to strengthen the roof structure
Fastening the rafter system
To ensure the reliability of the rafter system, you must first find out how they are attached to the supporting roof and ridge. If a fastening is made to prevent deformation of the roof when the house shrinks, then the rafters are secured on top with a hinge plate or a nut and bolt, and below with a sliding support.
Hanging rafters need a tighter and more reliable fastening in the ridge, so in this case you can use:
- overhead metal or wooden plates;
- cutting method;
- connection using long nails.
In the layered system, the rafter legs are not connected to each other, since they are attached to the ridge girder.
The rafters are attached to the mauerlat using the cutting method, which is made in the rafter leg. Thanks to this fastening method, the roof support will not weaken. Cutting is also done when installing rafters on floor beams. In this case, a cut is also made in the support beam.
Ridge installation technology
The installation of the ridge begins after the roofing has been laid on the surface of the slopes. The parts are delivered to the roof by rope or using a winch mechanism. First of all, a beam with a cross-section of 7x9 cm is installed. Sheathing elements in the form of wooden planks are attached to it on both sides. It is more convenient to perform these operations with a central ridge strip that has a rounded surface, so if desired, you can manually process the timber with a jigsaw or grinding and chipping machines. To prevent negative biological processes, it would be useful to insulate the installed wooden elements with roofing felt, which will also perform the functions of steam and moisture protection. By the way, the back side of the metal tile for the ridge assembly is usually provided with a lining of insulation and protection against mold and mildew. The tile elements in this part are fastened directly to the timber.
Fixing the ridge structure
Mechanical fastening of ridge structure elements can be performed in different ways. A typical fixation model is implemented in the following sequence:
- Mounting holes are drilled on the main elements of the assembly (only on flat sides).
- Before installing the fasteners, the fitting and joining of parts with an overlap of 10 cm or more is completed.
- For a semicircular ridge, a connection along stamping lines is used.
- Rafter trusses under the ridge assembly are fastened using self-tapping screws with nails or using the method of laying in a groove. The main thing is that at the time of installation the angles of inclination from the slope are correctly calculated.
- To increase the strength of the structure, a ridge board is installed as an addition above the level of the sheathing trusses.
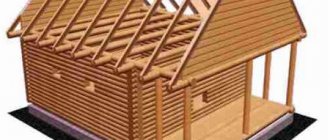
Do-it-yourself technology for constructing hip roof structures
For high-quality installation of a hip roof, you need to have experience in constructing rafter systems, because the work must be done clearly and competently. This requires skills in using power tools. First of all, all structural elements are calculated, a suitable cross-section and size are selected.
The calculation takes into account the shape of the structure, wind loads in the construction region and the average weight of snow, as well as the possibility of creating a living space under the roof. After the calculations have been made and the necessary building materials and tools have been purchased, installation can begin.
Mauerlat device
For a wooden structure, it is not necessary to install a mauerlat, since the rafters are laid on the top frame of the log house.
When erecting a roof for a brick or concrete building, a screed is first laid, into which special pins are installed for further fastening the support beam. Then waterproofing is laid, most often a layer of roofing material is used. The Mauerlat is placed on the insulation and secured with studs. The beam is connected to the leg to provide a stable connection. The entire structure is secured with bolts, and the corner parts are reinforced with brackets. Markings are made on the surface of the Mauerlat for the subsequent installation of roof elements.
A side one brick thick is laid along the perimeter of the wall; it compensates for the force of expansion.
If the construction plan has large dimensions, then wooden floor beams are taken into account in the calculations. They are placed on top of the mauerlat from one edge of the building to the other. Short extensions are attached to the end parts of the beams at a certain pitch, which form overhangs over the opposite walls. For small houses, preliminary installation of beams is not necessary.
Installing the support and hip rafters
At this stage, the central support is installed to ensure the clarity of the assembly of the remaining elements.
Subsequently, the support is dismantled and the rafter system will support itself. Rafters are made using the layered method. The upper part of the board is attached to the central post, and a cut is made taking into account the angle of the roof slope. The lower part of the wooden beam is attached to the mauerlat with corners; the rafters are also pre-cut. If a beam system was installed, then the lower part of the rafter leg will rest against the cornice.
Next, a pair of opposite rafters are installed using the same principle, to install them crosswise with the previous set. The upper ends are sawed off, secured with nails and reinforced with corners. This stage is especially important when constructing a structure. If everything was calculated and installed correctly, there will be no further problems and no corrections will be needed.
The cornice is installed around the perimeter of the building and is attached to the outer ends of the beams and perpendicular extensions.
Installation of diagonal rafters
In any corner of the resulting frame, the location for installing the diagonal beam is selected and a mark is made. The beam must have a thickness equal to the size of the hip elements. It is applied to the ridge unit and a vertical cut is made at the upper end. The other end of the diagonal rafter leg is laid and attached to the mauerlat with corners or attached to the cornice.
The remaining rafters are also installed diagonally. The lower ends of the beams protrude beyond the contour of the building by at least 50 cm if the cornice has not been installed. If there is not enough length, additional boards called fillets are screwed to the ends of the rafters. They are made smaller and attached to the upper edge of the inclined beam.
Installation of spigots
At the last stage, the frames are installed using the principle of fastening the rafters.
Also, the beams are cut on both sides and one end is laid on the support axis, the other on the mauerlat. At the same time, the extensions also protrude beyond the walls by 50 cm, forming a straight line with the ends of the rafters. The overhang of the cornice is necessary to drain water further from the walls of the building. Support posts are mounted in the middle under the springs. They are needed for additional structural rigidity. The upper end of the support is attached to the lower edge of the frames, and the other end rests against wooden beams. If there are no beams, scaffolding is installed; they fasten the opposite hip rafters together.
The hip roof has several design options depending on the size of the building, the angle of the roof, the design features of the house and the wishes of the customer. But the principle of the device remains unchanged. The main feature of the hipped design is the symmetry of the side slopes, which makes the roof an original decoration of the appearance of the structure.
Skate device with deflector
Maintaining dryness in the under-roof space is the most important condition for ensuring the optimal condition of the rafter system. The ridge deflector helps remove steam and moisture from under the roof and attic, preventing precipitation from entering. When installing this element, it is advisable to use a roof segment with a ready-made ventilation duct. The same metal tiles provide ergonomic and easy-to-install plastic deflectors. The roofer only needs to install a segment with an air exhaust channel into the ridge assembly and, if necessary, provide it with auxiliary elements such as a pipe and a diffuser. Next, the adjacent joints of the roofing segment with the deflector are additionally reinforced with hardware, and the gaps are sealed with polyurethane foam or construction silicone.
Why do you need a Mauerlat?
The rafter system absorbs the load from external forces and transfers it to the walls through the support beam - the Mauerlat. Its functions are to create a flat plane for attaching rafters and distribute evenly point forces on supporting structures.
As a rule, in private construction the mauerlat is made from softwood lumber - timber or boards. The size of the section and the method of attachment to the walls depends on the type of rafter system:
- With layered rafters, large bursting forces are transferred to the walls. The cross-section of the Mauerlat is powerful enough - 150x150-200x200 mm - to ensure load absorption. It is attached to the walls as firmly as possible.
- In hanging systems, the rafter legs are rigidly connected to a horizontal tie, forming a geometrically stable truss. Only vertical load is transferred to the walls, so the Mauerlat acts as a support pad. In this case, timber or boards are laid either on the entire surface of the walls, or in sections for each truss.
Lumber for the Mauerlat must be at least grade 2, dried to a moisture content of no more than 15%, and treated with antiseptics and fire retardants. To prevent wood from rotting, waterproofing is installed when laying on brick or concrete walls.
Joint location of the support beam