Design of a gable roof truss system
In cross-section, a gable roof is a triangle. It consists of two rectangular inclined planes. These two planes are connected at the highest point into a single system by a ridge beam (purlin).
Gable roof diagram
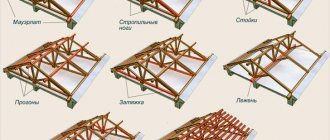
Now about the components of the system and their purpose:
- Mauerlat is a beam that connects the roof and walls of a building, serves as a support for rafter legs and other elements of the system.
- Rafter legs - they form the inclined planes of the roof and provide support for the sheathing under the roofing material.
- Ridge purlin (bead or ridge) - combines two roof planes.
- A tie is a transverse part that connects opposite rafter legs. Serves to increase structural rigidity and compensate for thrust loads.
- Lezhny - bars located along the mauerlat. Redistribute the load from the roof.
- Side purlins - support the rafter legs.
- Racks - transfer the load from the purlins to the beams.
There may still be fillies in the system. These are boards that extend the rafter legs to form an overhang. The fact is that to protect the walls and foundation of the house from precipitation, it is desirable that the roof ends as far from the walls as possible. To do this, you can take long rafter legs. But the standard length of lumber of 6 meters is often not enough for this. Ordering non-standard is very expensive. Therefore, the rafters are simply extended, and the boards with which this is done are called “fillies”.
There are quite a few designs of rafter systems. First of all, they are divided into two groups - with layered and hanging rafters.
The difference in the design of layered and hanging rafters
Types of gable roof
The installation of a gable roof truss system depends, first of all, on its design.
There are several options for gable roofs (types, types):
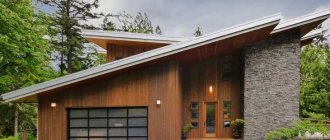
Simple gable roof - symmetrical
A simple gable roof is symmetrical. The most common roof design option due to its simplicity and reliability.
Thanks to symmetry, a uniform distribution of loads on the load-bearing walls and mauerlat is achieved. The type and thickness of the insulation does not affect the choice of material. The cross-section of the beam makes it possible to provide a reserve of bearing capacity. There is no possibility of rafters bending. Supports and struts can be placed almost anywhere.
An obvious drawback is the impossibility of arranging a full-fledged attic floor. Due to sharp corners, “dead” zones appear that are unsuitable for use.
Simple asymmetrical gable roof
Simple asymmetrical gable roof The construction of one angle of more than 45° leads to a reduction in the amount of unused area. There is an opportunity to make living rooms under the roof. At the same time, the requirements for calculations increase, because the load on the walls and foundation will be distributed unevenly.
Broken gable roof, with external and/or internal fracture
Broken gable roof, with an external and/or internal break. This roof design allows you to equip a full second floor under the roof.
Naturally, a simple gable rafter roof differs from a broken roof, not only visually. The main difficulty lies in the complexity of the calculations.
With hanging rafters
These are systems in which the rafter legs rest only on the external walls without intermediate supports (load-bearing walls). For gable roofs, the maximum span is 9 meters. When installing a vertical support and a strut system, it can be increased to 14 meters.
The good thing about the hanging type of gable roof rafter system is that in most cases there is no need to install a mauerlat, and this makes the installation of rafter legs easier: there is no need to make cuts, just bevel the boards. To connect the walls and rafters, a lining is used - a wide board, which is attached to studs, nails, bolts, crossbars. With this structure, most of the thrust loads are compensated, the impact on the walls is directed vertically downwards.
Types of rafter systems with hanging rafters for different spans between load-bearing walls
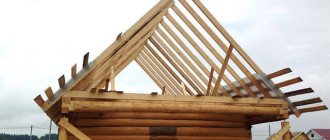
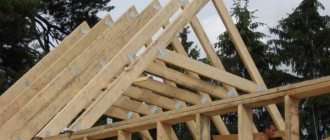
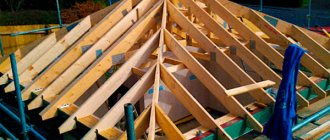
Gable roof rafter system for small houses
There is a cheap version of the rafter system when it is a triangle (photo below). Such a structure is possible if the distance between the external walls is no more than 6 meters. For such a rafter system, you can not make calculations based on the angle of inclination: the ridge must be raised above the tie to a height of at least 1/6 of the span length.
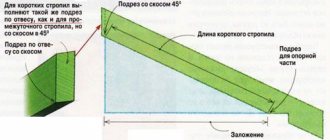
But with this construction, the rafters experience significant bending loads. To compensate for them, either rafters of a larger cross-section are taken or the ridge part is cut in such a way as to partially neutralize them. To give greater rigidity, wooden or metal plates are nailed on both sides at the top, which securely fasten the top of the triangle (also see the picture).
The photo also shows how to extend rafter legs to create a roof overhang. A notch is made, which should extend beyond the line drawn from the inner wall upward. This is necessary to shift the location of the cut and reduce the likelihood of the rafter breaking.
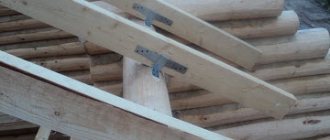
Ridge knot and fastening of rafter legs to the backing board with a simple version of the system
For mansard roofs
An option with the installation of a crossbar - used when organizing a living space under the roof - an attic. In this case, it serves as the basis for lining the ceiling of the room below. For reliable operation of a system of this type, the crossbar cut must be hingeless (rigid). The best option is in a semi-frying pan (see picture below). Otherwise, the roof will become unstable to loads.
Rafter system of a gable roof with a raised tightening and a crossbar insertion unit
Please note that in this scheme there is a Mauerlat, and the rafter legs must extend beyond the walls to increase the stability of the structure. To secure them and dock them with the Mauerlat, a notch is made in the form of a triangle. In this case, with an uneven load on the slopes, the roof will be more stable.
With this scheme, almost the entire load falls on the rafters, so they need to be taken with a larger cross-section. Sometimes the raised puff is reinforced with a pendant. This is necessary to prevent it from sagging if it serves as a support for ceiling cladding materials. If the tie is short, it can be secured in the center on both sides with boards nailed to the nails. With a significant load and length, there may be several such belays. In this case, too, boards and nails are enough.
For large houses
If there is a significant distance between the two outer walls, a headstock and struts are installed. This design has high rigidity, since the loads are compensated.
Gable roof rafter system for a large span and ridge and rafter insertion units
With such a long span (up to 14 meters), it is difficult and expensive to make the tie in one piece, so it is made from two beams. It is connected by a straight or oblique cut (picture below).
Straight and oblique cut for connecting the tie
For reliable joining, the connection point is reinforced with a steel plate mounted on bolts. Its dimensions must be larger than the dimensions of the notch - the outermost bolts are screwed into solid wood at a distance of at least 5 cm from the edge of the notch.
In order for the circuit to work properly, it is necessary to make the struts correctly. They transfer and distribute part of the load from the rafter legs to the tie and provide structural rigidity. Metal pads are used to strengthen connections
Fastening struts for a rafter system with hanging rafters
When assembling a gable roof with hanging rafters, the cross-section of lumber is always larger than in systems with layered rafters: there are fewer load transfer points, therefore each element bears a greater load.
Read how an attic roof works (with drawings and diagrams) here.
Calculation of loads on the rafter system
Before proceeding with this section of the calculations, you need to consider all possible loads on the rafters. The rafter system comes in different types, which also affects the load. Types of loads:
Types of load:
- Constant. This type of load is constantly felt by the rafters; it is exerted by the roof structure, material, sheathing, insulation material, films and other small elements of the system. The average value of this parameter is 40-45 kg/m2.
- Variable. This type of load depends on the climate and the area where the building is located, since it is caused by precipitation in a given region.
- Special. This parameter is relevant if the location of the house is a seismically active zone. But in most cases, additional strength is enough.
Important: it is best to make a reserve when calculating strength; for this, 10% is added to the resulting value. It is also worth taking into account the recommendation that 1 m2 should not bear a weight of more than 50 kg.
It is very important to take into account the load exerted by the wind. Indicators of this value can be taken from SNiP in the “Loads and Impacts” section.
To calculate the load produced by snow, you need:
- Find out the snow weight parameter. This indicator mainly varies from 80 to 320 kg/m2;
- Multiply by the coefficient that is necessary to take into account wind pressure and aerodynamic properties. This value is indicated in the SNiP table and is applied individually. Source SNiP 2.01.07-85.
ATTENTION!
If the angle of inclination of the slope is more than 45 degrees, then the calculation of the snow load is not carried out, since such a slope will ensure the sliding of snow.
Wind load
With layered rafters
In gable roofs with layered rafters, the ends rest on the walls, and the middle part rests on load-bearing walls or columns. Some schemes push through the walls, some don't. In any case, the presence of a Mauerlat is mandatory.
The simplest version of layered rafters
Non-thrust schemes and notch units
Houses made of logs or timber do not respond well to thrust loads. For them they are critical: the wall may fall apart. For wooden houses, the rafter system of a gable roof must be non-thrust. Let's talk about the types of such systems in more detail.
The simplest non-thrust rafter system diagram is shown in the photo below. In it, the rafter leg rests on the mauerlat. In this version, it bends without pushing the wall.
A simple non-braced gable roof system with layered rafters
Pay attention to the options for attaching the rafter legs to the Mauerlat. In the first, the support area is usually beveled, its length being no more than the section of the beam. The depth of the cut is no more than 0.25 of its height.
The top of the rafter legs is laid on the ridge beam, without fastening it to the opposite rafter. The structure results in two pitched roofs, which in the upper part are adjacent (but not connected) to one another.
It is not recommended to do such a scheme without experience: at the slightest inaccuracy in execution, expansion forces appear and the structure becomes unstable.
The option with rafter legs fastened at the ridge part is much easier to assemble. They almost never push against the walls.
Option for attaching rafters without bracing to walls
To operate this scheme, the rafter legs at the bottom are attached using a movable connection. To secure the rafter leg to the mauerlat, one nail is driven from above or a flexible steel plate is placed from below. See the photo for options for attaching rafter legs to the ridge girder.
If you plan to use heavy roofing material, it is necessary to increase the load-bearing capacity. This is achieved by increasing the cross-section of the rafter system elements and strengthening the ridge assembly. It is shown in the photo below.
Reinforcing the ridge assembly for heavy roofing material or for significant snow loads
All of the above gable roof schemes are stable in the presence of uniform loads. But in practice this practically never happens. There are two ways to prevent the roof from sliding towards a higher load: by installing a screed at a height of about 2 meters or by struts.
Options for rafter systems with contractions
Installing contractions increases the reliability of the structure. In order for it to work properly, it needs to be secured to them with nails at the places where it intersects with the drains. The cross-section of the timber for the scrum is the same as for the rafters.
Schemes of rafter systems for gable roofs with contractions
They are attached to the rafter legs with bots or nails. Can be installed on one or both sides. See the figure below for attaching the screed to the rafters and ridge girder.
Attaching the screed to the rafters and ridge beams
In order for the system to be rigid and not “creep” even under emergency loads, it is enough in this option to ensure rigid fastening of the ridge beam. In the absence of the possibility of its horizontal displacement, the roof will withstand even significant loads.
Read how to make a gable roof (photo report) here.
Main fastenings of the roof rafter frame
To know how to properly make a roof frame, you need to understand what the main components of the rafter system are. The main nodes are as follows:
- Attachment point to the beam. The rafter leg must be attached to the beam using a tooth with a tenon (in the rafter) and a socket (in the beam). In this case, the nest should have a depth that will be 25-30% of the volume of the beam. If we are talking about a roof with an angle of less than 35°, a knot with two spikes is used. To create the structure, metal screws, nails, angles, bolts, as well as wooden scarves, tenons and beams are used.
- Mounting point to the Mauerlat. For fastening, a cut or saddle is made on the rafter, then the connection is fixed using nails, staples and wire. Two nails are crossed together, and the third is forgotten between them in the center. This is how the rafters of the gable roof and the Mauerlat are fastened.
- Ridge connection unit. Can be mounted end-to-end, overlapping and on a ridge beam. Most often this is done with an overlap, in this case the rafter legs touch each other not with their ends, but with their planes. Fastening occurs using a pin, nails or bolt.
attachment point to the beam
attachment points to the mauerlat and ridge
Video with errors during the construction of the rafter system. You can't build like this:
Layered rafter systems with struts
In these options, for greater rigidity, rafter legs, also called struts, are added. They are installed at an angle of 45° relative to the horizon. Their installation allows you to increase the span length (up to 14 meters) or reduce the cross-section of beams (rafters).
The brace is simply placed at the required angle to the beams and nailed on the sides and bottom. An important requirement: the strut must be cut accurately and fit tightly to the posts and rafter leg, eliminating the possibility of it bending.
Systems with rafter legs. The top is a spacer system, the bottom is a non-spacer system. The correct cutting nodes for each are located nearby. Below are possible strut mounting schemes
But not in all houses the average load-bearing wall is located in the middle. In this case, it is possible to install struts with an angle of inclination relative to the horizon of 45-53°.
Rafter system with off-center vertical girder
Systems with struts are necessary if significant uneven shrinkage of the foundation or walls is possible. Walls can settle differently on wooden houses, and foundations can settle on layered or heaving soils. In all these cases, consider installing rafter systems of this type.
How to make a gable roof: step-by-step instructions with photos
The work includes several stages:
- preparation;
- installation of a rafter system;
- laying hydro-, heat- and vapor barriers;
- installation of roofing material.
Lumber must be well dried. They are stored in stacks under a canopy or covered with film or tarpaulin in bad weather.
Preparation
If the walls are made of piece materials - blocks, bricks - it is recommended to install a reinforced concrete belt around the perimeter of the building. This will allow you to assemble the structure together and level the surface for laying the Mauerlat.
At the same stage, studs with a cross section of 10 mm made of galvanized steel are embedded in the fresh solution. You need to start from the corners, the laying step is 60 cm. Subsequently, the Mauerlat will be placed on them and secured with nuts.
To prevent contact between wood and concrete, waterproofing is installed - the surface of the reinforced belt is coated with hot bitumen and covered with 2 layers of roofing material.
Laying the Mauerlat
Holes are drilled in the timber in those places where the studs protrude from the walls. The Mauerlat is laid on the surface of the wall closer to its inner side to avoid demolition during strong winds.
The bars need to be aligned horizontally. You can insert spacers or trim off protruding parts.
It is allowed to lay the Mauerlat not entirely on the wall, but in separate segments directly under the rafters. For brick or concrete walls, fastening with metal plates, wooden plugs and brackets, and curved reinforcement is additionally used.
The length of the beam is joined with an oblique or straight lock. Corner joints are sawed into place and secured to the wall with anchors (studs).
Installation of ridge beams
At the highest points of the roof, a purlin is laid, which is attached to the posts and beams with metal corners and plates. The pitch of the racks is 3-5 m.
You can change the sequence and start by installing rafters at the ends of the building, but then you will have to secure each pair of beams with braces or boards. In the case where there is a ready-made run, the assembly proceeds faster and with better quality.
Installation of ridge beams
Installation of rafters
It is better to prepare rafters using a template. A groove is cut in the lower part to rest on the Mauerlat. The depth of the cut is no more than 1/3 of the width of the board.
2 types of fastening rafters to the Mauerlat
If lumber has to be spliced for rafters, an overlapping or overlay joint is used. It is recommended to make the joint at a distance of at least 1 m from the support points, preferably at about 1/3 of the rafter length. It is impossible to connect the boards in the center, since the maximum bending moment acts in the middle, and the beam can bend at the weakest point.
The assembly of the rafters begins from the gables. First, the first and last fragments are set, then the cord is pulled and markings are made. The studs should not fall into the support areas, so as not to create problems with cutting. Read in detail about attaching rafters to the mauerlat in a separate article.
The rafters are secured to adjacent elements using stops, struts and ties. It is important to firmly fix the system in space.
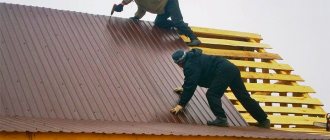
Fastening the sheathing
The base for laying the roofing covering is made of boards, slats, OSB boards or moisture-resistant plywood. The choice of material depends on the type of coating:
- for metal tiles - boards with a pitch of 35-45 cm, equal to the length of the transverse wave;
- flexible tiles, ondulin, roll roofing - continuous flooring;
- asbestos-cement slate - lathing in increments of 450-750 depending on the angle of inclination.
Boards or slats are laid perpendicular to the rafters. At each fastening point they are screwed with two self-tapping screws. The lathing additionally gives the rafter system rigidity and stability.