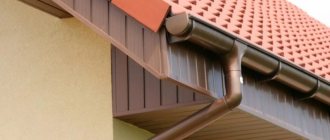
The roof of a house is one of the main components of a house. It represents the upper structure of the building, without which it is difficult to imagine comfortable living. The main functions of the roof are protection from snow, rain and other precipitation, as well as heat retention in the cold season and protection from overheating in the summer months. Nowadays, there is a wide variety of roofs to suit every taste and budget. However, the most common and popular at any time are gable roofs, which are versatile, inexpensive and easy to install. We’ll talk about how to properly make a gable roof with your own hands in today’s article.
The gable roof design is the most common in private construction. As is clear from the name of this type of roof, it is made in the form of two slopes or, more simply, in the form of a triangle. Such roofs are easy and quick to install, they are quite durable and their appearance finds many admirers, as it combines the look of a Russian hut and a modern building. Having the necessary knowledge, you can do it yourself using available tools.
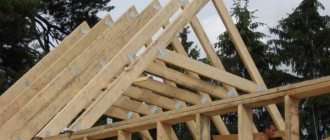
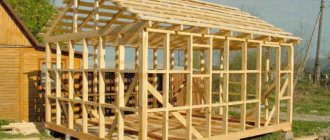
Construction of a gable roof rafter system
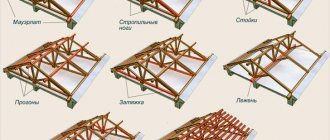
The rafter system of a modern gable roof consists of many elements, each of which evenly redistributes the weight of the structure and correctly transfers it to the walls of the house. The figure below shows the design of a gable roof of a house with its main components and elements of the rafter system.
Let's look at each of the elements shown in the diagram separately:
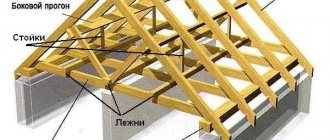
- The rafter leg is the main part in the design of the rafter system of a gable roof, which is an inclined element laid across the entire roof. To create it, the strongest beams are selected, since the rafter leg, in addition to the weight of the roofing material and sheathing, can bear the weight of precipitation in the form of snow;
- Mauerlat is the so-called “foundation” of the roof, which is the main support for the entire structure, distributing the load on the walls. It is a beam or a thick board on which the rafter legs rest and which serves as a “gasket” between the wall and the roof;
- Tie (tie) - a spacer lying at the base of the triangle, enhancing strength. The tightening performs a double function, since the ceiling is mounted to its lower part;
- Purlins - ridge purlins are attached in the upper part, side purlins in the center of the rafter legs. The purpose of the purlins is to keep the rafter legs from falling and “folding”;
- The stand is located in the central zone, directly under the ridge. Serves as a support, transfers the load to the tightening;
- The bench is an additional element on which the stand rests;
- Lathing - boards that are mounted across the rafters. The sheathing is designed to lay roofing material on it (in the simplest case) and to provide additional rigidity to the entire rafter system.
This roof scheme is universal for many buildings, but depending on the complexity of the structure, special elements can be added here to give stability and rigidity to the entire rafter system.
Preparing to start work
Before making a gable roof, you will need to select materials. Installation begins with the selection of wood. To build a reliable structure with your own hands that is resistant to external factors, you will need to follow the following recommendations:
For construction, it is better to choose first or second grade coniferous species
- It would be right to choose softwood materials (spruce, pine, larch are more resistant to rotting);
- the structure is assembled from wood of the first or second grade, the use of the third for critical elements is unacceptable;
- it is better to choose those lumber that are produced in the northern regions; the more complex the growing conditions of the tree, the denser its structure;
- they try to choose the material that was cut down at the end of the cold period of the year (February-March).
Next, you should select the section of the rafter leg. It depends on the following points:
- load from snow cover (snow region);
- weight of the roof covering;
- rafter pitch;
- span (distance between reference points);
- insulation thickness.
Table of average values of rafter legs
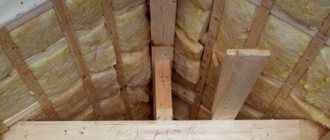
A thermal insulation layer is required when designing a living space - an attic - in the under-roof space of a house. Most often, do-it-yourself installation of mineral wool material is done to improve the thermal insulation characteristics. In this case, it is important to provide a ventilation gap between the heat insulator and the roofing. The height of the rafter leg should not be less than the thickness of the insulation. To increase the clearance, a system element such as a counter-lattice is introduced - a block that is nailed parallel to the rafter and increases its height.
The most convenient pitch of rafters for a private house is one that provides a clear distance between them of 0.58 m.
This allows you to correctly install mineral wool slabs without trimming or additional elements. For such a step, the following recommendations for the cross-section depending on the span can be given:
- span 3 m – rafter size 40x150 mm;
- 4 m – 50x150 mm;
- 5 m – 50x175 mm;
- 6 m – 50x200 mm.
It is important to know the following: load-bearing capacity and bending resistance are more affected by height than width. If necessary, increase the load-bearing capacity more effectively by increasing the height. Another element whose cross-section will need to be selected is the sheathing. The most optimal value would be a thickness of 32 mm. With increased load, the value is increased to 40 mm.
The remaining components of the house's rafter system are assigned structurally, based on what lumber is available. But it is still worth taking into account the strength requirements.
Immediately after purchasing the material, before assembling the system begins, you will need to treat all the elements with special compounds yourself.
A gable roof, like any other roof of a house, needs the following types of protection:
- antiseptic, carried out without fail, helps prevent the processes of decay and the occurrence of mold and mildew (even if installation is not planned some time after purchasing the wood, the treatment is carried out immediately);
- fire retardant, optional, but very important, it increases the wood’s ability to resist fire, thereby increasing the safety of the structure.
The angle of inclination of a gable roof
Choosing an acceptable roof slope angle is a significant task, but for many builders it fades into the background, which is not true. The so-called gable structures with straight slopes are considered standard. The optimal angle of inclination of a gable roof is on average 30°-45° (the angle at the base of an isosceles triangle is taken as the basis).
The choice of inclination angle will determine how well the upper part of the house will withstand the following factors:
- load from wind and rain;
- snow pressure;
- the weight of an individual object on the roof, for example a person.
The first two points must be taken into account with special care, since a miscalculation in choosing the slope of the roof can cost large financial losses and health in the event of a collapse.
Example: the greater the angle, the less the load on the roof from precipitation, but the threat of wind damage increases due to the created windage (the roof can simply be blown off). The noise effect will also increase if metal is chosen as the roofing material.
It is important to pay attention to the manufacturers' recommendations regarding the use of a particular product. Take a closer look:
- Roll materials: the number of layers is pre-calculated. The more there are, the lower the roof can be made. Double flooring - from 10-15°;
- Stacked elements: these include tiles (including soft ones) and slate. The angle of inclination of the rafters can be adjusted from 20°;
- Metal tiles: a slope of 14° should be maintained;
- Corrugated sheets: its sheets should be placed at an angle of 12°;
- Ondulin: it is allowed to adhere to the indicator from 6°.
Thus, when designing a roof and choosing the angle of inclination, it is important to know in advance what roofing material you will cover it with. As you can see, the minimum angle of inclination of a gable roof can be 6°.
Selection of roofing material
The next step in installing a gable roof with your own hands is to choose high-quality roofing material to cover your house, bathhouse, and other buildings. The chosen base should be as strong as possible and easily mounted on a rafter system with sheathing. Resistance to strong winds and compatibility with the selected angle of inclination are the most important parameters for the optimal choice.
If you wish, you can see photo instructions on the basic rules for choosing. Today, in building materials stores you can choose the following types of roofing at affordable prices:
- Metal tiles and corrugated sheets.
- Bituminous shingles.
- Ceramic tiles.
- Galvanized roofing.
Significant differences between these materials lie in the practical choice of the type of lathing. Some foundations, such as a do-it-yourself gable roof made of corrugated sheets, are too soft and therefore require laying a continuous sheathing.
Types of rafter systems for gable roofs
Most rafter systems for gable roofs are divided into two main types - hanging and layered. The first type is the most common. Let's look at both types in detail.
Hanging rafter system for a gable roof
This type of roofing structure is used exclusively when the walls of the house are located at a distance of up to 10 m from each other and there are no supporting floors between them. The rafters (legs) are connected only to the side parts of the house in the form of a mauerlat. The disadvantage of a gable roof with hanging rafters is the possibility of its damage due to the thrust load, since in this case there are no braces between the rafters.
Layered rafter system of a gable roof
The difference between layered structures is the presence of additional support in the form of a wall or other support. The layered rafter system is installed with supports that are attached to the intermediate walls. This design allows you to cover large spans without compromising the rigidity of the entire rafter system.
Separately, it is worth talking about several more types of gable roofs. By design, a gable roof can be made in the following options:
- symmetrical gable roof;
- asymmetrical gable roof;
- gable sloping roof.
The differences between these designs are clear from the name. Depending on the design of your house and design decisions, the roof may be asymmetrical, that is, have different angles of inclination at the base. Such a roof is a little more difficult to install than a conventional symmetrical roof, which has an isosceles triangle at its base, but it will not be difficult for an experienced craftsman to erect such a structure.
The gable sloping roof is also very common. The rafters of such a roof seem to be slightly broken at the base. Such roofs practically do not retain precipitation and allow you to gain in attic space for arranging an attic.
Features of the construction of roofs with an angle
A gable roof is the simplest option for building a private house. The rafter system can have a layered, hanging or combined design.
Layered and hanging rafter system.
In the first case, the rafters are “leaned” - laid on external and internal supports. In the second, they are “suspended” with support only on the walls.
Layered construction
The layered system is used in the construction of houses with internal main walls that relieve external enclosing structures from thrust. The main load here is vertical.
The absence of horizontal expansion forces simplifies and reduces the cost of the design of the supporting roof frame. It consists of rafter legs, struts, crossbars, purlins and racks. The mauerlat or bench is mounted 100-150 mm above the ceiling level for free access to the bottom of the rafters. If the walls are weak, it is placed around the perimeter of the building. Otherwise, you can get by with short ones 60-70 cm long, placed under the rafters.
In wooden buildings, the function of the mauerlat is performed by the upper crown or trim. The lower end of the rafters is cut into the supporting beam, additionally secured with staples and wire twists. To prevent bursting stresses from arising in the ridge and the rafters do not move along the slope, the mating is done with an overlap or a butt, secured with overlays, bolts, dowels.
Read more about the construction of all types of roofs and roofing in the appropriate section by following the link. We also recommend reading the article about a pitched roof and then deciding which type is right for your building.
The system is reinforced with purlins, struts and racks. In addition, this helps to reduce the cross-section of the rafters and deflections. The elements are connected with metal fasteners - nails, staples, bolts, plates, rings, toothed discs.
Installation of a roof using the hanging method
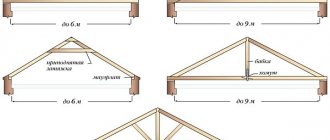
Hanging rafters are installed for house spans of 6-14 m. Relying only on the outer walls, the load-bearing beams absorb significant pushing forces. To distribute them, additional horizontal and vertical elements are introduced into the structure - crossbars, tie rods, headstocks (racks resting on the tie rod).
The wider the span of the building, the greater the stresses that arise in the structures, and the more complex the structure of the frame. Up to 6 m, ties combining the functions of floor beams are sufficient. Above - additional crossbars are introduced. In houses without an internal load-bearing wall, exceeding a width of 9 m, the roof system is strengthened with headstocks and struts. A fragment of two rafters, tie rods and ties is called a truss.
In some cases, the Mauerlat is not installed. The finished trusses are mounted on a board laid along the top of the wall on a layer of waterproofing. The rafters are cut into a tie or laid with a beveled edge. Secure with dowels, pads, clamps.
The ridge knot is more difficult to solve than in layered roofs. The rafters are cut into a horizontal beam, and the joint is reinforced with wooden or metal plates. The construction of a hanging rafter system is more complex and expensive than a non-thrust one. Therefore, trusses are often installed in increments of 3-4 m, connected by purlins along which layered rafters are laid. This method is called combined.
The advantage of hanging structures is the ability to use the attic space as an attic.
Calculation of a gable roof
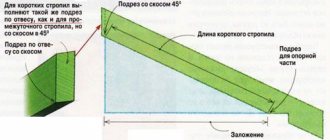
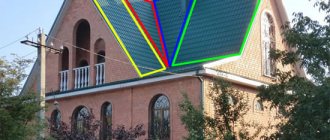
Often, novice builders, before designing and calculating the purchase of material, have questions about how to find out the length of the rafters of a gable roof. To do this, it is important to know at the design stage what the width of the building will be in order to select rafters of a standard size, so that you do not have to splice them together, sacrificing their load-bearing capacity. At the same time, you must not forget about the angle of the roof. All of these factors will ultimately influence the length calculation.
So, to calculate the length of the rafters of such a roof, you need to divide the triangle formed by the rafter system into two right triangles. Further, knowing the width of the building and the angle of inclination of the roof, you can determine the height of the ridge of the gable roof. Knowing the two legs of a right triangle and using the Pythagorean theorem, we can calculate the hypotenuse of each right triangle, which is the required length of the rafters of our roof.
As a result, to determine the final length, another 30-50 cm must be added to the obtained value to ensure roof overhangs.
All calculations carried out to determine the height of the ridge (also known as the height of the pediment) and the length of the rafters are clearly shown in the image:
From all of the above, we can conclude that a gable roof is the cheapest and most versatile type of roofing for a private home. There are examples when, using improvised means, people erected a gable roof on their own alone. But we still advise you to use the help of specialists in such matters, because a well-made roof over your head means comfort and coziness in the house.
Roof calculation
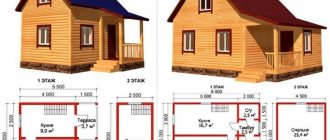
Like any construction process, the roof structure of a house must be created with your own hands based on engineering calculations. For the convenience of its implementation, before building a gable roof, you need to sketch out a rough plan, which must indicate the length of the roof along the ridge, the exact length of the slopes, taking into account plumb lines. At this stage, the slope of the future roof should already be determined:
- If the main aggressive factor in the construction area is wind, then it should be 10-10° so that its gusts do not tear off the roofing material.
- If construction is started in an area with a lot of winter precipitation, a slope of 35-45o is more appropriate, which does not make it difficult for snow to slide off the roof.
When calculating the required material, it is better to round the obtained values up, without complicating the calculations by deducting holes for chimneys or roof windows, in order to avoid confusion.
The necessary calculations do not require knowledge of complex formulas, so anyone who has taken a school mathematics course can perform them. However, the more sophisticated and complex the gable roof of a house, the higher the complexity of the calculations and the design of the rafter system.
Designing a gable roof structure for a house
The first and fundamental stage in the construction of a gable roof is its design. We have already said that the choice of roof angle will determine the load taken by the roof, and, as a consequence, the choice of roofing material that can withstand precipitation and the loads from this precipitation and wind.
At this stage, design drawings of the future roof are created and all necessary calculations are carried out. This is necessary, first of all, to have an idea of the general appearance of the roof and its dimensions, as well as to take into account all the expected maximum loads.
After the design, you will have in your hands the entire package of documents, which will indicate all the dimensions of the future roof, its area for the purchase of roofing materials, and the full range of lumber used in the construction. Having a list with the nomenclature of lumber will allow you not to spend extra money on its purchase, since lumber is the main expense item when building a roof.
After all design work has been completed, they proceed directly to construction work. When doing the work yourself, you save half of the budget that could have gone to paying builders. In this case, it is important to remember to comply with all norms and rules so that the final result meets expectations.
Video on assembly and installation of gable roof rafter system
Building a gable roof with your own hands is not easy: there are a lot of subtleties and nuances, there are different methods of fastening and extension. Describing them in words is a thankless task. This is the case when it is better to see. Below you will find a selection of videos that may be useful to you.
Video report on how a gable roof is made
The house owner's story about the stages of construction. There are interesting technical points that may be useful.
Two types of rafter connections: rigid and sliding
Video about the two most problematic types of connections.
Construction of a gable roof step by step
Installation of the Mauerlat of a gable roof
The Mauerlat takes on the entire load from the roof and transfers it to the walls, so a fairly thick and strong beam is chosen as the Mauerlat. The thickness is chosen based on the thickness of the wall on which it rests. As a rule, they tend to choose the thickness of the mauerlat beam equal to or close to the thickness of the wall.
The Mauerlat must be laid flush with the outer part of the wall, firmly connecting them together. To connect the Mauerlat to the wall, anchor bolts or wire are laid (poured into the reinforced belt) even at the stage of wall construction. If wire is used as fastening, then after laying the timber it is tightly tied with this wire around and remains firmly fixed in this form. If anchor bolts were walled into the wall, through holes are pre-drilled in the mauerlat, with which the beam is placed on the bolts and tightened from above with nuts and wide washers.
It is also important not to forget to lay a layer of waterproofing material in the form of a gasket between the wall and the Mauerlat. As a rule, roofing felt or similar materials are used as waterproofing. More information about securing the mauerat is described in this video.
Installation of gable roof rafters
After the base has been prepared, we begin to assemble the rafter system of the gable roof. Installation of rafters can be done in several ways: install the rafters directly on the roof or perform some structural elements on the ground and then lift them to the installation site using special equipment. Correctly placing the rafters on a gable roof with your own hands without the help of a partner is quite problematic, so it is better to get help so as not to make a mistake and not nullify all your efforts.
To make it easier to attach the beams, it is worth marking the attachment points on each wall and connecting the opposite walls with beams (beams), on which racks will be installed to support the rafters. A ridge beam is installed on the racks, which serves as a guide for installing the rafter system. In order to connect the rafters as accurately as possible so that the entire skeleton of the rafters is the same, templates are used. This way you can avoid dips and distortions in the roof.
After installing the ridge beam, they proceed to the most important part - the installation of rafters (already fastened together or separately). It is important to constantly monitor the level and evenness of the installation. The rafters are fastened together, usually with nails or using iron staples. Common schemes for placing rafters on a gable roof and attaching them to each other are shown in the figure below.
After completing the roof frame, it is necessary to install auxiliary fasteners to improve the rigidity of the roof. To do this, install struts and middle skates.
We invite you to watch a video that clearly shows how to install rafters with your own hands for a gable roof.
What are the main parts of the roof?
A gable roof has several parts in its design. The following are the elements that make up the roof structure:
- Mauerlat.
- Rafter legs.
- Vertically located racks.
- Struts.
- Puffs.
- Horse.
- Sill.
- Lathing.
To understand what function all these elements perform, let’s look at each of them individually.
Mauerlat
If earlier, when installing the roof, not even one nail was used, now everything is attached to steel elements, without them it’s impossible. The Mauerlat must be securely fastened. And this can only be done by using steel rods or anchor bolts. Threaded rods are embedded directly into the wall. The main function of the Mauerlat is to transfer load pressure directly to the external walls . The upper part of the wall ends with the Mauerlat; the timber must be laid on top.
To ensure the structure has sufficient strength, timber made from coniferous wood should be used. Most often, such timber is made in a square shape with an edge length of 10 or 15 cm. Look at the diagram for attaching the Mauerlat to visualize this process.
Rafter legs
Rafter legs are usually called boards that are attached to the mauerlat. Their cross-section can be 5*15 cm or 10*15 cm. Rafter legs are necessary to give the roof structure a regular triangular shape. Together, the two rafter legs form a truss. The number of trusses that need to be built depends on how long the house is, as well as what type of roofing is used. The distance between trusses is usually from 0.6 to 1.2 m.
When choosing your stride length, be guided by the climate in your region. In strong winds, the step should be smaller. The same applies to regions where there is increased precipitation in winter. Snow is very heavy, especially if it is wet, this is worth keeping in mind.
Vertical racks
Rack elements are extremely important. Using vertical posts, the load is transferred directly to the load-bearing walls of the building. The rack bars have a cross-sectional area of 10*10 cm. They are located inside each of the trusses.
Struts
It is important to install the braces at an angle. These are the elements between the posts and rafters. In the production of struts, edged timber is used. The struts perform the most important function - increasing the load-bearing capacity of the roof structure. The brace serves to strengthen the side of the truss.
Puffs
A tie is an element by which the parts of the rafters are connected from below. In fact, the beam itself is called a tightening. It is located at the base of the triangular part of the farm. The function of the tightening is to increase the strength of the truss and make it more resistant to significant loads.
Skate
A ridge is a functional element that connects two slopes to each other. It is located at the highest point of the roof. In fact, a ridge is called a longitudinal beam. It may consist of one or two boards. In the case when two boards are used in the construction of the ridge, they must be nailed on both sides. In this case, the connection must be made at a strictly defined angle.
In the lower part, directly under the ridge, there are vertical posts. And the end parts of the rafters are attached to the sides.
Sill
A beam is used when the distance of the run from one external wall to another is more than 10 m. A beam having a cross-section of 10*10 cm is usually called a beam. It is laid parallel to the central load-bearing wall.
Lathing
The term sheathing refers to boards that are placed on top of the rafters. You can also use timber to install the sheathing. There are several types of lathing. These are solid structures with gaps between each other. Which type of sheathing is best to choose depends on the type of roofing. The sheathing should be fastened in a horizontal plane, strictly perpendicular to the direction of the rafters.
Mauerlat installation
In houses made of wooden logs or timber, the role of the mauerlat is played by the top row of the frame, this makes the process simpler. A groove is cut out on the inside of the log into which the rafter leg is installed.
In brick or block houses, the Mauerlat is laid as follows:
- When laying the last rows, threaded metal studs are installed in the masonry. They should be located around the entire perimeter of the house at a distance of about 1.5 meters from each other.
- The upper part of the walls is covered with roofing felt in several layers, piercing it with studs.
- Holes are drilled in the beams in accordance with the location of the studs.
- Lay the beams, putting them on the studs. At this stage, it is important to ensure that the beams are laid exactly horizontally and that the opposing elements are parallel to each other.
- The nuts are tightened on the studs, pressing the Mauerlat. Read also: “How to install a Mauerlat for a gable roof - installation options, mounting procedure.”
The result of this stage should be a rectangle of the correct shape, located on the same horizontal line. This design makes the structure more stable and facilitates subsequent work. The completion of the work is cutting out the grooves in accordance with the size of the rafters.
How to make a sheathing correctly
Before laying the sheathing, the rafters are covered with a layer of waterproofing, protecting it from getting wet. Waterproofing is laid in a horizontal direction, starting from the eaves and going up. The strips are laid with an overlap of 10-15 cm, the joints are sealed with tape.
There must be a ventilation gap between the sheathing and the waterproofing; for this, slats with a thickness of no more than 4 cm must be placed on each rafter leg.
Now you can sheathe the rafter system. The sheathing can be made from timber 5*5 cm or boards having a thickness of no more than 4 cm and a width of more than 10 cm. The sheathing begins from the bottom of the rafters, maintaining a certain step.
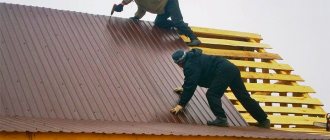
After installation, the sheathing begins to cover the gables and overhangs. Depending on the construction budget and the desires of the homeowner, you can make a gable roof with your own hands with gables made of plastic, corrugated sheets or wooden boards. Knowing how to sheathe the gable of a house with corrugated sheets, you can carry out the installation yourself. The sheathing is attached to the sides of the rafter using nails or self-tapping screws. Overhangs can be hemmed with all kinds of materials.