Features of a hip roof
It is impossible to make a correct calculation without understanding the subject itself. Each element of the rafter system plays a very important role; any errors have an extremely negative impact on the overall strength and stability of the system. Even small miscalculations can cause emergency situations. What parts does a hip roof consist of?
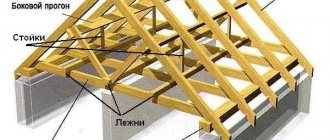
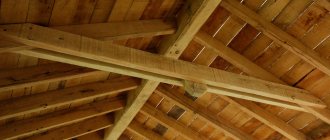
The rafter system of a hip roof differs from a conventional gable roof
Table. Components of a hip roof
| Roof element | Brief description and purpose |
Diagonal rafters (sloping) | The longest and most loaded elements of the rafter system. They are installed at the corners of the slopes, and the spouts rest on them. As a rule, they are made of paired rafters, due to this the load-bearing capacity is increased. |
| Ordinary rafter legs | They are no different from the rafters of ordinary pitched roofs; most often these are 50x150 mm boards. |
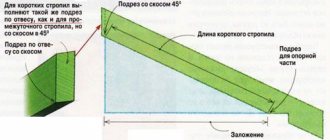
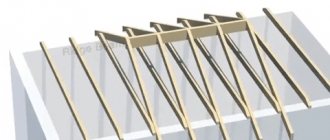
| Narozhniki | The hips are formed, the top rests on the slanted rafters, the heel is on the mauerlat. In order to reduce the load on the diagonal rafters, additional supports are installed. Depending on the specific features of the roof, the roofers can rest on a truss, corner struts, etc. |
Supports for diagonal rafters
When choosing a hip roof, you need to know about its advantages and disadvantages.
Design advantages:
- during construction there is no need to take into account the direction of the prevailing winds, the roof has completely identical windage parameters on all sides;
- The roof is rigid and can withstand significant snow and wind loads. The use of special elements makes it possible to cover houses with a large area;
- has no pediments, which somewhat facilitates and reduces the volume of masonry work.
A hip roof allows you to save on the construction of house gables
Flaws:
- requires a lot of lumber, this increases the estimated cost of the structure;
- technological complexity. The process of erecting a hip roof has many individual nuances; such work can only be performed by very qualified builders;
- a large amount of unproductive waste of roofing materials. This is especially true for metal roofs - pieces cut off at angles have to be thrown away.
The main disadvantages of a hip roof are the complexity of construction and the large amount of waste building materials
General algorithm for the functioning of the calculator
There are many different calculators on the Internet, but they all work in the same way and use the same formulas. None of them can change the mathematical principles of calculations; the program includes generally accepted norms and formulas. At the output, users receive the parameters and number of rafters, including those located diagonally. The length of the ridge and the volume of lumber for the sheathing are calculated. If desired, you can calculate the number of roofing materials depending on their type, the footage of waterproofing materials, etc. The user must enter the initial data one by one, and the recommended dimensions should be used.
Example of an online calculator for calculating a hip roof
What formulas does the calculator use? Let's list just a few of them.
- Ridge height. H (ridge height) = b (building width) / 2 × tan A (slope angle). The parameters of all elements of the hip roof depend on the height of the ridge.
- Length of sloped rafters. C (rafter length) = b (building width) / 2 × cos A (slope angle). These are the longest and most loaded parts of the rafter system; increased attention is paid to their strength.
Formulas for calculating the height of the ridge and the length of the rafters
- Length of ordinary rafter legs. D (rafter length) = h2 (ridge height) + b2 (building width) / 2. The number of legs takes into account the width of the insulation materials. The width and thickness are selected depending on the current loads.
- Hip roof area. The program automatically sums up the area of all slopes. The dimensions of triangular slopes are determined by the formula S (ramp area) = [a (width of the triangle) × h (height of the triangle)]/2. The area of the trapezoidal slopes is calculated by the formula S = (a+b)×h/2, where a is the length of the slope in the ridge, b is the length of the slope along the eaves line, h is the height of the slope.
Formula for calculating the area of a hip roof
Hip roof area calculator
Go to calculations
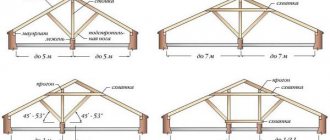
Roofing device
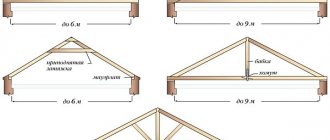
The hip roof belongs to the category of hip roofs. Its two opposite slopes are trapezoids, the other two are triangles. They are joined together by so-called corner rafters, which create boundaries between the slopes. These are the load-bearing elements of the hip roof, the cross-section of which determines the load-bearing capacity of the structure as a whole.
In addition to the corner rafters in terms of load-bearing structures, there are other elements in the hip roof:
- ridge beam, which is the support for the main number of rafters;
- the rafter legs are central, they rest on the roof mauerlat with one end, the other on the ridge, and are located in the plane of the trapezoidal slope;
- hip rafters form hip slopes, resting with their upper ends on the corner rafters.
How to use a calculator to calculate the amount of building materials for a hip roof
There is nothing particularly complicated - the main thing is to carefully enter all the initial data, taking into account the recommended dimensions of the loaded elements of the rafter system. The calculator will allow you to find out the cost of building materials, familiarize yourself with the drawing and nomenclature. Before starting work, it is recommended to carefully study the instructions; on most sites they are quite detailed.
Step 1. Go to the fill fields, this is where work begins on each calculator. Select the roofing type for the hip roof. Two options are offered.
- Tough. This refers to metal tiles, metal profile sheets, asbestos-cement slate or piece tiles. A rigid roof has more waste; the calculator will calculate their amount depending on the roof parameters.
- Soft. There is little choice here. Only bitumen shingles are used.
First of all, you need to indicate the type of roof
There is no need to enter specific names of roofing materials, you just need to note the type.
Step 2. Specify the length, width of the building and its height. Height is the distance from the ceiling to the ridge; the volume of the attic largely depends on it. The width of the building is not the width of the house, but the width of the rafter system, taking into account the roof overhang from the wall to the edge of the roof.
The following are the main parameters of the house:
Step 3. What materials will the rafter legs be made from? Most often, boards of 50x150 mm are used, but the dimensions may vary depending on the climatic zone of the building. For example, in the northern regions, the width of the boards can reach 200 mm or more. This situation is explained by two reasons: high snow cover and the need to install insulation with a thickness of at least 25 cm.
The next important parameter is the cross-section of the rafters
Step 4. Mark whether the roof will be warm or cold. This parameter affects several factors on which the calculation algorithm depends.
- Warm roof. The distance between the rafter legs must correspond to the width of the insulation materials. Due to this dependence, their number is affected only by this factor; roof loads are ignored.
- Cold roof. For a cold roof, the pitch of the rafter legs can reach 90 cm or more; the main calculation criterion is the maximum load forces possible in a given region.
The distance between the rafters is selected depending on the presence or absence of insulation
The dimensions of the battens for sheathing are indicated as standard, and their pitch is influenced by the technical characteristics of the roofing coverings. The lathing can be stepwise or continuous.
Step 5. Specify the dimensions of the metal sheets and their overlap. These data make it possible to find out the actual usable area of each element and their quantity, taking into account unproductive waste.
Be sure to indicate the dimensions of the roofing sheets and the width of the overlaps
If you want to count the counter-lattice and the mauerlat, then check the boxes next to these elements and enter data about them.
- Mauerlat. It can be made from timber 150×150 mm or boards 50×150 mm.
- Waterproofing . Recommended overlap is 10 cm.
- Counter-lattice. Made from bars 50×50 mm.
- Insulation thickness. Depends on the region of residence, but not less than 10 cm. Less is prohibited; a dew point will appear in it, which has an extremely negative impact not only on the effectiveness of the insulation, but also on the service life of the rafter system.
To calculate individual elements of the system, you need to check the box next to them
After filling out all the available fields, you must confirm the data entry and click on the special icon. At the output you will receive the quantity of all materials needed to build a hip roof. Now all that remains is to find out the current prices for them and decide on an approximate estimate. The calculation results can be sent to the contractor by e-mail, printed or saved on a computer.
The calculator displays the calculation results in the column next to the original data
Types of roofing coverings
When determining the type of roof and roofing material, they always take into account the angle of inclination of the slope. In the case of a hip roof structure, it is possible not to pay so much attention to this parameter, because almost any roofing material is suitable for it.
Types of coatings:
Roof tiles. This type of roofing material, which is often used in the construction of a hip-type hip roof, has many varieties.
There are tiles made of cement, ceramics, a bituminous variety, which is otherwise called soft tiles, and metal. Slate. Varieties of slate are used for hip roofing without exception. However, when choosing this type of material, much depends on the need to construct a residential-type attic or attic.
In this case, it is better not to use metal slate (metal profiled sheet material); it cannot create a comfortable atmosphere in the room under the roof. To cover a hip roof, under which there is a living space, it is better to use Euro slate. The composition of the material is fiberglass and bitumen impregnation, thanks to which the roof is ensured reliability and good heat-insulating properties. VIP coating.
This coating is an ideal solution for roofing. It can be put on a par with slate tiles and reed roofing, which give a majestic appearance to the house, especially if they cover a hip roof. There is only one disadvantage in this case - the high cost of the materials, but relative to other qualities and properties of the VIP materials, they are made at the highest level.
Types of roofing coverings
Calculator for calculating the hip roof rafter system
It makes it possible to obtain technical design data with a drawing. This is very important information for builders.
First you need to enter the following data into the calculator:
- roof height from ceiling to ridge;
- length and width of the building;
- planned roof overhang at the eaves (soffit);
- width and thickness of rafter legs;
- distance between rafters;
- width and thickness of materials for sheathing under roofing;
- sheathing step.
Each parameter has a letter designation
This is standard data for most calculation calculators. Data can be entered in centimeters or millimeters; instructions for using the calculator specify the feed parameters.
For the convenience of entering the required values, there is a basic schematic drawing of a hip roof with letter designations for each size. It allows developers to navigate and avoid mistakes when entering initial data. In addition, this drawing explains the format in which the calculator produces calculation results.
The calculator gives a schematic drawing in which each element has its own designation
Without a calculator, the developer was forced to carefully draw a sketch of the structure, determine the length and methods of cutting each element. There was a problem with waste; it was difficult to use pieces of different lengths, and there are a lot of them when building a hip roof. Sometimes it was necessary to throw away expensive lumber due to a lack of understanding of the algorithm for its further use.
How to Sketch a Hip Roof
Selecting the roof slope angle and determining the height of the ridge
As in previous calculations, the process of determining the height of the ridge depends on the selected slope angle. Despite the fact that the hip roof structure allows you to build slopes with different angles, it is best to make a structure with the same angles.
This will allow the load to be distributed evenly and the roof to have an aesthetically pleasing appearance.
A more specific definition of such a parameter is influenced by:
- The factor of increased load from snow suggests the construction of a structure with a steeper slope. If the wind in the area where the house is located is strong and gusty, then it is recommended to make the slope no more than 30 degrees. The intention is to use the attic room as a living space. In this case, the ease of movement around the attic and the ability to provide all communication structures in such a way that they can be easily accessed if necessary are taken into account. The coating chosen for the roof also plays an important role. When choosing a specific material, you need to inquire about the minimum permitted characteristics regarding the angle of the slope.
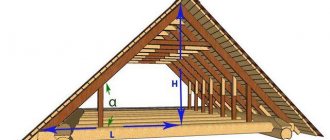
Regarding the height of the ridge, it is very simple to determine it, knowing the value of the angle of the slope. In the design, it is necessary to conditionally select a right triangle, in which one of the sides will be the desired height.
Formula: h = b / 2 * tanA.
Roof angle
What results do users have?
- General plan of the hip roof rafter system (top view). It shows the overall dimensions of the structure, the schematic location of the rafters and sheathing. This plan is for informational purposes only; it does not contain details of interest to builders.
- Working drawing of the rafters arrangement. Each of them is assigned its own number, the distances between the elements display user-specified values. The numbering of the rafters allows you to see its location on the roof, and later find out the linear dimensions.
- Drawings of slopes in two projections. Due to the fact that the hip roof has two absolutely identical slopes, there are also two drawings. They indicate the height and width of the slope, the width and height of the eaves overhang. This data is required to control the main structural elements and is used during construction as starting points for measurements.
The user receives a detailed diagram of the rafter system
Important! Working drawings must always be before the eyes of builders; not a single parameter can go beyond the specified limits. The calculator provides details of each element, thereby greatly simplifying and speeding up the process of preparing the parts of the rafter system.
Common mistakes when calculating a roof
Many even experienced craftsmen, when calculating a hip roof, immediately begin to draw up a drawing and a detailed plan, which is extremely incorrect. Behind these actions lies the main mistake - the lack of measurements of the building box. There are general dimensions, of course, but few people pay attention to the walls. From the outside they appear smooth with perfectly right angles. But if you take additional accurate measurements with your own hands, you can find many invisible errors even on a new house. Ignoring them will lead to the fact that the completed roof drawing will contain incorrect dimensions of some components. These errors will prevent the first supports from being installed correctly.
Before making a calculation for a hipped roof, you need to take a level, tape measure, construction cord and make new measurements. Using a cord and a tape measure, measure the diagonals between opposite corners, and check the heights of the walls with a level. Although there are small inaccuracies, they will still be there and they need to be corrected:
- Non-parallelism of the walls of the box is leveled due to the correct location of the Mauerlat.
- A small error in the height of each wall is corrected with pads under the Mauerlat.
If, surprisingly, the control measurements made by yourself showed large errors, additional elements of the roof frame must be added to the calculation and drawing to correct the shortcomings.
Important! A two-dimensional drawing of the roof frame creates an erroneous vision of the structure. To have a complete picture of the future roof, you need to create a three-dimensional model of it yourself.
Based on the developed model, it is easier to determine whether you like the design or not. You can still change something at the design stage. In the future this will not be possible.
Advice! When looking on the Internet for a ready-made drawing for certain dimensions of a house box, you should not take detailed diagrams with complex formulas and Latin notations. Only a specialist can understand them.
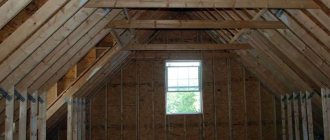
To better imagine the process of building a hipped roof, you can see a master class in the photo, which shows all the main components and stages of their construction.
What information do builders receive?
Professional developers also actively use such calculators in their work. What does this give them?
Rafter parameters
The most important loaded elements of any roof are the rafters; all the main operational characteristics are directly dependent on them. Each rafter is designated by its individual number, and its length is calculated. This applies to all types of both ordinary and slanted rafters, and splices. Now the developer can correctly mark the rafters and can easily navigate the further use of short sections.
A detailed plan makes it possible to correctly mark and install rafters
But that’s not all, the calculator produces a very detailed detailed drawing, on which you can see the technology for sawing the junction points of the rafters:
- the distance from the top of the leg to the bottom. This parameter makes it possible to make the required angle of inclination of the junction of elements;
- the corners of the side cuts - these planes are used to fix the splices to the layered rafters.
Accurate calculation helps to correctly perform rafter junction nodes
Now, when cutting off each rafter leg, there is no need to use squares.
Not every developer knows how to handle such measuring tools, which increases the likelihood of errors. They are difficult to correct; subsequent correct adjustment reduces the length of the board, and it can no longer be installed in the planned location. Accordingly, it is necessary to change the angles of adjacent planes, and this again can cause an error.
General data of hip roof
Last, but not least, a block of information. For a general idea, the roof area, length of eaves and ridge are given. Based on data on the total area, the developer calculates roofing materials based on their type. There is a list of all elements of the rafter system, their length and quantity. The data is summarized, giving the total footage of the rafter legs and the volume of required lumber based on their width and thickness.
Using online calculations, the developer receives the exact amount of roofing covering
As for the lathing, here too the calculator provides significant assistance to developers - they know the length of each batten depending on the row of its fixation. Workpieces can be cut on the ground and already fitted slats can be placed on the roof, reducing the amount of waste and speeding up work. In addition, the safety of construction work is significantly increased; sawing on the ground is easier than doing it at height in an awkward position. Using the sheathing, the total length and cubic capacity of the lumber are also calculated.
Based on the calculation results, the required volume of lumber for the rafter system is purchased
Video - Hip roof calculator
The calculation on the calculator allows you to see the design drawings of the slopes and sheathing, and find out the required amount of building materials. Based on the information received, the developer can find out the cost of a hip roof and determine a specific estimate for materials. If you do not have your own experience in arranging rafter systems, then it is advisable to additionally consult with professionals. To complete the information, you need to understand the technology for constructing such roofs; a detailed description is available on the pages of our website.
Calculation of roofing material consumption
The roofing pie includes waterproofing, and if the attic is warm, you will also need a vapor barrier and insulation.
The amount of hydro- and vapor barrier is always the same. These materials represent a film or membrane. The only difference is where they are attached. Waterproofing is laid on top of the rafters, and vapor barrier is installed on the inside. You can calculate their consumption with your own hands based on the total area of the slopes, making a 20% allowance for overlaps.
Thermal insulation consumption depends on the number of rafters and the distance between them. This is due to the fact that the insulation is placed between the rafters. Although this is not so important, because the total consumption will still correspond to the total area of the slopes. The only exception is that there will be no need to allow for overlap.