The construction market offers a wide selection of high-quality flooring. Despite their diversity, many consumers prefer wooden floors.
Wood has many advantages, the main one of which is its naturalness. But the natural origin of the material is its main disadvantage - wood is sensitive to changes in humidity and temperature. Under the influence of unfavorable factors, it swells, dries out, and cracks form between the lumber. Laying a floor made of tongue and groove boards can eliminate this drawback.
The correct choice of materials will allow you to increase the service life of floorboards. And you can get a perfectly flat, seamless surface if you lay the boards with your own hands in compliance with certain rules.
What is a tongue and groove board?
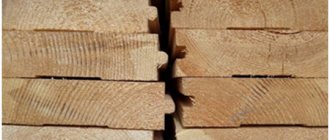
This definition applies to lumber that has a groove cut along one side and a tongue (tenon, ridge) along the other.
Thanks to this feature, when laying the floorboard, the tongue fits into the groove, providing a strong connection that ensures there are no gaps.
During the production process, the material is dried and polished on both sides. In order to reduce the final cost of the product, lumber can be sanded only from the front side. Special grooves are cut on the back surface to ensure air exchange and prevent the formation of fungus.
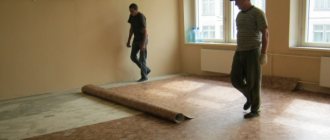
Laying on a plywood base
Joists, screed or an existing wooden floor can be used as a base for plywood. Installation of plywood is done using dowels, screws or glue.
When laying boards on a plywood base, choose moisture-resistant plywood with a thickness of 18 mm or more
Note! When choosing an adhesive method, it is important to choose a composition that will ensure high-quality adhesion to the base material.
Table 5. Laying boards on a plywood base
| Illustration | Description |
| Plywood sheets are glued to the cleaned and level screed. | |
| For gluing, a 2-component adhesive composition specially designed for these purposes is used. Apply it in a thin layer using a notched trowel. | |
| Plywood is laid with seams staggered in each subsequent row. Holes for dowels are made in each sheet in three places - along the edges and in the center. In this case, the hole should be located at a distance of several centimeters from the edge. | |
| The plywood is pulled to the screed with dowels. | |
| After laying, the plywood is sanded. | |
| After this, use a vacuum cleaner to remove wood dust. | |
| Before laying the boards, prepare an adhesive solution. | |
| Starting from the corner, apply glue with a notched trowel. | |
| When laying diagonally, work begins from the corner, not forgetting to leave a gap from the wall. | |
| Additionally, the board is fixed with a self-tapping screw to the plywood base. |
Prices for floor boards
floor boards
Criterias of choice
When choosing lumber, the following indicators are taken into account:
- wood type;
- size;
- quality category;
- humidity.
Choosing a wood type
The tongue and groove board is made from the following species:
- pine trees, spruce trees;
- larches;
- oak, ash.
Features of pine and spruce
The main advantages of spruce and pine include the following indicators:
- low cost;
- elasticity;
- high heat capacity.
Pine and spruce grow throughout Russia. The pine lumber floor is pleasant to step on with bare feet. It remains warm even in the winter cold.
The disadvantages include the following:
- softness;
- high moisture absorption;
- susceptible to rotting and insect damage.
It is not recommended to lay pine floorboards in public places, as they are left with dents from heels and legs of heavy furniture. Dents remain after falling heavy objects.
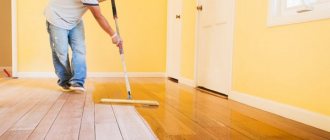
Such material requires a mandatory multi-layer coating with high-quality varnish that protects the board from moisture and other adverse factors.
Features of larch
Larch is a coniferous species. Unlike previous options, it is characterized by increased hardness. Under the influence of moisture, larch does not collapse or rot, but becomes harder.
Larch flooring does not require varnishing. It is treated with oil impregnation, which preserves the natural texture of the wood. The main disadvantage of this material is its high cost.
Features of oak and ash
Oak and ash are deciduous tree species. The oak floor looks very good. And it can last for several decades. Floorboards made of oak and ash do not require varnish.
Oil impregnation treatment is sufficient. However, laying tongue-and-groove boards made of oak and ash is not affordable for most consumers. The material is highly expensive.
Laying a wood floor from oak will require quite a bit of capital investment.
Size selection
The size of the material is determined by the following indicators:
- width (from 70 mm to 200 mm);
- thickness (from 18 mm to 45 mm);
- length (3-6 m).
The strength and durability of the floor depends on the thickness of the lumber. When laying on joists, it should be taken into account that the thinner the board, the smaller the distance between adjacent joists should be. The joists act as supports, preventing thin floorboards from sagging.
The choice of width depends on consumer preferences. Laying material that is too narrow will take a long time. It is also not recommended to choose floorboards that are too wide. The optimal width is 130-150 mm.
The length of the material should be slightly longer than the length of the room in which it is intended to be laid. If the room is too long, it is possible to join the floorboards on the joists.
Quality categories
There are 4 quality categories for tongue and groove boards:
- extra;
- class A;
- class B;
- class C.
Extra is the highest category of quality, guaranteeing the absence of cracks, knots, and other defects on the surface of the lumber. Floorboards from the same batch have the same structure and shade.
Class A - first-class material. It includes lumber that does not have defects on the surface, but differs in structure and shade. Class B is established if there are small brown spots, knots, and cracks on the surface of the material. All three options can be used to finish the floor.
Class C includes third-grade material that has knots on the surface, a significant number of brown spots, cracks, and through holes. Such boards are suitable for arranging a subfloor.
Humidity
Drying is one of the stages in the production of tongue and groove boards. Wood can be dried in autoclaves (chamber drying) and in natural conditions. Boards dried in autoclaves are of higher quality.
Drying chamber for wood
The optimal moisture content of materials should be 10-16%. This indicator guarantees that the boards will not shrink during operation.
Boards that have been kiln-dried are packaged in polyethylene, which protects the material from environmental influences. During the selection process, you should pay attention to the following:
- when tapping on dried boards, a ringing sound is produced, while on wet boards, a dull sound is produced;
- the plastic packaging must be undamaged and there must be no condensation inside;
- high-quality factory boards have a light glossy shade, while raw floorboards have a dark matte shade.
Tips for laying floorboards
How to choose the right board
All the advantages of tongue and groove boards appear only with the correct selection of material and sufficiently high quality. Let's figure out what you should pay attention to when choosing.
Wood type
One of the most important characteristics is the type of wood from which the board is made. The most commonly used conifers are spruce, pine, and larch. More expensive varieties are made from deciduous trees. Ash, oak, and noble wood species are used. The choice of breed is a compromise between price and quality:
- The most affordable boards are made of pine or spruce. However, their durability leaves much to be desired. A dent on such a tree can be caused by a fallen heavy object, furniture legs, heels, etc. To protect against damage, the floor is varnished in several layers, but this increases the cost of the coating.
- Larch has sufficient strength; it does not need to be varnished. At the same time, the pattern of wood fibers is pleasing to the eye, the floor looks great even without coating. The disadvantages of larch boards include their high cost.
- Oak or ash boards are the most aesthetic option. But the high cost makes the use of this material unjustified in most cases.
The downside of strength is difficulty in processing. Therefore, it is advisable to buy boards made of hardwood of higher quality. It will be more difficult to adjust the unevenness of the coating that has arisen due to the poor quality of the elements when laying larch boards than when using pine lumber.
Thus, in most cases, larch boards provide the optimal combination of reasonable cost and high performance and aesthetic qualities.
Variety and characteristics
The grade of a board is determined by its external characteristics:
- The absence of dark knots and other defects on the board (chips, cracks, stains) allows it to be classified as “Extra”.
- A single brown or black knot (in the absence of other defects) is typical for category “A”.
- In the “AB” category, brown knots and other minor defects (stains, uneven wood structure) are acceptable.
- The lowest class (category “C”) implies the presence of single through knots, as well as stains and texture irregularities.
If you plan to make a subfloor, category “C” will suffice. If you do not plan to do a final coating, choose a material from the first three categories, focusing on price.
Dimensions
The geometric parameters of the board are selected based on the following considerations:
- The length is determined based on the length of the room. This approach will avoid joints in the row. The most common are three- and six-meter boards, but many manufacturers also produce options with a length of 4 m, 5 m, or are ready to make lumber of the required length to order.
- Thickness ranges from 1.8 cm to 4.5 cm. Thin boards are cheaper, but their use for flooring is not justified. Thin boards will sag. To avoid this, you will have to install lags more often, and this will negate all savings. Boards with thicknesses of 2.8 cm, 3.6 cm, 4.5 cm are optimal for flooring.
- The width of the boards varies from 7 cm to 20 cm. You should not take boards that are too narrow: installation will take too long. But a board that is too wide is not ideal, since the risk of deformation is higher. Most builders prefer the average (12-15 cm).
In general, the choice of size should be made based on the tasks set, the volume of the estimate and your own skill.
Installation features
The purchased material must remain in the room where it is intended to be installed for a week. During use, the boards can dry out, forming cracks.
Therefore, you need to lay the floor in two stages:
- First, every 4-5 boards are fastened;
- After 6-8 months, the floor is pulled together and each floorboard is secured to the joist.
During the drying process, wood can lose its attractive appearance. The initial fastening with the back side up will allow you to avoid unnecessary labor costs associated with grinding. After six months, the floorboards are turned over with the front side remaining clean.
You need to purchase material with a reserve, since during the process of shrinking and tightening several boards may not be enough.
Laying floor boards along joists
The method of laying floor boards on logs is relevant for private wooden houses and log houses, buildings made of other materials, as well as for apartments with reinforced concrete floors with a sufficient ceiling height. Flooring with joists or beams is an alternative to cement screed and is used when the base is weakened and cannot support the bulk of the self-leveling floor.
Read more about attaching joists to a concrete floor in a special article.
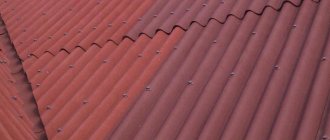
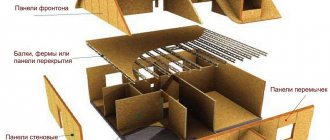
Floor design when laid on joists
Wooden flooring laid in this way can be rough or finished, or it can even combine a rough structure with insulation and a finishing decorative layer of high-quality boards. In the latter case, additional finishing of the boards with varnish, wax, oil or paint will be required.
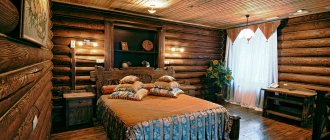
Wooden floor in the bathroom
Wooden floors always look expensive and beautiful, they are durable and environmentally friendly, so they can be used for bedrooms and children's rooms. For the arrangement of rooms with high humidity - bathrooms, baths, wood is used that is resistant to moisture, dries quickly and is not subject to deformation under the influence of temperature changes.
The nuances of making wooden flooring using joists
The main feature of any wooden floor is the vulnerability of the material to moisture, which wood can absorb from the environment, to deformation due to temperature changes and a tendency to rot. In this regard, before installing them, the logs and the floor board on all sides are carefully treated with antiseptic compounds.
The nuances of making plank flooring using joists include the following:
- When attaching boards to joists, it is important to ensure they are securely fastened. As a result, cracks and voids should not form, and sagging of logs and boards should not be allowed.
- If the coating is finishing, then it is important to ensure their maximum adjacency to each other, using special expanding wedges.
- It is important to choose the correct screw length - ideally it should be 2.5 times the thickness of the lamella.
- Before tightening the screw, you need to drill a hole with a smaller diameter for it. The exception is special wood screws, which have a special cutter at the end.
- When installing the finishing coating, it is recommended to use a hidden method of fastening the boards. If the fastening is open, then the heads of the screws are hidden using wood putty, matched to the color of the board.
- When purchasing boards, it is advisable to choose material from one batch so that the shade and degree of drying of the lamellas match.
Possible mistakes
The most dangerous mistake is neglecting the installation of a vapor barrier layer. For its manufacture, dense polyethylene or penofol is used, with which you can also increase the sound insulation of the room. If vapor barrier is abandoned, the wooden flooring will soon begin to rot, mold, creaks and signs of destruction will appear.
To avoid mistakes, you must strictly follow the installation technology
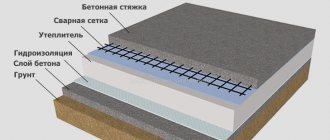
The main layers in the manufacture of floors using joists
The second mistake is choosing the wrong wood regarding humidity. The optimal value is 15%. As the ambient humidity increases, wood begins to absorb moisture. If the humidity outside is high, for example, it rains for several days in a row, then it is better to postpone the installation of the floor.
Boards that are too wet become deformed when they dry, cracks and differences form between them, and creaking appears.
You can check the evenness of the joists using a building level
It is also important to level the logs so that they are located in a single plane, otherwise, due to differences, the flooring will creak and soon become loose.
Gap Formation
Another nuance that should never be neglected is the formation of a compensation gap between the wall and the flooring at least 1 cm wide. With thermal expansion of the material, excess load will not be concentrated in the flooring, which can cause creaking and cracking of the boards .
Flooring by joists - pros and cons
The advantages of a wooden floor made using joists include the following:
- Natural, environmentally friendly and safe materials.
- The ability of wood to increase heat and sound insulation in a room.
- Relatively light weight of the floor structure.
- Unique natural coating pattern.
- The space under the joists can be used for laying insulation or hidden communications.
Laying communications under the joists
The disadvantages of wooden floors include the following:
- The material is flammable, so it is necessary to carry out appropriate treatment of the joists and boards.
- The material is sensitive to moisture and temperature changes.
- The process of laying a floor is a relatively labor-intensive process. It is necessary to control the tightness of the boards.
- High cost of material for finishing coating.
Preparation for installation work
Most often, tongue and groove boards are laid on joists. The base can be a subfloor or brick columns.
Before starting work, you should prepare the following:
- logs;
- finished floorboards;
- screws for wood (the length of the screws should be 2.5 times the width of the floorboards);
- electric screwdriver;
- jigsaw or hacksaw with a wide blade;
- level;
- hammer;
- construction staples;
- wooden wedges.
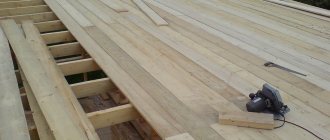
Features of laying the finished floor
In addition to straight grooves, floorboards are available with grooves in the form of a trapezoid or segment. Some floorboards are produced without ventilation and require careful cleaning of the surface of the joists (beams).
Increased labor intensity when laying a subfloor from boards without grooves. It will take a lot of time and effort to adjust the boards to reduce the gaps between the boards. True, if you plan to lay plywood on a subfloor, you can save money and instead of a tongue-and-groove board, lay a subfloor made of unedged boards. You can use ready-made solid flooring boards.
By the way, 20 mm FK and FSF plywood are used in the floor construction.
- The first board located against the wall needs to be cut off the tongue.
- The end joining of the floorboards is done offset. The distance between the end joints is more than 400 mm.
The growth rings of the boards should face in different directions.
For more details on laying floorboards, read the separate article: Laying wooden boards on joists
Installation stages
At the initial stage, the longest board is selected (preferably it matches the length of the room). The floorboard must be laid tongue-and-groove against the wall, leaving a gap of 1-2 cm between the wall surface and the board.
The gap is necessary to compensate for the thermal expansion of the wood. Wooden wedges are inserted into the space between the wall and the board. Upon completion of the work, the wedges will be removed and the gap will be closed with a plinth.
The outermost floorboard is secured with self-tapping screws along its entire length to each joist.
Next, take the second board and insert it with a tongue and groove into the groove of the laid floorboard. To press the boards as tightly as possible to each other, you should attach a wooden block to it and tap it with a hammer along the entire length of the floorboard.
3 more boards are laid in the same way. A hole is drilled in the lower edge of the groove of the fourth floorboard at an angle of 45-50 degrees. Through the hole, the board is secured to the joist with a self-tapping screw.
Next, we lay the remaining boards, securing every fourth one to the joist with a self-tapping screw. In most cases, the last floorboard has to be cut using a jigsaw. The width of the board is calculated taking into account the compensation gap. The floorboard is screwed along its entire length to the joists, and the wedges are removed.
After six months, the floor is dismantled and reassembled. During the laying process, the boards are pulled together and secured to the joists with self-tapping screws.
Methods of tightening
Floor screeding is done in several ways:
- wedges and staples;
- wedges and emphasis;
- screw jack.
Screw jack
In the first case, the bracket is driven into the joist at a distance of 1 cm from the floorboard. A pair of wedges are inserted between it and the bracket, which are driven in with a hammer. After tightening, the board is secured with self-tapping screws, the bracket and wedges are removed. The second case is identical to the first. The only difference is replacing the bracket with a wooden stop.
The jack is placed between the bonded floorboard and the joist. It is pressed against the floorboard through a wooden block.
The process of pulling together floorboards can only be avoided if you purchase “Extra” class lumber.
By covering the floorboards with impregnation or stain, you can get the perfect floor covering. The floor surface can be renewed by scraping and re-coating with impregnation or varnish.
Installation requirements
The floor structure is subject to serious loads more often than others. In this regard, poor-quality fixation of the lamellas leads to their rapid loosening and the appearance of squeaking. Over time, if no measures are taken, the gaps between the boards will increase, and the gradual destruction of the structure will begin.
Wooden floor in the interior
Therefore, when installing a plank floor yourself, special attention should be paid to the choice of fastening method, taking into account the purpose of the room and the upcoming loads. To make the structure rigid, strong and durable, you need to follow some recommendations, which will be discussed below.
When making a plank floor, the following should be considered:
- The flooring is manufactured using the floating method, which means that there must be a gap of at least 1 cm between it and the perimeter walls, as well as protruding structural elements.
- Logs are an important part of the structure, affecting the evenness of the future floor, so special attention is paid to their location in space - the elements must be located in a single horizontal plane.
- When joining lamellas along the length, the joints are placed staggered (in a checkerboard pattern). Each joint should be located in the center of the joist.
- When choosing a board, first of all, take into account its humidity level - high-quality dried material will not bring unpleasant surprises.
Construction of a plank floor on joists
Aspect #1 - wood type
The first thing people pay attention to is the quality and type of wood. Tongue and groove boards are made from:
Spruce and pine are inexpensive, easy-to-process species. Their main advantage is their low price.
In addition, they have excellent heat capacity, so spruce and pine floors always seem warm. However, it is better not to use them for floors in high traffic areas. Women's heels, furniture legs, fallen objects - all this can leave noticeable dents on the wooden surface.
Varnishing is required. Larch is a hard coniferous wood characterized by moisture resistance and durability. Larch boards have a beautiful, clear structure and rich color. Thanks to this, it is not necessary to cover it with stains and varnish. Oak and ash are durable, hard woods.
Their wood has a clearly defined texture and rich shade. Ash and oak boards are considered the most reliable and durable. However, they are also the most expensive.