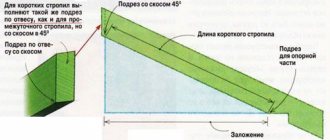
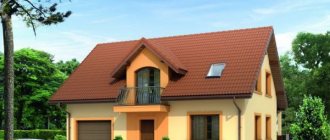
Many private households become much more attractive if a gable roof with an attic is added to the project. This is a good idea to use the free space under the roof. You will receive not only the design and architectural appeal of the house, but also additional rooms for living. But drawing up a project also poses many problems - for example, you need to correctly calculate the roof and choose a convenient device. We will tell you exactly how to make an attic with a gable roof in our article. But let’s touch a little on the broken design, since it is one of the most common.
Features of a roof with an attic
An attic is a structure in which people live. Its purpose, frankly speaking, is specific. Therefore, the roof will have the following features:
- The shape of the roofing system will be special, it is very different from the “classic” one.
- It is necessary to make a large number of windows in the roof.
- A full-fledged thermal insulation layer is installed, which allows for comfortable living of the people inside.
- You will definitely have to lay internal communications in the attic floor.
In the article we will present designs of houses with a gable roof and an attic, which people most often use during construction. But you should always remember that, in addition to standard projects, there are individual ones - you can always order them from an architect, but you will have to pay a certain amount.
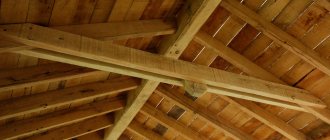
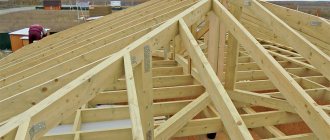
Roof truss system design
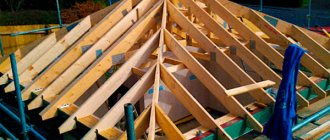
The most important element of the attic is the rafter structure. If you do it correctly, you will not only be able to correctly implement the arrangement of the attic, but also ensure the normal operation of the entire house. If you focus on practice, you can equip the attic floor with any roofing option. In the article we provided photos of houses with a gable roof with an attic. You can also see the broken structure of the roof and see the differences between the two systems.
Depending on the design of the building, even a pitched roof structure can be used. The use of hip or multi-panel roofs is also allowed. In other words, it all depends on your capabilities, desires and project. It is worth noting, however, that the design of a broken rafter system has a number of advantages - it allows you to increase the free space under the roof due to the fact that the angle of inclination changes.
This option would be almost ideal, unless you take into account the high construction costs. The consumption of materials increases, and significantly. But we cannot fail to mention that technically it is more difficult to construct such a roof than a simple gable roof. Its design contains the following elements:
- Ridge and side rafters.
- Sheathing of ridge and side rafters.
- Struts.
- Racks.
Rafters can be hanging or inclined. The latter are used if the project contains intermediate load-bearing walls. In other words, one side of the rafters should rest against the Mauerlat on the outer wall, and the other on the inner wall. As for hanging rafters, they have two tiers - lower (side) and upper (ridge). In order to give rigidity to the structure, racks and lintels are installed.
Calculation results
Roof:
Angle of side rafters: 0 degrees.
The angle of inclination is suitable for this material.
It is advisable to increase the angle of inclination for this material!
It is advisable to reduce the angle of inclination for this material!
Angle of inclination of ridge rafters: 0 degrees.
The angle of inclination is suitable for this material.
It is advisable to increase the angle of inclination for this material!
It is advisable to reduce the angle of inclination for this material!
Roof surface area: 0 m2.
Attic floor area: 0 m2.
Approximate weight of roofing material: 0 kg.
Number of rolls of insulating material with an overlap of 10% (1×15 m): 0 rolls.
Rafters:
Load on the side rafter system: 0 kg/m2.
Load on the ridge rafter system: 0 kg/m2.
Length of side rafters: 0 cm.
Length of ridge rafters: 0 cm.
Number of side rafters: 0 pcs.
Reduce the pitch of the rafters!
Number of ridge rafters: 0 pcs.
Reduce the pitch of the rafters!
Lathing:
Number of side rows of sheathing (for the entire roof): 0 rows.
Number of ridge rows of sheathing (for the entire roof): 0 rows.
Total number of rows of sheathing: 0 rows.
Uniform distance between the side boards of the sheathing: 0 cm.
Uniform distance between the ridge boards of the sheathing: 0 cm.
Number of sheathing boards with a standard length of 6 meters: 0 pcs.
Volume of sheathing boards: 0 m3.
Approximate weight of sheathing boards: 0 kg.
Where to start building an attic roof?
It should be noted right away that calculating the attic under a gable roof is the first step that must be completed before starting work. Usually, the construction of an attic is included in the general work plan. But sometimes homeowners change their roof and at this stage they realize that they want something more from their home.
For example, increasing living space. In order to properly organize construction work, you need to develop a drawing and plan. And subsequently you need to strictly follow these documents. Let's start from the very beginning - with the calculation of the attic.
How to calculate the parameters of the attic floor
It is necessary to adhere to a certain sequence when calculating a gable rafter roof with an attic. The rules are as follows:
- In the first step, you need to choose a truss design.
- Now you need to calculate the parameters of the attic room.
- Calculate the amount of materials and maximum permissible loads.
- Draw up a detailed plan for construction work.
It is imperative to approach all calculations with the utmost care so that all indicators are calculated correctly. Otherwise, the integrity of the structure during operation may be compromised.
How to correctly calculate indicators
When calculating the attic plan and implementing it, an important place is occupied by how correctly all the indicators were found. First you need to find the area of the attic floor. Pay attention to what sizes are the most optimal:
- Floor height – 2 m.
- The optimal width is 3 m.
If you make an attic room with these dimensions or larger, you will ensure comfortable living in it. It is also necessary to determine the blind area of the floor. The article shows a photo of an attic with a gable roof and a sloping roof. They have differences, in particular, in the usable floor area.
The basic rule when calculating the usable area is that you need to take into account the distance from the bend of the ceiling to the floor surface. It is recommended to stick to a value of 0.9 m or more. The remaining area of the attic floor can be considered dead; it is simply irrational to use it for living.
To calculate the roof area, you need to add up the corresponding values of the individual elements. In other words, if the attic is under a gable roof, then you need to add up the areas of the two slopes. If the structure is broken and symmetrical, then you need to add up the areas of the ridge and side slopes, and then multiply by 2. The photo of an attic with a gable roof shows what differences there are from the broken structure.
Now let's talk about how to calculate the parameters of the rafter system:
- Calculate the angles of inclination of the side and ridge rafters.
- Calculate the amount of material that is needed for the manufacture of the rafter system (ridge and side parts).
- Determine the parameters of the sheathing.
- Calculate how much material you need to spend to make the sheathing.
- Summarize all the data and make a complete list of materials.
And at the last step you will have to calculate the costs of materials. It all depends directly on the size of the structure and the design option. You also need to take into account manufacturing costs - if you hire workers, then get ready to pay at least another 75% of the cost of the material.
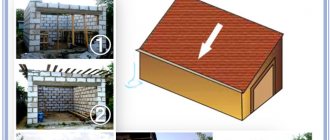
Mansard roof
This method of organization can be performed in two forms:
- Attic gable. With this device, the height from the zero level of the roof to the ridge is up to 4 meters, and the angle of inclination of the roof reaches 55 degrees. However, due to the strong slope of the walls, only the space in the middle is useful .
- A mansard sloping roof is a type of gable roof. This roofing device differs from a conventional gable roofing device by the presence of joints on the planes . The plane of each side, descending at a certain angle, is divided into two parts. The second part, lower, acquires an even greater angle of incidence. Visually, the geometry of such a roof turns out to be broken.
The main advantage of the broken attic type is that it allows you to avoid significant financial costs and at the same time significantly increase the useful space of the house .
After all, organizing such a device is easier and cheaper than building an additional floor and then covering it with a roof.
In addition, with the help of a mansard roof, you can significantly transform an existing house with an old roof.
ATTENTION!
You should keep in mind the type of foundation of the entire building in order to make the correct selection of roofing material.
Gable mansard roof
Broken mansard roof
Rafter angles
When drawing up a project for an attic with a gable roof, you need to take into account the angle of inclination of the side elements. Of course, it all depends on the specific house and the meaning can be anything. For example, when calculating the angle of inclination of the side rafters of a sloping roof, you need to take its minimum value of 60 degrees. When calculating, you should rely on the following methods:
- The simplest and most reliable is geometric. When carrying out calculations, it is enough to use the Pythagorean theorem.
- You can use reference books to determine the angle of inclination.
- A technique based on geometric constructions. In this case, a plan is built to scale, then all the necessary parameters are calculated.
- You can use construction calculators offered by roofing installation companies.
If you decide to install a sloping roof, then you must adhere to an angle of inclination of the ridge rafters of 30 degrees. This is the most optimal value. When making an attic with a gable roof with your own hands, this value is not taken into account. We will talk about the parameters of the gable structure further.
Additional information about the calculation results
Angle of inclination of side rafters
The angle at which the side rafters are inclined to the plane of the ceiling. He's usually cooler. Different roofing materials allow different maximum angles. The calculator will show whether it is possible to build a roof at a given angle using the selected roofing material.
Angle of inclination of ridge rafters
The angle at which the ridge (hanging) rafters are inclined to the plane of the attic floor. This angle is usually more sloping. Different roofing materials allow different maximum angles. The calculator will show whether it is possible to build a roof at a specified angle using the selected roofing material.
Roof surface area
The area of the entire roof surface including overhangs. To determine the area of one slope, it is enough to divide the indicated value by two.
Attic floor area
The area of the attic premises. This does not include the area under the side slopes.
Approximate weight of roofing material
The weight of the selected roofing material for the entire roof area, taking into account overhangs.
Number of rolls of insulation material
The required amount of insulation material for the entire roof area. The quantity indicated in rolls is based on the standard roll size - 15 meters long, 1 meter wide. The calculation also took into account an overlap of 10% at the joints.
Loads on the side and ridge rafter system
These values show the maximum possible loads on a given roof. The calculations involve both the total mass of the roofing pie and the sum of the wind and snow loads of the selected region.
Side rafter length
The estimated length of the rafters of the side slopes, located from the bottom of the slope to the top of the attic floor.
Ridge rafter length
The estimated length of the ridge (hanging) rafters, located from the top of the attic floor to the roof ridge.
Number of side and ridge rafters
The total number of side and ridge rafters required to construct a roof with the given parameters.
Minimum section of rafters / Weight of rafters / Volume of beams
- The first column indicates the permissible cross-sections of rafters in accordance with GOST 24454-80 Softwood lumber. Weight, specified design parameters, and possible roof loads are taken into account. The calculator calculates the total loads that can affect the structure and selects the optimal options for rafter sections.
- The second column contains information about the weight of rafters with the specified cross-section. The total weight of the rafters for the calculated roof is indicated here.
- The third column displays the total volume of rafters in cubic meters. Use these values to calculate the cost of lumber.
Number of rows of sheathing
The number of rows of sheathing that will be needed for the entire roof with the given parameters.
Uniform distance between sheathing boards
The distance that is recommended to be maintained between the sheathing boards in order to optimize material consumption and avoid trimming it.
How to calculate roof area
In order to purchase roofing material, insulation, sheathing, panels for finishing, you need to correctly calculate the roof area. For convenience, you need to break the entire surface into simple components. So, in the case of a gable roof, it is necessary to divide it into two identical elements. To calculate the area of one, you need to multiply the length by the width. Multiply the resulting value by 2 and get the total surface area.
But this is for the case when you are making a gable roof on a house with an attic. If you decide to make a broken roof, you will have to divide the entire surface into 4 sections. To calculate the area of one slope, you need to add the corresponding parameters of the side and ridge parts. The total area value can be obtained by multiplying this result by 2.
Roofing calculation
We need to calculate the roof area to accurately calculate the required amount of roofing material.
In order to calculate the required material, you should know the dimensions of the material, as well as the method of fastening it together .
Let's look at the most common ones:
- Ceramic tiles . Consumption per 1 sq.m. about 10 pcs.;
- Metal tiles . The length can be any, width - from 1190 mm;
- Corrugated sheeting . Any length, width - from 750 to 1100 mm;
- Ondulin . Length 2000 -2400 mm. Width 950 – 1250 mm
- Soft roofing shinglas . Length from 317 mm. Width 1000 mm.
Calculation example for metal tiles
You should buy roofing material with a reserve of 7-8% of the total area.
Calculation of the area of the attic room
The parameters of the attic floor are determined by the area of the room on it. In order to calculate the area, you need to determine the line of the walls. To calculate the area, you need to multiply the length of the room by its width. If the walls of the attic room run along the lines of the racks, then you need to resort to a different method of calculation. It is necessary to multiply the length by the distance between the opposing posts.
If the room has a complex shape, then you need to divide it into simpler sections (triangles, squares, rectangles) and first calculate their areas. Then all the obtained values must be summed.
How much insulating material is needed
When insulating the attic of a gable roof, you can use both roll and slab materials. It is not worth using bulk materials (for example, expanded clay). We will focus on rolled materials, as they are the most convenient to use. When making calculations, you need to take into account an overlap of 10 cm. Standard dimensions of roll insulation: length - 10-15 m, width - 1 m.
Before purchasing, be sure to find out what the actual dimensions of the material are. Depending on the manufacturer, sizes may vary. After all, the technical manufacturing conditions are different for all manufacturers. Knowing the dimensions of the roll, you can calculate its area. To find the number of rolls, you need to divide the roof area by the same amount of insulation material. But a reserve is needed - do not forget about the overlap.
Calculation of attic area
First of all, to create a functional project, it is necessary to calculate the area of the attic. This parameter depends on the size of the house, but it is also influenced by the roof design. The total area of the attic consists of 2 indicators:
- Useful volume . This term refers to the area of the under-roof space in which the ceiling height is above 0.9 m. Obviously, the useful volume does not occupy the entire area of the attic, but only the middle part. In order to rationally manage free space, you should clear the space under the roof ridge from the elements of the rafter system, moving them to the sides.
- "Deaf" zones . “Blind” areas of the attic are the corners formed between the floors and the lower part of the slope, in which the ceiling height is 0.9 meters or lower. These areas are unsuitable for human habitation, but niches or storage cabinets can be placed in them. It is better to calculate the slope and shape of the roof so that the “dead zones” occupy a smaller part of the total area of the attic.
Important! In order for the calculator program to calculate the area of the attic, you need to enter the slope and height of the roof ridge, the dimensions of the house, as well as the shape and number of slopes in the free fields. After this, the user will have the opportunity to see the exact calculation of the indicator, as well as visualize the result of the calculations using a diagram.
Dependence of the usable area of the attic on the slope
Comparison of attic area depending on roof shape
How to calculate the load on the rafters
It is necessary to take the average load value - about 200 kg per linear meter. If you make rafters taking into account this load, your roof will be able to withstand the effects of wind and snow. When carrying out calculations, it is recommended to use reference data and tables with coefficients of snow and wind loads. For example, in different regions of our country, the load created by snow (maximum) can be 220 kg or a little more. 220 kg is the average value for all regions of the Russian Federation.
When carrying out calculations for a specific design, it is necessary to take into account correction factors, which depend on the angle of inclination of the roof:
- More than 60 degrees – the coefficient does not need to be taken into account.
- 25-60 degrees – coefficient 1.25.
- Less than 25 degrees – factor 1.
Consequently, when calculating the load created by a layer of snow, it is necessary to take into account both the average value (220 kg) and correction factors. So, if the angle of the ridge part is 30 degrees, then you need to multiply 220 by a factor of 1.25. The result is 275 kg per square meter.
When calculating the length and width of the roof, you need to use simple mathematical formulas. To make calculations easier, divide the entire structure into simple components.
How to calculate the rafter system
Before calculating the rafter system, let's highlight its main system-forming elements :
- Rafters;
- Racks;
- Mauerlat;
- Struts;
- Lathing;
- Skate;
- Roof;
- Connection elements.
You should also remember a few rules:
- For the construction of frame components, it is necessary to use beams with a section of 100 * 100 mm;
- Wood moisture content should be no more than 15%;
- Wooden elements must be treated with an antiseptic.
CAREFULLY!
The service life of both the roof itself and the entire building depends on how correctly the calculations of all elements, including rafters, are made .
To calculate all elements, the first step is to determine the permanent and temporary loads to which the rafter system is subjected.
These include: the dead weight of the roof and natural phenomena in the form of wind, rain and snow. Depending on this and the choice of appropriate roofing material, the angle of inclination of the slopes is calculated .
After determining the level of the required slope of the slopes, calculate the total load on the rafters . To do this, sum up the weight of the rafters, sheathing and roofing to calculate the weight of the element per 1 square meter.
The resulting value is multiplied by a multiplying factor of 1.1 -1.4 . The resulting load figure, depending on the roofing material and insulation, ranges from 35 to 50 kg. per 1 sq.m.
This is a constant load value, to which periodic loads in the form of snow or wind are added .
To determine these loads, use the appropriate maps for individual regions. Snow load can vary from 80 to 150 kg per sq.m.
It should be multiplied by 0.7 if the roof slope is from 25 to 60 degrees . This value determines whether double rafters and continuous sheathing should be installed.
After calculating the load on the roof area and per square meter, the cross-section of the rafters is calculated . The number of rafters is determined by the length of the roof span and ranges from 70 to 120 m, depending on the length of the slopes.
Calculation of the rafter system
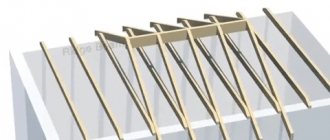
Rafter lengths
The structure of a gable roof with an attic has rafters. They are located directly on the walls of the house. It is imperative to extend it beyond the walls by about half a meter. Look at an example of a gable roof design with an attic.
In the picture, the attic space is highlighted by filling. H is the height from the floor surface of the room to the ridge, L is the length of the rafter leg. The extension beyond the outer walls is 0.5 m. To find L, you need to use the Pythagorean theorem (your triangle should be rectangular). But you will need to know the length of two legs - this data is in the project. The article also contains photos of the interior attic. Projects with a gable roof are the most attractive, as they are easier to manufacture. For example, your height is 3 m, and the second leg is also 3 m. The formula for calculation is:
L2=H2+A2
L=(H2+A2)1/2
L=(9+9)1/2
L=4.24 (m).
The calculation of a broken structure is carried out somewhat differently. This happens due to the fact that the shape of the rafters is somewhat different. The system also contains ridge rafters.
Do-it-yourself mansard roof: drawings and construction stages
A house with an attic is not only an additional living space, but also a respectable appearance for the entire building. Even if the room under the roof is made unheated and is used only in the summer, it still creates a powerful “air cushion” that helps retain heat inside the entire building.
DIY mansard roof
In principle, a mansard roof can be built with your own hands, but only with the help of an experienced, knowledgeable craftsman, since it is a rather complex and massive structure.
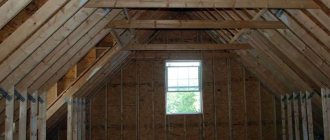
The attic space can be arranged under different types of roofs, but the most popular are gable or broken structures. According to their structure, they differ somewhat from each other.
To decide which design is more suitable for a particular home and will be easier to install, you need to take a closer look at both of these most commonly used options.
In addition, the master who will build the attic must figure out which of the two existing types of rafter system structures to choose.
Types of rafter systems
Any roof belongs to one of two types of rafter systems - hanging and layered structures. Each of them has its own characteristics, and which one to choose will depend on how the load-bearing walls of the building are located.
Hanging structure
A hanging structure is a rafter system that rests only on the outer main walls. This happens when in the building itself, except for the external walls of the house, there are no more capital partitions.
Diagram of a hanging rafter system
This design can only be used if the distance between the two main walls is no more than 8 meters, since this system puts a large load on the foundation of the load-bearing walls.
To ease this load, various elements are used in the hanging system, such as headstocks and tie rods, crossbars and struts.
For example, struts, as it were, pull the floor beams to the rafter legs, and the headstock hangs the tie to the ridge connection.
In the hanging system, fairly thick bars or hewn logs are used for floor beams, mounted on an edge. Their cross-section must be at least 100 × 200 mm. In order not to make mistakes in the parameters, since the floor in the attic room must be very reliable, it is recommended to entrust the calculations to a specialist.
Are you building a mansard roof with your own hands?
We recommend that you familiarize yourself with the material about how to make rafters with your own hands; in addition, you need to read how rafters are calculated.
In addition, we recommend reading the article about how to calculate the angle of roof inclination.
Layered system
Unlike a hanging system, a layered system is supported not only on two external load-bearing walls, but also on permanent partitions that are installed on the foundation. Therefore, when planning the construction of an attic, you need to think through the design of the foundation in advance if you are installing a strip version on which permanent partitions will be built. The layered system is ideal for constructing an attic underneath, as it can withstand significantly greater loads than the hanging version. It provides a reliable basis for the floor beams, and therefore for the attic floor.
The layered system has additional support on capital partitions
If you build a broken version of the attic roof, then a combined roofing system can be used, i.e. ridge rafters are arranged in the form of a hanging system, and side rafters are arranged in a layered type.
Types of roofs with attic space
When building a house made of brick or blocks with an attic, very often its front side is immediately built from the same material. This is very convenient because you don’t have to calculate the parameters of these roof elements and assemble them from bars, and then lift them onto the wall. However, one must remember that the walls of the building must stand on a reliable foundation and have the proper thickness, since such a pediment puts a very large load on the main structure.
House with a gable mansard roof
If the attic will serve as another floor of the house all year round, then a gable wall made of brick or foam blocks is an ideal option for creating a living space under the roof.
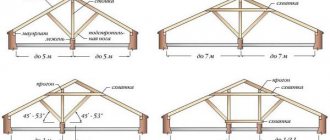
In order for attic rooms with a gable roof to have a normal height and spacious rooms, the angle of the roof slopes should be approximately 45-50 degrees, depending on the width of the end part of the building. If you take a smaller angle, the usable volume of the room will significantly decrease. Increasing the steepness of the slopes will lead to an unreasonably high roof, its weight, greater windage under strong wind loads, and waste of materials.
Dependence of the dimensions of the attic on the angle of the gable roof
Installation of a gable roof is certainly simpler than a broken structure, since smooth rafters are used from the edge of the walls to the ridge, without any kinks or additional connections. However, the broken structure makes it possible to make the rooms in this part of the house more spacious and the ceilings higher.
Broken roof truss system
The broken rafter system is much more complex in calculations, execution, and roofing, but it not only creates a more spacious space under the roof, but also gives the entire structure solidity.
The complexity of a broken system lies in the large number of rather complex connecting nodes. All connections must be made in accordance with existing rules - only in this case will the roof be built stable and reliable.
With a broken system - a large number of complex connections of parts
If the walls are built of stone or brick, then, as in the first version of the attic, the front parts can be laid out in advance, during the general laying process. In this case, in order to create a rafter system, all that remains is to align the finished gables with installing intermediate rafters and supporting fastenings to them.
Video: rafter system for an attic sloping roof
Before purchasing and preparing material for any of the presented systems, it is necessary to draw up a design project with dimensions - it will become the main guiding document for the preparation and assembly of all elements during the installation process.
Attaching the rafters to the mauerlat
In order for the article about the gable roof to remain a multiple of step-by-step instructions, we have included step-by-step information on attaching rafters to the Mauerlat into a separate step-by-step technology - a link to the material.
Read about how to cover a roof with corrugated sheeting on our portal.
Attic project
When drawing up a diagram for the construction of an attic, it is best to do this in different projections in order to see and understand the placement of all elements of the rafter system. It is very important to correctly calculate the height of the roof ridge, since the size of the area under it will directly depend on it.
The height of the racks and the length of the ties will determine the height and width of the residential attic space
When drawing up a design diagram for the construction of an attic roof, you need to calculate the height of the ridge, ceiling and total area of the room.
The minimum height from the floor to the ridge should be 2.5-2.7 m, but if this distance is less, then the room is not an attic, it can only be called an attic. This parameter is established by SNIP standards.
Possible dimensions for a gable mansard roof
In order for all the elements to be drawn accurately and have the desired location in the overall system, you need to start from a figure with right angles, that is, a rectangle or square - a section of the attic room being created. Based on the sides (the height and width of the future room), it will be almost impossible to make a mistake with the angles at which the roof slopes are located, with the location of the ridge, rafters and all supporting elements. When determining these parameters, they must immediately be entered into the drawing.
First you need to find the middle of the width of the front wall. Starting from this point, the parameters of the height of the ridge, the future ceiling of the attic, the location of the wall studs and the size of the eaves overhang are determined.
Due to the fact that each of the structures has a certain number of connecting nodes, which have different configurations, it would be a good idea to draw each of these connections separately in order to understand their features of interconnecting all the elements connecting at this point.
The main elements of the attic roof rafter system
Any rafter system consists of basic elements and additional ones, which may not be present in every structure. The main components of an attic roof include:
- Floor beams, which are the basis for the remaining elements of the rafter system. They are laid on the main walls of the building.
- A rafter leg, straight in a gable roof system or consisting of two sections - in a broken pattern. In this case, the top rafter is called the ridge rafter, since it forms the highest point of the roof - the ridge, and the rafters that form the walls of the attic are called side rafters.
- A ridge board or beam is a mandatory element for a gable roof, but is not always used when installing a broken roof model.
- Mauerlat is a powerful beam attached to the main side walls of the building. Rafter legs are installed on this element.
- Racks are the supporting elements necessary to strengthen a gable and broken structure. In the latter case, the ridge and side rafters are attached to it, and in the first, the stand is a reliable support for a long rafter. In addition, the racks serve as a frame for insulating and covering the walls of the attic.
- Diagonal bracing members or bevels additionally secure posts or longitudinal beams and rafters, making the structure more durable.
- Attic floor beams are used in all versions of the attic - they connect the racks, and they also serve as the frame for the ceiling.
- Inter-rafter purlins are installed in a broken roof for structural rigidity.
To be sure that the prepared project has been developed correctly, you need to show it to a specialist. Only he will be able to determine whether the attic parameters are correctly selected for the width and length of the walls of the building.
Video: professional calculation of a mansard roof using special software
Material parameters for the construction of an attic roof
If the graphic design is ready, then, based on the dimensions marked on it, you can calculate the amount of materials required for the construction of the attic roof. Materials must be selected according to their characteristics, which must meet fire and environmental safety requirements. For wood, it is necessary to provide special treatment with fire retardants, which will reduce the flammability of the material. So, for construction you will need:
- Boards for rafter legs. Their cross section is selected based on the results of special calculations - this will be discussed in more detail below.
- A beam having a cross-section of 100×150 or 150×200 mm is for floor beams, depending on the chosen rafter system and the width between the load-bearing walls, as well as for purlins, diagonal legs or valleys - if they are provided for in the design.
- Beam with a cross section of 100×150 mm or 150×150 mm for laying the Mauerlat.
- For racks, timber 100 × 100 or 150 × 150 mm is usually used.
- Unedged board for laying the subfloor and some fasteners.
- Annealed steel wire with a diameter of 3-4 mm - for fastening some parts together.
- Nails, bolts, staples of various sizes, angles of various configurations and other fasteners.
- A metal sheet with a thickness of at least 1 mm is for cutting out overlays.
- Lumber for sheathing and counter-lattens for roofing material - depending on the type of roof chosen.
- Insulation materials – for thermal insulation of the roof.
- Waterproofing and vapor barrier membranes.
- Roofing material and fastening elements for it.
What section of rafters are required?
Rafters are roofing elements that will bear the main external loads, so the requirements for their cross-section are quite special.
The size of the required lumber will depend on many parameters - on the step between the rafter legs, on the length of these legs between the support points, on the snow and wind load that falls on them.
The geometric parameters of the rafter system design are easy to determine in the drawing. But with the remaining parameters, you will have to refer to the reference material and make some calculations.
Snow load
Snow load is not the same for different regions of our country. The figure below shows a map on which the entire territory of Russia is divided into zones according to the intensity of the snow load.
Map of calculated snow loads on the territory of the Russian Federation
There are eight such zones in total (the last, eighth, is rather extreme and cannot be considered for the construction of an attic roof).
| Zoning by snow load | Value in kPa | Value in kg/m² |
| I | 0.8 kPa | 80 kg/m² |
| II | 1.2 kPa | 120 kg/m² |
| III | 1.8 kPa | 180 kg/m² |
| IV | 2.4 kPa | 240 kg/m² |
| V | 3.2 kPa | 320 kg/m² |
| VI | 4.0 kPa | 400 kg/m² |
| VII | 4.8 kPa | 480 kg/m² |
Now you can accurately determine the snow load, which will depend on the angle of the roof slope. For this there is the following formula:
S = Sg × μ
Sg – table value - see the map and the table attached to it
μ is a correction factor depending on the steepness of the roof slope.
- If the slope angle is less than 25°, then μ=1.0
- With a slope from 25 to 60° - μ=0.7
- If the roof is steeper than 60°, then it is considered that snow does not linger on it, and the snow load is not taken into account at all.
It is typical that if the attic roof has a broken structure, then for different sections of it the load can have different values.
The slope angle of the roof can be easily estimated from the ratio of the height of the ridge and the width of the span
The slope angle of the roof can always be determined either with a protractor - according to the drawing, or by a simple ratio of the height and base of the triangle (usually half the width of the span):
| Ratio of slope height to projected width (H/L) | Approximate slope angle (α) |
| 0.27 | 15° |
| 0.36 | 20° |
| 0.47 | 25° |
| 0.58 | 30° |
| 0.7 | 35° |
| 0.84 | 40° |
| 1 | 45° |
| 1.2 | 50° |
| 1.4 | 55° |
| 1.73 | 60° |
| 2.14 | 65° |
Wind load
Wind load also mainly depends on the region in which the building was built and on the characteristics of its surroundings and the height of the roof.
Zoning of the territory of the Russian Federation according to the average level of wind load
And again, for the calculation, the initial data on the map and the table attached to it are first determined:
| Zoning of wind load in Russia | 1a | 1 | 2 | 3 | 4 | 5 | 6 | 7 |
| Table value of wind pressure, kg/m² (W) | 24 | 32 | 42 | 53 | 67 | 84 | 100 | 120 |
The calculation for a specific building will be carried out according to the formula:
Wp = W × k × c
W – table value, depending on the region
k – coefficient taking into account the height of the building and its location (see table)
| Building height (z) | Zone A | Zone B | Zone B |
| no more than 5 m | 0.75 | 0.5 | 0.4 |
| from 5 to 10 m | 1 | 0.65 | 0.4 |
| from 10 to 20 m | 1.25 | 0.85 | 0.55 |
The following zones are indicated by letters in the table:
- zone A - open areas, steppes, forest-steppes, deserts, tundra or forest-tundra, wind-exposed sea coasts, large lakes and reservoirs.
- zone B – urban areas, wooded areas, areas with frequent wind obstacles, relief or artificial, at least 10 meters high.
- zone B – dense urban development with an average building height above 25 meters.
с – coefficient depending on the predominant wind direction (wind rose of the region) and on the angle of inclination of the roof slopes.
With this coefficient the situation is somewhat more complicated, since the wind can have a dual effect on the roof slopes. So, it has a direct, overturning effect directly on the roof slopes. But at small angles, the aerodynamic effect of the wind takes on special importance - it tries to raise the slope plane due to the resulting lift forces.
Diagrams and tables of wind load distribution by roof sections
The drawings, diagrams and accompanying tables indicate areas of the roof exposed to maximum wind loads and indicate the corresponding coefficients for calculation.
It is characteristic that at slope angles of up to 30 degrees (and this is quite possible in the area of ridge rafters), the coefficients are indicated both with a plus sign and negative, that is, directed upward. They somewhat dampen the frontal wind load (this is taken into account in the calculations), and in order to neutralize the effect of lifting forces, it will be necessary to very carefully secure the rafter system and roofing material in this area, using additional connections, for example, using annealed steel wire.
Once the wind and snow loads have been calculated, they can be summed up and, taking into account the design features of the system being created, the cross-section of the rafter boards can be determined.
Please note that the data is given for the most commonly used coniferous material (pine, spruce, cedar or larch). The table shows the maximum length of the rafters between the support points, the section of the board depending on the grade of the material, and on the pitch between the rafters.
The value of the total load is indicated in kPa (Kilopascals). Converting this value into more familiar kilograms per square meter is not difficult. With quite acceptable rounding, we can accept: 1 kPa ≈ 100 kg/m² .
The dimensions of the board along its cross-section are rounded up to standard lumber sizes.
| rafter section (mm) | Distance between adjacent rafters (mm) | ||||||
| 300 | 600 | 900 | 300 | 600 | 900 | ||
| total snow and wind load | 1.0 kPa | 1.5 kPa | |||||
| higher | 40×89 | 3.22 | 2.92 | 2.55 | 2.81 | 2.55 | 2.23 |
| 40×140 | 5.06 | 4.60 | 4.02 | 4.42 | 4.02 | 3.54 | |
| 50×184 | 6.65 | 6.05 | 5.28 | 5.81 | 5.28 | 4.61 | |
| 50×235 | 8.50 | 7.72 | 6.74 | 7.42 | 6.74 | 5.89 | |
| 50×286 | 10.34 | 9.40 | 8.21 | 9.03 | 8.21 | 7.17 | |
| 1 or 2 | 40×89 | 3.11 | 2.83 | 2.47 | 2.72 | 2.47 | 2.16 |
| 40×140 | 4.90 | 4.45 | 3.89 | 4.28 | 3.89 | 3.40 | |
| 50×184 | 6.44 | 5.85 | 5.11 | 5.62 | 5.11 | 4.41 | |
| 50×235 | 8.22 | 7.47 | 6.50 | 7.18 | 6.52 | 5.39 | |
| 50×286 | 10.00 | 9.06 | 7.40 | 8.74 | 7.66 | 6.25 | |
| 3 | 40×89 | 3.06 | 2.78 | 2.31 | 2.67 | 2.39 | 1.95 |
| 40×140 | 4.67 | 4.04 | 3.30 | 3.95 | 3.42 | 2.79 | |
| 50×184 | 5.68 | 4.92 | 4.02 | 4.80 | 4.16 | 3.40 | |
| 50×235 | 6.95 | 6.02 | 4.91 | 5.87 | 5.08 | 4.15 | |
| 50×286 | 8.06 | 6.98 | 6.70 | 6.81 | 5.90 | 4.82 | |
| total snow and wind load | 2.0 kPa | 2.5 kPa | |||||
| higher | 40×89 | 4.02 | 3.65 | 3.19 | 3.73 | 3.39 | 2.96 |
| 40×140 | 5.28 | 4.80 | 4.19 | 4.90 | 4.45 | 3.89 | |
| 50×184 | 6.74 | 6.13 | 5.35 | 6.26 | 5.69 | 4.97 | |
| 50×235 | 8.21 | 7.46 | 6.52 | 7.62 | 6.92 | 5.90 | |
| 50×286 | 2.47 | 2.24 | 1.96 | 2.29 | 2.08 | 1.82 | |
| 1 or 2 | 40×89 | 3.89 | 3.53 | 3.08 | 3.61 | 3.28 | 2.86 |
| 40×140 | 5.11 | 4.64 | 3.89 | 4.74 | 4.31 | 3.52 | |
| 50×184 | 6.52 | 5.82 | 4.75 | 6.06 | 5.27 | 4.30 | |
| 50×235 | 7.80 | 6.76 | 5.52 | 7.06 | 6.11 | 4.99 | |
| 50×286 | 2.43 | 2.11 | 1.72 | 2.21 | 1.91 | 1.56 | |
| 3 | 40×89 | 3.48 | 3.01 | 2.46 | 3.15 | 2.73 | 2.23 |
| 40×140 | 4.23 | 3.67 | 2.99 | 3.83 | 3.32 | 2.71 | |
| 50×184 | 5.18 | 4.48 | 3.66 | 4.68 | 4.06 | 3.31 | |
| 50×235 | 6.01 | 5.20 | 4.25 | 5.43 | 4.71 | 3.84 | |
| 50×286 | 6.52 | 5.82 | 4.75 | 6.06 | 5.27 | 4.30 | |
Tools
Naturally, during work you cannot do without tools, the list of which includes:
- Electric drill, screwdriver.
- Building level and plumb line, tape measure, square.
- Axe, chisel, chisel, hammer
- Circular saw, jigsaw, hacksaw.
- Carpenter's knife.
Installation will be accelerated if the tools for the work are of high quality, and the work will be carried out with competent mentors and assistants, carefully and step by step.
Installation stages
It is necessary to strictly follow the sequence of work - only under this condition the structure will be reliable and durable.
Mounting the Mauerlat
The installation of any rafter system begins with attaching a powerful support beam - a mauerlat - to the end of the side walls of the structure, on which it will be convenient to install the rafter legs. The Mauerlat is made from high-quality timber with a cross-section of at least 100 × 150 mm. It must be laid on roofing felt waterproofing laid along the upper end of the wall (regardless of the material).
Due to the Mauerlat, the load will be evenly distributed over the walls and transferred to the foundation of the building.
One of the options for attaching the Mauerlat to the walls of the house
The Mauerlat is secured to the wall using metal pins, which are pre-embedded in a concrete belt or crown running along the upper edge of the wall, or with anchor bolts with a diameter of 12 mm. They must go into the wall at least 150 - 170 mm. If the Mauerlat is installed on a wooden wall, then the beams are attached to it using wooden dowels.
Installation of truss structure
- Installation of the rafter system begins with the installation of floor beams. They can be mounted on the Mauerlat from above if the beams are planned to be moved outside the perimeter of the building and thereby increase the area of the attic. In this design, the rafter legs are fixed to the floor beams.
Floor beams fixed on top of the Mauerlat (Fig. A)
- In another case, they can be laid on waterproofed walls and attached using corners or brackets to the inner edge of the Mauerlat. This option is used when the rafter legs are planned to be attached directly to the mauerlat.
Another option is that only the rafter legs are attached to the Mauerlat
- Next, you need to find the middle of the floor beam, since this mark will become a guideline for determining the location of the support posts and the ridge.
- The posts should be located at the same distance from the marked center of the floor beam. They will subsequently determine the location of the walls of the attic room, that is, its width.
- The bars for the racks must have a cross-section equal to the size of the floor beams. The constructions are attached to the beams using special corners and wooden overlays. However, to begin with, they are first nailed, then carefully leveled using a building level and a plumb line, and only then are they permanently secured, taking into account future loads.
Installation of racks and ties connecting them
- When the first pair of racks is installed, they are fastened together from above with a bar, which is called a tie. This tightening is also connected to the racks using special metal corners.
Shaped metal corners for reliable fastening of rafter system parts
- After securing the tie, you will get a U-shaped structure. Layered rafters are installed on its sides, the second end of which is attached to the floor beam or placed on the mauerlat.
- A special recess (groove) is cut into the installed supports for the timber or in the rafters. With its use, the rafters are tightly installed on the mauerlat beam, and secured with metal brackets.
Fastening the rafter leg to the mauerlat with a bracket
- To provide rigidity to the structure, additional struts can be installed from the base of the rack to the middle of the installed side rafters. If this does not seem enough, and saving material is not in the foreground, then you can strengthen the overall structure with additional racks and contractions (they are indicated in the drawing, Fig. A, with translucent lines).
- Next, while tightening, the middle is calculated - the headstock will be attached to this place, supporting the ridge connection of the upper hanging subsystem of the rafters.
- The next step is to install the ridge rafters, which can be fastened together with various connections - this can be a metal plate or powerful bolts with metal plates or washers.
Interconnection of rafter legs in the ridge area
- After installing them, the headstock is attached to the ridge and the middle of the tightening.
- Having completed work on one part of the rafter system, you need to make all the rest according to the same principle. The distance between adjacent rafters in such a system should be no more than 900 - 950 mm, but the optimal interval would probably still be 600 mm - this will provide the necessary rigidity and stability of the structure, and will be convenient for insulation using standard mineral wool mats . True, this makes the structure heavier and will require more materials.
Installation is carried out gradually, with the installation and tying of rafter pairs.
- First, the side parts of the system assembly are installed, and then the intermediate parts. They are connected to each other by purlins, which are installed between the upper ends of the racks and act as spacers. Thus, you will get a rigid structure of the attic rafters, in which the frame for wall cladding will already be ready.
Prices for various types of fasteners for rafters
Rafter fasteners
Waterproofing attic roof
When the rafter system is built, you can proceed to finishing it with insulation and related materials.
- The first coating that should be fixed directly on top of the rafters will be a waterproofing and windproof film. it is attached to the rafters using staples and a stapler, starting from the cornice. The canvases are overlapped by 150 - 200 mm, and then the joints are glued together with waterproof tape.
- On top of the waterproofing, a counter-lattice is placed on the rafters, which will more reliably fix the film on the surface and create the necessary ventilation distance between the windproof and roofing material. The counter-lattice is usually made of boards 100 - 150 mm wide and 50 - 70 mm thick.
Waterproofing and windproof film, lathing and counter lathing on the roof surface
- The sheathing is fixed perpendicular to the counter-lattice, on which the roofing material will then be laid. The pitch between the slats must be calculated depending on the type and size of the sheet roofing material, taking into account the overlap required for it
- If a soft roof is chosen, then plywood sheets are most often fixed to the counter-lattice.
Roofing installation
The roofing material is attached to the prepared sheathing or plywood. Its installation usually starts from the roof eaves and proceeds in rows, from one of the edges - depending on the type of roof. Roofing sheets are mounted with an overlap. If a metal profile or metal tile is used for the coating, then such material is secured with special self-tapping screws with elastic gaskets. Fastening elements are usually matched in color to the roofing material.
The creation of a mansard roof is completed by laying roofing material
The most difficult thing in covering an attic sloping roof is the transition from layered side rafters to hanging ridge rafters. There may be certain difficulties if the roof has projections for installing roofs over balconies or windows.
In addition, if a chimney pipe goes onto the roof, it requires a separate design of the hole inside the rafter system and an insulating layer, and on the roof - reliable waterproofing around the pipe.
You can find out in detail how and what is the best way to cover a roof on our portal; there is a whole section “roof and roofing” , in which you can find answers to many questions, including recommendations for reliable insulation of an attic room.
Prices for popular types of corrugated sheets
Corrugated sheet
Video: detailed video tutorial on building a mansard roof
It should be noted that the work of constructing any roof, and especially one as complex as an attic roof, is not only responsible, but also quite dangerous and requires special, increased safety measures. If you have no experience in carrying out such construction processes, then it is better to entrust their implementation to professionals or perform all actions under the supervision of an experienced craftsman, and with the utmost care and precision.
How many rafters are needed?
When calculating the number of rafters, you need to take into account the linear dimensions of the house, as well as the roof area. Be sure to install the rafters at the same distance. Standard rafters made of wood with a cross-section of 50 x 100 mm are mounted at a distance of 70-80 cm. Provided that the leg length is over 6 m. If the rafter leg length is 3-6 m, then they need to be placed at a distance of 1.2 m.
When calculating sloping and gable roofs, you must adhere to the following parameters - the cross-section of both side and ridge elements should be from 50 x 100 mm. When making calculations, you need to take the average density of wood at a relative humidity of 18%. This is 500 kg per 1 cubic meter. m.
Components of the rafter system
The load-bearing parts of the rafter structure must be strong. Usually coniferous wood is chosen for them. It is almost indestructible and easy to process, withstands sudden changes in temperature and has a low specific gravity. The material prepared for installation must be treated with a fire-resistant solution and liquid to protect against wood pests and rodents. The rafter structure includes several wooden and other elements: rafters, purlins, mauerlat, sheathing, ridge, support post or strut, bed, tie and filly.
The rafters are the frame of the entire structure and are installed on the mauerlat. The rafters are connected to each other by purlins and secured with ties. The outer sheathing is attached to the rafters and the roofing material is mounted on it. In addition to the external sheathing, there is also an internal one. Insulating material is laid between them. The battens perform an additional ventilation function. The slopes are combined into a skate. The bench is installed from the front wall to the ceiling, and struts and racks are mounted on it to give strength. To increase the length of the rafters of structures, fillets are used, which increase the roof overhang.
Construction of a gable roof rafter system
Lathing
But not everything has been taken into account; before making an attic with a gable roof, you need to calculate the amount of material for the sheathing. Consider the following data:
- For a soft type of roofing material, you can make lathing from OSB boards or plywood.
- If semi-rigid materials are used, then it is best to install compacted or sparse lathing.
- If the roofing material is hard (for example, slate), you need to make a sparse sheathing.
- For semi-rigid large-sized material, you need to make a continuous sheathing.
In order to find the number of rows, you need to use the following recommendations:
- For roofs with a small slope (less than 12 degrees), you need to make a continuous type of sheathing.
- For a slope of less than 60 degrees, the sheathing must be laid in increments of 0.2-0.23 m.
- If the slope is more than 60 degrees, then the sheathing is installed in increments of 0.6 m.
Usually a sheathing is made from edged boards 0.2 m wide. They are laid at a distance of 0.2-0.3 m from each other.
Explanations for the calculation results
Angle of inclination of side rafters
This is the name of the angle at which the side slope and side rafters are inclined to the plane of the attic floor. By entering an angle, you can not only calculate the amount of materials for a given angle, but also check whether it is possible to build side slopes at this angle using the materials you have chosen.
Angle of inclination of ridge rafters
This is the name of the angle at which the upper (sloping, ridge) slope and hanging rafters are inclined to the plane of the attic floor. By entering an angle, you can calculate the amount of materials for the selected angle and check whether it is possible to install ridge slopes and rafters at this angle from the selected materials.
Roof surface area
The total area of the roof slopes, including the area of the overhangs of the specified length. Determines the amount of roofing and under-roofing material required to create a roof.
Attic floor area
Area of the attic floor. The area under the side slopes is not taken into account.
Approximate weight of roofing material
The total weight of roofing material required for a roof with the specified parameters.
Number of rolls of insulation material
The volume of required rolled roofing material, taking into account the required overlap of 10%. In our calculations, we assume rolls 15 meters long and 1 meter wide.
Loads on the side and ridge rafter system
The maximum possible loads exerted on the rafter system. The weight of the entire roofing pie is taken into account, as well as the wind and snow loads of your region.
Side rafter length
The length of the rafters of the side slope (the so-called layered rafters).
Ridge rafter length
The length of the ridge rafters (the so-called hanging rafters).
Number of side and ridge rafters
The total number of rafters required to organize a roof rafter system at a given pitch.
Minimum rafter section
To ensure the roof has sufficient strength, it is necessary to select rafters with a cross-section of at least the minimum specified here. The calculation takes into account materials, parameters and expected loads for the climate of your region.
Number of rows of sheathing
The exact number of rows of sheathing that will be required to install the selected roof. If you want to determine the number of rows for one slope, then this value must be divided by two.
Uniform distance between sheathing boards
To avoid trimming, and therefore without wasting labor and materials, you need to choose exactly this distance between the sheathing boards.
How many rows of sheathing are needed?
So, let’s say you decide to use a 200 x 20 mm edged board to make the sheathing, and the distance between adjacent rows is 200 mm. Therefore, three rows of sheathing need to be laid on one meter. But what if we increase the distance between adjacent rows (for example, make it 300 mm)? Only two rows will fit on one meter. If you are calculating a broken system, you will need to add two more rows - cornice and ridge.
The distance between the rows must be maintained the same for maximum strength. After all, you need to take into account the fact that the entire system must withstand both the mass of the roofing material and the effects of snow and winds. And most importantly, with the same distance between the rows of the sheathing, you will be able to install the heat-insulating cake with the highest quality possible.
Number of boards for making sheathing
The lumber used is standard; both hardwood and softwood can be used to make the sheathing. Standard lumber:
- Coniferous species - length 4.5 and 6 m.
- From deciduous trees - no more than 5 m.
- Coniferous species for special needs - 9 m long.
Based on this, we can say that for a house 8 x 10 m, a roof slope 10 m long requires two 6 m boards. It is imperative to take into account an overhang of at least 20 cm.
But all boards are usually sold not in pieces, but in cubic meters. To find the volume, follow these steps:
- Count the number of boards needed to make the sheathing.
- Convert all linear dimensions to meters for further calculations.
- Multiply the number of boards by all the dimensions of one.
For example, you need 10 identical boards measuring 200 x 20 mm and 6 m long. 200 mm is 0.2 m, 20 mm is 0.02 m. You need to find the product 0.02x0.2x6x10 = 0.24 (cubic. m).
The total mass of wood from which the sheathing is made can also be calculated and this will not be difficult. So, at a relative humidity of 18%, a cubic meter has the following mass:
- Spruce – 450 kg.
- Cedar pine – 440 kg.
- Common pine – 510 kg.
- Siberian fir – 380 kg.
- Caucasian fir – 440 kg.
It is recommended to use the average weight of rafters and sheathing when calculating - 500 kg per 1 cubic meter. m. Therefore, if you need to spend 10 boards to make the sheathing (based on the calculation above), then their mass will be equal to 0.24 x 500 = 120 kg. This is the total mass of the entire sheathing structure.
A little about design and calculations
When building an attic (projects with a gable roof and photos of the interior space are given in the article), you need to adhere to the general design of the building. It is imperative to draw up a detailed plan for the roofing system, build the most detailed drawing showing all dimensions to scale. It is recommended to rely on standard dimensions of building materials that are produced by industry. For example, you need to take into account that the boards will have a standard length - 4.5 or 6 m.
When carrying out finishing work, you will also need the data that was obtained at the design stage. After all, the amount of material for wall cladding can be calculated by referring to data on the roof area. All these calculations must be made as accurately as possible so that when making a gable roof with an attic there is not a large amount of “extra” building material left.
Mansard roof and its elements
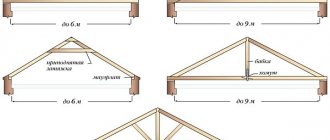
There are several roof options for building equipment. They differ from each other not only in shape, but also in the type of construction and are divided into: two, three and four slopes, broken gable, half hip and hip.
Gable roofing is easy to install and can withstand high loads. It has symmetrical slopes and a triangular frontal appearance. With a building width of up to 6 meters, the slopes can have an inclination angle of up to 45 degrees. If the width exceeds the distance of 6 meters, then the requirements of regulatory documents allow the specified angle to be increased to 60 degrees.
Three- and four-slope roofs have slopes of various sizes, with different installation angles. Because of this, they are often called asymmetrical. The presence of such wooden structures will give the building originality. But installation of such a roof requires careful calculations and considerable financial costs.
A mansard sloping gable roof is distinguished by the fact that its slopes are installed at different angles relative to the base. An important positive aspect of such a roof is the efficiency of the rafter structure and the ability to make maximum use of the internal area of the attic.
Semi-hip and hip roofs are variations of the simple gable roof. They form additional slopes from the front of the roof and its sides.
Main types of roof shapes