The roof of a house is one of the main components of a house. It represents the upper structure of the building, without which it is difficult to imagine comfortable living. The main functions of the roof are protection from snow, rain and other precipitation, as well as heat retention in the cold season and protection from overheating in the summer months. Nowadays, there is a wide variety of roofs to suit every taste and budget. However, the most common and popular at any time are gable roofs, which are versatile, inexpensive and easy to install. We’ll talk about how to properly make a gable roof with your own hands in today’s article.
The gable roof design is the most common in private construction. As is clear from the name of this type of roof, it is made in the form of two slopes or, more simply, in the form of a triangle. Such roofs are easy and quick to install, they are quite durable and their appearance finds many admirers, as it combines the look of a Russian hut and a modern building. Having the necessary knowledge, you can do it yourself using available tools.
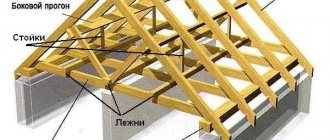
Construction of a gable roof rafter system
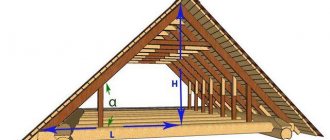
The rafter system of a modern gable roof consists of many elements, each of which evenly redistributes the weight of the structure and correctly transfers it to the walls of the house. The figure below shows the design of a gable roof of a house with its main components and elements of the rafter system.
Let's look at each of the elements shown in the diagram separately:
- The rafter leg is the main part in the design of the rafter system of a gable roof, which is an inclined element laid across the entire roof. To create it, the strongest beams are selected, since the rafter leg, in addition to the weight of the roofing material and sheathing, can bear the weight of precipitation in the form of snow;
- Mauerlat is the so-called “foundation” of the roof, which is the main support for the entire structure, distributing the load on the walls. It is a beam or a thick board on which the rafter legs rest and which serves as a “gasket” between the wall and the roof;
- Tie (tie) - a spacer lying at the base of the triangle, enhancing strength. The tightening performs a double function, since the ceiling is mounted to its lower part;
- Purlins - ridge purlins are attached in the upper part, side purlins in the center of the rafter legs. The purpose of the purlins is to keep the rafter legs from falling and “folding”;
- The stand is located in the central zone, directly under the ridge. Serves as a support, transfers the load to the tightening;
- The bench is an additional element on which the stand rests;
- Lathing - boards that are mounted across the rafters. The sheathing is designed to lay roofing material on it (in the simplest case) and to provide additional rigidity to the entire rafter system.
This roof scheme is universal for many buildings, but depending on the complexity of the structure, special elements can be added here to give stability and rigidity to the entire rafter system.
Properties of a pitched roof
To understand whether such a roof is suitable, it is worth weighing its advantages and disadvantages.
Main advantages:
- due to its simple design, it will require less material and craftsmen will be able to quickly assemble it;
The roof is flat, but it is also pitched
- this type of roofing is beneficial for regions where strong winds often blow;
- It's easy to look after her. And it is easier to repair it, especially if the angle of inclination of the slope is not very large;
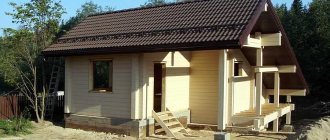
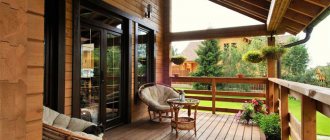
Frame house with a pitched roof - country design
- precipitation will flow in one direction, so there will be no need to install stormwater systems around the perimeter of the building. However, due to the increased load, you will have to buy reinforced snow guards and parts for drainage;
- such roofs are in demand because they can be used to install solar panels in energy-efficient smart homes;
- you can design an attic with large windows (for examples of the layout of a house with an attic, see the link).
An attic under a pitched roof - there is very little space left in the lower part of the slope.
There are few disadvantages:
- It is not always possible to provide a suitable slope for precipitation, which is why water lingers on the roofing material. To prevent it from getting wet, they organize enhanced waterproofing;
- The shape is not entirely correct, which is especially noticeable in buildings with an attic. Due to the declining slope, it is not possible to use the entire area of the one and a half floor equally;
- The rafters can be very long. It is necessary to accurately calculate snow loads and select a material with sufficient reliability.
Project of a frame house with a pitched roof
Project of a frame cottage with a flat pitched roof
This roof has a slight slope
There are no critical shortcomings. If the project is drawn up correctly and construction standards are observed, a building with such a roof will serve no worse than others.
The angle of inclination of a gable roof
Choosing an acceptable roof slope angle is a significant task, but for many builders it fades into the background, which is not true. The so-called gable structures with straight slopes are considered standard. The optimal angle of inclination of a gable roof is on average 30°-45° (the angle at the base of an isosceles triangle is taken as the basis).
The choice of inclination angle will determine how well the upper part of the house will withstand the following factors:
- load from wind and rain;
- snow pressure;
- the weight of an individual object on the roof, for example a person.
The first two points must be taken into account with special care, since a miscalculation in choosing the slope of the roof can cost large financial losses and health in the event of a collapse.
Example: the greater the angle, the less the load on the roof from precipitation, but the threat of wind damage increases due to the created windage (the roof can simply be blown off). The noise effect will also increase if metal is chosen as the roofing material.
It is important to pay attention to the manufacturers' recommendations regarding the use of a particular product. Take a closer look:
- Roll materials: the number of layers is pre-calculated. The more there are, the lower the roof can be made. Double flooring - from 10-15°;
- Stacked elements: these include tiles (including soft ones) and slate. The angle of inclination of the rafters can be adjusted from 20°;
- Metal tiles: a slope of 14° should be maintained;
- Corrugated sheets: its sheets should be placed at an angle of 12°;
- Ondulin: it is allowed to adhere to the indicator from 6°.
Thus, when designing a roof and choosing the angle of inclination, it is important to know in advance what roofing material you will cover it with. As you can see, the minimum angle of inclination of a gable roof can be 6°.
Reliability of a flat roof in our climate
When you look at beautiful houses that are hundreds of years old, ask yourself why they were built this way and not otherwise. Why do houses built in a coastal area somewhere in Norway, Sweden or Scotland do not have roof overhangs and the usual drainage? They are simply not needed due to strong winds that turn rain into a horizontal stream of water hitting the walls. The same goes for houses with flat roofs. They were built in warm climates, where there is little precipitation but strong wind load.
A flat roof is more wind resistant than a pitched roof.
Dmitrievich-50FORUMHOUSE user
Our ancestors are smart people. They considered the design of the house from the point of view of practicality, based on the climatic conditions of their residence. Why were flat roofs built in Central Asia? On the Central Russian Upland are they sloped? In the Baltics, not just pitched ones, but with a sharp ridge angle? A pitched roof with a slope of 45 degrees, in the Moscow region or Saratov, will provide reliable protection from rain or snow for 20-25 years, even if covered with cheap corrugated sheeting or slate.
A flat roof, with the right approach to construction and using modern materials, will also provide reliable protection for the house from precipitation and will not leak.
The only question is how much 1 sq. m. will cost. m of such a roof with a guarantee that it will not leak quickly during frequent transitions through 0. Icing. Night freezing and daytime thawing of snow cover. Lingering downpours. And most importantly, how can we make a roof that will last a long time in our climate?
The second difficulty in building a cottage with a problem-free flat roof is the harsh Russian operating conditions.
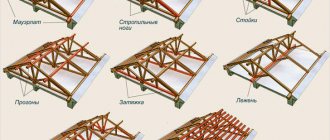
Types of rafter systems for gable roofs
Most rafter systems for gable roofs are divided into two main types - hanging and layered. The first type is the most common. Let's look at both types in detail.
Hanging rafter system for a gable roof
This type of roofing structure is used exclusively when the walls of the house are located at a distance of up to 10 m from each other and there are no supporting floors between them. The rafters (legs) are connected only to the side parts of the house in the form of a mauerlat. The disadvantage of a gable roof with hanging rafters is the possibility of its damage due to the thrust load, since in this case there are no braces between the rafters.
Layered rafter system of a gable roof
The difference between layered structures is the presence of additional support in the form of a wall or other support. The layered rafter system is installed with supports that are attached to the intermediate walls. This design allows you to cover large spans without compromising the rigidity of the entire rafter system.
Separately, it is worth talking about several more types of gable roofs. By design, a gable roof can be made in the following options:
- symmetrical gable roof;
- asymmetrical gable roof;
- gable sloping roof.
The differences between these designs are clear from the name. Depending on the design of your house and design decisions, the roof may be asymmetrical, that is, have different angles of inclination at the base. Such a roof is a little more difficult to install than a conventional symmetrical roof, which has an isosceles triangle at its base, but it will not be difficult for an experienced craftsman to erect such a structure.
The gable sloping roof is also very common. The rafters of such a roof seem to be slightly broken at the base. Such roofs practically do not retain precipitation and allow you to gain in attic space for arranging an attic.
Low maintainability of flat roofs
sv2321FORUMHOUSE user
I have a house with a flat roof. Waterproofing - membrane. I'm struggling with the roof. As they say, water will always find a hole. I like the flat roof, but I think I’ll give it up and convert it to a pitched roof, although I’ll have to change the entire architecture of the house. And that's why:
- There is no absolute guarantee that all joints of a flat roof will be airtight. Enough microcrack and off we go. If there is a slope, then small defects are not critical;
- Snow lingers on a flat roof. He's melting. Water fills microcracks. It was frosty at night. The water is frozen. With frequent daily freeze-thaw cycles, microcracks enlarge and then rupture. They are getting bigger. The pitched roof has no welded areas and there is nothing to tear there. In the worst case scenario, a small temporary leak will appear without progressive consequences. It is easy to find and repair;
- The most unpleasant thing. On a flat roof, you will never know exactly where the defect occurred. There is a leak in one place, and water is dripping from the ceiling in another. The craftsmen will come, check the joints and find one of the defects, but the rest will remain. If the roof is inverted or loaded with gravel, then defect detection is an even bigger problem.
According to the user, the optimal roof for our climate is pitched. The angles of the slopes compensate for the crooked hands of the builders and changes in the properties of materials over time, and the overhangs protect the walls and finishing from precipitation.
So, fifth - low maintainability . The quality of a flat roof is greatly influenced by the human factor.
If a pitched roof with a cold attic is leaking, then finding and repairing the defective area is not difficult. As a last resort, you can dismantle the coating and perform local repairs or get to the problem area from the inside. In the case of a flat roof, finding a leak and repairing it becomes more difficult due to the complex “pie”. Many layers in the structure, especially in the so-called. "green roof". Presence of concrete screed, etc.
Calculation of a gable roof
Often, novice builders, before designing and calculating the purchase of material, have questions about how to find out the length of the rafters of a gable roof. To do this, it is important to know at the design stage what the width of the building will be in order to select rafters of a standard size, so that you do not have to splice them together, sacrificing their load-bearing capacity. At the same time, you must not forget about the angle of the roof. All of these factors will ultimately influence the length calculation.
So, to calculate the length of the rafters of such a roof, you need to divide the triangle formed by the rafter system into two right triangles. Further, knowing the width of the building and the angle of inclination of the roof, you can determine the height of the ridge of the gable roof. Knowing the two legs of a right triangle and using the Pythagorean theorem, we can calculate the hypotenuse of each right triangle, which is the required length of the rafters of our roof.
As a result, to determine the final length, another 30-50 cm must be added to the obtained value to ensure roof overhangs.
All calculations carried out to determine the height of the ridge (also known as the height of the pediment) and the length of the rafters are clearly shown in the image:
From all of the above, we can conclude that a gable roof is the cheapest and most versatile type of roofing for a private home. There are examples when, using improvised means, people erected a gable roof on their own alone. But we still advise you to use the help of specialists in such matters, because a well-made roof over your head means comfort and coziness in the house.
Designing a gable roof structure for a house
The first and fundamental stage in the construction of a gable roof is its design. We have already said that the choice of roof angle will determine the load taken by the roof, and, as a consequence, the choice of roofing material that can withstand precipitation and the loads from this precipitation and wind.
At this stage, design drawings of the future roof are created and all necessary calculations are carried out. This is necessary, first of all, to have an idea of the general appearance of the roof and its dimensions, as well as to take into account all the expected maximum loads.
After the design, you will have in your hands the entire package of documents, which will indicate all the dimensions of the future roof, its area for the purchase of roofing materials, and the full range of lumber used in the construction. Having a list with the nomenclature of lumber will allow you not to spend extra money on its purchase, since lumber is the main expense item when building a roof.
After all design work has been completed, they proceed directly to construction work. When doing the work yourself, you save half of the budget that could have gone to paying builders. In this case, it is important to remember to comply with all norms and rules so that the final result meets expectations.
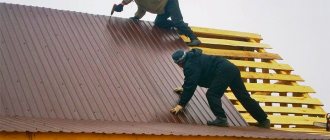
Construction of a gable roof step by step
Installation of the Mauerlat of a gable roof
The Mauerlat takes on the entire load from the roof and transfers it to the walls, so a fairly thick and strong beam is chosen as the Mauerlat. The thickness is chosen based on the thickness of the wall on which it rests. As a rule, they tend to choose the thickness of the mauerlat beam equal to or close to the thickness of the wall.
The Mauerlat must be laid flush with the outer part of the wall, firmly connecting them together. To connect the Mauerlat to the wall, anchor bolts or wire are laid (poured into the reinforced belt) even at the stage of wall construction. If wire is used as fastening, then after laying the timber it is tightly tied with this wire around and remains firmly fixed in this form. If anchor bolts were walled into the wall, through holes are pre-drilled in the mauerlat, with which the beam is placed on the bolts and tightened from above with nuts and wide washers.
It is also important not to forget to lay a layer of waterproofing material in the form of a gasket between the wall and the Mauerlat. As a rule, roofing felt or similar materials are used as waterproofing. More information about securing the mauerat is described in this video.
Installation of gable roof rafters
After the base has been prepared, we begin to assemble the rafter system of the gable roof. Installation of rafters can be done in several ways: install the rafters directly on the roof or perform some structural elements on the ground and then lift them to the installation site using special equipment. Correctly placing the rafters on a gable roof with your own hands without the help of a partner is quite problematic, so it is better to get help so as not to make a mistake and not nullify all your efforts.
To make it easier to attach the beams, it is worth marking the attachment points on each wall and connecting the opposite walls with beams (beams), on which racks will be installed to support the rafters. A ridge beam is installed on the racks, which serves as a guide for installing the rafter system. In order to connect the rafters as accurately as possible so that the entire skeleton of the rafters is the same, templates are used. This way you can avoid dips and distortions in the roof.
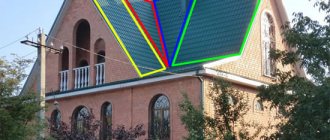
After installing the ridge beam, they proceed to the most important part - the installation of rafters (already fastened together or separately). It is important to constantly monitor the level and evenness of the installation. The rafters are fastened together, usually with nails or using iron staples. Common schemes for placing rafters on a gable roof and attaching them to each other are shown in the figure below.
After completing the roof frame, it is necessary to install auxiliary fasteners to improve the rigidity of the roof. To do this, install struts and middle skates.
We invite you to watch a video that clearly shows how to install rafters with your own hands for a gable roof.
Examples of construction of a “double-slope” veranda
Specifically for the roof of the veranda, you will need to build a rafter system, which is called a hanging one. Its essence is that you:
- make rafter trusses in advance - isosceles triangles that are securely fastened at the corners. And only then will you lift them onto the finished base and attach them.
- All work will be done at height, but both roof slopes will rest only on the walls of the veranda, without any supports in the middle.
So, for the veranda roof you will need 50 x 50 centimeter bars and fasteners. So how do you fasten the truss beams together? You can do this using modern metal plates, screws and bars.
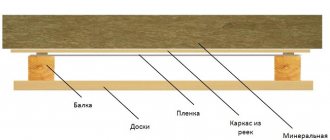
In total, the whole process will look like this:
- Step 1. Place the logs at the same distance.
- Step 2. Secure the vapor barrier to the joists using a construction stapler or thin nails.
- Step 3. Now between the joists, directly on the film, lay the insulation.
- Step 4. Spread a waterproofing film over the insulation and secure it in the same way as the vapor barrier.
- Step 5. Now we attach the counter-lattice. These are thinner bars that are attached to the joists strictly perpendicularly.
- Step 6. The selected roofing covering is already installed on the counter-lattice.
Before building a rafter system for the veranda, be sure to treat all prepared elements with fire retardants and an antiseptic against rotting. And keep in mind that the roof of the house must have a drainage system directly above the roof of the veranda, otherwise the gable roof will be subject to a double load: rainwater and what drains from the roof.
Simultaneous construction of house roofs and verandas
In this project, for example, all work on the construction of the gable roof of the veranda and the house is carried out simultaneously, and at a height:
This is the simplest method of construction, and the most economical, we note.
Simple gable roof veranda
Simple and unpretentious:
Classic version, perfect proportions. What else does a veranda need?
Gable roof with cross structure
And the roof of this veranda was built in a cunning way:
The so-called cross design is used here. What is its essence? In order not to lose valuable ceiling space of such a low roof, but also not to leave the rafter system too weak, it is strengthened with the help of crossed supports. As you can see, it all looks quite impressive and practical. Take note!
Construction of a veranda... on the second floor
Yes, sometimes this really happens. After all, the bottom is always damper, and the higher you go, the fresher the air and warmer it is. Why not, if similar projects are successfully implemented around the world:
Gable roof veranda with different slopes
And here is a wonderful example of the construction of an unusual gable roof of a veranda:
In this project, the veranda became a real decoration of the house. Please note that its roof seems to rest on several pillars, and they look quite primitive during construction. But the end result is a very stylish roof design with different slopes, which are especially in fashion today. Moreover, here the shape of the pitched roof is not intended for a more rational distribution of the load from snow and wind, but plays an exclusively aesthetic role.
And this roof looks so impressive because it involves such an exterior design technique as rhythm. This is when the same detail is repeated, and although it looks ridiculous alone, in an ensemble with its own kind it turns out to be an excellent concept.
Have you decided to build a veranda with a gable roof? Go for it!