What are ground floors?
It is necessary to explain the essence of the technology itself. Floors on the ground can be used in houses where the foundation is a strip and there is no basement. When the foundation has reached its original strength, backfilling is carried out.
Backfilling of foundation sinuses is a complex construction topic that requires a separate analysis; read about the most common mistakes in this work in a separate section https://www.sdvor.com/articles/11-oshibok-pri-stroitelstve-fundamenta/
The next stage involves installing a foundation under the floor of the first floor; the foundation can be floors that rest on a foundation strip or floors on the ground. Such floors do not rest on a foundation, but lie on a cushion of crushed stone and sand. This often causes skepticism about this technology.
Stages of arranging a concrete screed on the ground
Preparatory work ends after the creation of the thermal insulation layer. However, you cannot immediately proceed to pouring concrete - you need to take care of the strength and reliability of the future structure.
Screed reinforcement
Reinforcement process - knitting rods
The next step is laying reinforcement, which will give the concrete coating additional strength and durability. Traditionally, road mesh is used for this purpose; the diameter of the bark rods varies between 5-6 mm. The dimensions of the cells are 100*100 mm or 150*150 mm. Such reinforcement will prevent the appearance of cracks in the screed during shrinkage.
Reinforcing mesh
It is best to place the reinforcing layer a few centimeters above the thermal insulation material, since this way it will be inside the concrete covering. If the operational load of the floors is very high, then a reinforcement cage is used to strengthen them.
The photo clearly shows the mesh laid on the waterproofing
Creating formwork
Before the construction of the final concrete screed begins, guides and formwork are installed. This technology allows you to more accurately maintain a given level. The available area is divided into equal sections, the width of which does not exceed 2 m. After this, guides are installed, their height must correspond to the desired level of the screed. The guides are attached using a cement solution into which clay and sand are added.
Then formwork is laid in the space between the guides, thereby dividing the base into rectangular parts, which are then filled with cement mortar. The guides and formwork are brought to the desired level and leveled horizontally, serving as a guarantee of the evenness of the future coating. After pouring, they will be removed from the concrete, which is quite difficult to do, so to simplify this process they are coated with a special oil.
Filling the screed
Filling the screed
In order to obtain a monolithic surface, the screed is poured in several passes:
- work begins from the corner located on the opposite side of the door. After filling several rectangles, the solution is distributed over the entire area using a spatula;
- then comes the time for rough leveling, which is carried out with movements towards you, while excess concrete is removed;
- in the treated areas, the formwork and guides are removed, and the resulting voids are filled with a cement mixture.
The process of leveling freshly poured concrete
This procedure is maintained until the entire floor area is filled. To compact the concrete surface, you can use a special vibrator, which will speed up the process and remove all voids. When the screed is completely ready and leveled, it is kept under film for 3-4 weeks and periodically moistened. A leveling screed made of concrete M-100 and higher can be poured over the finished monolithic surface.
The process of pouring and leveling the concrete layer
Improper preparation of the base
This mistake is associated with the main fear that the floor will sag along the ground. To prevent this from happening, a dense cushion must be formed under the floor. Sand is best suited as a base, as it is easier to compact. Let's look at the main mistakes at this stage.
- The entire layer of sand is compacted at once - high-quality compaction can only be achieved with layer-by-layer compaction. The thickness of the layers depends on the equipment used for compaction.
In most cases, a vibrating plate or vibrating leg is used; with a vibrating plate, the thickness of the compacted layer depends on the weight of the device. It is usually recommended to rent equipment that is capable of compacting layers of 15–30 cm. Read more about mistakes when compacting soil in the article on the website.
- Chernozem under the floor - in some cases, when installing a strip foundation, they are limited to a trench; soil with organic matter is not removed from under the floor. Such soil is not suitable as a base for floors, as it contains organic inclusions. Rotting of organic matter leads to subsidence.
How to do it yourself?
There are three main methods for creating floors on the ground if the building was erected on a strip foundation. Each of them has its own advantages and nuances, but they all have good load-bearing capacity.
Wood flooring
The simplest method that requires the least financial costs . To support the structure, you will need columns placed on the surface of the ground so as to create a support system for wooden logs.
Expanded clay must be poured between the posts; sometimes you can leave the space empty, but then you will need holes for ventilation.
The logs must be leveled so that the plane of the supports is absolutely level , after which the subfloor is laid. A film is placed on it, providing vapor and waterproofing, and a standard substrate.
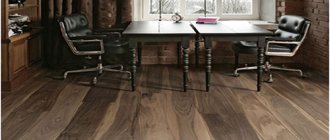
Laminate, linoleum can be used as a final floor covering, or a floor made from a material at the owner’s request can be installed.
Dry screed
This option provides good results in the shortest possible time. Work required:
- A sand and gravel cushion is poured, where the components are arranged in layers twenty centimeters thick, carefully compacted, after which a sheet of geotextile material is laid on them.
- A reinforcing mesh is installed onto which the concrete mixture for the rough screed is poured.
- The next layer is a waterproofing film - the canvases are placed ten to fifteen centimeters above each other, the joints are sealed with construction tape, the edges are brought out onto the wall to a height of twenty centimeters.
- Plaster profiles or other structures are installed that will act as beacons allowing the formation of a flat surface.
- Expanded clay is poured in and leveled according to the previously installed beacons.
- The subfloor is being installed. Drywall or plywood sheets are used for it. Experts consider tongue-and-groove plasterboard to be the most suitable, which is reliably connected into a single sheet thanks to a special profile.
Next, all that remains is to install the finished floor covering, using any materials that the owner likes - from laminate to tiles.
Concrete screed
This method turns out to be more labor-intensive than others. It is recommended to use it if the air temperature does not drop below five degrees, the sun will not shine on the surface, and the site is prepared for work.
The screed algorithm is as follows:
- About ten to twenty centimeters of sand are poured out to create a pillow. The layer can be larger, but not exceed 60 cm. Compaction is carried out for maximum density, for example, like on a well-traveled road.
- A layer of gravel or crushed stone is formed on the resulting cushion, the thickness of which is similar to that of sand. Compaction is being carried out.
- The geotextile fabric is laid overlapping, with an overlap of fifteen centimeters. The same is done on the foundation walls.
- A damping layer is installed around the perimeter.
- Reinforcement is carried out with a special mesh of fiberglass or metal reinforcement, after which the concrete composition is poured. Now you will need to wait until the mixture completely hardens.
- Waterproofing is being installed. Suitable as roofing felt in combination with bitumen mastic, or modern impregnations.
- A layer of insulation is laid. Experts recommend penoplex, as it is dense and copes well with loads.
- A steam-waterproofing film is placed with an overlap on the walls. Overlap up to fifteen centimeters, on walls - up to twenty. All joints are sealed with construction tape.
- A reinforcing mesh is installed for finishing pouring. The concrete layer does not exceed ten centimeters.
If the owner of the building has planned to install a heated floor, then pipelines and other necessary communications are laid before pouring concrete. It is necessary to make sure that all connections can withstand the load and are made with the required safety margin.
Polyethylene film instead of vapor barrier
The waterproofing layer serves to protect the screed from moisture suction from the soil, but waterproofing alone is not enough. When the temperature in the house is above zero, moisture from the soil begins to evaporate, turning into steam. As the steam rises up the structure, it condenses inside the floor “pie,” which can lead to the destruction of the reinforcing elements. For this purpose, steam-waterproofing is used. Sometimes polyethylene film is used as a cheaper alternative.
Another task of vapor barrier in ground floors is to protect against radon entering the lower floors of the building. It is a radioactive gas that is released when uranium and thorium decay. The spread of radon is typical for individual regions; we discussed the radon problem in more detail in a separate section https://www.sdvor.com/articles/ugroza-radona-na-polakh-po-gruntu-pravda-ili-mif/
Such a film is often used in screeds that are made on floors, and in this case such a vapor barrier is sufficient, but not in the case of floors on the ground. The main disadvantages of the film are that it does not fit tightly enough to the base, folds and air bubbles form on its surface, and it is difficult to achieve uniform installation. In addition, the film is easily damaged during the installation of subsequent layers, as a result of which the tightness of the insulating layer will be compromised.
Manufacturing technology
Before you start pouring the floor, it is important to carefully prepare the base, consisting of several layers. The main recommendations are to use fine-grained filler in the concrete mixture and lay it along the beacons in one go.
Laying the underlying layer
This layer consists of a compacted sand cushion with a height and a crushed stone bedding (fraction 30-50 mm) with a height of 7 to 10 cm each. The purpose of this layer is to protect the lower part of the slab from exposure to moisture from the soil and to act as a leveling base.
The soil characteristics that must be taken into account before proceeding with floor installation include the following:
- It is important to remove the plant layer of soil when preparing the base. Otherwise, due to shrinkage, the concrete structure will simply collapse.
- Sand is used when groundwater levels are low to the surface, as it is capable of absorbing moisture.
- When using crushed stone on wet soil, capillary rise of moisture is excluded.
Sand and gravel backfill
Important! The footing can be replaced if the layer of crushed stone is leveled with sand so that the waterproofing film laid on it is not damaged. Cement laitance is used to pour the underlying layer first.
Special installation with water supply for sand compaction
To reduce the cost of work and get a high-quality result at the preparation and design stage, it is necessary to take into account some nuances:
- After laying the finishing material, the level of the finished floor should coincide with the level of the threshold of the entrance opening.
- It is necessary to prevent the floor screed from resting on fragments of the base or foundation that protrude from the internal walls.
- During the process of compacting the sand layer, it is irrigated rather than spilled through with water.
Installation of footing and waterproofing
The purpose of the waterproofing material is to prevent the insulation and screed from getting wet under the influence of moisture.
Recommendations for waterproofing are as follows:
- When directing bitumen roll materials, two layers are created. The overlap is at least 15 cm when positioned perpendicularly.
- When using film, the direction of gluing the sheets does not matter. The main thing is to overlap and carefully seal the joints.
- The EPDM membrane is laid in one layer.
Finishing screed
The installation of a concrete footing with a height of 5 to 10 cm allows you to create a flat and rigid base for the waterproofing layer (gluing film, fusing bitumen). Otherwise, when using rolled bitumen materials or PVC film, their installation becomes significantly more complicated due to the divergence of joints on loose ground.
Bitumen waterproofing
Important! To create a rough screed, it is possible to use lean concrete, in which the cement content is minimal. It is not necessary to reinforce this layer. Rigid fixation of the rough screed with the foundation and plinth is prohibited.
Laying insulation
Strips of insulation or a tape of the same name are used as a damper layer. The tape is glued directly to the inside of the foundation or plinth around the perimeter of the room.
The thickness of the insulation (from 5 to 15 cm) is taken in accordance with the operating conditions in the region of construction.
Being, in fact, a ceiling, the ground floor is not rigidly fixed to the walls of the room. Therefore, it has the following qualities in the field of insulation:
- The contact points between the floor and the plinth, due to the presence of a lower insulated layer, are completely protected from heat loss.
- Using a damper layer installed around the perimeter of the room between the screed and the wall, the room can be protected from vibration and noise.
- Sealing and leveling work, which is required when laying slabs, will not be required in this case.
- The advantage is the lack of free space (underfloor) under the floor structure.
Floor insulation with penoplex
Reinforcement
A floating screed involves introducing utility pipes into the room before pouring the solution - heating, cold and hot water supply, sewerage.
It is important to understand that the input nodes with such a floor design have zero repairability. Therefore, in order not to resort to destruction of the screed, risers are laid inside pipes of larger diameter, so that timely replacement or cleaning of pipes is possible.
Reinforcement
Concrete pouring options
Plaster beacons or metal profiles, which are used when pouring mortar, can increase the productivity of the work performed and obtain a high-quality coating.
The peculiarity of the work is that you cannot walk on the reinforcing mesh while pouring the floor, so there are two ways to carry out the work.
When pouring the mortar from the far corners of the room towards the door, the reinforcing mesh inside the concrete is given the required level of rigidity, so the free areas of the reinforcement do not move. This method is called "tracks".
Movement around the pouring area can be carried out using ladders - suitable stands made of brick or timber installed in the mesh cells, on which the boards rest.
After 3 days the floor can be finished.
Prices for reinforcing mesh for screed
reinforcing mesh for floor screed
Lack of concrete (sub-concrete) preparation
The so-called footing is a layer of lean concrete (grade B3.5 - B10), which serves to create a flat plane for further construction. The footing can be done with or without crushed stone. It is easier to lay waterproofing on a concrete layer by preparation, since this base has a flat and durable surface on which you can walk without hindrance. On a sandy or crushed stone base it is quite difficult to achieve a tight fit of the rolled material.
The insulation has insufficient density
After the waterproofing layer, insulation is used in the floors along the ground; it should prevent the outflow of heat from the premises of the first floor. Insulation also helps protect the soil under the floor from freezing. Typically, expanded polystyrene (EPS) or extruded polystyrene foam (EPS) is used for insulation; sometimes mineral wool is used. The density of the material must provide the necessary compressive strength so that the weight of the floor does not push through the heat insulator.
Difficulties arise due to the fact that the compressive strength differs between different insulation materials, therefore the density required is different. For example, for expanded polystyrene 35 kg/m3 will be sufficient, for mineral wool – 160–175 kg/m3.
Design Features
Layer order
When constructing a strip foundation or a foundation with a grillage of small height, it is possible to use floors on the ground - a structure consisting of the following layers:
- sand-crushed stone cushion designed to stabilize the concrete layer and protect it from underground moisture
- screeds (concrete preparation, footing): according to the recommendations of SNiP, in central Russia it is enough to arrange a layer 5 cm thick
- roll waterproofing
- insulation layer
- concrete underlying layer 1 cm thick
- clean floors: you can use, for example, tiles, linoleum or laminate; It is also possible to use a classic base in the form of wooden floors on joists
Unlike a slab foundation, the screed in floors on the ground in a private house is not made too thick. After all, it must withstand the load only of the weight of furniture, household appliances and other things in the house. 2 layers of screed: rough, laid immediately after the pillow, and finishing, top, will be quite enough. Such a foundation is made only after the construction of the structure itself.
Floating screed
There are two types of ground floors. They can:
- tie to a tape base;
- be manufactured in the form of a floating screed not connected to the foundation
Each of these designs has both advantages and disadvantages. With a rigid connection to the foundation, the screed lying directly on the foundation shrinks less and therefore does not crack. But when the foundation subsides, it can simply “hang” in the air. Although with high-quality reinforcement of the base this is not such a big problem. Backfilling, not with soil taken from the pit, but with specially imported non-metallic materials, sand and crushed stone, will help prevent the slab from sinking.
When using a floating screed, when the base shrinks or the soil moves, stress will not be transferred to the concrete slab, and cracks will not occur in the floors. However, it can “play” on its own, which often leads to defects - cracking or the appearance of gaps between them and the wall. Therefore, when pouring a floor over a foundation, the strength of the concrete solution and the use of high-quality reinforcement are essential.
Advantages and disadvantages
There are many advantages to concrete floors on the ground in a private home. Let's list the main ones:
PROS:
- Can be used on most soil types
- minimal concrete consumption and, as a result, low cost
- sufficient resistance to frost heaving forces
- Thanks to careful insulation in a house with such a foundation, it is easier to maintain positive temperatures in winter, since a screed with a heat insulator installed inside can accumulate heat well, resulting in reduced costs for heating the building; It is enough just to insulate the base and blind area well
- such floors do not require ventilation and annual drying
- unlike wooden floors, they do not require periodic replacement of rotten beams
MINUSES:
- The disadvantages include the difficulty of repairing communications. Therefore, it is imperative to lay duplicate sleeves in the concrete, in which additional sewerage and water supply systems are located. They can be connected quickly and without problems in case of clogging of the main communication systems.
- Another disadvantage of such foundations is the lack of a basement floor. However, the underground floor in a private house can be organized in another utility room.
Some developers advertising their own services claim that under such floors it will be constantly wet. But if high-quality drainage, storm drainage and removal of flood and groundwater are installed, moisture accumulation can be completely avoided.
Floor installed on the ground
Geotextiles, widely advertised in recent years, under a layer of sand cushion will not only be inappropriate, but also harmful. It will not allow the soil to compact properly, as a result of which the effectiveness of floors on the ground will be reduced to zero. The drainage properties of this material are useful only when laying communications.
Replacing fiber reinforcement
Recently, fiber has become widespread - these are small polymer fibers (12 - 18 mm), which are added to the solution to reduce cracking. It may seem that reinforcement performs the same function, but this is misleading. The reinforcement combines the entire screed into a single monolithic slab. Thanks to this, the floor absorbs loads over the entire area. Fiber reduces local cracking, that is, in fact, the fibers prevent small shrinkage cracks from opening too much.
Deformations of the insulation under the screed are small, but they still occur; reinforcement helps reduce the negative effect of these deformations.
If the screed on the floors between floors in most cases does not experience strong temperature deformations, so you can limit yourself to fiber, then in the case of floors on the ground, reinforcement is mandatory, while adding fiber to the solution is also desirable.
What is a loose floor and what are its advantages?
The term “fill floor” refers to the use of modern material – dry screed.
The basis of the bulk floor is expanded clay, i.e. translated from Greek as “burnt clay”. Expanded clay, as is known, does not contain harmful impurities, is chemically inert, and has many suitable properties for creating comfort in the room.
The benefits of screed flooring
Loose flooring has impeccable characteristics, which is why its popularity has been steadily increasing recently.
The big advantage is the absence of wet processes when installing this floor. There is no need to dry the floor, which means the overall repair time is reduced. In addition, the amount of pollution is reduced.
The use of dry screed does not in any way interfere with the main cycle of finishing work. And, as soon as the installation of the bulk floor is completed, the remaining work is completely resumed.
Dry screed is a material that belongs to the middle price segment. Its cost is slightly higher than the cost of concrete mortar. But, it is worth considering that these costs will be more than compensated by the simplicity and speed of installation.
Another advantage for those who carry out repair work themselves is the absence of the need to level the surface and the ability to immediately proceed to laying the finishing floor covering.
There is also no doubt about the strength of a floor made with dry screed. After all, sheets are laid out on the screed, which act as a load distributor over the occupied area, which means that point impact on the dry material is excluded, and the installation technology makes it possible to create a rigid base.
Today, loose flooring has become the simplest and most rational option that will fit any family budget.
Mesh with large cells in cement-sand screed
In some screeds on ground floors, a cement-sand mixture is used instead of concrete. This in itself is not a mistake, because the use of concrete in some cases is pointless (for example, on thin screeds). The mistake is to use grids with large cells.
Concrete and cement are susceptible to cracking to varying degrees, therefore, for cement, the maximum cell size of the reinforcing mesh for DSP should be no more than 100x100 mm.