Materials
Publication date: 02/06/2020
2
17672
- Choosing the type of roofing system
- Beginning of work
- Hanging system technology
- Installation of an inclined system
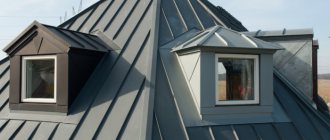
If there are no problems with the construction of the frame and walls of a wooden house, then, as a rule, a number of questions arise regarding the construction of the roof. They relate to both the choice of the type of rafter system and the device itself and the fixation of its main elements. The roof frame is one of the main parts of a frame house, since it bears the main load from the roof (rafters are the most important element). The roof of a frame house is most often made of wooden beams; it can have a different appearance, slope and construction principle.
Roof frame of a frame house
Choosing the type of rafter system
There are different rafter systems, but this is what you need to decide first, choose which one will be used. All these systems consist of two rafter legs. At the top of the frame they are connected to each other. At the bottom they are also connected, for this there is a bottom tie. This screed can be the basis for an attic floor. As in any business, there are some nuances here.
Rafter systems can be layered or hanging. In the construction of a private house, both one and the other systems are possible.
Types of roof frame structures
It should be noted that the roof frame may differ depending on the roofing structure used, for example:
- Rafter type frame - made of lumber, intended for pitched roofs of buildings.
- Reinforced concrete frame - made from special floor slabs, designed for flat roofing structures.
- Metal frame - made of iron beams, used for arranging the roofs of industrial buildings.
- Frame made of lumber - used in private housing construction for gable roofs.
How to choose a system for constructing a frame?
The choice of rafter system depends primarily on what kind of house is being built and its size. A hanging system is installed if the distance between two load-bearing walls is not very large, no more than 6 meters, that is, the house is small. With this system, if the building is large, the rafters may sag under their own weight, since their legs rest on the side walls and nothing more.
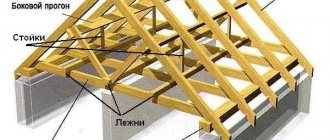
In a large house, you need to use a layered system; it is much more reliable. In this case, the house must have an internal load-bearing wall in the center. Another support is installed on it, which will prevent the rafters from sagging.
Choosing a roof type
Before designing a house, its owners must decide whether the second floor will be used for living. The fact is that the technology of a frame roof for the second floor is different, because the living space is located directly under the roof. In this case, there is no need to build the walls of the upper floor and install a roof above it.
In addition to advantages, frame roofs for the second floor also have disadvantages, including the inability to install full-fledged window openings, and it is difficult to make the living space comfortable.
Choosing materials for the frame
Let's see what we need to purchase in order to build a gable roof frame ourselves.
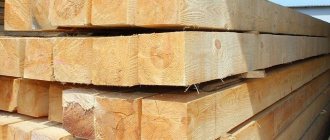
The rafters are made of wood. This is the most important element in the construction of the frame. You need an edged board (50x150 mm), you will also need timber (150x150 mm).
The best wood is coniferous, especially if it was harvested in winter. It’s great if the resin hasn’t been drained from it first. Resin serves as a natural antiseptic and will extend the life of wood for many years. It is important how the tree was stored before sale and how dry it was. In general, already at this stage you need to be very careful in order to buy high-quality material. It is necessary to carefully inspect the wood so that in no case are there woodworms or their traces, there are no cracks or other defects.
In general, only high-quality material is purchased, the rest is mercilessly rejected as unsuitable for constructing a frame for the roof of a house.
You should know that wooden frames are not the only ones in nature. Roof frames made of metal channels are also possible, or reinforced concrete are possible. The roof with such frames is very heavy, it is impossible to build it yourself. That is, only a wooden frame is suitable for DIY work, which is what is being considered.
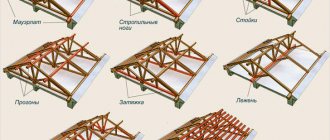
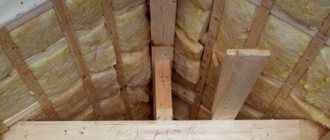
The roof frame consists of rafters, purlins, racks, attic floors, counter battens and sheathing. Each element has its own task and purpose.
An attic space can be an ordinary attic, a warehouse for unnecessary things, or it can be thought of as an attic, an additional area of the house. So, if this is a simple attic, 50x150mm boards are suitable for the attic floor. For an attic, it is clear that the flooring must be much stronger; a board cannot be used here. You need timber 150x150 mm. It gives quite sufficient strength. Place it directly on the Mauerlat.
Next, you need material for the sheathing and counter-lattice. A thinner beam is suitable here. Perhaps 50x50 or even 40x40, square section. These beams can support the weight of a roof made of any material.
The timber for the sheathing must be strictly straight. You need to keep an eye on this when purchasing it. The slightest error will significantly complicate roofing work. So this condition of straightness of the beam is important.
Lathing and counter-lattice can be made not only from timber. A material such as a perforated galvanized iron profile is also perfect.
In addition to the materials actually used for the rafters, both sheathing, ceilings, some other things are needed.
- To attach the support beam, called the Mauerlat, you need threaded metal studs.
- The rafter legs are attached to the mauerlat using staples and brackets, therefore, they are also needed.
- The rafters also need to be connected to each other. This is done using various fasteners, such as wood screws, studs of different diameters - 8 and 10 mm.
- You need galvanized nails.
The tools for the job are quite common - these are hammers of different sizes, you will need different ones, and a drill to drill holes. You need a grinder or a saw to cut the rafters to size and give them the required shape. You need a carpenter's ax and planes. All this is often found in a man’s toolbox at home. So there is no need for new acquisitions, everything is simple.
A measuring tool is a must. These are a level, a plumb line and a tape measure. In the construction of the roof frame, everything must be very precise, no “by eye”.
Necessary tools for DIY roof installation
To carry out installation work, you need to make sure that all the necessary building materials, as well as tools, are at hand. The list of essentials includes:
- perforator, drill;
- universal tools for woodworking - axes, hammers, saws, nails;
- compressors, spray guns;
- measuring instruments - rulers, squares, calipers;
- level, construction cord;
- fasteners, drills, nails.
You will also need wood (timber for beams, boards, slats for sheathing), insulation, waterproofing and roofing materials, and sealants.
Frame wood protection
All wooden parts of the future frame must be protected from possible fire and rotting. This must be done before starting construction, erecting rafters, and so on.
There are two compositions that must be used to process all the details of the future building - rafters, sheathing and others. It is an antipyretic and antiseptic.
The first substance significantly reduces the flammable properties of wood, which dramatically reduces the possibility of fire.
Secondly, it kills bacteria, which prevents putrefactive processes from developing in the wood.
To apply the compositions, it is recommended to use a brush; it gives a better result than a spray. The sprayer does not provide deep impregnation. Each composition is applied in layers, let the layer dry, after which the next one is applied.
Please pay attention ! Some protective compounds are toxic to one degree or another. It's better to work outside. If indoors, it should be well ventilated. Goggles and a respirator are required, that is, personal protective equipment.
Protection of the roof frame is possible even after its construction.
Sometimes protection from fire and bacteria is carried out after the construction of the frame. It's worse, but possible. It is clear that the brush is used to process wood in an already constructed structure. You need to pay very close attention to the places where the beams are connected; they need to be impregnated especially carefully.
So, with the chosen type of rafter system, purchased and prepared material, you can begin construction directly.
Installing the Mauerlat
The wooden beam that is laid on the load-bearing walls of the house and which will serve as a support for the frame of the future roof is called Mauerlat by builders. It transmits and distributes the loads arising from the weight of the roof, from external influences (wind, snow, rain), onto the supporting structures of the house. Only for the roof of a frame house or for a house made of timber, a Mauerlat is not needed, where the upper wall beam plays its role. In other systems, the Mauerlat is necessary; it is the basis of the rafter system.
It is recommended to use timber for the Mauerlat. It can be 100x150, 150x150 is also possible. On the inside of the building, they try to lay the mauerlat “flush” with the surface of the house, and on the outside, a brick barrier is erected at the level of the mauerlat. A concrete pavement is laid around the perimeter of the building. After it dries, roofing material is laid on it in several layers. This is to ensure waterproofing. In addition, roofing felt will prevent moisture from concrete from getting into the wood.
Most often, the Mauerlat is laid using the following technology:
- Metal studs with a diameter of more than 10 mm are installed in the concrete. The studs can be installed when the blind area is dry. To do this, you will need to drill holes in the concrete and secure the installed studs with fresh mortar. It is better to foresee this in advance and install the studs in the newly poured blind area. Of course, this method is more profitable, we will save time, we will save labor.
- A solid beam for the mauerlat is laid along the blind area, and the locations of the already installed studs are marked on it. Holes are drilled along these marks. The diameter of the drill must match the diameter of the studs. After this, the Mauerlat is put on the studs. The studs should stick out from the timber by 15 centimeters.
- The Mauerlat is secured to the studs with nuts. Wide washers must be placed under the nuts. They save the wood from damage when tightening the nut.
Please pay attention ! If you have the skills of a welder and a welding machine, you can do without studs, saving on them. Their role is perfectly played by reinforcing bars, and the nuts are welded to these bars.
There is another simpler way of laying the Mauerlat, which makes the work easier. In this case, not timber is used, but two layers of boards.
- The boards of the first row are laid around the perimeter of the building. They are fastened with countersunk anchor screws and a metal sleeve. You need a hammer drill to drill holes in concrete or brick. The board is pre-drilled with a drill.
- The boards of the second row are laid on the first. The joints of the boards should not match. In the corners, the boards are laid “in a bandage”.
- The rows are connected using large (100mm) nails.
The main relief of such installation is the simpler lifting of the material, the boards are lighter than the beams. The strength of such a structure does not suffer much compared to a timber structure. She is enough. Especially if the house is frame.
Roof of a frame house: frame assembly technology
The roof of a frame house has a fairly simple design, so you don’t even have to spend a lot of time and effort on building it yourself. Today we will try to deal with the main difficulties that may arise during the construction process. We will give practical recommendations on choosing the type of roof, roofing material, and also tell you about the rules and regulations that must be observed during the work process.
Before starting work on installing the roof, it is worth deciding on the type of structure itself, its slope and the type of material that will be used for finishing. It is equally important to choose insulation in advance.
Installation of rafters
The next stage after the Mauerlat is the installation of rafters. It is recommended to carry out all processing of rafter beams on the ground. This is especially true for single masters. On the ground, it is more convenient to give the rafters the required size, use a template to give the desired shape, make the grooves and holes necessary for fastening. Next, the rafters (their parts) rise to the top, and work on fastening them can begin.
Let's look at how a roof with a hanging rafter system is built and its technology.
To install the rafter legs, grooves are cut in the Mauerlat. The distance between the rafter legs is determined individually at the stage of thinking through the project, but it is not less than 1.5 meters. Anything less is impossible, the structure will be insufficiently strong.
Please pay attention ! When planning roof insulation, the distance between the rafters must be linked to the amount of insulation. This will help save time on cutting the latter, since entire sheets of it will be laid.
The rafters are installed from the end sides of the roof, that is, from the gables. When the rafters are installed at the ends, a cord is pulled from ridge to ridge. They are guided by it when installing the remaining rafters - intermediate ones.
The rafter legs are inserted into the grooves and fixed. For this, complex fasteners are used. The steel bracket will limit the transverse movement, and the brackets will limit the longitudinal movement. This bracket secures the rafter to the mauerlat.
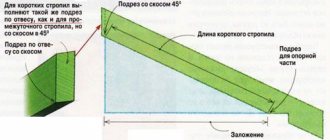
The rafters must extend beyond the perimeter of the house; this must be remembered when installing them. The overhang (or overhang) of the rafters is considered normal by 40 centimeters. This overhang will protect the walls of the building from rain, from water flowing abundantly down the roof of the house. This overhang of the rafters is necessary; it can also be increased by adding a thin board, which is called a “filly”. The “filly” is attached to the rafters with nails, using a spacer - a piece of board.
Please pay attention ! “Filly” makes it possible to make the structure of the roof frame lighter and cheaper. This is in no way a defect or shortcoming. In addition, this makes it easier to repair the overhang. You can replace a “filly”, two “fillies” - it’s still easier than changing the rafter beam.
- The lower parts of the rafters are fixed with strapping. This strapping is used as a base for the attic floor. Mauerlat is a support for the beams of this harness.
- If the length of the rafter beam is insufficient, it is increased. Two beams are laid overlay, and the overlap must be at least a meter, otherwise the strength will be low. The bars are fixed with pins. Their diameter is at least 8 mm.
- The rafters are connected to each other by pins. Holes are pre-drilled for them. To prevent the rafters from rotating and to be firmly fixed, they are connected with two studs at once.
- If the roof is no more than 6 meters wide, the hanging rafters are connected by a cross beam. It's called a puff and is shaped like the letter "A". Tightenings are made from boards 50x100 or 50x150, they are attached to the rafters with self-tapping screws. Sometimes tie-ins of three 30x100 boards are installed; they are placed on both sides of the rafters.
- At the top of the rafter trusses, they are fixed with a longitudinal ridge beam, sometimes with a ridge board.
- To strengthen the rafter assembly from above, sometimes a ridge beam is connected to a tie. For this, a piece of board is used. This is especially necessary when there is a large distance between the rafters. With such a connection there will be no deflection of the tightening.
These operations are repeated for all rafter pairs. When this difficult work is completed, the rafters are installed, you can begin the sheathing.
Construction of a gable roof step by step
Installation of the Mauerlat of a gable roof
The Mauerlat takes on the entire load from the roof and transfers it to the walls, so a fairly thick and strong beam is chosen as the Mauerlat.
The thickness is chosen based on the thickness of the wall on which it rests. As a rule, they tend to choose the thickness of the mauerlat beam equal to or close to the thickness of the wall. The Mauerlat must be laid flush with the outer part of the wall, firmly connecting them together. To connect the Mauerlat to the wall, anchor bolts or wire are laid (poured into the reinforced belt) even at the stage of wall construction. If wire is used as fastening, then after laying the timber it is tightly tied with this wire around and remains firmly fixed in this form. If anchor bolts were walled into the wall, through holes are pre-drilled in the mauerlat, with which the beam is placed on the bolts and tightened from above with nuts and wide washers.
It is also important not to forget to lay a layer of waterproofing material in the form of a gasket between the wall and the Mauerlat. As a rule, roofing felt or similar materials are used as waterproofing.
More information about securing the mauerat is described in this video.
Installation of gable roof rafters
After the base has been prepared, we begin to assemble the rafter system of the gable roof. Installation of rafters can be done in several ways: install the rafters directly on the roof or perform some structural elements on the ground and then lift them to the installation site using special equipment. Correctly placing the rafters on a gable roof with your own hands without the help of a partner is quite problematic, so it is better to get help so as not to make a mistake and not nullify all your efforts.
To make it easier to attach the beams, it is worth marking the attachment points on each wall and connecting the opposite walls with beams (beams), on which racks will be installed to support the rafters. A ridge beam is installed on the racks, which serves as a guide for installing the rafter system. In order to connect the rafters as accurately as possible so that the entire skeleton of the rafters is the same, templates are used. This way you can avoid dips and distortions in the roof.
After installing the ridge beam, proceed to the most important part - the installation of rafters (already fastened together or separately)
It is important to constantly monitor the level and evenness of the installation. The rafters are fastened together, usually with nails or using iron staples.
Common schemes for placing rafters on a gable roof and attaching them to each other are shown in the figure below.
After completing the roof frame, it is necessary to install auxiliary fasteners to improve the rigidity of the roof. To do this, install struts and middle skates.
We invite you to watch a video that clearly shows how to install rafters with your own hands for a gable roof.
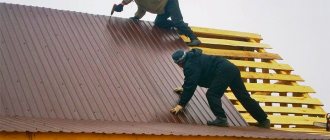
Gable roof sheathing
Sheathing a gable roof in the simplest case involves installing transverse boards on the rafters for laying roofing material on it. But, as a rule, modern roofing is a more complex pie of various layers.
After installing the sheathing, the roof is covered with a layer of waterproofing, the layers of which are mounted overlapping each other, and the joints are fastened with tape.
The next step is to secure the counter-lattice - strips fixed at an angle of 90 degrees to the main sheathing. This is necessary to provide a ventilated gap in the roof pie to get rid of moisture.
At the final stage of installation of a gable roof, the roofing covering is laid, the choice of which, as mentioned at the beginning of the article, depends on several factors, including the financial component
External work on installing the roof ends with filing the eaves and arranging the gables, if they are not part of the walls. After this, they move on to interior finishing work and roof insulation, if necessary. We will talk in detail about roof insulation in the following articles.
It is worth noting that building a gable roof with your own hands is not so difficult, the main thing is to make the calculations correctly and follow the instructions step by step so as not to miss important points during installation.
A brief video instruction on installing a gable roof is presented in the video:
Lathing
The type of sheathing will depend on the type of roofing material and roof rafters - whether it will be solid or thinned. For laying soft and rolled roofing materials, a continuous sheathing is required. For its manufacture, fairly thick (at least 10mm) moisture-resistant plywood or OSB boards are used. The sheets are stuffed onto the rafters through a counter-batten.
If thinned sheathing is being erected, beams or boards are placed onto the rafters for the roof with your own hands. The board can be unedged if strict economy is necessary. The size of the roofing material determines the distance between the boards or beams.
Fill the thinned sheathing from top to bottom. The first rows from the ridge are filled without a gap. This is done for greater strength.
After this work is completed, the roof is insulated and waterproofing is installed. Roofing work can begin.
Of course, the process of building a frame for a roof cannot be called a simple matter. But if you approach the matter seriously, weigh everything, study it, think it through, success will certainly come.