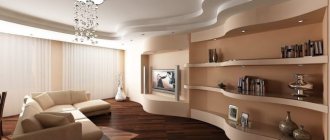
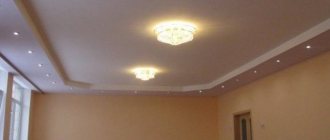
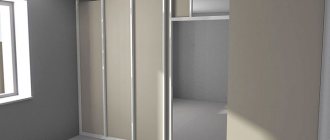
This is what the illuminated ceiling looks like
Drywall is an almost unique material. It is light, plastic, can withstand loads well and can be used both for interior partitions and for forming ceiling elements. For example, making a ceiling with lighting with your own hands is not so difficult: you just need to understand how the material behaves during processing, have a minimum of tools and straight hands.
What is drywall?
Drywall is a layer of gypsum covered on both sides with cardboard. The standard sheet width is 120 cm, the length can be different - both 240 cm and 360 cm. Given the flexibility and fragility of the material, it, like no other, requires the use of a lattice frame. A mesh with a cell of 20x40 cm, made of a metal profile or a wooden beam, is considered ideal, but the cell size can be reduced, but cannot be increased to avoid sagging. For example: backlit plasterboard ceilings weigh from five to 10 kg per sq. m.
It’s not for nothing that we talk about the fastening mesh: unlike wall partitions, suspended ceilings are fastened so that they can withstand their weight, lamps, a noise-insulating layer (most often, mineral wool) and electrical wiring. Therefore, when tasked with creating a backlit plasterboard ceiling, you need to firmly understand how much it will weigh, as well as what other functions it will need to perform.
Light sources for hidden ceiling lighting
There are several options for lighting the ceiling surface. The question, at first glance, is trivial, but in fact it needs to be given maximum attention. The construction of a plasterboard niche in itself turns out to be safe enough to withstand almost any existing light source, except mercury and halogen lamps.
In practice, to illuminate the ceiling using a niche or additional level made of plasterboard, three types of lamps are used:
- LED strips, both monochrome and color;
- Neon tubes are usually used in the manufacture of outdoor advertising, but if handled correctly, it is quite possible to use them to illuminate the ceiling at home;
- Housekeepers or fluorescent lamps. For illumination, lamps with a body length of 60-80 cm and a power of no more than 25 W are used.
The scheme of illuminating the ceiling with fluorescent tubes, which was quite common 10-15 years ago, is becoming less popular today, and the lighting is increasingly being replaced by a more practical and reliable LED scheme.
Important! Today, ceiling lighting using housekeeper lamps is installed only in those places where the owners prefer to relax, read books, or work at the computer.
Despite the apparent inconvenience and higher energy consumption, housekeepers are still used to equip lamps in niches. The emission spectrum of the lamp is very close to daylight, so vision gets less tired. Economy lamps, along with neon lamps, are used to equip the so-called external lighting circuit, when a line of lamps is not hidden in a niche, but mounted on top of it.
Illuminated plasterboard ceiling with LED strip
In modern design, almost all contour lighting for the ceiling surface is made on the basis of a polymer strip of printed LED crystals connected in one chain. The advantages of an LED strip light include low energy consumption, high level of radiation brightness and long service life.
In addition, there are serious disadvantages:
- The LED strip produces an uneven flow of light, so you have to use plastic diffusers. If you place the lamp in a niche without a diffuser and too close to the surface of the ceiling, then up close you can see microspots on the drywall from the glow of single LEDs;
- LED ceiling lighting is very bright and at the same time not very comfortable for vision due to the narrow spectrum of radiation. It is impossible to mount an LED strip directly on the ceiling in an open version due to the high radiation intensity; you have to use a reflected stream of light, and hide the lamp itself in a niche.
LED installation diagram
In addition, without a plasterboard screen, the light from the LED always turns out bright, but somehow unnatural. An LED strip can contain several colors, which usually soften the dazzling white stream of light, but in practice, when assembling ceiling lighting, you have to experiment a lot until you can find the desired color. Therefore, if the design conditions require a variety of colors on the ceiling, then the lighting is usually retrofitted with overhead filters or used in conjunction with neon lamps.
Hidden neon lighting for plasterboard ceilings
In this case, the intensity and spectrum of the glow differs from LED in a positive direction, the human eye perceives neon light more comfortably, the backlight can be placed directly on the plasterboard ceiling, without screens or filters.
Most designers still hide neon lamps in a plasterboard niche. This is done, as in the case of LEDs, in order to increase the dispersion of the light flux on the matte surface of the ceiling. In this case, the design turns out to be quite soft, and the lighting itself looks barely noticeable on the plasterboard lining.
Traditional lighting uses three types of colors:
- Transparent cords filled with neon are characterized by a red glow;
- Tubes filled with argon give off a very beautiful dim blue glow;
- When using helium, the backlight turns out to be a soft pink color.
In some lamp models, it is possible to change the saturation and color of the glow, which is especially valuable for ceilings designed according to a floating surface scheme or a cascading multi-level form.
Neon gives a very soft glow that is comfortable for the eyes
Important! The glow of a neon light can easily be confused with an ultraviolet lamp, which absolutely cannot be used to illuminate the ceiling. Even if you install such a lamp in a plasterboard niche, the consequence of this decision will be serious burns to the retina.
Everything is ready and calculated, what to do next?
Illuminated ceiling diagram
A do-it-yourself plasterboard ceiling with backlighting differs from a professional installation in that you will perform the actions that the masters perform tens and hundreds of times for the first time. Don't rush: plasterboard is a fragile material, and it may happen that you ruin more than one sheet before you can “build” the correct structure. Have you marked the lamp points? Put the matter aside and rest. After 20 minutes, you decide to do everything differently or remember that the distance from the wall should be at least 20 cm, and the lamps themselves should be at least 30 cm.
Another aspect of creating plasterboard ceilings is preparing the wiring in advance. You need to remove the wires not only before you have already “sewed up” the ceiling, but also before you start laying the profile around the perimeter. The lamp should be installed approximately in the middle of the ceiling cell; accordingly, when installing the ceiling, the wires will pass through the holes of future lamps and will hang until you begin to install the lampshades themselves.
Drawing of a single-level plasterboard ceiling
A single-level structure, as a rule, is installed without a drawing, since it is the simplest option for creating a plasterboard ceiling. However, it should be understood that the drawing greatly simplifies the work even when installing such a simple structure. There are a number of points that need to be applied to the drawing in order for the installation process to be as convenient and easy as possible.
Show on the drawing the distance from the base base of the ceiling to the future level at which the frame profile will be fixed. This parameter depends, first of all, on how level the base base is, and also on whether you plan to install a built-in lighting system in the ceiling. If you want to install soffits in a plasterboard ceiling, you will have to take into account that the minimum distance for installing this addition is five centimeters. Provided there is no lighting system and the ceiling is perfectly flat, the structure can be mounted closely. In this case, this parameter is useless.
It is very important to depict in the drawing the distance between the load-bearing and guide profiles of the frame. The standard sheet size is one hundred and twenty centimeters. Based on this, the supporting profile must be fixed either at a distance of forty centimeters or sixty. Precision in specifying this parameter is very important. The edges of two sheets of drywall that meet on the same profile should not be located further than the middle along the entire sheet. Otherwise, the structure simply will not fasten. In most cases, the outermost row of sheets has to be trimmed. In this case, a sketch will help, which will allow you to calculate how the most appropriate cutting of cardboard can be done.
A nuisance that should be avoided is transverse cracks that form at the joints of plasterboard sheets. To avoid such installation errors, it is necessary to clearly show in the drawing that the fastening is carried out in a running motion.
Upper level frame
Installation begins with the arrangement of the frame. Drywall sheets cannot be called a sufficiently durable material. They will not be able to withstand the weight of the new tier, in which they install an LED strip for illumination. For this reason, the frame of the second tier is attached to the guides of the first level directly through the drywall. To do this, they need to be placed exactly where the guide passes, which will form the box with lighting. Both frames are attached around the perimeter of the room.
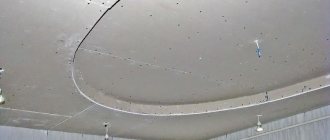
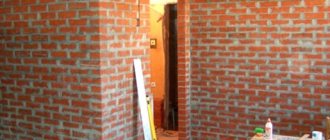
Example of a marked rough ceiling
There should be no problems when installing two parallel guides, which are mounted across the longitudinal profiles on the main ceiling. They are screwed in at a pitch of 400 mm. It is important to follow it strictly. It is important to make it not very large.
Frame for plasterboard ceiling
The other two guides will be more difficult to attach if the longitudinal profile does not pass through them. It must be laid at the moment when the installation of the main frame is carried out. All this work is not difficult to do on your own if you act correctly. The main thing is to carry out installation in strict sequence. Action. Do not skip the most important stages of work.
Table No. 1. Types of drywall used in finishing residential premises
Installation of the second level frame
Each plasterboard ceiling has a frame that holds it, but not only that. To arrange the chosen lighting option, you will need to think about organizing a niche for placing devices, for example, the popular LED strip.
Just as in the case of installing the first-level frame, the process begins with marking the location of the starting profile with transitions between tiers. The next step will allow you to determine the location areas of the lighting equipment with subsequent installation of wiring.
As soon as everything is ready, they proceed to preparing the starting profile, which is attached to the ceiling with screws according to the markings in the locations of the main profiles of the previously established level.
Frame with niche for lighting
The main ceiling must be covered with plasterboard sheets. Then you can install the next level. To make a high-quality plasterboard ceiling with lighting, correct markings are necessary. It is carried out as follows:
- You need to make marks on the walls. To do this, it is necessary to retreat from the base the distance that will be the height of the planned box. The marks are connected by a horizontal line along the entire perimeter. The resulting line should form a regular rectangle in shape.
- Installation should begin by securing the guide according to the markings made. The profile should be positioned with the shelves down. In this case, it is attached towards the opposite wall. The guides are secured to the profile of the base frame at the ceiling level.
Wedge anchor installation sequence
- Prepare hanging racks made from profile. With your own hands, using available tools, cut the profile into equal sections. It is important that they are equal in height to the box. It is necessary to make cuts on one side. They should have a height of no more than 4-5 cm. They are bent inward towards the back. When installing hangers, it is necessary to observe a step of 50-60 cm.
- The racks prepared in advance must be inserted with the unedged side into the profile located on the ceiling. They are tightened using metal screws equipped with press washers.
Table No. 2. Materials for installing plasterboard ceilings
- Then blanks are made from the profile. It is cut into pieces that should be the same as the bottom of the box. The number of such blanks should be equal to the number of hangers.
- One side of the workpiece must be inserted into a guide profile located on the wall surface. In this case, they should be positioned with the shelves facing up. Then they are secured with self-tapping screws. The other part of the workpiece is fastened using a suspension. It is important to maintain a right angle.
Table No. 3. Installation of drywall sheets step by step
The result is a box frame with protruding profiles. It is important to muffle them, for which sections of suitable length are cut. They serve as a basis for securing strips of drywall, which form shelves for the lighting device. All this can be done with your own hands.
It is necessary to close the ends of the frame. For this, a guide profile is used, which is installed around the entire perimeter. It is simply screwed on using self-tapping screws. Then the wiring is laid and cladding is carried out using plasterboard.
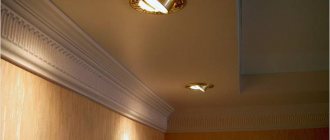
Main design differences
Illumination of a plasterboard ceiling can be hidden or open. Open - spotlights that are fully or partially visible. Hidden is called so because only its radiation is visible. Therefore, when installing a plasterboard ceiling with hidden lighting, the lower level boxes are made with a shelf on which the lighting fixtures are placed.
To install hidden lighting in the lower level box, make a special shelf for lamps
This shelf can be open or closed and, depending on this, and the position of the light sources, the width and brightness of the strip of light on the ceiling changes.
How does the light flux change depending on the shape of the shelf and the location of the light source?
Design of the lighting box
To make such a box for ceiling lighting, you need two types of profiles:
- UD - guides. They are mounted on the ceiling and on the wall, also in the middle of the structure and at the place where the side is attached, if provided.
- CD is a load-bearing profile of greater rigidity. Racks and lintels are made from it, to which a plasterboard sheet is attached.
Design of a box for illuminating a gypsum board ceiling
In the version shown in the photo above, the shelf does not rest on anything. The rigidity of the gypsum board itself is enough to hold a light backlight. In this case, it is necessary to take into account the weight of the lighting elements. The heaviest are fluorescent lamps, but they are practically not used recently, since there are other options that are more energy efficient and easier to install (LED strips, duralight).
There is a second design. Here the shelf extension rests on elongated crossbars. If the previous design seems unreliable to you, you can make this one. Only in this case a little more supporting profile will be required. The photo shows an example of organizing a two-level flow of plasterboard with lighting.
Box diagram for hidden lighting
Exactly the same scheme can be implemented in a single-level version. If your main ceiling is in good condition, you can only make a box around the perimeter. An example of an assembled frame for lighting is below. All that remains is to make the inner side and hem the frame from below.
The frame for lighting is ready for plasterboard covering
A backlit plasterboard ceiling does not always have straight lines. They are simply the easiest to implement. But the same schemes are made with curved lines. The results are very beautiful suspended ceilings.
Example of two-level backlighting
Only at large distances from load-bearing walls it is necessary to additionally fix the load-bearing profile either to the ceiling or to the profiles of the previous level. It is more convenient to do this with the help of suspensions.
If the width of the lighting box is large, the supporting profiles are additionally secured using hangers
Sources of light
When planning to illuminate plasterboard ceilings, you must remember that this is not lighting at all, but only a way to decorate the room. The flow of light is diffuse. Initially it is fused onto the ceiling, and then into the room. And it adds almost nothing to the overall illumination of the room. With its help, you can visually “raise” the ceiling, making it one of the components of the interior, but this element cannot be considered lighting. You will have to take care of lighting separately: install built-in lamps, wall lamps or traditional chandeliers.
Backlighting can be done using different light sources, but recently three types have been used:
- LED strip;
- duralight.
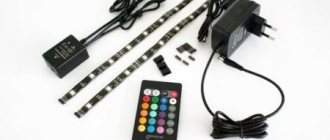
LED strips and duralight
This is a series of LEDs mounted in series. Their peculiarity is that they are powered by 12 V or 24 V. This power can be provided using an adapter that converts the 220 V household voltage to a lower one. There are monochrome tapes (white, red, blue, green) which are labeled as SMD or universal RGB.
Monochrome ones always emit one color; the color of universal ones can change. RGB strips only work with a controller and remote control. Upon command from the control panel, they change shade (the number of colors can be different - from tens to hundreds); in some models, the intensity of the glow can also change.
By type of design, LED strips are:
- Ordinary. They do not have a protective coating and can only be used in dry rooms.
- Waterproof. Their surface is varnished. Can be used to illuminate wet rooms - kitchens, bathrooms.
- Moisture resistant. They are sealed in a polymer tube (called duralight) or housing. They are rarely used to illuminate rooms, more often in aquariums, swimming pools, etc.
The choice here is clear. Select the type of tape depending on the room conditions. You can read more about types, colors, markings, connections here, and we’ll talk about why LEDs are good or bad in backlighting.
First, about the advantages:
- Low power consumption. They are very economical. Considering that this is just decoration, I don’t want to shell out large amounts of money for its maintenance.
- They don't warm up. Only the power supply can heat up; the LEDs themselves do not heat up. This is important if the ceiling is wooden.
- Long service life. Counts in thousands of hours. With normal power supply, they burn out very rarely (do not exceed the current strength for which they are intended).
- Low price. SMD tape 35*28, 5 meters long and with a density of 120 pcs/m, costs about $2-3. You have to pay about the same amount for the adapter. True, these are AliExpress prices. Everything in stores is much more expensive (2-3 times), although you won’t go broke either.
- Easy installation. An adhesive composition is applied to the back surface of the tape. Remove the protective layer and glue it in the right place. If the surface is rough, you can “shoot” with staples from a construction stapler, but it is better not to pierce the tape itself.
Now about the disadvantages. First, and most important: LEDs harshly highlight all surface imperfections. Therefore, the requirements for the quality of ceiling finishing are very high. The second minus: the presence of adapters. They need to be placed somewhere. I guess that's all.
Neon tubes
These are glass tubes filled with a mixture of inert and luminous gases. The brightness of the glow changes with changes in current strength, which is regulated by the convector. These devices are installed every 5 meters, their power consumption is about 100 W, and they do not make noise during operation.
A step-up transformer is also required for operation: normal voltage is not enough for neon to operate. Transformers are installed every 6 meters. But they can hum during operation, and also get warm and, of course, draw electricity quite well. The entire system as a whole consumes a fairly large amount of electricity, which, coupled with the fragility of the tubes and the rather high complexity of installation, makes it not very attractive compared to LEDs.
But recently neon cords have appeared. They come with a controller and all you need to do is press a button. They operate on AA batteries. But the power of such lighting for the ceiling is definitely not enough. They can be used in conjunction with LEDs to illuminate interior details.
Installation of LED lighting
It is necessary to make calculations of the required amount of LED strip. It should have a length equal to the entire perimeter of the illuminated surface. It is also important to choose a suitable transformer with a power supply. On the packaging with the tape you will find all the necessary descriptions with the parameters of these devices.
If you are doing the work yourself, it is important to install it carefully. You need to be careful when connecting the tape to the transformer. It is important to check the resulting connection for functionality. And only then can you put the tape in the niche. For this purpose, special connectors are used - connectors.
Interestingly, the backlight can be made not only hidden, but also open. Hidden lighting will look organic and stylish. But its organization requires a lot of time and experience. Therefore, in the absence of experience, such work cannot always be done with your own hands. In addition, the ceiling surface will have to be lowered further. And this doesn’t look good in a room with low ceilings. A special border is installed in the niche. But it is important to remember that if there are more than 60 diodes per meter of LED strip, hidden wiring cannot be installed.
It is important to follow safety precautions . Never connect an aluminum conductor to a copper conductor. In this case, a galvanic couple will appear, which will lead to the destruction of aluminum. The wire must be in a special protective corrugation. This will provide additional security. Direct contact with metal elements, including even screws, should be avoided.
Installation of the lighting box
For hidden lighting, a special niche is mounted:
- At the first level, the boundaries of the second level of the ceiling structure should be drawn.
- The guide profile is fixed according to the markings.
Those profiles that are attached to the ceiling should be directed with shelves downwards, and at the walls - with shelves towards the opposite wall.
- Suspension stands are made from the supporting profile. Their number is determined by the size of the ceiling: for every 100 centimeters you need to use 2 hangers.
- The racks are inserted into the guide with the untouched side and tightly fixed using self-tapping screws.
- The next step is to make jumpers from the ceiling profiles. Their length is equal to the length of the lower part of the niche, and their number should match the number of hanging posts.
- The jumpers are inserted with the shelves up into the guide against the wall and secured with self-tapping screws. The suspension stand and the second end of the workpiece must also be fastened and form a right angle.
- The protruding sections are muffled with cut parts of the ceiling profile inserted inside. This way you should have shelves for installing lighting.
USEFUL INFORMATION: Installation of partitions from gypsum plasterboard: step-by-step instructions, price per m2
Installation and connection of LED strip
You can purchase it in special 5-meter reels. The other side is made sticky. This makes it possible to install it yourself not only horizontally, but also vertically. Installation is possible not only along the entire length, but also in a strictly defined area.
For fastening, use both the shelf of the niche and the inner wall of the side itself. This allows you to do the work without additional effort with your own hands. The wires for the second tape are laid in a niche parallel to the first. Then the power supply is placed in the niche. At the final stage, it is connected to the network. This way everything can be done easily with your own hands.
As a result, illuminated plasterboard ceilings will not only become an interesting decorative element, but will also illuminate the necessary areas in the room. They will make your rest comfortable and your work productive. And the ability to carry out installation at all stages with your own hands allows you to save additional money.
Installation and connection of hidden lighting
To install LED backlighting, you should adhere to the following rules:
- Strips with LEDs are cut into pieces only according to the marks on them.
- The strips are connected using both LED connectors and an ordinary soldering iron.
- Fastening to metal parts should only be done with insulating material.
- Under no circumstances should lighting be installed under voltage.
The last stage is the final finishing of the ceiling. For this, putty and primer are used. At the end, such a ceiling can be covered with wallpaper, painted or finished with textured plaster.
How to choose lamps for a plasterboard ceiling?
When you have an understanding of the project, including the number of planes, height differences or possibilities for combining, say, plasterboard and a stretch ceiling, it’s time to puzzle over the lamps. Despite their apparent simplicity, the complexity of their competent selection can be compared to the installation of the entire system. After all, a backlit plasterboard ceiling can have both point and diffuse light.
What types of lamps are there for plasterboard ceilings?
In particular, halogen lamps, which produce a powerful and diffused light beam, are best used in an apartment with not the highest ceilings, but they are difficult to install (there is a locking ring on the outside that closes the socket). Traditional incandescent lamps (they may not be covered with anything from the outside) are a good option for large rooms with high ceilings.
Finally, you can expect very bright light from an LED light bulb, which has minimal power consumption, but it can only be used as a spotlight to highlight a painting, a vase, or a workplace.
LED Strip Light
Preparing wiring and installing lighting
All wiring must be in insulating sleeves. Then there will be no opportunity to change or correct anything. Using your sketch, marks are made on the ceiling where the lighting will be. Therefore, it is clear in advance where to connect the wires. If you plan to install a massive chandelier, then in this place you need to prepare mortgages for it. It will be attached to the mortgages in the future for greater reliability.
Main stages of installation of recessed luminaires
LED recessed lights for plasterboard ceilings are the most popular option. You just need to drill a hole for them in the drywall after finishing. Then they are connected to the wires and fixed to the ceiling using a special fastening system. Everything happens quickly and simply, which is why this lighting option for multi-level ceilings is in demand.
Before installing the LED strip in a plasterboard ceiling, you need to wipe the mounting location with a damp cloth. This removes all dust to improve light reflection. After this, reflective tape is installed to improve light dispersion. Then the LED strip itself is connected and installed. More details about the whole process can be seen in the video.
How many ceiling lamps should I use?
So, you have an understanding of what the ceiling should look like, what kind of lamps and how many there should be, and you are prepared for the most important work. Mark on a sheet of drywall the places where the lamps should be. One device with a power of 20 W per 1 square meter is considered optimal. m, but this does not mean that a 360-watt “spotlight” will be enough for an 18-meter room. It is better to use 1 lamp per 2-3 sq m, so for the same 18-meter room it is worth allocating from six to nine lamps of LED, halogen or incandescent design.
Often people, having seen enough projects in design magazines, install lighting devices only around the perimeter, forgetting about the central part of the room.
Note Meanwhile, the main emphasis should be placed on the center, where the chandelier usually hangs. And one more thing: due to the shades, the chandelier shines not only downwards, but also to the sides. Ceiling lamps, on the contrary, shine downward due to their design and mounting. If there are few of them, twilight is guaranteed.
Plasterboard ceilings with lighting: photos in the interior
It is clear that this is the simplest and most affordable option for making a niche for illuminating the ceiling surface. The possibilities of steel profiles and plasterboard are much wider; if necessary, it is possible to produce very complex and beautiful options for illuminating ceiling decor.
Step-by-step work on installing multi-tiered suspended ceilings
You can choose a simpler installation option, focusing on two levels of the new ceiling. However, if you have sufficient experience and assistants, you don’t have to limit the flight of design ideas. It is enough to understand the structure of a two-level illuminated ceiling, its design and how the plasterboard sheets are laid.
What tools and consumables will be needed for the job?
For work you will need ordinary drywall 8-9 mm thick. For the kitchen and dining room, where there is a high probability of increased humidity levels, you can use moisture-resistant gypsum board. As consumables for the construction of a multi-level ceiling surface, you will need: aluminum or galvanized profiles of two types, ceiling C-shaped and U-shaped guides. The jumpers for assembling the frame are crabs. Spring hangers are used to secure the frame.
Note: the spring suspensions were not chosen by chance. Due to depreciation, movements of the suspension system and additional dynamic load are compensated.
To install suspensions in concrete, dowels are used; to install suspensions in the first level, assembled from plasterboard, anchors are used. Drywall sheets are attached to the guides using self-tapping screws.
As for the finishing, you will additionally need putty, fugenfueller, sickle, and damper tape.
The following tools will help you make a two-level ceiling:
- screwdriver;
- impact drill or hammer drill;
- grinder or hacksaw;
- mounting knife;
- roulette and level.
Decorative elements to complete the work will require internal spotlights or LED strip.
Note: for decorative lighting or creating the main sources of artificial lighting, you should use halogen or LED lamps. These lighting fixtures do not produce the intense heat that is typical of conventional incandescent lamps.
Preparatory work
Before proceeding with the installation of the frame, it is necessary to install electrical wiring, other communication lines and ventilation. For better convenience, you must immediately indicate the location of the distribution box; the installation locations of the first level lamps are indicated. The surface of the concrete floor is cleaned of debris and dust, and old plaster is removed if it is in unsatisfactory condition. A two-level ceiling in itself is already a heavy structure, so if old plaster falls onto the drywall from the back side, it may happen that the suspended structure cannot withstand the extra weight and collapses.
In addition to the ceiling, the walls also require preparation. The upper edges of the walls, half a meter from the ceiling surface, are leveled. Work on the ceilings should begin only after finishing the finishing work on other parts of the room. At this stage, it is important to make a final decision on what the first level will be - concrete or covered with plasterboard.
Next comes work according to a familiar and understandable scheme, similar to the installation of a single-level ceiling surface.
Covering the frame with plasterboard
When covering the ceiling with plasterboard, adhere to the following recommendations:
- We attach the first sheet in the corner of the room across the load-bearing ceiling profiles.
- All joints of adjacent sheets must fall on the profiles.
- If necessary, cut the leaf. At the cutting site, be sure to make a chamfer using a plane in order to subsequently apply putty and reinforcing tape.
- First we mount the sheets on the lower level, then we sew up the side surface.
- We recess the screws into the body of the sheet by 1 mm.
After covering the ceiling, we begin to putty the seams. After applying the 1st layer of putty, we apply reinforcing tape to the seam and press it into it. After this, apply a second layer of putty. When the mixture is completely dry, sand the seams with sandpaper. Now we treat the surface of the entire ceiling with a primer and after it dries, apply the finishing coat.