Material of manufacture
- Plastic. As a rule, this is polycarbonate - one of the most affordable materials. Having an affordable price, it is the best option for those who are used to doing everything with their own hands. This material comes in various colors: matte, transparent, colored, which gives significant scope for design ideas. Its physical properties are also almost universal: polycarbonate, being flexible, is at the same time quite airtight and resistant to mechanical damage.
Box for LED - plastic strips can be easily embedded into plasterboard walls. It can be easily glued to a suspended ceiling, and the ceiling will not bear any extra loads. Plastic compositions look beautiful, especially snow and ice sculptures.
Polycarbonate products are also resistant to temperature changes.
- Aluminum. The most popular design model, because in addition to its aesthetic appearance, it has a number of additional advantages, such as resistance to corrosion (aluminum, as you know, is coated with a thin oxide film that protects it from the external environment), and a high coefficient of thermal conductivity. For an LED strip, this is a real godsend, allowing for efficient heat removal, which is important: 30–60 light sources turned on simultaneously can heat up well, incapacitating themselves.
This profile can be used at high humidity without fear of negative consequences. The diodes in it will never overheat, and with proper care it will not lose its appearance, which cannot be said about other materials. Therefore, when making lighting with your own hands, just such a box is most often used.
By the way, it was specially developed for LED strips, so we can say that the aluminum profile is a universal profile. With its help, it is very easy to assemble a backlight yourself that will be different from anything anyone has seen before, and at the same time its functionality will remain at its best. The most progressive design solutions in the field of LED lighting are considered to be solutions using an aluminum box.
Installation methods
After choosing the profile material, you need to decide on one more point, namely: how it will be installed. There are three main ways that differ from each other. This determines which of the three models we will buy.
- Overhead installation. It is very easy to install it yourself, with your own hands - it is placed outside, and on any surface. Such a model can have various functions: you can install frosted diffusers to create soft lighting, or you can create hard, directional light. This effect is achieved using a transparent coating. The overhead installation is used mainly on furniture: lighting in various cabinets - compartments, showcases, and where the imagination will tell you.
- Mortise design. The name itself speaks for itself - this design is designed to be installed inside the structure, so that nothing is noticeable from the outside. Sometimes this is a matter of not only beauty, but also safety: for example, floor lighting. It is clear that the overhead method is inappropriate here, since you will have to trip over the structure all the time, breaking it. Mortise profiles are very durable and airtight. This allows them to be installed not only indoors, but also outdoors, where precipitation is possible. A box made of aluminum is ideally suited for such extreme conditions, because this material is resistant to moisture, does not corrode, and is quite durable, despite its low weight.
- Corner model. It is worth purchasing if you plan to install lighting in the corners. From the name it is clear: one of the sides of this design is made in the shape of an angle, which allows it to be installed inside cabinets, arched openings, under canopies near the wall. In addition, this model is widely used instead of baseboards on the floor or ceiling, which also looks very stylish.
From this short description it is clear: it is quite possible to assemble, design and install an LED strip yourself, without resorting to the services of craftsmen, which significantly saves the family budget.
Fastening
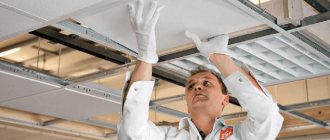
Modern room design technologies cannot be imagined without plasterboard structures of varying complexity. All this is illuminated using an LED source, creating unique effects. The lighting itself is placed so as to be as invisible as possible: it is hidden in the walls, ceiling, floor. It’s easy to attach the LED strip itself to the profile: there is a special place where they are attached. Sometimes this is done with glue.
When working with drywall, you need to remember some rules. In order for the light from the installed source to be more intense, the installation depth should be within 2–3 cm. But if the light needs to be diffused, then the light bulbs are moved closer to the edge of the drywall.
The assembly of the backlight structure has its own sequence:
- First, the profile itself is mounted.
- The next step is to install an LED strip in it.
- Now all this is covered with glass (or a lid - which was purchased for this case).
The profile, depending on the material, is attached to the surface either with self-tapping screws or glue. For example, an aluminum box, an overhead model, is placed on self-tapping screws: with a sufficient length, even despite the lightness of the material, the weight of this entire structure will be more than sufficient. However, you will still have to glue the inside of the furniture (for example, with double-sided tape) so as not to spoil the walls on which our lighting will be installed.
The cornice lighting is assembled according to the same principle: first, the light structure itself is attached to it, then the cornice itself is installed in its place. If it is a fillet, then a gap of 7–10 cm must be left between it and the ceiling.
In this simple way you can decorate any space with the help of modern light sources. When choosing the necessary components in a store, you need to know some technical aspects, which, as it turns out, are also easy to understand.
LED backlighting and its advantages
Such lighting devices are also called LED strips. They are flexible strips equipped with LEDs and resistors on one side, and on the opposite side there is adhesive double-sided tape with which they are attached. The tape is divided into sections of five centimeters. Each of them contains three LEDs. The sections are marked with cut marks for the diode strip. The LEDs are connected in a series circuit.
There are two types of LED strip:
- protected. It is covered with silicone or plastic overlays. This allows you to protect the LED system from negative environmental influences and damage;
- open.
In the manufacture of tape for plasterboard ceilings, two types of diodes are used: 3528 and 5060. The latter are used as independent light sources and are characterized by more powerful light compared to the former. Often, for ceilings with plasterboard boxes, multi-colored LED strips are used, which are equipped with four outputs. When connected, one wire goes to ground, and the other three – each to its own color.
Everything you need to install lights on the frame
The advantages of devices with LEDs are presented:
- easy installation with your own hands;
- long service life and independence from the number of times the light is turned on and off;
- moderate cost of lighting fixtures with LEDs;
- variety of color palette;
- flexibility and consumption of a minimum amount of electricity;
- minimal degree of heating, unlike other types of lamps;
- mechanical strength when installing the tape. Unlike a fluorescent or neon lamp, it is impossible to break it, but it is afraid of breaking;
- safety for eyesight.
How to attach tape to a plasterboard ceiling frame
Keep in mind that when illuminating a large area, it is irrational to mount a long strip of LEDs on a plasterboard box. This is explained by the rapid failure of diodes located close to the power supply, as they absorb a large amount of voltage.
Important! The maximum length of the ribbon for one power supply should not be more than fifteen meters so that the diodes last longer and do not burn out.
Selecting tape for installation
It includes the following subtleties:
- Initially, the type of LEDs used in the strip is selected: bright or dimmer. It depends on the purpose of using the backlight. If it should work as a night light, then the second option is preferable. the cost of bright lamps is higher;
- the second step is to determine the density of diodes on the LED lighting device. There are three options on the market: 30, 60 or 120 centimeters. These values show the number of diodes on a one-meter piece of tape. The more there are, the brighter the lighting;
- in the third step, the type of device is selected: open or protected. If lighting is provided for the kitchen or bathroom, then the use of the first is unacceptable;
- The fourth stage is the choice of single-color or multi-color backlight. The second option will require a controller.
Selecting a controller and power supply
It directly depends on the correctness of the calculations and measurements of the section of the plasterboard box in which the lighting device with LEDs is installed. To do this, first calculate the area of the room. After this action is completed, the resulting parameter is multiplied by the power consumption of the tape meter.
After this, the location of the tape is planned, and then the main installation stage follows.
Installing the backlight
If the strip of LEDs is single-color, then the ends are connected in strict compliance with polarity, that is, positive wire to positive, and negative to negative. If it is multi-colored, then you need to select areas with color designations on the tape.
Important! Cut the tape exclusively according to the marks on it, otherwise you can ruin it by damaging the chain.
The light cord is connected to the contacts marked with the letters N and L. When choosing a multi-color tape, the connection diagram becomes more complicated and becomes as follows: from the power supply the connection goes to the controller, and from there to the tape itself.
Attaching the tape to the cornice and drywall box
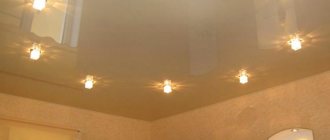
In most cases, lamps of this type are mounted in the form of a circuit. The second option is used for zoning a room or emphasizing certain interior details. For example, it could be a starry sky.
Installation of this type of lamps on the cornice and frame should be done in such a way that it is not visible from below. For this purpose, special cornices are used; protrusions are made on the plasterboard box, mounted on a profile frame. Here it is important to take into account the distance from the edge of the frame to the location of the tape. If it is too small, then the diodes will be visible from below, and if it is very large, then the lighting will be directed to the ceiling niche, and not to the surface itself.
Before installation, a project is created and a drawing is drawn that will help draw up a work plan. At the same stage, the number of tapes is planned. Next, tape is glued to the frame and cornice. For better fastening, it is better to use additional glue and a construction stapler.
To better attach the tape to the surface of the frame and cornice, it is degreased using an alcohol solution. If you need to bend the tape, keep in mind that the diameter of the bends should be no more than 2 centimeters.
All elements of the lighting device that need to be hidden in a box
LED lighting is often used in the kitchen, but, as mentioned earlier, they must be protected. This type of lighting makes it possible to divide the room into a working and dining area. Particular attention is paid to the areas of niches, cabinets, and aprons. Devices with LEDs look impressive in restaurants, bars and cafes, giving these establishments elegance and a special atmosphere. They are mounted on a plasterboard box created on a metal profile.
LED panels
This is a good alternative to tapes. They come in different colors and are between 13 and 15 centimeters thick. Unlike strips, LEDs are mounted on a profile or strip. On the market they are offered as separate elements or built-in, for example, for suspended ceilings. Such elements, when attached to a profile, can solve the problem of low ceilings. These models are equipped with a device for adjusting the light saturation, which makes it possible to select the most comfortable brightness level.
Lighting like the Starry Sky is ready - elegant and simple
Installing devices with LEDs on a plasterboard body will not cause any difficulties if you follow simple tips. It is important to study the installation instructions and select the required device. A responsible approach and compliance with standards during installation work is required. A strip with diodes will help you achieve an interesting ceiling design and give the room originality.
This video tip will help you understand and learn all the intricacies of installing LED lighting on a ceiling surface:
The owner of the room chooses how to install hidden lighting; it can be around the perimeter of the box, or a curved structure, or it can divide the room into zones. There is no big difference in making a box for hidden lighting and a simple design. Such levels significantly increase productivity and help build the correct plane of a plasterboard box or ceiling.
The higher the accuracy of the marks, the better the quality of the plasterboard structures.
Lighting on a plasterboard box
To create open lighting, you need to decide for yourself whether it will be located along the entire plane of the ceiling, or just along the perimeter. In the first case, you will have to install a suspended structure that will completely cover the ceiling. In the second, it is enough to build a small box on the ceiling, and leave the middle of the ceiling unchanged. Some craftsmen prefer not to attach vertical jumpers to the side, but simply screw on drywall.
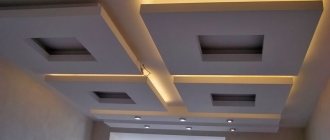
Of course, this can be done if the height of the box is less than 40 centimeters. Before assembling the structure of the box on the ceiling, it is worth drawing a plan that will show in which places it is planned to make spotlights. The wiring must be routed in advance and secured to the ceiling at the points where the spotlights are attached to the surface of the box. Assemble the frame in one of three ways and fix it to the ceiling. Today, the most popular among designers is the decoration of the ceiling with lighting elements. A backlit plasterboard box helps make the interior original and unusual. Lighting helps to divide a large room into zones.
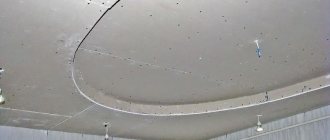
The popularity of this type of finishing is added by the inexpensive cost of the material and ease of arrangement. Decoration and design of a room with lighting on a plasterboard box To install hidden ceiling lighting, you need a box, which can be open or closed. The difference is that you will need to arrange a small niche for the diode strip. Before arranging it, you need to decide what type of lighting you want - a wide, bright strip along the entire ceiling, or a thin strip that will give the ceiling structure a soaring look. This is what hidden lighting on the ceiling looks like. Important! The smaller the niche, the thinner the glow will be.
Box for open lighting
As mentioned earlier, open lighting of the plasterboard ceiling is organized using built-in lamps. If the ceiling is made entirely of plasterboard, then the lamps can be mounted directly into it.
Fig.3.
If the height of the ceiling allows, then make a suspended ceiling from plasterboard, and use spotlights to illuminate the room or individual areas.
Often they do things differently; lamps are installed in special boxes. This approach contains both a design technique and a purely practical orientation. A plasterboard ceiling reduces the height of the room. With low ceilings, it is more advisable to leave the base of the ceiling the same and install the lighting in specially made boxes. The boxes can be located around the perimeter of the room, or create arbitrary patterns on the ceiling.
Fig.4.
If the height of the room is small, it is advisable to make a box of plasterboard around the perimeter for installing spotlights. You can install lamps of any type in the box, while the level of the main ceiling will remain the same.
Fig.5.
To organize lighting in the center of the room, you can also use a plasterboard box.
The easiest to manufacture is a rectangular plasterboard box located around the perimeter of the room. Typically, such a box has a width of 50 cm and a height of 50 - 70 mm. These are the most optimal box sizes.
The whole difficulty of creating a box lies in creating a frame for the box. The frame can be made in various ways. But there are only two most popular.
Fig.6.
The frame for a plasterboard box is made of metal profiles. A guide profile (PN) is fixed to the ceiling and walls, and the outer edge of the box is made from it. Ceiling profile (PP) is used for horizontal and vertical crossbars.
A guide profile for plasterboard is attached to the ceiling and wall. A rib is assembled from the guide profile, which consists of two profiles. These profiles are connected as shown in the diagram below.
Fig.7.
The outer edge of the box is made from 2 ceiling profiles, connecting them as shown in the figure. A horizontal crossbar made of PP profile will be attached to the bottom part of the structure, and a vertical crossbar to the top part.
Next, using sections of the guide profile, the stiffening ribs of the box are formed.
The second version of the box is no more complicated than the first. A guide profile is fixed to the walls and ceiling. Horizontal lintels are made from ceiling profiles and secured to the ceiling with hangers. A guide profile is also used for the ribs. It is fixed to horizontal jumpers.
Fig.8.
With a small height of the box of about 7 cm and a large width, it is possible not to install vertical crossbars, and the design of the box is simplified. A guide profile is used as a rib, and a direct suspension is used to hold the horizontal crossbar.
On the vertical side of the box, jumpers are often not installed at all, but are immediately covered with a strip of drywall.
Fig.9.
If the box has a small height, then the rib is fixed directly to the drywall without vertical crossbars or intermediate hangers. Before covering the box, electrical wiring is installed in it.
Before sewing the box, wiring is carried out for future lamps.
DIY plasterboard box on the ceiling
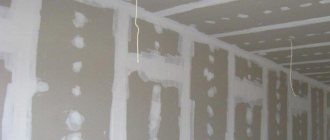
Before fixing the sheathing, insulation is laid, if provided. Drywall sheets are cut to fit the box. The joints of two adjacent sheets should be placed on one CD profile. Initially, the lower part of the structure is sutured, and then the side.
The result is a box with a protruding profile. Protruding sections should be drowned out. To do this, insert cut pieces of the profile of the appropriate length onto them.
This will serve as the basis for attaching a strip of drywall, and the LED strip will be mounted on top.
- It is not recommended to connect the tape to the power supply in series, since the subsequent section of the tape will glow weaker.
- If the power of the block is too large, this will significantly affect its size. Therefore, when arranging the frame, take this into account. There is another option, for example, to purchase a power supply for each piece of tape; it has small dimensions.
In this article we will tell you how to make a plasterboard box yourself, consider various options, and also demonstrate photo and video instructions. To select the appropriate power supply, you need to determine the power of the LED strip. To do this, you need to measure the perimeter of the entire niche and multiply the resulting figure by the power of a linear meter of tape. But that’s not all, as the following nuances should be taken into account:
Arrangement and installation of plasterboard caissons
Tools and materials
Metal scissors
To work you will need the following tools:
- the set of tools for different craftsmen may differ, but none of them will make a caisson without metal scissors , which are used to cut galvanized profiles for the frame;
- to attach the frame, you need to drill holes in the ceiling, and almost everyone uses a hammer drill , although as an exception you can use a drill;
A construction knife with a short blade will also come in handy
- for cutting plasterboard sheets, the instructions for some reason recommend a knife with a short blade , but a regular paint knife is excellent here - in any case, the blade is adjustable;
- both for the frame and for its covering you need a cordless or electric drill (screwdriver) and a drywall attachment ;
- for marking you need a water (laser) level , a chokeline (painting cord), a metric tape measure , a pencil and a building square ;
- to install recessed lamps, drywall is drilled with a hole saw of the required diameter;
Galvanized profiles for drywall
Materials you will need:
- CD and UD profiles are designed for ceilings . But given that structures are made multi-level, and also figured, builders often also use CW and UW, which can be of different widths;
- To attach the structure to a sub-ceiling, perforated strip hangers . But sometimes there is a need to lower the ceiling, then wire hangers (usually this is done in old houses where the height of the rooms reaches 3.5-4 m);
- to attach the frame to the ceiling, dowels with a diameter of 6 mm and self-tapping screws 3x70 mm are used, and to fix the profiles together, small self-tapping screws 9-11 mm long (“fleas”) are needed;
- For drywall use 25mm metal screws.
I won’t talk about puttying the caissons, but a plasterboard box for a suspended ceiling should have clear shapes. Therefore, I also want to mention plastic and metal perforated corners , which precisely emphasize the contours of the figure.
Marking
To mark the reference line you need a water level
Since it will be necessary to make a plasterboard box on the ceiling under a suspended ceiling at a certain height, you need to start work from the markings, that is, from the lower level of the caissons. Here it is not at all necessary that each of them be on the same level (the ceiling can be three-tiered).
However, each level must be identified and marked with a reference line on the wall around the perimeter of the room. Here it is very important to immediately determine the distance between the rough ceiling and the plasterboard - the hidden parts of the recessed lamps (most likely, you will have them) should be placed in this cavity.
We beat off the control line
- determine the depth of the ceiling cavity;
- put a mark;
- then, using a water level, place marks in each corner on both sides;
- Then we connect them with a control line, hitting it with a chockline, as in the top photo;
- if the caissons are straight, then control lines should also be drawn along their boundaries, but along the ceiling - this is very convenient for installation.
But in cases where the box is shaped, these contour lines will have to be drawn by hand - it’s best if you first make a sketch on a piece of paper to imagine how it will look on the ceiling.
The photo shows a water level
Water levels in the store are sold with plastic bulbs. But for marking under the ceiling, this is very inconvenient - these containers often rest against the ceiling, so it is better to remove them, since this will not affect the accuracy in any way.
Frame
Frame option for a rectangular box
When the caisson is straight, it is quite easy to assemble:
- screw the UD profile to the wall and to the ceiling along the approximate line with a fixation step of no more than 30 cm;
- then cut off pieces of CD so that their length corresponds to the depth of the ceiling cavity, but on the edge that will be below, cut off the shelves to the width of the base UD (27 mm);
- then you screw these icicles to the hook on the ceiling after 30-40 cm - you get something like icicles at the UD level that goes along the wall;
The design of a straight box located around the perimeter of the room
- then to the places where the shelves are cut off the profiles, screw the UD and get the vertical side of the box to which the baguette for the stretch ceiling will be attached;
- Now all you have to do is insert the CD pieces according to size, that is, along the bottom of the caisson. If these fragments have a length of more than 60 cm, then they should be strengthened with suspensions, screwing the latter to the ceiling.
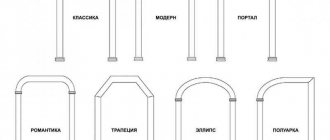
Frame for figured caisson
To make a figured caisson, you will need the same materials, and their price will not change at all, but at the same time, in a sense, the installation technology will change. The front end part of the box has a bent plane and for this, naturally, you need to bend the metal profile, which is designed so that it does not bend.
I would like to make a reservation that there is a special metal profile that can be bent, but it is quite difficult to find it on the open market.
This is how a metal profile is bent
To bend a profile, there is a fairly simple way, as in the photo above - the side flanges of the profile are cut to the base. The result is a strip with petals that can be easily bent.
But if you need to bend this profile with the shelves inward, then it is better to make triangular cutouts - this way you will create space between the petals and they will not overlap each other.
The distance between the cuts largely depends on the steepness of the bend, that is. The sharper the turn, the smaller the petals will be, but, be that as it may, they should be the same.
Sheathing with plasterboard
Sheathing a straight box with plasterboard
Sheathing a straight box is quite simple - you simply cut the sheet to size and screw these fragments to the caisson, as shown in the top photo.
If somewhere a whole piece is missing, then don’t be upset - the plane can also be sewn up in strips, the main thing is that such a fragment reaches two opposite sides of the frame.
Three options for screwing in a self-tapping screw, only one of them is correct!
Pay attention to the image above - there are three options for screwing in the screws - it will be correct if the head is recessed half a millimeter under the surface. I would like to note that for tightening self-tapping screws, it is best to use a special nozzle No. PH-2 with a lampshade, which is a limiter, and the cap does not push through the paper and remains at the required depth.
Covering a figured box
In cases where we are dealing with a shaped box, you will have to bend not only the metal profile, but also the drywall, which can be deformed according to the same principle. The strip is cut into fragments, as in the top photo, and the distance there is the same as on the profile, for example, every 7 cm.
Please note that the cuts are made from the convex side and if the strip is wavy, it means they will be both inside and outside.
The stretch ceiling is attached to the plasterboard box to the end part of the structure using three types of baguettes, as in the image above:
Installation of tension fabric is usually carried out by specialists
Such profiles come in aluminum and plastic, but the choice here mainly depends on the plane, that is, plastic, not aluminum, is certainly mounted on a bent caisson.
How to make a plasterboard ceiling with lighting
First make markings on the ceiling. All given dimensions are set aside and lines are drawn using a paint cord. Please note that the line on the ceiling is laid at a distance of 54 cm, and not 60 cm, as in the first diagram. It is obtained taking into account the fact that the step is moved forward by 6 cm.
The profile guides (CD or PNP as marked) are attached along the marked lines. They attached it to dowels at 50 cm intervals. They drilled straight through the metal. Having installed the plug, we tightened the dowel-nail. Now all that remains is to putty everything and achieve a smooth surface.
Almost everything. The plasterboard ceiling with lighting is ready, all that remains is to install the lighting itself. And it can be different.
This shelf can be open or closed and, depending on this, and the position of the light sources, the width and brightness of the strip of light on the ceiling changes. No news: to make curves, we cut the sides, bend them to the required diameter and install them in place, fixing them with self-tapping screws. The device can use LED lamps or strips.
They are sequentially installed low-power LEDs of 12 or 24 V, which is provided using an adapter from a 220 V household network. The main advantage of the suspended structure is that it can be installed independently. Let's take a closer look at these lighting systems and clarify how they are installed. In addition, the box for the LED strip varies depending on how it will be installed. In this regard, it can be: This kind of tape is a modern material that combines excellent aesthetic qualities, as well as practicality and versatility.
This article will outline the main points of installing LED strips on the ceiling with your own hands using a variety of devices (aluminum, plastic box, etc.).
Installation of LED strip
The easiest way is to install an LED strip in an open niche. It is glued to the inner side.
Fig.23.
The LED strip is installed in a niche. The appearance of the contour lighting depends on the position of the tape in the niche. To extend the life of the LED strip, it is recommended to install it on a metal strip, which will ensure good cooling of the LEDs. You should also not use a tape longer than 15 m connected to one power supply.
It is important to note that the LEDs heat up well during operation. To extend their service life, they need to be cooled. To do this, you can install an aluminum profile in place of the LEDs and stick an LED strip on it.
Installation in a closed niche has options: sticking tape on the back wall of the box, sticking tape on the profile located on the front wall of the box.
Fig.24.
Depending on the width of the lighting strip required, the strip can be installed in different places in the niche.
Often the LED strip is placed at the bottom of the box. This is quite a risky option. The fact is that in certain cases a shadow may form from the front wall of the niche. This may make the backlight less aesthetically pleasing.
To install an LED strip, in addition to the strip itself, you will need a transformer, and in the case of multi-colored LEDs, also an RGB controller.
Fig.25.
Using RGB tape you can change the color of the contour lighting. To do this, you need to install a controller next to the tape.
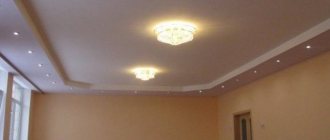
We looked at all the options for lighting a plasterboard ceiling and how to create it. In most cases, a box is used to install spotlights, since it does not reduce the height of the room. Using the box you can decorate the room and organize the illumination of the required area. A good solution is a combination of spotlights and contour lighting; with their help, you can create a sufficient level of illumination, and by using LED lamps in lamps you can significantly reduce power consumption and reduce the cost of lighting an apartment.
In conclusion, some interesting design solutions for lighting various rooms. These solutions use various lighting options and their combinations.
How to make a niche for an LED strip from plasterboard
The most popular today is considered to be a plasterboard niche with hidden lighting. Its design makes it possible to evenly distribute the light that is reflected from the ceiling surface. The result is a “floating air” effect. You can also install a niche in the wall, where it is usually made open. If you need to make a niche in the wall, then we make the frame by analogy with wall cladding, but with the formation of a recess in the right place using fasteners. When the niche frame is ready, we proceed to covering it with plasterboard. To do this you need to do the following:
- availability;
- wide range of choice;
- bright light;
- functionality;
- simple installation;
- high energy efficiency;
- long service life;
- remote control.
- along the drawn lines we fasten the starting profile “UD” with dowels;
- then we insert the main profile into it and fasten it to the ceiling with hangers or to the wall with dowels;
Most often, LED strip is used to create illuminated ceiling or wall structures. This popularity is due to a number of advantages of LED strip:
Installation and connection of LED strip
You can purchase it in special 5-meter reels. The other side is made sticky. This makes it possible to install it yourself not only horizontally, but also vertically. Installation is possible not only along the entire length, but also in a strictly defined area.
For fastening, use both the shelf of the niche and the inner wall of the side itself. This allows you to do the work without additional effort with your own hands. The wires for the second tape are laid in a niche parallel to the first. Then the power supply is placed in the niche. At the final stage, it is connected to the network. This way everything can be done easily with your own hands.
As a result, illuminated plasterboard ceilings will not only become an interesting decorative element, but will also illuminate the necessary areas in the room. They will make your rest comfortable and your work productive. And the ability to carry out installation at all stages with your own hands allows you to save additional money.
Installation of a gypsum board box with lighting
Boxes are created not only in rooms with normal humidity levels, such as living rooms or halls, but they are also quite often placed in bathrooms to hide pipes, etc. To work in such conditions, that is, high humidity, it is necessary to use plasterboard with moisture-resistant properties. Also, if the structure is located in a sauna, which can also be placed in a house, then fire-resistant plasterboard with moisture-proof properties (GKLVO) is used to cover the frame. Also, start joining large pieces of plasterboard on the frame, and finish the cladding by fastening small parts of the gypsum board.
The entire surface must be carefully primed, which will give it some moisture-proof properties, thereby preventing the paint from penetrating deep into the sheet and soaking the plaster. It is better if the primer is applied in two layers where the box itself will be located. On the ceiling, mark the boundaries of the box and all adjacent structures. Then start selecting all the parts of the frame that will be inside the box, that is, they will make up its skeleton, this is necessary to make it easier and faster to mount the profile. Also, indicate the location of the guide rails, keep in mind that the step between them is about 50 centimeters, but depending on the situation, you can change this figure, for example, up to 20 centimeters, which will increase the strength of the entire frame.
It will be difficult to sheathe the entire structure with gypsum plasterboard sheets at once, so you need to start from those areas where it is possible to immediately place a single sheet of drywall. If you need to bend the drywall, then cut it on one side along the lines, which should be 5-7 centimeters from each other over the entire surface of the sheet. But so as not to touch the other side, otherwise you will simply cut the sheet.
Using these cuts, you can safely bend the sheet in any direction. But before you start marking, you need to decide what the ceiling will look like, what size and shape it will have. To do this, sketch out several options on a piece of paper or in a graphics program. The exact dimensions of the product will help you correctly determine the required number of profiles and sheets of drywall, so don’t be lazy and compose them correctly.
It is better to indicate the size directly on the marked surface, this will make it easier to work in the future.
Using the box
The box is an excellent decorative solution, which also has a rather useful function - the ability to hide all unnecessary items in it. The shape of the box is chosen according to the preferences of the client, or the person who will build it. It can be either a flat, geometrically correct design, or have asymmetrical shapes. Also, consider what you want to place inside the box; it could be just any pipes, or wires from projectors or hoods, which owners of modern apartments are increasingly installing.
Backlighting, which is ideal for the box, has become very popular. It creates a pleasant and slightly romantic atmosphere, which is especially noticeable at night. Also, backlighting allows you to save a lot on electricity, since we often keep the light on even when we are not in the room, and such lighting consumes very little electricity.
Before you start reading this instruction, which will tell you how to properly install a gypsum plasterboard box with hidden lighting, we advise you to read about making plasterboard ceilings, since this knowledge will significantly help you. The box is rarely made separately from the ceiling, because this greatly spoils the appearance of the entire product. We will simply and clearly tell you how to build a high-quality box in which you can add both lighting and hide all the shortcomings of the previous ceiling. You don't need any experience to do this, but if you've worked with drywall before, you'll get the job done faster and possibly with fewer or no mistakes.
How to install an LED strip in a plasterboard ceiling yourself
LED lighting for a suspended ceiling is a decorative element, the advantage of which is ease of installation. Installing such lamps with a ready-made structure under drywall takes half an hour.
- at the corners, stepping back 10 cm from the ceiling, make marks, connect them together in a horizontal line, check the correctness of the markings using a building level;
- along the drawn line, mount a UD profile with a shelf width of 40 mm, fixing it to the wall using dowels;
- perpendicular to the guide at a distance of 40-50 cm, CW profiles with a shelf width of 50 mm are fastened with self-tapping screws and fixed to the ceiling using hangers;
The number of lamps in one meter of such a strip varies from 30 to 120 pieces. The more there are, the brighter the light source, but installation is also more expensive. This depends on the power source, which must not only be powerful (20-30% more than the total power of the connected lamps), but also compact so as not to hang from the suspended plasterboard ceiling in the form of an ugly pile of wires.
Therefore, as the main lighting for the living room, it is better to choose RGB or SMD 5050 with the number of lamps within 60 pieces per meter.
- emphasize the volume of the ceiling;
- divide the room into zones;
- highlight interior items;
- use a minimum amount of wiring, terminals, adapters;
- save energy costs.
The effect of floating ceilings is created through optimally selected lighting. Knowledge of the technology of installing a plasterboard ceiling with lighting involves a detailed study of how to arrange the frame, attach the lighting and what materials are best used for this. This means you can do the work yourself.
Upper level frame
Installation begins with the arrangement of the frame. Drywall sheets cannot be called a sufficiently durable material. They will not be able to withstand the weight of the new tier, in which they install an LED strip for illumination. For this reason, the frame of the second tier is attached to the guides of the first level directly through the drywall. To do this, they need to be placed exactly where the guide passes, which will form the box with lighting. Both frames are attached around the perimeter of the room.
Example of a marked rough ceiling
There should be no problems when installing two parallel guides, which are mounted across the longitudinal profiles on the main ceiling. They are screwed in at a pitch of 400 mm. It is important to follow it strictly. It is important to make it not very large.
Frame for plasterboard ceiling
The other two guides will be more difficult to attach if the longitudinal profile does not pass through them. It must be laid at the moment when the installation of the main frame is carried out. All this work is not difficult to do on your own if you act correctly. The main thing is to carry out installation in strict sequence. Action. Do not skip the most important stages of work.
Table No. 1. Types of drywall used in finishing residential premises