An original method of finishing the ceiling is the installation of a multi-level structure. The market offers an extensive list of materials for this type of cladding. One of them is drywall. Beginners are interested in the question of how to make a multi-level ceiling from plasterboard with their own hands, how to correctly form the “skeleton” of the building?
DIY multi-level ceiling
Multi-tiered ceilings are popular. Since one of the advantages of this type of coating is the abundance of configurations that drywall can acquire. Thanks to these properties of the material, any design masterpiece can be constructed. In the vastness of the Runet it is possible to find a huge number of professional videos that describe all the moments of editing.
Drywall
General characteristics and selection of material
Drywall is a compressed gypsum sheet, formed into a sheet and wrapped with facing cardboard.
It has been successfully used in construction and decoration for more than 100 years, although it has only reached its peak of popularity today. The reason for such a belated turn to a very convenient and inexpensive finishing material lies on the surface: the active development of the entire industry - and as a consequence of this, an excellent offer on the market, allowing you to select plasterboard sheets of the necessary characteristics and color solutions.
- “breathable” material;
- environmentally friendly;
- not flammable;
- Maintains a normal level of humidity in the room for humans.
The main disadvantage of plasterboard sheets is their rather weak moisture resistance
. Moreover, there are gypsum board sheets on sale with a “pumped” moisture resistance indicator - they come, as a rule, in green or blue - but even in this case, drywall is not recommended for use outdoors. In addition, it is afraid of sub-zero temperatures and is fragile.
The range of uses for plasterboard is wide, but ceilings occupy a key place in it.
Buying the necessary material in order to make a two-level plasterboard ceiling with your own hands seems like an elementary task only in words. First you need to find out which of the existing types is best suited specifically for your renovation. This is determined by the functional purpose of the room:
- what is the humidity level in it;
- how high is the level of fire danger;
- frequency of temperature changes;
- lower and upper temperature threshold.
How to choose the right plasterboard sheets in order to make a two-level plasterboard ceiling with your own hands, our table will tell you, in which, next to each type of plasterboard, a recommendation is given on the conditions of use.
| Drywall type | Color | Purpose |
| Regular plasterboard | Grey | For interior decoration in rooms with normal and low humidity conditions |
| Moisture-resistant gypsum plasterboard | Green | For interior decoration in rooms with dry, normal, wet and wet humidity conditions |
| With increased resistance to open fire GKLO | Grey/Pink | For interior decoration in fire hazardous areas |
| Moisture-resistant with increased open flame resistance GKLVO | Green | For interior decoration in fire hazardous areas with high humidity |
Also, when selecting material for installing a two-level ceiling, pay attention to the following points:
- dimensions (most often 250 cm in length and 120 cm in width);
- type of side edge (straight, thinned, semicircular, rounded);
- sheet thickness (no more than 9.5 mm).
The dimensions indicated are standard, but you can always order sheets made to order. In this case, you will have to wait, but installing a two-level ceiling will be much more convenient and easier. As for choosing the type of side edge
, then again, for purely practical reasons, the choice of a semicircular or thinned edge seems optimal: less time needs to be spent on post-processing.
The most popular manufacturers:
- Knauf (Germany);
- Gyproc (Finland);
- Lafarge (France);
- Rigips (Austria);
- JSC "Gips" (Russia).
How to choose plasterboard for a multi-level ceiling with lighting
Drywall is a universal and common building material that can be used to finish a multi-level ceiling.
When choosing drywall, you need to consider the following nuances:
- Determine the type of material. For living rooms, you should opt for regular or moisture-resistant gypsum plasterboard.
- Measure the ceiling. Measure walls and ceilings, monitoring their deviations. If there is a discrepancy in data, the largest of them must be taken into account.
- Calculate the required amount of drywall. To calculate, you can use a special calculator. You just need to enter the area and perimeter of the floor into it, and it will calculate the material consumption.
For ceilings, gypsum boards with a thickness of 9.5 mm are usually purchased. But since it will be mounted in a multi-level structure, the load on the load-bearing base will increase, so gypsum boards with a thickness of 9.5 mm may develop cracks at the joints. In this case, do this:
- For the 1st level, buy gypsum board with a thickness of 12.5 mm.
- For level 2, 9.5 mm drywall is purchased.
- For level 3, the thickness is 6.5 mm.
After taking measurements and choosing the type of material, you can begin preparing the room for renovation.
Required tools and materials
You won’t be able to limit yourself to buying just plasterboard if you want to make a two-level plasterboard ceiling with your own hands correctly. After all, to secure the purchased sheets, you will first need to build a frame
, and no one canceled the finishing treatment. Let's look at those tools that can be safely called a “must have” for the installation of a two-level ceiling:
- metal scissors;
- screwdriver with drill;
- knife;
- hacksaw;
- square;
- roulette;
- laser level;
- spatulas;
- protective gloves;
- protective glasses;
- pencil;
- pliers;
- painting thread;
- Serpyanka mounting tape;
- ladder.
In the video below, an experienced craftsman very convincingly talks about why each of the tools we mentioned is just as necessary in the work of installing a two-level ceiling, as is fuel for the full functioning of your car.
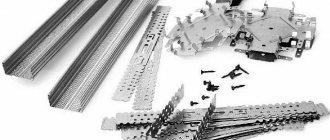
And, of course, consumables, without which your tools will never be able to prove their usefulness:
- guide profile UD;
- CD ceiling profile;
- crab connectors;
- ceiling suspensions are straight or spring (at a distance from the concrete base of more than 120 mm);
- extensions for the profile (where the width of the room is greater than the usual length of the profile);
- dowels;
- screws 25-35 mm;
- primer;
- putty;
- painting mesh.
A very interesting video that will help you choose the right individual consumables for installing a two-level ceiling from the list above.
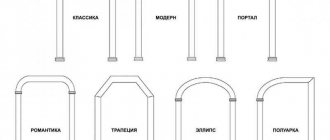
Pay attention to the profile sizes
and their purpose is shown in the image below.
Installation of a multi-level structure
It's no secret that when mastering something, you should always move from simple to more complex. We will do the same, because without knowing how to make a simple plane, you can’t even dream of assembling a curved figure.
Before starting work, you need to draw a small drawing on paper, which indicates the dimensions of all elements, calculates the location of the profiles in the frame, marks the installation locations for lighting equipment, and draws the figure that you want to see in the end.
The more complex the figure on the ceiling, the more attention you should pay to the accuracy and scale of your drawing. By spending time at this stage, you will save a lot of time during assembly.
If you have no experience in drawing and design art, then look for ready-made solutions on the Internet, or use free online calculators. All these measures together will give a good result.
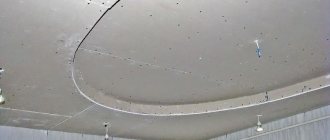
Single-level horizontal plane
And now we read carefully and delve into it, using our spatial imagination as much as possible. If this is a little difficult, then watch the video that we selected on the topic.
- The first thing we need is a tape measure, a pencil and a water level. If there is a laser axle builder available, we use it - it’s faster, more convenient and you can work alone.
This level will quickly draw a plane on all sides
- So, according to the project, the height to which the false ceiling will fall is usually taken into account. This should take into account the size of all communications remaining under the casing, unevenness of the capital surface and the height of lighting fixtures, if any, are built into the structure. Our task is to find the lowest point in the room and make sure that the design height recedes downwards from it.
- A laser level will allow you to check almost the entire plane, whereas when working with a water level, only the corners are checked - which is sufficient in the vast majority of cases. If doubts remain, then add a couple more centimeters to the indentation, unless of course the height of the room suffers greatly from this, but as practice shows, no one will be able to notice the visual difference between 250 and 249 centimeters.
- We mark the level with marks at an arbitrary height from the ceiling in all corners of the room. Next, all distances from the base ceiling to the resulting marks are measured. The smallest value will be the lowest point - in this corner we retreat the planned distance, measure the distance to the previous mark with a tape measure and correct the difference in all other corners.
- When working with a level, just hang it from the ceiling and turn it on. Using an extended tape measure, you can “feel” the entire ceiling. Further actions are similar.
- The marks at the corners are connected by lines using a tapping cord with dry paint.
The principle of working with dye thread
Attention! If the length of the wall exceeds 6 meters, then it is recommended to put an additional level mark in its center to avoid sagging of the thread when pulling.
- The markings are ready and installation can begin. We take the PPN guide profile, apply it exactly with the bottom edge along the line, drill it along with the wall and attach it to an anchor or dowel screw. In this manner we go through the entire perimeter of the room.
Installing a PPN profile
- For this work you will need a hammer drill and a concrete drill of the appropriate length. The drill is usually used with the following parameters - 6x110 mm.
For fixation, use fasteners with a length of 4 to 6 centimeters
- Next, we look at which direction is most convenient to place the sheets of drywall. Usually they choose transverse, relative to the length of the room, if the total length does not exceed 3 meters, and longitudinal, if it exceeds - now we will explain why.
- As already mentioned, in such cases you will need to lengthen the profile. There is a way to avoid installing an extension cord in each belt or get rid of them altogether. To do this, we need to divide the ceiling area into sections, the length of which will be equal to 3 meters, that is, if the width of the room is greater than this value, we will only need to lengthen the sectional profile.
- Wrapped? For clarity - in other words. Let's assume the dimensions of the room are 5 by 4 meters. We put marks on parallel walls from the total adjacent distance of 3 meters. Using these marks we install one profile, which, of course, needs to be lengthened. The resulting section, perpendicular to the installed profile, is filled with PP profiles trimmed by 3 centimeters, in increments of 60 centimeters, since this value is a multiple of 120 centimeters, that is, the width of the sheet.
- The length of the plasterboard sheet is 250 centimeters, that is, it can also be installed transversely, making a step between the profiles of 50 centimeters, but then the long edges of the sheets will be attached not to the main, but to the transverse profiles, which is not good.
- If the width of the room is less than or equal to 3 meters, then it is easier to insert the main profile between the guides.
Finished frame with jumpers
- We hope we were able to explain it clearly. In general, the next stage is filling the frame with a load-bearing profile. As you might have guessed, you need to make cells with a size of 50x60 centimeters. We first mark the main profile (in increments of 60), trim it if necessary with metal scissors and install it, aligning the central axis with the mark, and tying the frame together with self-tapping screws.
Straight cutters for metal
- Then the profiles are attached to the ceiling using hangers and simultaneously aligned to the plane. To do this, it is convenient to use a nylon thread stretched across.
Attaching the suspension to the concrete floor
- The final touch is the installation of crossbars, which are attached to the main profile using “crabs”. The work is quite tedious, so many people prefer to limit themselves to only the joints of drywall sheets. This design has a right to exist, but keep in mind that it is better then to buy a good, durable profile.
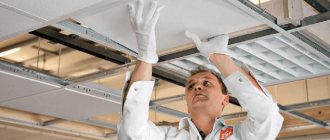
Afterwards, the process of covering the plane with plasterboard begins. This work is simpler for installers than assembling the frame.
Its main difficulty lies in lifting and holding heavy sheets in weight. Professionals use special lifts for these purposes, and for one-time work you can invite a couple of assistants.
You can operate the lift alone
During installation work, you will definitely need to cut the sheets into pieces of the required length. For a direct cut, use the most ordinary stationery knife, which is used to cut through the top layer of cardboard along a rigid guide, then break the sheet and make a cut on the back side.
If you need to cut holes in the sheet and make them shaped, use a special drywall saw or an electric jigsaw.
Cutting drywall along broken lines
It is most convenient to make round holes in sheets for lamps or acoustics using metal wood bits.
Set of crowns
Drywall sheets are attached to all profiles with which they intersect, including guides. The fastener spacing is 15-18 centimeters, which corresponds to a span - an old Russian measure of length. The measuring span is the distance between the tips of the thumb and index finger.
Advice! When positioning the sheet, make sure that its edges are located exactly at the centers of the profiles.
Adjacent rows of drywall are placed at intervals relative to each other so that the seam is not continuous. This measure significantly strengthens the bond of the structure and prevents the formation of cracks on the surface in the future.
Inclined planes
The attic ceiling is geometrically complex
Now we know the basic principles of working with profiles and drywall, so in the future we will do without repetition, focusing only on the most important points. Next up is the multi-plane attic ceiling.
Most often, the ceiling of this room consists of three planes: horizontal and two inclined, but there are also pitched options without a horizontal:
- This form is quite difficult to cover, especially if the craftsman does not have enough experience and does not have developed spatial thinking. We will look at two types of ceilings that can be arranged here: vaulted and straight.
- The main difficulty of such work is that it requires the evenness and correctness of the geometry of the room and the ceiling, but often the sheathed rafter system cannot boast of such parameters and you actually have to build a new frame for the entire room.
- First of all, you need a reference point from which you can base your measurements. The easiest way is, if the walls of the room become such, you need to sheathe them so that all the corners in the room are exactly 90 degrees, the walls are strictly vertical, plus it would be nice to additionally focus on the plane of the central window, if there is one.
Next, in order, let's start with the vaulted ceiling.
Vaulted ceiling in the attic
- This solution is more suitable if the roof of your house is gable.
- So, we determine the level at which we want the vault to adjoin the walls, and we make perimeter markings of the level, as we described in the previous chapter.
- We measure the lengths of the side walls and find their centers. At these points we screw in the screws halfway or forget the dowels - this will be the central axis of our rounding.
- Next, we assemble a compass from a piece of wire of the required length and a pencil and draw a semicircle. If the dimensions of the room do not allow this, then you can make a kind of spire by shifting the axis to the sides, making the figure actually consist of two intersecting circles.
- Now, according to the markings, a guide profile is attached, but it is specially prepared. For straight sections of walls, its sides are bent towards the ceiling at the desired angle. To install along curves, the profile must be cut in a certain way - the base and one side.
Now the profile can be freely bent along the radius
- The most difficult thing to set is the central guides. To do this, additional load-bearing parts are installed from the same plasterboard, the shape of which should follow the bend. These elements are screwed along its lower edge.
- Afterwards, in increments of 30-40 centimeters, a supporting profile is installed, to attach it to the central guide, pieces of the PPN profile are used. For fixing, homemade corners are assembled from the same PPN profile as in the photo with the frame above. These parts are assembled using a cutter.
Profile cutter
- Next, the drywall is screwed on. The radius of such a ceiling is usually not very steep, so you can easily bend even a dry sheet of 9.5 mm drywall. Along the joints during assembly, pieces of PP profiles are inserted for reinforcement.
In general, if you managed to assemble a curved base of the frame, further work will not cause any particular difficulties.
2nd level plasterboard ceiling
It’s not much more difficult, and maybe easier, to assemble a 2-level plasterboard ceiling in the attic, with corners.
- We first assemble the frame of the walls, as already mentioned.
- Next, we determine the angle of inclination of the side parts of the ceiling. To do this, first draw a horizontal level of its upper part and find its center, which should correspond to the middle of the floor.
- We make horizontal markings on the wall frame, determining the connection point between this and the inclined planes, although its height should ideally already be set to this point and have a guide profile inserted on top. Now we look at which angle follows our markings so that nothing interferes and it is convenient to attach to the load-bearing elements of the roof.
- We mark all this on the walls, draw lines and attach guides.
- Between them we establish the main profiles and act in a manner already familiar to us.
- Separately, it is worth saying that it is worth very carefully setting and strengthening the profiles at the junctions of the corners. Look at the photo above - the ribs of the adjacent belts are tightly connected without gaps.
Ceiling with box
2-level plasterboard ceilings
The next design we'll look at is very versatile. Having mastered the principle of its construction, you will be able to build not only a box, but also a three-level plasterboard ceiling, and options with niches and overhangs in the center of the room.
So:
- We need to build, in fact, two planes, but at different heights. We can go in two ways: first hem the upper level, and then attach the lower one to it, or vice versa - the upper part of the ceiling will be tied to the lower one. The second option is more preferable, since all horizontal loads will fall on the main floor, while in the first, especially curved figures are partially associated only with drywall.
- We mark the lower level along the walls, and on the ceiling, using a tape measure and a pencil, we mark its boundaries.
- We install guide profiles along all marked lines.
- At the outer corner of the box we stretch a parallel nylon thread, which will be our main guide.
- We cut the drywall into strips according to the height of the box and attach them vertically to the profile on the ceiling, aligning the lower edge exactly along the thread, read: this edge should be perfectly smooth.
- We screw a guide profile to the plasterboard along the bottom edge from the inside. This could have been done before installation - whatever is more convenient for you.
Installation of load-bearing parts
- As a result, we get a closed contour from the guide profile, the internal space of which is filled, like a regular plane. If the box is short, then only the main belts are installed, but if it is wide, then cross members and reinforcement of the structure with hangers will be required. Look at the place - each object is unique and always requires some imagination from the assembler, which indicates some creative component of this work.
- The upper level is assembled exactly like the most ordinary plane, while the guide profiles will be fixed to the vertical jumpers, which need to be secured behind the vertical part of the box in increments of 40-50 centimeters, until it is hemmed from below.
Calculating the amount of consumables needed
- plasterboard sheets
-
divide the width of the room by the length of the sheet, add 5% to the resulting number - the required reserve - and round to a whole number, add the amount that is necessary to use the second level; - guide profiles - again we take into account the width of the room, as well as the length of the profile, after dividing the first number by the second and subsequent rounding we get the whole number of elements we need.
In order to accurately determine the number of certain consumables for installing a two-level ceiling, in particular, self-tapping screws, remember that at least 8 screws
, and each ceiling suspension assembly needs
6 self-tapping screws
.
Also remember about the step that is followed when installing the sheathing for a two-level ceiling. It is at least 50 centimeters
.
Multi-level frame - installation
There are many variations of a multi-level suspended ceiling, its shape, design, etc., and a detailed description of them is a good topic for a separate article. Here we also consider the ceiling, where both tiers and the sides between them are made of plasterboard.
Prices for ceiling lamps
ceiling lamps
Installation of two frames. The lamps are mounted in the second of them
Step 1. The first thing is marking. Here, creating a drawing and transferring it to the ceiling is given twice as much attention as for a single-level ceiling - the complexity of the task is significantly higher.
Two-level ceiling project
Step 2. Lines of guide profiles for the upper and lower levels are marked on the wall, and holes for fastening are drilled.
Ceiling frame outline
Step 3. The upper level guide profiles are attached to the wall. Details are described in previous instructions.
Step 4. Direct hangers are installed. The interval between them can be reduced (and, therefore, more hangers can be placed), since the load on the floor and frame will be higher.
Step 5. Top-level ceiling profiles are installed, as for a single-level ceiling. You can use either a transverse or a cellular structure.
Installation of CD profile
Step 6. The lower level guides are attached to the wall.
Step 7. One of the straight profiles is cut into many vertical posts, which will be the “sides” between the ceiling levels. Using tiered or T-connectors, the racks are attached to the upper level supporting structure.
Cuts on the walls of a metal profile
Step 8. An arched profile is attached to the bottom of the posts. It can be replaced with a guide profile with evenly applied cuts and bends in the right places.
Step 9. Bearing PP are inserted between the arched profile and the lower level guides.
An example of a multi-level plasterboard ceiling frame
Video - Installation of a multi-level plasterboard ceiling
This creates a frame for a multi-level ceiling, where the upper level bears additional load. In such work, the help of an experienced craftsman is very important.
Now, after reading this article, you know how the frame for a suspended ceiling works. All that remains is to acquire materials, tools, great desire and the help of relatives or friends.
Bathroom ceiling made of plastic panels
Step-by-step instructions for installing a bathroom ceiling made of plastic panels can be found here. We also recommend reading about how to putty a plasterboard ceiling with your own hands.
Preparing the room and concrete base
- remove the remnants of the previous finishing material from the concrete ceiling base: be sure to clean it of crumbling plaster and treat it with an antiseptic to prevent the occurrence of fungus or mold;
- if there are cracks on the base, then seal them with cement-based putty, and then prime them;
- To adapt to the temperature conditions of the room, store the purchased gypsum board sheets for several days - it is best if they are in a horizontal position;
- try to free up the room as much as possible - remove the furniture, and if this is impossible due to its size, then cover it with film for protection;
- Compliance with safety precautions is a priority that must always be adhered to, so adjust your workplace to achieve the maximum level of comfort, prepare safety glasses, gloves, and check the serviceability of the stepladder.
And, of course, you can’t do this without additional help, so make an agreement with someone in advance - otherwise it will be very problematic to install a two-level plasterboard ceiling with your own hands.
Making subsequent levels
All subsequent tiers are installed using level No. 1 technology:
- draw the profile of the intended figure;
- we assemble a frame from guides, supporting and transverse profiles;
- sheath the sheathing with sheets of plasterboard.
Marking
The drawing of each subsequent level must be correctly transferred to the created suspended structure with clearly visible lines in accordance with the scale. It is performed according to the previously discussed scheme.
If difficulties arise with drawing complex shapes, then paper patterns are made with edges reinforced with tape. They are used as templates for marking lines.
Frame installation
The difference between the manufacture of a multi-level structure is the creation of curved shapes of the profile frame. Their bends are created using a UD guide profile. On its sides, cuts are made every 5–7 cm to create a curved plane that repeats the relief of the next tier.
The desired curve is drawn on the ceiling, along which the created shaped profiles are installed. If, according to the drawing, the level is more than 10 cm from the mounting plane, then a series of hangers descend from the guides, onto which the lower support, load-bearing profile and cross members are attached.
A special feature of a multi-level figure is that the invisible areas located under the closed planes of the tiers do not need to be sheathed with plasterboard. This will save material and also further strengthen the sheathing structure in the places where the next levels are attached.
Covering the tier with gypsum board sheets
The technology repeats the work with first-level drywall. The sheets are secured with screws so that the seams are located in the middle of the profiles.
Creating Curvilinear Shapes
A special feature is the production of figured bends. To mark them, you will need the same paper templates that were used to transfer the drawing onto the cardboard frame of the sheet. The intended shape is cut out along the created line using a jigsaw or a construction knife.
How to bend a gypsum board sheet
If bending is necessary, strips of drywall are treated with a spiked roller, making punctures in the paper base, and then they are moistened with water. After 15–20 minutes, the plaster will absorb water and the sheet will become elastic.
If the bending efficiency is insufficient, the impregnation process is repeated. The gypsum board sheet prepared in this way is carefully fixed to the frame with several screws. After it has completely dried, final fastening is provided.
Room layout
The first action you must perform is to correctly mark the room so that in the future you can build an even and reliable frame for a two-level ceiling. To do this you will need a pencil, painting thread, and a laser level. If you decide to make a two-level plasterboard ceiling with your own hands, then at this stage you should already have a drawn up project with clear markings of levels. All that remains for you is to transfer ideas from paper to the rough ceiling.
- determine the height of the room in 4 corners, if the results differ - and this happens very often - take the corner with the lowest height as a starting point and make a mark on it;
- Using a laser level, we make similar marks in the other three corners and use paint thread to mark a line along the perimeter of the entire room;
- your markup is ready.
It is best to immediately complete the markings for the next level - this way you can know exactly how much material you will need, and also complete the work much faster. Decide what a two-level ceiling will look like:
- linear;
- arcuate;
- ragged.
After this, draw a line on the base of the two-level ceiling that will highlight the second level.
Carrying out marking
Before starting work, draw up a detailed drawing indicating all structural elements. This can be a sketch on paper or on a computer. Such forethought will help to avoid unnecessary costs when purchasing the necessary materials.
- We begin marking the first level. If you plan to install spotlights, then the distance between the base and the drywall should be at least fifteen centimeters. When installing external lighting fixtures, five centimeters of inter-ceiling space is sufficient.
- We find the lowest corner in the room and mark the first point from the surface of the base using a marker. Then we screw a screw into the indicated place and transfer the mark using a water level to the opposite wall.
- The procedure is repeated around the entire perimeter of the building. After that, the points are connected with painting string and with a light blow on it, marking lines are applied to the wall.
When marking, be sure to take into account the thickness of the sound insulation and the presence of internal communications.
Before starting work, conduct a complete inspection of the air ducts, since after installing the plasterboard ceiling, access to them will be limited. Select in advance the installation locations for the lamps and lay the electrical wiring to them.
- Markings are made around the entire perimeter of the room. The ceiling profile should have a pitch of sixty centimeters between each other, and the crossbars connecting it should be at least fifty centimeters.
Installation of the 1st level frame
- we install UD profile guides - they are fixed on the wall at the level that you marked with painting thread, with an optimal fastening step of 60 centimeters;
- We fix ceiling hangers to the points marked on the base ceiling base with the same recommended step of 60 centimeters;
- insert the prepared ceiling CD profile and securely fix it with a suspension;
- in the end you should end up with such a simple but very practical frame;
- To prevent it from sagging, we use crab connectors - the structure will become much more stable.
The entire process of installing a first-level frame for a two-level plasterboard ceiling with your own hands is shown in the photo below.
Second level installation
Installation of sheathing
Installation of subsequent levels is complicated. The marking is done directly on the first level drywall.
Frame installation involves the following steps:
- After determining the contour of the second tier of the ceiling, it is worth deciding on the height and marking the level on the walls.
Level installation
Important! When the next level of the suspended ceiling is adjacent to the walls, then the guide profile should be attached around the circumference.
- To make the correct circular shape from plasterboard, it is better to watch the video and understand in which direction to make the cuts, since they depend on the radius of the structure.
Bending drywall is done in the following sequence:
- The curved profile is attached to the sheet of the first level after 15-20 cm. If a step of 15-20 cm does not allow you to fit into the profile, it is made a little smaller, or the profile is simply attached to the sheet at small intervals.
- It is necessary to make small sections from the profile. 3-5 cm is cut off on the sides of each.
- The segments are attached to the profile vertically (step 20-25 cm), and a second profile is screwed to them.
This completes the complex process of erecting the second tier of the ceiling.
Important! A step of 15-20 cm does not allow you to get into the profile, in which case it can be made a little shorter. Or simply attach the profile to the sheet at small intervals.
Sheathing the 1st level frame with plasterboard
Let's get to the most interesting and important. Although, in principle, all stages of installation are equally important, the contours of our future base of a two-level ceiling are already clearly visible.
- we fix the drywall on the profiles using a screwdriver and self-tapping screws; their caps should go deep, but not excessively, to prevent damage to the material;
- the correct sequence is the first sheet from the corner, the next one on the opposite side;
observe the spacing of the screws - no more than 15 cm; - in the locations of the lamps, make the necessary holes in advance and stretch the wiring;
- It is not necessary to attach drywall at the location of the second level of the ceiling, but remember that it should extend into it by about 10-15 centimeters.
Cross frame - installation
Compared to a cellular structure, such a design requires less material - there is no need for jumpers and, accordingly, for crab-type connectors. But at the same time, the gap between the individual transverse profiles is reduced - instead of 60 cm, 40-50 cm is needed.
Cross frame for suspended ceiling
Step 1. As described above in the article, the ceiling is marked - a line for the guides is installed, and the installation sites for the profiles are marked out with the help of a thread. In addition, you need to determine the angle as close as possible to 90 degrees.
Step 2. Holes are drilled in the wall for the guide profile in increments of 30-40 cm.
Step 3. The guide profile is covered with sealing tape and attached to the wall with screws and dowels.
Using Sealing Tape
Profiles can be fastened using dowels, depending on the surface material - driven or screwed
Step 4. As for the cellular frame, hangers are installed 30 cm from the wall and 60 cm from each other. The ends of the elements are bent down.
Attaching hangers
Step 5. The transverse ceiling profile is cut to the required length. To prevent damage to the drywall during thermal expansion and prevent warping, the “extra” 5 mm is cut off.
Fastening the cross ceiling profile
Video - How to cut a UD and CD profile with your own hands
Step 6. The profile is covered with sealing tape on the bottom side, inserted into the guides and attached to the hangers using small self-tapping screws called bugs.
Installation of the 2nd level frame
- we draw lines on the drywall that will help to correctly place the UD profiles;
- we fix the pre-rounded UD profile on the wall and ceiling - to give it the desired shape, it is necessary to make notches;
- we cut off the necessary fragments of the CD profile and insert the flat side into the already mounted UD profile, fasten them in increments of 50-60 cm for linear segments and 20-30 cm for round ones;
- if some pieces stick out, you should cover them with a UD profile.
Ceiling preparation
First, you need to remove old paint or whitewash from the ceiling. If the panels were glued, they must be removed and the ceiling surface cleaned of traces of glue. If there was a suspended ceiling, then it is disassembled, all fasteners and other elements are removed. If the base of the ceiling is initially crooked, a single-level ceiling must first be assembled.
Sheathing the 2nd level frame with plasterboard
Most often, a two-level plasterboard ceiling, if you do it yourself, causes difficulties at the stage of covering the second level. Largely due to the fact that the material must be rounded in order to be fixed to the arched structure. Despite the apparent simplicity of the manipulations involved, very often there are sad cases of damage to sheets. To do this, in order to eliminate such an annoying possibility, it is necessary to make notches on the sheet itself - only carefully so as not to damage the front part, lined with cardboard.
- complex arches require tedious segmentation - cutting out a number of fragments and their subsequent installation to the profile;
- do not forget to make holes for the lamps, if you plan to use them, and route the wiring under them.
DIY multi-level plasterboard ceiling
You can assemble the ceiling cladding into several levels by rebuilding the old single-level frame. Often it is necessary to find joints between sheets of drywall under the putty, which are used to determine the location of the load-bearing metal profiles of the frame. Once the frame design becomes clear, one or two additional levels of plasterboard cladding can be added.
Of course, this method is applicable only if the frame for the future multi-level ceiling was assembled with at least a double safety margin. Otherwise, there is a real risk of structure failure.
For beginners, it is easier and more reliable to assemble a three-level frame for plasterboard cladding “from scratch.”
Preparatory work for installation
The first step is to clean the rough surface of the ceiling, remove the remains of the old cladding, treat the concrete with an antifungal mixture and repair chips and joints between the slabs.
Next, markings must be applied to the walls and ceiling for fastening the guide profile. It is laid around the perimeter, in the same way as when assembling a single-level plasterboard finish.
Several rows of profile will be required
Along the lines of the pattern of the lower tier of the multi-level finishing, hangers are attached to the ceiling. At the same time, load-bearing profiles for the top layer of plasterboard cladding are laid on the concrete.
If there are no secrets in installing hangers, then installing a profile has its own peculiarities. It has to be laid directly on the concrete surface to reduce height loss. If the rough ceiling is flat, then it can be secured with dowels. Otherwise, you have to use suspensions, which means that the upper tier of a multi-level ceiling grows up to 7 cm.
In places where the installation of vertical parts of drywall, the second and third tiers of the ceiling will be carried out, the profile is cut off and the ends are connected with a split flexible galvanized profile.
Two or three similar levels can be made, depending on the cladding scheme
Installation of multi-level plasterboard ceilings
After the frame of the upper tier has been assembled, sections of the supporting U-profile are sewn into the split profile, which will serve as the basis for the plasterboard of the vertical sections of the decor and at the same time act as load-bearing hangers holding the second tier of the multi-level structure.
To lay drywall on the second tier, you need to assemble the next level of sheathing. Initially, sections of the supporting profile are laid, then jumpers are mounted on the crabs.
Particular attention is paid to window niches
The third-level frame elements are suspended from the ceiling using additional ribbon hangers. To hang the sheathing of the last layer of cladding, you cannot use pieces of the profile; the plane must be attached to flexible tapes, otherwise cracks will form in the corners under load.
Particular attention should be paid to arranging niches for curtains and curtains. It just so happens that the multi-level ceiling falls below the line where the baguettes are installed, and can often even block part of the window opening. Usually they try to solve the problem at the design planning stage, for example, they move the lower levels to corner areas or to the center of the room.
If the design cannot be changed, then niches will need to be assembled under the curtains, into which in the future it will be possible to install a baguette and ceiling lighting.
Plasterboarding and wiring
Complex multi-level frames are very inconvenient for laying ceiling electrical wiring and communications. Despite the large volume of the structure, there is not much space left on the rough ceiling, so they try to lay the wiring on concrete under the profile of the upper tier.
Wiring often has to be simply hung on drywall
Pipes and channels are mounted on vertical hangers of a multi-level ceiling, in this way it is possible to reduce the load on the drywall. After the wiring issues have been resolved, plasterboard is laid on the frame in the places where the lamps are planned to be installed. After rough installation and adjustment, electrical appliances are dismantled, and the ceiling is finally covered with plasterboard.
All that remains is to putty and paint the structure.
Finishing the ceiling
So we have come to the final part of installing a two-level plasterboard ceiling with our own hands. Finishing will not cause you any difficulties: this is a fairly simple stage designed to make the installed ceilings as presentable and impressive as possible.
- seal the seams with sickle tape;
- take a narrow spatula and apply putty along each taped tape;
- carefully cover all the screws with putty so that the rust on their heads is not visible afterwards;
- treat the entire surface with a primer;
- We carry out finishing decoration - whitewashing, painting.
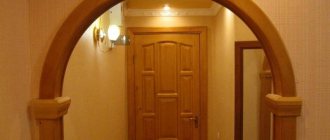
As a result, you should get a beautiful two-level ceiling with a harmoniously executed arch or with complex geometry with the majority of truncated fragments. Isn't this what you dreamed about when you started this tedious (or not so tedious?) editing?
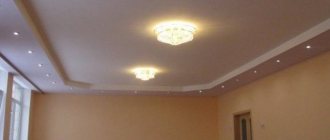
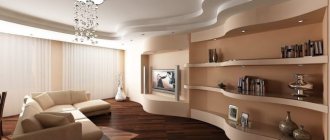
Photo gallery of the most popular options
Take a look at what nice options come out when people decide to make a two-level plasterboard ceiling with their own hands - and approach their work responsibly and creatively.
Where to begin
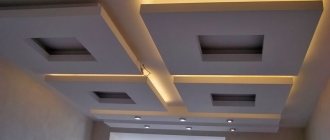
Before you decide to install such a ceiling, you should consider whether it will look appropriate in a particular room. After all, even a simple single-tier structure made of gypsum plasterboard will take away at least 5 cm of the room’s height. When the distance from floor to ceiling in an apartment is no more than 2.5 m, then it is impractical to build a system of several tiers. Two levels can be considered if the first tier is mounted around the perimeter in the form of a narrow box. But a three-level ceiling will further reduce the spatial dimensions of a low room.
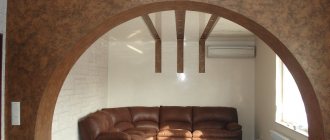
Photo of a three-level plasterboard ceiling in the living room
Next, select the figure you want to depict and calculate its dimensions (height, width). In this case, consider the purpose of the room. For example, when developing a sketch of a suspended ceiling for a bedroom, you should abandon overly pretentious shapes and elements, choosing soft lines and smooth transitions.
The next step will be to determine the number of lighting fixtures and their locations. Typically, spotlights or hidden LED lighting are used to illuminate multi-level ceilings. Often different devices are combined. For example, LED strips are installed between the tiers, and spotlights are installed on the second level. A traditional chandelier is placed in the center or dispensed with if the brightness of the devices is enough for full illumination.
After the design problems have been solved, they move on to installing multi-level suspended ceilings.