Advantages and disadvantages of two-level plasterboard ceilings with lighting
A two-level ceiling is made of plasterboard and stretch fabric. Designs of this type are extremely popular among consumers, as they allow you to create extraordinary compositions that not only highlight the interior of the room, but also become its main detail.
Among the advantages of a multi-tiered ceiling are:
- Curly structures are lightweight, which prevents excessive load on wall and ceiling floors.
- It is characterized by simple installation; drywall is easy to cut and give it the required shape.
- Sheets of plasterboard reliably mask all flaws in the ceiling. When deciding to install a two-level structure, the consumer may not care about carefully leveling the surface.
- Thanks to the free space between the base of the ceiling and the levels of the plasterboard structure, the user has the opportunity to install volumetric structures (ventilation cabinet) and lay utility lines.
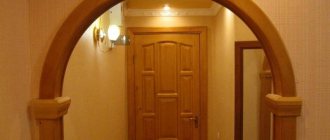
- The two-level design has many configurations, which allows you to visually divide the room into separate zones. In combination with properly selected lighting, this will be especially impressive.
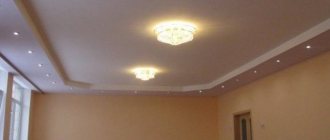
- In its finished form, a two-level ceiling has a magnificent appearance, certainly attracts attention and can become a central element in the interior of the room.
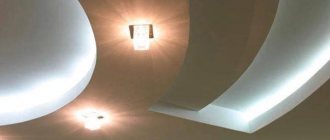
- The presence of several levels allows you to play with lighting options. Many designers use this design feature of a plasterboard ceiling to create beautiful and harmonious lighting in a room.
- Thanks to the special technological properties of plasterboard, its use as a ceiling covering helps improve the heat and sound insulation properties of a room.
Along with the advantages, experts highlight a number of negative points that need to be taken into account when deciding to install a 2-level plasterboard ceiling with lighting:
- This design is quite large and significantly reduces the height of the ceilings in the room. Due to the profile on which the base rests, the room loses about 5 cm of space. Installing a second tier will also remove about 10 cm.
- Over time, cracks and other deformations may form in the area of the joints of drywall sheets. This can be avoided by installing special protective tapes or decorative framing at the points of contact.
- It is almost impossible to cope with the installation alone. If the user plans to do everything with his own hands, he needs to enlist the support of friends and acquaintances who will help him.
- Installation of a two-level ceiling structure is considered a rather labor-intensive process. The consumer must not only have certain construction skills, but also have a fairly large assortment of construction equipment at hand, be able to draw up drawings and design.
Materials for stretch ceilings
There are 2 main types of materials for suspended ceilings:
- PVC film (polyvinyl chloride);
- textile.
Which one is better? You can list the advantages of each of them.
Table. Comparison of the advantages of fabric and film ceilings.
| PVC film (polyvinyl chloride) | Fabric (polyester) |
| Durable | Durable |
| Easy to stretch | Looks much more attractive |
| Does not allow moisture to pass through | Allows air to pass through (ventilation will operate normally) |
| Costs less | Partially transmits light through itself (hidden backlighting is possible) |
| Can be washed with a sponge | Does not require heating during installation |
But fabric material for suspended ceilings is much more expensive. It is allowed to use several materials at once. For example, the first level will be made of glossy PVC film to visually increase the space, the second level will be made of fabric with a satin-like texture. This is the optimal combination that designers often use.
Materials for suspended ceilings
Be that as it may, the final choice is up to the consumer. It is recommended to visit specialized stores and independently evaluate the attractiveness of each of the materials by studying their texture. You can even order photographic film for the ceiling according to your own design. Everything is limited only by flights of fancy and the size of your wallet, nothing more.
Is it possible to combine tension fabric and suspended plasterboard in two-level ceilings? This option is possible, but it makes no sense. The exception is forced zoning of space. This is done when, for example, it is necessary to divide one large room into a sleeping and guest area. An aluminum frame made of C-shaped profiles must be mounted under a rigid base.
Construction of a two-level plasterboard ceiling with lighting
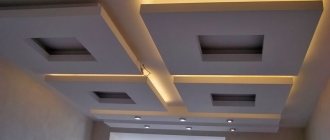
One of the key reasons for the popularity of two-level plasterboard structures is the wide range of design possibilities. The design features allow you to create real masterpieces that will become the central element of any design plan. The two-level plasterboard ceiling with lighting in the photo looks especially impressive.
The first level has a fairly large mass; it must be firmly fixed to the base of the ceiling. The second level is lighter; it is the one that forms the geometric shapes in which the structure is made.
Important! If the plasterboard is installed in a room with high humidity, it is necessary to initially select drywall with protection from water. This will prevent deformation of the structure.
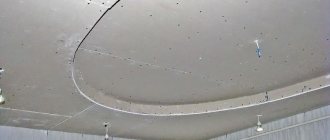
Marking
Having measured the height of the second level, a line for attaching the guide profile is drawn on the wall around the perimeter of the room. It is better to use a spirit level or laser level. A drawing of future borders is transferred to the ceiling surface, and the location of future lintels and places for attaching hangers are marked in 600 mm increments.
USEFUL INFORMATION: What you can make from plasterboard with your own hands: a dressing room made of plasterboard in the bedroom
Types of two-level plasterboard ceilings with lighting
Experts distinguish between two main types of ceilings - single-level and multi-tiered. The first option is suitable for almost all rooms, regardless of their size and functional purpose. As for two-tier structures, everything is much more complicated here.
When deciding on arranging a two-level ceiling, you need to remember that such a design can significantly reduce the height of the room by at least 10-15 cm. The loss of free space will be catastrophic for rooms with low ceilings. That is why structures of this type are not installed in them.
Two-level ceilings can be classified in several ways:
- Depending on the type of backlight. There are ceilings with spot or contour light, with external and internal lighting, etc.
- Tier material. The two-level design allows you to combine different types of flooring. Both tiers can be made of plasterboard sheets. The most popular option is a combination of gypsum board and tension fabric. This option will significantly improve the decorative functions of the installation and give the structure a more aesthetic appearance.
There are also several types of design depending on the installation:
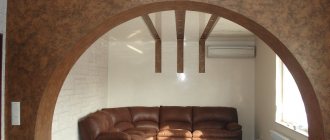
- Frame. It goes around the perimeter of the room, leaving an uncovered ceiling base in the middle. This option is equipped with spotlights, and a pendant chandelier is often placed in the center, with a style that is as close as possible to the interior.
- Diagonal. Crosses the space of the room diagonally, can be straight or curved. The first level is as even as possible, the second protrudes above the base a short distance. The most successful option for zoning a room.
- Zonal. Used for furnishing studios and large rooms. Allows you to visually divide the space into several autonomous zones.
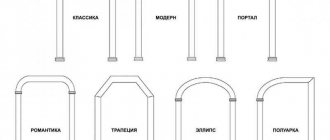
Depending on the shape of the structure, there are three variations:
- figured. The second level has an unusual shape in the form of a geometric figure, a plant element or an animalistic motif;
- abstract. Here there is a combination of different forms, which can be arranged either in a strictly defined sequence or chaotically. To make the overall composition stand out, the forms are given different colors;
- soaring. This option is suitable for rooms with high ceilings. Thanks to the fastening of fitting sleeves and metal pins, the composition takes on a slightly fairy-tale appearance. Visually, it seems that the ceiling is floating in the air. This effect can be especially emphasized by properly selected lighting.
Minimum room height for installation
During the installation of any tension structure, the ceiling is lowered. If the room ends up being too low, it will be awkward and uncomfortable to be in.
According to SNiP 31-01-2003, recommendations for the minimum room height are as follows:
- for living rooms and kitchens in temperate climates - 2.5 m;
- in hot or cold areas - 2.7 m;
- for corridors and hallways - 2.1 m.
The shortest distance by which the ceiling will drop is determined by the width of the profile. For baguettes of the first level this is 3-4 cm, for the second - 8-10 cm. That is, the height will decrease by at least 11 cm. The calculations are valid for rooms with a small vertical difference in the ceiling.
It turns out that a height of 2.7-2.8 m is sufficient for a two-level stretch ceiling. Hallways and halls may be lower.
Dimensions of a two-level plasterboard ceiling with lighting
The dimensions of a two-level ceiling structure can be very diverse. One of the advantages of this option is a large selection of architectural forms and design solutions.
When deciding to install a two-level plasterboard ceiling with lighting, the user needs to think about the concept of the project in advance. The specific size of the structure will directly depend on the features of the interior, the chosen style and the area of the room. If the room is spacious enough, you can install a volumetric overall composition.
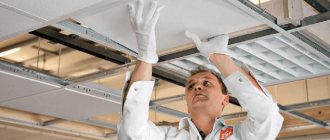
Fastening drywall
After finishing the production of the sheathing, sheathing with gypsum material occurs. It is convenient to cut the material with a construction knife - it is a soft material. When cutting out a shaped part, precision is maintained. If you need to bend a figure from plasterboard, then you need to make cuts along the edges and bend a sheet of plasterboard. The second option is the wet method - passing over a figure cut out of a sheet with a needle roller, wet the part, put it in a special mold and leave for 10 hours. Fasteners for sheets are installed with a certain distance. The self-tapping screws are slightly “recessed” into the plasterboard covering so that the “hats” do not stick out above the plane.
Types of lighting for a two-level plasterboard ceiling
For two-level ceilings, there are two lighting options:
- Open lighting. All lamps are mounted directly into the finished product and placed in plain sight.
- Closed lighting. Between the ceiling levels in the free space, a special niche is created in which lighting fixtures are hidden in such a way that only the emitted light remains visible.
You can use any lighting options, from spotlights and contour lamps to large hanging chandeliers and LED strips.
The only thing you need to pay attention to when creating lighting is the dimensions of the suspended structure. If the ceiling is small, a massive chandelier on it will look ridiculous, and it will also visually reduce the free space, which will negatively affect the overall exterior of the room.
Important! When installing the backlight, you need to ensure that the electrical wiring does not come into contact with the metal elements of the frame.
Installation of the second level of ceiling
The process of leveling ceilings with plasterboard is well known, so there is no need to dwell on it separately. But when installing the second level, it would be useful to follow some recommendations. Let's look at them using the example of the option with borders, when the first level is the base surface of the ceiling, but all these stages and subtleties apply to other models of two-level ceilings.
The main installation steps are listed below.
Schemes of a two-level plasterboard ceiling with lighting
How to make a two-level ceiling frame from plasterboard with lighting
Since the two-level illuminated ceiling has quite large dimensions, for this structure it is necessary to install two frame bases. To install the first level frame, you must perform the following steps:
- Install guide UD profiles along the surface of the concrete (brick) ceiling base. They must be firmly fixed with an optimal fastening step of 60-70 cm.
- Ceiling hangers are attached to predetermined points and secured to the guide elements using “fleas.”
Important! Ceiling suspensions must be fixed with an optimal fastening step, which corresponds to the installation of guide profiles. According to experts, the distance between them should be within 60-70 cm. - Insert the ceiling profile CD, after which it must be firmly fixed with a suspension.
- If the structure is large enough, it is necessary to prevent possible deformation of the base. For this purpose, special “crab” type connectors are used. They will give the structure stability and prevent subsidence.
After installing the frame, it is sheathed with plasterboard. This will be the first tier of the ceiling. To form the next level, it is necessary to install a second frame:
- Special lines and marks are applied to the drywall sheet, which will allow you to place guide profiles according to a pre-planned pattern.
- UD profiles are pre-rounded and then fixed to the wall and ceiling. To form the desired shape, small notches are made on the profile.
- The CD profile is cut into fragments of the required size, and then installed with the flat side into the UD profile. Next, they should be fastened together in increments of 20-30 cm - for rounded elements, 50-60 cm - for linear ones.
- If, after fixing the profiles, some parts protrude, you need to get rid of them. To do this, small fragments are cut out of the UD profile to cover the unevenness.
Installation of the first level frame
In first-level production there are methods by which the sheathing is installed. The first option is simpler - transverse:
- Fastening the NP to the wall according to the intended markings. Fasteners are installed every 50 cm.
- Suspensions are attached along the marked crosses. The distance between them is 50 cm.
- The PP is attached to them with small self-tapping screws. The ceiling profile is connected to a guide on the wall.
- To make the surface even, a nylon thread is stretched, and sagging PPs are adjusted with hangers. Their ends are bent and the PP is tightened.
- The thread should be stretched along the NP on the wall. If the ends of the hangers peek out, they need to be bent in different directions.
After the first tier is created, the laying of wires begins. They must be placed in corrugation for insulation.
Wires should not come into contact with metal to avoid short circuits and fire. At each point of the proposed electrical appliance, the wire is set at 15 cm. The wiring is brought out to the switch point at one end, and to the electrical box at the other end.
The second option is to install a cellular frame
The cellular frame is a kind of mesh, which is installed as follows:
- An NP is attached along the wall across the entire room at a distance of 10 cm from the top. The fasteners are fixed using dowels every 40 cm. The bottom of the NP must coincide with the drawn line.
Scheme for attaching a cellular frame when installing a plasterboard ceiling - From the wall, at a distance of 30 cm, along the intended boundaries, hangers are attached. They should be located every 60 cm and it should look like this: lintel-hanger-lintel.
- The PP is fixed with self-tapping screws to the hangers. To make the plane even, a silk thread is stretched. The edges of the suspensions bend in different directions. If the metal part is short, it is extended with a connector.
- The jumpers are fixed perpendicular to the PP; crabs are used for this. They are located at the border of the gypsum joint (every 3 meters), so the jumpers will be every 60 cm. Fastening occurs in stages.
The process of attaching jumpers when installing a ceiling
Cells are formed in this way. If the PP sags, it is tightened with hangers. The jumpers are made of PP using the cutting method. One jumper is 60 cm. The crabs are attached to the other parts with small self-tapping screws. In some cases, before attaching the profiles, a sealant is glued to the “back”.
DIY installation of a two-level plasterboard ceiling with lighting
The process of installing a two-level ceiling structure with lighting begins with preparation. First you need to collect all the materials and tools:
- plasterboard sheets. In order not to buy extra material, you must first calculate the ceiling model and find out how much drywall will be required for installation;
- UD and CD profiles;
- ceiling suspensions. If the design provides for fairly large dimensions, it is better to use a spring rod; if the dimensions are small, use direct hangers;
- soundproofing materials;
- extension cord (if the width of the room exceeds the length of the profile);
- fastening elements (dowels, fleas, etc.);
- self-tapping screws;
- finishing material.
After preparing the necessary equipment, you can begin installing the structure. The first stage includes preparing the frame parts of the future ceiling. How to mount the frame is described above.
As practice shows, it is not difficult to make a two-level plasterboard ceiling with lighting. Problems often arise during the process of covering the frame with plasterboard sheets. Therefore, you need to consider the following points:
- if a sheet of drywall is cut, a chamfer is made on the edge using a knife or plane;
- to ensure the most reliable fastening, gypsum boards need to be joined in the middle of the profile;
- in order not to complicate subsequent finishing, the heads of the screws are slightly recessed in the plaster;
- when fastening, the distance between the screws should be 30-35 cm, while there should be at least 2 cm to the edge of the sheet;
- You need to leave a small gap (no more than 2 mm) between the gypsum board sheets. This is necessary to prevent deformation due to sudden temperature changes and high humidity in the room.
Installation of a plastic frame
Step 1. Installation of the plastic frame begins with attaching wooden retaining bars under the future profile. They are attached to the main ceiling using dowels. This is a simplified variation of the stiffening frame. You can replace it with metal U- and C-shaped profiles, but without experience it will not be possible to create such a structure. Therefore, it is better to use wooden blocks. They are attached with a space of 20-30 centimeters between each other.
Installation of bars under the profile
Another option is to install a suspended ceiling frame
Step 2. Now the plastic profile itself is installed along the previously drawn line. It is attached to the bars using ordinary wood screws. The ends of the plastic profiles are connected using an additional plastic insert. It should also be secured to the tree. The lower part of the plastic profile is covered with an angular flexible perforated insert - it is glued with polyurethane or glue with similar properties. This is done so that when the fabric is tensioned there are no sharp corners on which the elastic material can tear.
Prices for spotlights
spotlight
Installation of dividing profile
You can also use an aluminum profile - you need to cut it with a grinder, and you can’t rush here; the final cut is completed with a hacksaw
Step 3. During the installation of the plastic profile, it is important not to damage the communication cables (for example, fire alarms). They are either covered with a narrow plastic box or secured to the ceiling with staples. At the junction of the cable and the frame, a small incision is made in the latter.
Step 4. The plastic profile sets the height of the lower level of the future ceiling. Be sure to check the reliability of the fastening. The best option is a point load of 15 kilograms. This safety margin will be sufficient even taking into account possible flooding from neighbors (if we are talking about an apartment).
Ready frame
Step 5. In places where the plastic comes into contact with the wall, the corners of the profile are cramped. It is more convenient to do this with a grinder with an emery sheet or a regular file. It is necessary to create a smooth bevel to the wall so that the point of contact is smooth, without a rough transition. At the point of contact, a metal profile with a harpoon is attached, since the tension material will also be attached along this line.
Options for finishing a suspended two-level plasterboard ceiling with lighting
In order for the two-level ceiling structure to be as smooth and beautiful as possible, after completing the installation work, the joints and seams of the drywall need to be primed. It is recommended to use a special putty composition for seams.
After the primer has dried, the application areas are covered with a thin layer of plaster. A special tape is applied to the wet layer, which needs to be slightly embedded in the primer. Particular attention should be paid to the screw heads; they are also puttied. After this, holes for lamps are cut out in places specially marked on the plasterboard.
The finishing depends on the chosen material. Often, GKD is covered with several layers of putty, after which it is cleaned with special tools to obtain a perfectly flat surface. You can proceed to painting the ceiling with water-based compositions with the addition of colored pigments.
You can also use fabrics, wallpaper, 3D paintings and other materials as finishing materials.
Tips for caring for a two-level plasterboard ceiling with lighting
Plasterboard multi-tiered structures have a long service life. In order for them to continue to delight the eye with their ideal appearance, they need to be carefully looked after.
Caring for KHF is quite simple. They should be wiped regularly with a dry cloth to remove possible accumulations of dust and dirt. You can also use a vacuum cleaner. If the consumer plans wet cleaning, non-aggressive detergents should be used. Before you start cleaning, the rag should be thoroughly wrung out, it should be barely damp.
Particular attention is paid to the location of lamps. Often, under the influence of lamps, GKO changes its color. This negatively affects the overall appearance. You can get rid of plaque and faded parts using special felt-tip pens, which can be easily found in any hardware store.