Wall decoration is one of the most important stages of renovation in an apartment, because they are the ones that immediately catch your eye. I want the home to have an atmosphere of comfort and beauty, and at the same time, so that the repair costs do not exceed the budget. One of the simplest finishing solutions is painting the walls. Anyone can do the work themselves, but still, it’s worth knowing a few rules of technology. We will look at how to paint walls correctly in this article.
Calculate the amount of paint
In order not to run to the store for the missing can, it is important to immediately estimate the required amount of material. To do this, you need to divide the area of the walls by the paint consumption, multiply by the number of layers and add 10–15% in reserve. As an example, let's calculate how much paint will be needed for a room (4.5 × 3 m) with one window (1.4 × 1.6 m) and a door (2.1 × 0.7 m). Ceiling height - 3 m.
First we find the total surface area. To do this, calculate the perimeter of the room and multiply it by the height of the ceilings.
(4.5 + 4.5 + 3 + 3) × 3 = 45 m²
Now let's determine the net paint area. To do this, calculate the area of window and door openings, and then subtract it from the total area of the walls.
45 − (1.4 × 1.6 + 2.1 × 0.7) = 41.29 m²
And finally, we will find out how much paint will be needed. To do this, divide the net area to be painted by the paint consumption per square meter (indicated on the label), multiply by the number of layers (usually two) and add 15% in reserve.
(41.29 ÷ 10) × 2 + 15% = 9.5 l
Next stage
If the original wall is smooth, the plaster on it has been preserved, the defects have been repaired, you can begin finishing. What it will be – puttying or covering the surface with decorative plaster – depends on the type of work chosen. In any case, smooth walls can already be prepared for painting. It’s another matter if they are so crooked that it is almost impossible to cope with them
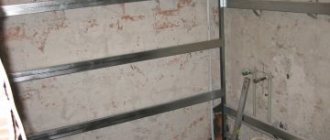
In this case, it is more advisable to pay attention to drywall. Using it you can level the surface quite simply and quickly.
True, then it will also have to be prepared for painting, but we will talk about this below.
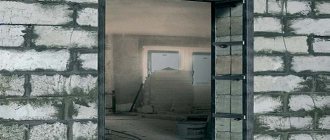
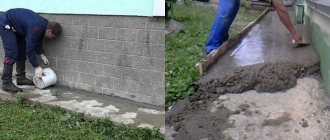
If you have removed all the old plaster, and in front of you is a bare concrete or brick wall, you will have to level it with plaster mortar using beacons. This is the most effective method that allows you to end up with a truly flat surface.
Remove or protect anything that gets in the way
Before starting work, you need to remove everything unnecessary from the room and protect surfaces that will not be painted from splashes.
Take out the furniture and all other items, and place what cannot be removed in the middle of the room and cover it with film. Wrap the heating radiators with it or remove them. Cover the floors with thick film or several layers of newspapers.
Illustration: Artyom Kozoriz / Lifehacker
Turn off the power to sockets and switches, remove their covers and cover them with masking tape. Also cover the baseboards, platbands, edges of slopes and other adjacent surfaces so as not to splash them.
Preparing the premises
Typically renovations are done in rooms filled with furniture.
It is advisable to take it out of the premises. The remaining items are moved away from the walls, grouped in the center, and covered with film. Painting boundaries and openings adjacent to the walls can be covered with masking tape. Protective equipment for the face and hands should be provided: gloves, goggles, respirator. The walls must be cleaned of old coating. If painting is provided instead of wallpaper, then it must be removed, carefully removing the residue. The walls are then inspected for damage.
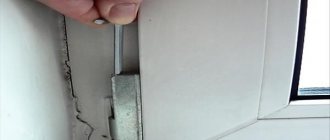
Even the most expensive paint will not hide the imperfections of the walls, and they can spoil the exquisite design. Therefore, small holes and cracks are filled with putty, after drying they are rubbed, then primed.
For grouting, you can use an abrasive mesh, installing it on a grinding machine or hand-held machine. These devices will help make the surface perfectly smooth.
The purpose of the primer is to remove dust and seal the surface layer. It improves adhesion. After priming, it is possible to identify small blemishes - scratches, bumps. They need to be eliminated by cleaning or puttying. Then you need to sand and prime again. When the primer is dry, you can proceed to painting.
Prepare the walls
Illustration: Artem Kozoriz / Lifehacker
When painting, the surface must be perfectly flat. Otherwise, the paint will lie unevenly and all the flaws will then appear even more pronounced.
Use a spatula to remove layers of old paint and wallpaper and clean the surface well. Putty all the smallest cracks, dents and irregularities, and after complete drying, sand thoroughly with fine-grained sandpaper.
What paint to paint the walls
The paint must have the following characteristics:
- Safety
- Durability
- Easy to care for
- Wear resistance
What paint is best to paint walls? Safety is the first criterion when choosing paint. A wide selection of compositions allows you not to fix your gaze on only one specific type. Don't be afraid to ask for quality certificates. Always check the composition, it should not contain toxic substances above the permissible limit. Some substances can be harmful not only during operation, but even after drying. Don't skimp on yourself and buy quality products.
According to its characteristics, the paint must have high characteristics so that its service life is not short. One of the most important conditions is resistance to mechanical damage. Of course, no species can withstand a strong blow, but it should not endure much damage. Otherwise it will start to crumble. Paint should not be afraid of light. Then it will not fade or fade and will serve you for many years.
Choose waterproof paints. At first glance, this condition seems decisive only when painting walls in damp rooms. But if the paint does not like water, then it is not recommended to wash it. And to do only dry cleaning is just to drive away dust. You will have to clean such a surface carefully, and if stains appear, you are unlikely to remove them. In addition, moisture-resistant types have higher characteristics, so it is better to buy them.
If you are wondering how to paint the walls in a room with your own hands, then another selection criterion is drying time. The paint is applied in several layers; if it dries for a long time, the repair may take longer. Therefore, purchase paints that dry quickly enough.
woman paint on wall
The more expensive the paint, the better it is. But not everyone is ready to spend money. In fact, by purchasing cheap paints, you may not save money, the point here is in expense. Manufacturers indicate how much paint is required. Low-quality and cheap ones are quickly absorbed into the walls, and sometimes it even needs to be applied in three or four layers before it takes on the desired look. Therefore, pay attention to the manufacturers' instructions on material consumption.
Apply primer
Illustration: Artem Kozoriz / Lifehacker
Before painting the walls, you should definitely prime them: after this treatment, the paint will lie smoother and will adhere better. In addition, by reducing surface absorption, paint consumption will be significantly reduced.
Using a wide, medium-nap roller, apply primer to the walls. Make sure that there are no untreated areas. Don't rush and don't let it drip. Let the soil dry completely. This usually takes about 2 hours, the exact time is indicated on the label.
Features of painting walls of different materials
To get the desired result after painting, work must be performed taking into account the characteristics of the base. After all, each material requires compliance with a number of nuances.
To get the desired result after painting, work must be performed taking into account the characteristics of the base.
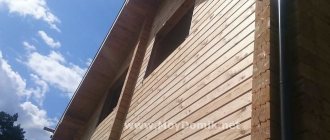
Wooden walls
Step-by-step instructions for working with wood include the mandatory application of a primer. The paint should be selected with good vapor permeability.
The paint should be selected with good vapor permeability.
Brick walls
Cleaning the surface with water is carried out seven days before painting. The walls are primed. Brickwork can be painted with acrylic and alkyd paints.
Brickwork can be painted with acrylic and alkyd paints.
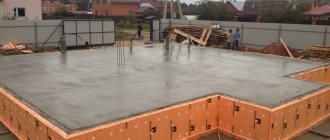
Concrete walls
Concrete will absorb all the paint if it is not treated with a deep penetration primer solution. Latex and epoxy paints are suitable.
Concrete will absorb all the paint if it is not treated with a deep penetration primer solution.
Wallpaper
Painting over wallpaper makes it possible to repaint it at any time. For this purpose, a water-based type of paint is chosen; the water base eliminates the presence of thinners.
Painting over wallpaper makes it possible to repaint it at any time.
Drywall
Drywall is a material onto which a putty, plaster and primer solution is applied before painting. Products based on acrylic and silicone can be selected.
Drywall is a material onto which a putty, plaster and primer solution is applied before painting.
Plaster
It is necessary to create a perfectly level surface and remove all minor flaws. Two coats will be required to cover the porous structure.
It is necessary to create a perfectly level surface and remove all minor flaws.
Prepare the paint
Illustration: Artem Kozoriz / Lifehacker
Mix the paint thoroughly with a wooden spatula for a few minutes. You can use a mixer, but at the lowest speed to prevent the formation of bubbles.
Fill the tray with paint about a third: if you pour more, dipping the roller will be inconvenient. Immediately close the jar tightly to prevent the paint from drying out.
If you wrap the tray in a layer of foil, then after work it will be enough to remove it and throw it away. The bath itself will remain clean.
Do not submerge the roller completely. Roll it several times over the surface of the paint and then over the top of the tray to evenly distribute the material. Pre-moisten the roller in water and squeeze it out: this way the paint will better saturate the coat and will be applied well to the wall from the very beginning.
Expert tips for painting walls with your own hands
To make painting easier, you need to pay special attention to surface preparation. In this case, if the wall requires leveling, you can resort to the services of craftsmen. When choosing a coloring agent, the type of base is taken into account; carrying out the work also requires knowledge of the intricacies of working with different materials, they were described earlier.
To make painting easier, you need to pay special attention to surface preparation.
Painting the surface is a quick and easy option to update the interior of a room. The construction market offers a huge number of different types of coatings. If desired, you can create not only a smooth coating, but also a textured one. It is important to follow the instructions to get the desired result.
Lay down the corners
For better results and faster work, first carefully paint all the corners and contours of the junctions, and then the main surface. There are two main options for performing layering.
Illustration: Artyom Kozoriz / Lifehacker
First: using a small brush, slowly paint 5-7 cm wide stripes along the ceiling moldings, in corners, at baseboards, and around radiators, sockets and switches. To protect the ceiling, you can seal the spatula blade with masking tape and, placing it in a corner, calmly paint with a brush.
Second option: cover the junctions with the ceiling and other surfaces with masking tape, smoothing the joint well with a spatula so that paint does not flow there. There is no need to smooth the entire surface of the tape, otherwise the tape will be difficult to remove later.
The adhesive tape on the ceiling can additionally be painted along the edge with white paint: this way it will immediately fall into the gap and after painting the wall with a different color the border will be perfect.
Compositions for the kitchen, hallway and bathroom
Water-based acrylic and silicone paints are suitable for hallways and kitchens. They are resistant to abrasion and can be washed. A pronounced relief in the kitchen will be inappropriate, as it will be more difficult to maintain cleanliness. And with mother-of-pearl stains, the room can be made visually more spacious.
But for the bathroom you need to choose paints that are resistant to temperature and moisture. The options listed below are best suited for these purposes, but not for painting the walls in the room:
- Alkyd. They resemble oil compositions in consistency, but differ greatly in performance characteristics. Painted surfaces withstand elevated temperatures, high humidity, and exposure to ultraviolet radiation. Vapor permeability is average, can be applied to metal and wooden elements. The alkyd mixture can be matte, glossy, or semi-matte. Among the disadvantages: it is diluted with organic solvents, which cause a characteristic pungent odor. Inexpensive option, but not particularly durable.
- Based on silicates. An excellent choice for the bathroom. Thanks to the special chemical composition, you don’t have to worry about mold or mildew forming on the walls over time. The result is a durable and strong coating with very high vapor permeability. While the composition dries, it is harmful to health - this is a big minus. You must work in protective clothing. Silicates are not compatible with other types of coatings, so they are not applied to surfaces that have previously been painted with other paints (it will need to be completely removed).
Painting design
There are a lot of options for painting walls in an apartment. You need to find the right combination of colors, but often this is a matter of taste. But different methods of combined painting can significantly change the home interior.
Horizontal division into zones
It is considered the traditional way. More often, the room is divided into two zones: the bottom is painted with dark shades, the top is painted with light shades. Classic: divided in height into three parts. Here the bottom is decorated with a dark shade, and the two upper parts of the walls are decorated with light shades. If you want to decorate the walls with dark shades almost up to the ceiling, then you need to remember that this technique will visually make the ceiling lower.
If you paint on your own, it is difficult to achieve a perfect border between two colors. But you can decorate the imperfections with the help of moldings. Or, before applying other colors, you can carefully stick masking tape along the entire length, helping yourself with a level. After coloring, the tape is removed and a perfect line is obtained.
The use of moldings can be classified as classic; it is acceptable for country and ethnic styles. But the design with a shiny stripe or just clear boundaries is closer to hi-tech or minimalism.
Accents with flowers
Accentuating a wall is a fashionable technique when decorating a room. One of the walls is highlighted in a different color. This is usually a darker tone of the background color or a color that matches the background color. Both options look attractive if you choose the right details. This is an easy way to transform your interior, making it brighter.
But in the bedroom it is advisable not to use harsh combinations - the atmosphere there should be soft. Sharp contrasts look good in children's rooms and living rooms.
Stripes on the walls
The “Horizontal Stripe” color type is appropriate when you need to draw attention to certain decorative elements. A fairly wide strip is placed at eye level
This technique is suitable for a hallway: when the ceiling height is lowered, the corridor itself visually becomes wider.
Striped walls are also a very interesting design technique, but it’s better not to use it throughout the room. But it’s suitable for accenting one wall. An interesting effect will be achieved by combining stripes of the same color, but with different textures - glossy and matte.
Highlighting interior details is a technique that is used very often. Sometimes some details are emphasized with a calmer or brighter color: frames, niches, space for placing a beautiful decorative shelf. A popular option: outline the walls with a strip of dark color, highlighting all the corners. A small room will immediately become visually more spacious: it will “expand” both in width and height.
https://youtube.com/watch?v=N6Q707a8UB0
Apply the first coat of paint
Illustration: Artem Kozoriz / Lifehacker
Before starting work, you should close the doors and windows to eliminate drafts and maintain humidity - this way the paint will dry more slowly and evenly. Additionally, you can spray water with a spray bottle, and also cover the windows with film to protect them from direct sunlight.
If the paint is thick, then for the first layer it can be diluted according to the instructions on the can - usually add 5-10% clean water to the total volume. To avoid streaks, do not skimp and put enough paint on the roller.
Cut the pile at the edges of the roller at an angle of 45°, and the joints of adjacent strips will not be so noticeable.
Start coloring from the corner. Using a roller extension, roll continuous strips from the ceiling to the floor without stopping. Each subsequent strip should overlap the previous one by 3–4 cm.
Spread the paint evenly, being careful not to make the layer too thick. Gradually move from one corner to another. Don't stop until you finish painting a wall before moving on to the next one or taking a break.
Surface Preparation Tools
The list of tools that will be needed to prepare walls for painting depends on the material of the old finish - it could be a layer of plaster, paint, ceramic tiles, or one of the types of wallpaper.
If the walls are covered with plaster that is not applied evenly enough or has begun to peel off from the wall surface, then it must be completely removed. To do this you will need the following tools:
A simple, but very useful tool for the household - a chisel with a plastic shield protecting the hand
— a chisel with a protective plastic handle, or a hammer drill with appropriate attachments;
- hammer;
Brush with metal bristles. There may be varieties for installation in a drill chuck or for an angle grinder
- a metal brush attachment for an electric drill or grinder;
- soft brush for removing dust.
- If the wall is being cleared of old ceramic tiles, the same tools will be required for this process.
- Old paint is removed from surfaces in different ways, using special solutions or tools. The latter include:
A hair dryer is a great helper when removing old layers of paint.
- construction hair dryer, scraper, chisel and spatula, 120÷150 mm wide;
- a metal brush attachment for the drill and a soft brush for removing dust.
To remove whitewash from a wall, you will need a large sponge, a spray bottle or a paint roller with a fluffy nozzle to wet the coating, as well as a spatula or scraper.
Some types of old finish require a lot of moisture to remove. A roller with thick pile or a foam attachment can be used.
To remove wallpaper from walls, different methods are also used, and therefore different tools:
The simplest set of tools for removing old wallpaper
- the simplest and most accessible tools for removing old wallpaper are a spatula and a spray bottle with warm water;
Professional finishers often have in their “arsenal” such a specific tool - an old wallpaper steamer
- a more expensive tool for cleaning surfaces from this material is a steamer, which allows you to remove the old coating without much effort;
- needle roller.
After removing the old finish, the stages of leveling the walls and their final “finishing” follow. All this also requires a certain set of tools.
- Building level and plumb line to control the evenness of the walls.
- Rule for leveling plaster.
- Brush and roller for applying primer.
- Wide and medium-sized spatula - for filling surfaces.
- A hand grater or sander (eccentric, belt or vibrating) with a set of appropriate sandpaper or mesh - for processing and sanding leveled walls.
- An electric drill with a mixer attachment and a container for mixing the solution.
The work ahead will be very dusty. Therefore, to ensure personal safety, respiratory, eye and hand protection must be worn when performing wall cleaning work. This is especially true if chemicals are also used for cleaning.
Apply a second coat
Illustration: Artem Kozoriz / Lifehacker
You can start painting the next layer only after the previous one has dried, otherwise the roller will tear off the paint and all the work will go down the drain. In the warm season, it usually takes about 2 hours; for the exact time, see the instructions for the paint.
The second layer should be painted in exactly the same way as the first, the only difference is that the paint no longer needs to be diluted.
Surface treatment process
Before you start painting the surface, you need to carefully prepare the walls. The preparation process consists of 3 stages:
- The walls are cleaned of old paint or wallpaper. If the surface was previously covered with a water-based composition, remove it with a wet sponge. The enamel or oil coating is cleaned off with a spatula.
- Padding. A primer is a special material that is used to treat the base before finishing work. After priming, allow the material to dry for 6 hours.
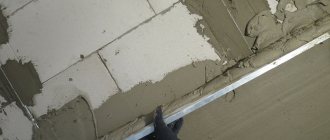
- Puttying and leveling the surface. If the walls are built of brick, putty is applied directly to it. For concrete walls, plastic mesh is used. Detailed recommendations on how to putty and evenly paint walls can be found here.
Once the surface is prepared, begin preparing the paint. The water-based composition is mixed with water, other types of paints are poured into a painting tray.
You should start painting from the area near the door jambs with a roller for narrow surfaces. Then hard-to-reach places are painted with brushes:
- baseboards;
- decorative elements;
- area behind the batteries.
In order not to stain the jambs, they are covered with masking tape. The furniture and floor are covered with plastic film.
Having finished with hard-to-reach places, they move on to painting the walls with a roller. The work takes place in 2 stages - from bottom to top, then vice versa. After the first layer has dried, apply the second one - across, from right to left, and vice versa. They start painting from the window, smoothly moving towards the door.
We recommend watching a video on how to prepare and paint walls:
Concrete
Before painting a concrete surface, it must be prepared. The wall is washed with soapy water to remove dust and dirt. If there is a rusty coating, it is removed with a solution of copper sulfate.
Paint can be applied to concrete walls immediately after priming or putty. It is not necessary to plaster the surface if you want to preserve the visible structure of the coating. However, it is worth choosing the compositions for impregnation and primer more carefully in order to fix the paint well.
The following types are used for painting concrete bases:
- epoxy - protects against moisture, but cracks over time;
- acrylic - dries quickly, is economical in consumption, but has a short service life;
- glossy - environmentally friendly, but sensitive to mechanical stress.
Advice
If there is a need to fight fungus, any paintwork material with antibacterial components will do.
Brick
It is recommended to paint brick walls with water-soluble compounds. For work use a roller or brush.
For high-quality painting you need to apply 2-3 layers. Before applying the next layer, you need to wait until the previous one has completely dried. Water-based compositions dry within 3-4 hours.
The wall is painted horizontally according to the texture of the masonry. The corners are treated with a narrow brush. The work is carried out with acrylic or alkyd paints. The coating is updated approximately once every 5 years.
Remove the masking tape
Illustration: Artem Kozoriz / Lifehacker
After everything is painted, it is important to remove the tape that protects the contours and junctions of the walls. This should be done 15–20 minutes after applying the second layer. If you hesitate, the paint will dry out and the masking tape will tear it off. Be careful not to damage the paint edge.
It takes about a day to dry completely, depending on the temperature in the room and the type of paint used.
How to paint the walls in an apartment with your own hands
Before painting the walls, they are prepared, the rules of work were described earlier. Painting tools include brushes and rollers. It is better to paint the main part of the walls with a roller with a long handle; hard-to-reach places are treated with brushes. Some paints can be applied with a spray gun. Usually two layers are done so as not to leave unpainted areas.
Some paints can be applied with a spray gun.
How to quickly make a convenient textured decorative roller
It is permissible to make a roller for original wall painting yourself. There are many features to consider.
From the rope
To do this, you should take an ordinary clothesline or lace. The more often you wind the lace, the denser the pattern will be. It is acceptable to make intersections and other patterns. As a result, it is possible to obtain a three-dimensional drawing.
With a knife
Use a sharp knife to cut strips or other shapes on the foam roller. The larger they are, the better the texture of the drawing will be.
Using a plastic bag
This is the simplest and most accessible method. An old roller will do for this. It is recommended to attach a wrinkled bag to it. Folds help create a complex pattern. Instead of a bag, use scraps of fabric, rubber bands, and paper.
From a rubber roller
To do this, take a rubber roller and cover it with a pattern. Then cut it out with a knife. It is also permissible to use ordinary rubber with a thickness of at least 5 millimeters.
From foil
To do this, you should take thick foil, a hook and putty. First, the foil is covered with a pattern. Then use a crochet hook to squeeze out relief patterns on the surface. Cover the back wall with putty and press it to the roller. Leave the workpiece to dry. Finally, the foil is glued to the roller.
Made from thin rubber
First you should prepare thin rubber. In addition, you will need silicone sealant. You will also need a marker. The rubber should be cleaned and degreased. Apply the design and follow its contours with sealant. Finally, the rubber sheet is glued to the roller.
Wooden rolling pin
This is the most suitable tool. First, remove the handle so that the cylinder remains. After this, make a hole in the center and place a rod in it. Wire is also suitable for this purpose.
Methods of painting a brick wall
Although brick itself is very beautiful and aesthetically pleasing, sometimes it may be necessary to paint a brick wall. The main difficulty is the heterogeneity of the brickwork - the seams crack over time and do not hold paint well. To do this, all joints are first sealed with cement and plaster. Lime stains and other contaminants are removed, the surface is washed, degreased with a solvent and dried.
A primer is required; it will fill all the pores and bind the solution in the cracks, improving paint adhesion. Apply a layer of 1-2 mm evenly over the entire surface. We use ordinary water-based acrylic paint, but the roller and brush should be as hard as possible - due to unevenness they will wear out more. Painting with silicate and latex compounds is allowed. In some cases, clear varnish may be used to highlight the texture of the brickwork.
Guide to types of coloring compounds
A beautiful wall design can be achieved if you select the compositions in accordance with the chemical structure.
Oil products
Oil paints are made on the basis of mineral and vegetable solvents. After application, the oil components oxidize and, after drying, form a film. The coating has insufficient durability characteristics - after a certain time it peels off or flakes off.
The compositions have one more drawback - the film does not allow moisture vapor to pass through, so it is difficult to maintain a normal microclimate in the home.
The inexpensive cost allows you to use the products in large quantities, but they are not suitable for painting walls in an apartment.
Paints made from alkyd resins
Their consistency is similar to oil, but the binding component is extracts from soybean and linseed oil. Organic solvents are used - gasoline, turpentine. The advantages of the compositions include:
- rapid evaporation without the release of harmful substances;
- formation based on durable film;
- brightness, resistance of the finish to moisture, temperature fluctuations, ultraviolet radiation;
- excellent hiding power - the paints will create a dense, bald spot-free coating;
- ideal for kitchen or bathroom;
- Manufacturers' range of products includes alkyd products with a matte or glossy effect.
The disadvantages of coloring mixtures are low vapor permeability, the possibility of fire and the strong smell of solvent when applied.
Specifics of silicate products
The peculiarity of silicate paint is that it is made on the basis of mineral “liquid glass”. The durability of the coating allows you to realize any design ideas. Silicate products withstand abrasive influences, exclude the penetration of mold and mildew, and do not require the use of an antiseptic primer.
Always take into account the specifics of painting work with silicates:
- use gloves, protect your respiratory and vision organs - the paint contains a high concentration of alkalis;
- choose an alkaline-based tint - the rest will only spoil the composition;
- Before painting, completely remove the old layer from the surface.
Characteristics of water-soluble products
The solvent of the products is water, in which the remaining components are present in the form of dispersions or emulsions:
- binding elements - create a film, ensure a tight fit and adhesive properties of the material;
- pigments - the composition is painted in a certain color;
- fillers - mineral or quartz dust, crumbs, talc, which give the surface a certain texture;
- plasticizer additives – regulate the processes of liquid evaporation and polymerization.
The type of product depends on the film-forming substances.
Polyvinyl acetate compounds
Water-based paints are made on the basis of PVA glue and are economical in use.
Advantages:
- inexpensive cost;
- painting walls with water-based paint is quick;
- easy to wash off skin and instruments;
- environmental friendliness - no unpleasant odors or toxins in the composition;
- good adhesive properties;
- ease of tinting.
Minuses:
minimal moisture resistance.
Styrene-butadiene colorants
Made from a type of artificial rubber, they are rare.
Advantages:
- versatility - can be applied as a primer;
- resistance to abrasion and wet environments.
Minuses:
turn yellow from ultraviolet rays.
Latex products based on water dispersion
Water-dispersed products contain latex film-forming components.
Advantages:
- formation of a waterproof film after polymerization;
- minimal vapor permeability;
- possibility of masking cracks up to 1 mm wide;
- moderate hiding power;
- the best choice if you need to paint the ceiling;
- after applying 2 layers, the painted walls in the interior look like silk upholstery.
Minuses:
- high price;
- difficult to wash off hands and tools.
Silicone products
Universal compositions used for painting walls in an apartment or finishing the ceiling.
Advantages:
- excellent hiding power;
- masking cracks with a width of 1.5 to 2 mm;
- resistance to moisture, abrasion, dust;
- vapor permeability;
- durability of the finish;
- environmental friendliness;
- ease of use.
Minuses:
are expensive.
Acrylic dyes
Acrylic is an ideal option for decorating rooms and is therefore popular among professional builders and beginners.
Advantages:
- ease of tinting;
- resistance to sunlight;
- abrasion resistance;
- Can be used on ceiling and wall surfaces.
Minuses:
fill only thin cracks (up to 0.5 mm).
More information about types of paints
The following types of paints exist:
Emulsion. They have very good reviews from consumers, as they do not smell, dry quickly, and are economical in consumption.
Belife spray paint - everything you need to knowWhich parquet varnish is better to choose - advice from professionals on choosing varnish and manufacturers’ ratings for 2021
Which solvent is better to choose - features of choice, characteristics and tips for use
Acrylic. Durable, UV resistant, diluted with water, but not used in wet areas.
Latex. They are used for wallpaper for painting, do not smell, dry quickly, and mask minor irregularities. Disadvantages: they are afraid of light and are expensive.
Water-based. Used for painting plastered walls and ceilings. The texture resembles whitewashing with liquid lime. They dry quickly, but smear after drying and are not resistant to abrasion.
Water-dispersed. Used for wet areas. afraid of sub-zero temperatures.
Silicone. Due to their increased elasticity, they mask cracks and chips well, but take a long time to dry.
Quick-drying, odorless paint for interior work - main types, selection tips and benefits of useThe best aerosol paint in cans - main types, application features and advantages of use
The best water-based paint - ranking of the best manufacturers of 2018
Alkyd. These are the usual oil and enamel. They give a shiny surface, are resistant to abrasion, and are not afraid of moisture. They have a very pungent odor, have a negative effect on the human body, and take up to 2 days to dry.
The texture of the paints is smooth, glossy, embossed, imitating natural texture.