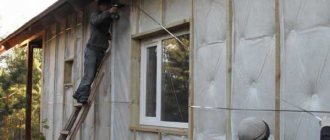
If during the cold season the electric heater in the house does not turn off, and mold has grown on the walls due to dampness, it’s time to think about thermal insulation. The most popular method is to line the building with insulating material on the outside.
However, this option is difficult to implement in apartment buildings. Therefore, residents are wondering whether it is possible to insulate the interior with penoplex in order to retain heat in the apartment without disturbing the aesthetics of the building.
In an apartment, using penoplex you can insulate the walls, floor, and balcony.
General information
Previously, foam plastic and glass wool were used for such work. From the point of view of reliability, moisture resistance and heat-saving properties, there are no complaints about these materials. But glass wool contains harmful substances that, if inhaled, can cause an allergic reaction or poisoning. Extruded polystyrene foam developed in Russia is safe for health and easy to use.
There are products from different manufacturers on the market.
Preference should be given to brands whose names are associated with high-quality and reliable building materials.
The influence of production technology on harmful properties
During the creation process, expanded polystyrene is subjected to melting and chemical treatment. It acquires a dense, solid structure and loses its negative properties, i.e. stops releasing any harmful fumes into the air.
Unlike glass wool and low-grade foam, the material obtained as a result of extrusion is environmentally friendly and can be used in rooms where small children or allergy sufferers live.
Characteristics and properties of penoplex
Depending on the installation location, there are 4 types of penoplex: for roofing, for walls, for foundations and universal. The color is the same, orange, but the design is slightly different. For example, wall panels have ribs to improve adhesion to the surface.
The qualitative characteristics of penoplex make it a universal insulation material.
The main characteristics of the material include:
- low ability to absorb and retain moisture;
- no loss in thermal conductivity coefficient during the service life;
- resistance to water vapor;
- extended service life - up to 50 years;
- flammability class - G1-G4;
- Possibility of installation in rooms with temperatures -50…+75°C.
Penoplex - use correctly
The name Penoplex hides ordinary extruded polystyrene foam, which, as you know, has its own area of application. But the advertising pressure of the brand is so great that many already take it for granted to use Penoplex everywhere. And therein lies a serious mistake - firstly, significant money is spent without any benefit, and secondly, damage is caused to the structures of the house. But first things first…
The common joke about the misuse of “Snickers and Tampax”, due to a lack of understanding of what is hidden under these names, accurately describes the situation with Penoplex. Blindly following advertising brochures leads to ambiguous situations.
Is it profitable to use
Standards recommend that private owners create economically feasible insulation so that it pays off at current energy prices over a certain period of time - up to 12 years. Therefore, in the design documentation for private houses and apartments, heat insulators are laid out that are quite reliable (durable), but at a reasonable price - insulation should be beneficial for the owner.
You won’t find too expensive foam glass in projects. But cheap high-density polystyrene foam (foam) is widely used. In house designs, extruded polystyrene foam is used strictly for its intended purpose.
No one will use extruded polystyrene foam where polystyrene foam, which is much cheaper, can be used. Otherwise, the meaning of insulation is lost - it simply will not pay for itself in normal terms, and violation of the standard threatens with deprivation of the design license, for example.
What makes extruded polystyrene foam special?
Penoplex production is carried out using the extrusion method, which was first used in the USA half a century ago. Polystyrene foams through a chemical reaction under high pressure and high temperature. As a result, very small cells are formed in the material - up to 0.2 millimeters, with almost identical dimensions. And also completely closed, unlike polystyrene foam.
Extruded polystyrene acquires the following distinctive properties:
- Increased compressive strength - from 0.2 MPa to 0.6 MPa, depending on the density, which can range from 25 kg/m3. up to 50 kg/m3, the densest ones can be laid under the pavement of the car path.
- Almost zero water absorption - can be used in the ground without protection.
- Almost complete absence of permeability to water vapor - on a wall made of any ordinary building material, a layer of extruded polystyrene foam with a thickness of 2 cm will act as a vapor barrier.
Where and when is it correct to apply this thermal insulation material?
Sheet sizes, types
Penoplex is produced under the names “Wall”, “Foundation”, “Roof”, “Road”, “Universal”... From name to name the density varies mainly from 25 kg/m3. for “Wall” up to 40 kg/m3. for “Road” and, accordingly, the strength of the material.
The standard density of conventional extruded polystyrene foam for wide applications is 35 kg/m3. But in the case of Penoplex, for example, the “Universal” type, somewhat contradictory data are given - density from 28 to 34 kg/m3.
The desire to save money in production is obvious - a weaker, lighter material with slightly increased water absorption is proposed. as if “Economy-Light extruded polystyrene foam”.
But it is likely that other manufacturers’ products may be “lightweight” or may not even meet the stated technical characteristics...
The dimensions of the Penoplex insulation sheet are usually 600x1200 mm. The thickness varies, maybe 20, 30, 40, 50, 60, 80, 100 (mm).
Application errors
A typical mistake in using Penoplex is more likely to do with belief in some “miraculous” properties of the material, or with the usual reluctance to delve into questions.
Nomadic teams of insulation workers impose their opinions on thermal insulation, seeking their own benefit. Penoplex is often imposed as a more expensive material for insulating walls, floors, and roofs, instead of foam plastic or mineral wool that is economically or technically feasible.
And so that the owners do not find it too expensive, they simply use sheets 20 mm or 30 mm thick to insulate the walls.
The heat saving effect from such a thin layer is minimal, or even practically unnoticeable. And the significant costs for gluing and plastering using the Wet Facade technology are wasted money.
Damage
Thus, heat insulator extruded polystyrene foam glued to a large area of walls causes significant damage to the owners.
In addition, only very dense concrete can withstand vapor barrier almost painlessly. Brick and porous materials will easily acquire high humidity, the same as indoors, which is not very useful. And in cases of poor-quality gluing, along the edges of the area, or some kind of steam leaks through the outer shell, it is quite possible that the wall will be soaked with condensation formed at the border of the wall and the insulation.
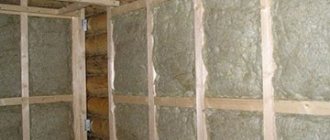
Also, in rafter systems, in wooden floors, in contact with wood, experts generally recommend the use of vapor-permeable insulation, ventilated from the outside, ensuring the durability of the structure.
In addition, polystyrene foam indoors is unsuitable for fire requirements and is extremely dangerous when melted, without being fenced off from the living space by a fireproof partition...
How to use Penoplex for insulation
Penoplex, like any other extruded polystyrene foam, in accordance with the manufacturer’s recommendations, is well suited for insulating the soil around the house when constructing shallow foundations. Placed under the blind area, it will reliably protect the soil from precipitation and frost.
To insulate foundations, it is recommended to use extruded polystyrene foam. At the same time, it is glued to the coating waterproofing, forming with it a durable heat-insulating and water-resistant layer.
It is important to glue the seams (tongue and groove) between the insulation boards.
Where Penoplex should not be used
But extruded polystyrene foam cannot be used with materials that destroy it.
What should Penoplex not be used with? — the following are substances with which extruded polystyrene foam should not come into contact.
The following is a list of substances that are allowed for contact.
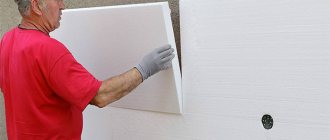
If you want to stick it on the wall...
If, for some reason, a decision is made to insulate the walls with penoplex (possibly due to the manufacturer’s statements about the great durability of the material...), then the wet facade technology must be done at least correctly.
- The torn insulation layer from below and above must be protected by appropriate strips.
- A flat, durable wall surface is provided on which the sticker will be applied.
- The sheets are glued with the appropriate glue, with the maximum-largest area of close contact with the wall on the glue... And also much more....
More details on how to insulate the facade of a house and other walls using wet facade technology yourself can be found here....
Key Benefits
Along with durability, soundproofing properties and ease of installation, extruded polystyrene foam has an impressive range of advantages.
Permeability
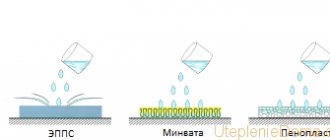
Foam plastic, like many other porous materials, allows moisture to pass through. There are voids inside it, which, when gradually filled with moisture or steam, worsen the thermal insulation properties. Penoplex is free from this drawback due to its integral structure. It absorbs moisture on average 10 times less than foam.
Mechanical strength and safety
The integrity of the structure affects the strength characteristics of penoplex.
With temperature changes and increased pressure during vertical installation, it does not crumble, deform or shrink like glass wool.
The flammability of the material is determined by the manufacturer. Depending on what processing was carried out during its creation, a class is assigned from low to high flammable. When purchasing, you should study the technical description of the goods and choose the safest one.
The undoubted advantage of penoplex is its non-toxicity.
The best option
A comparison of the advantages and disadvantages of various materials allows us to conclude that extruded polystyrene foam is the most suitable option for insulating rooms from the inside, loggias, floors, roofs, garages or verandas.
Medium thickness slabs (40 mm) are conveniently and securely installed on wood, concrete or brick surfaces.
Penoplex inside the walls
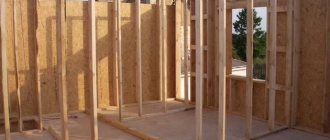
Frame houses
Penoplex as a wall insulation inside has found the most beneficial application. In a frame house, the main heat-protective function is assigned to it, and this material fully justifies itself. For internal wall insulation, the thickness of penoplex is calculated based on the climatic conditions of a particular region. For Moscow, for example, they recommend at least 100 mm for foam insulation inside the wall structure and 150 mm for the roof.
When building a frame house, to protect the insulation from external influences, it is usually necessary to have a vapor barrier film, a windproof membrane, and leave a ventilation gap for ventilation. Internal wall insulation with penoplex does not require their use during the construction of the frame. Almost zero moisture absorption, low vapor permeability combined with high density - these are the qualities of this insulation, thanks to which it itself protects from wind and moisture. However, despite the fact that there is penoplex inside the walls, it would not hurt to additionally insulate them from steam from the side of the room in order to definitely prevent the load-bearing wooden structures from getting wet. Penoplex insulation inside the wall, complemented by high-quality external finishing, ensures good heat retention in the house.
Well masonry
When constructing brick walls, well or layered masonry is often used. As the name suggests, it contains three layers. The first one is concrete, aerated concrete or brick, the middle one is penoplex as insulation and the outer one is brick. This entire structure is held together with embedded parts, and a straightening gap is left between the insulation and the external masonry, which is filled with dry sand. Well masonry is easy to use, durable and can significantly reduce the thickness of the brick structure.
Sandwich panels
It is worth mentioning separately about sandwich panels. Their use is a modern option for quick construction and at the same time internal insulation with penoplex, which is sewn between two profiled steel sheets. It can be other materials - OSB boards on one side and plastic “tile-like” on the other, etc. Panels with insulation are attached to the frame and can serve as both external walls of the building and interior partitions. In addition, sandwich panels with penoplex are used not only for internal insulation of walls, but also for external insulation and finishing of facades.
Types of penoplex
Based on technical features and installation location, penoplex is divided into several types:
- “C” - used for thermal insulation of rooms on the ground floors, walls and room partitions;
- “F” - used for insulating foundations and basements;
- “K” - installed on roofing structures;
- “Comfort” - used when arranging loggias and free-standing small buildings;
- “45” (density 35 - 47 kg/m³) - suitable for thermal insulation of industrial structures, used at airfields and in civil engineering.
Main types of penoplex.
PENOPLEX COMFORT® - wide-profile thermal insulation
This brand of thermal insulation is used where special conditions are not required: for insulating balconies/loggias, walls of apartments and houses without subsequent finishing with plaster or tiles; in some cases (at low loads) they can be used for thermal insulation of heated floors. If necessary, PENOPLEX COMFORT® will replace PENOPLEX®WALL slabs. You can create the surface roughness with your own hands - to do this, make notches on the surface using a fine-toothed hacksaw. However, it is better to work with a factory-quality rough surface.
PENOPLEX® slabs will provide a high level of thermal protection for any building envelope whose surface allows the installation of sheet materials. For thermal insulation of hard-to-reach places and structures with complex geometric configurations, we recommend using spray insulation of our own production PENOPLEX®FASTFIX®, which also has high heat-shielding properties and other advantages.
Subscribe to our Telegram channelExclusive posts every week
Material selection criteria
In order for the insulation to serve for a long time and justify the money invested in it, you should check whether it complies with GOST. Sometimes manufacturers offer products that are made in accordance with their internal requirements, but have passed state certification. In this case, the properties of the material may differ from generally accepted ones and require careful study.
It is recommended to touch the material before purchasing. It should be durable and not deform from light pressure. You should evaluate the storage location of the product, its protection from sunlight and possible exposure to solvents (acetone, petroleum products, etc.).
Before purchasing penoplex, you need to check the certificates of conformity.
The thickness of sheets of the same type must be the same. Pay attention to the fire safety mark. If, as a result of finishing, it is necessary to enhance sound insulation, the layer of material should be thicker.
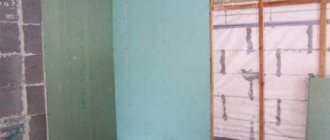
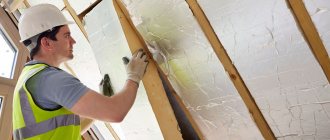
Internal wall insulation
Insulating walls from the inside with extruded polystyrene foam is the most successful option. The sequence of work is as follows.
Preparation
The surface for installing Penoplex should be as flat as possible. Therefore, the walls are first thoroughly cleaned of old finishes. Then it is better to plaster them to smooth out all the unevenness. For stronger adhesion to the insulation, the surface of the walls must be primed.
Laying slabs
The insulation sheets are fastened using adhesives and dowels. It is better to apply glue both to the walls and to the insulation. It is important to install the slabs as closely as possible to each other. If gaps form, they are sealed with pieces of thermal insulation material.
Reinforcing layer and finishing
To enhance the strength of the structure, a reinforcing mesh is installed on top of the insulation, after which the surface is leveled with an adhesive composition. You can move on to decorating the walls. Drywall sheets are often used for this.
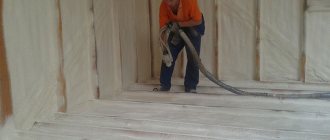
Penoplex is thin and easy to work with. All activities can be carried out at any time of the year. The work can be done with your own hands, since there is no need to use scaffolding, scaffolding, etc. When using Penoplex, you can insulate rooms from the inside in certain areas, for example, in the corner part of an apartment or at the junction of a balcony or loggia.
Penoplex, in addition to excellent thermal insulation qualities, has the ability to suppress noise. Therefore, its use is also justified for walls between neighboring apartments.
In rooms with high humidity, a layer of thermal insulation with Penoplex is supplemented by laying a vapor barrier made of foil film. The vapor barrier layer is fixed to the insulation, with the shiny side facing the inside of the room. This insulation technology is suitable for kitchens and bathrooms, but they require a forced ventilation system.
Sequence of work
If you decide to carry out the insulation work yourself, it is better to study in advance and subsequently follow the procedure for performing the work.
Insulation calculation
First, determine the required thickness of the sheets. The final consumption of material depends on it. The thermal resistance indicator (in Russia it ranges between 3.5 to 4.6 m*K/W) is divided by the thermal conductivity coefficient of penoplex slabs. The second parameter is found in the characteristics of the material.
After taking measurements of the insulated room, the required amount of material is calculated. When purchasing, it is recommended to make a reserve of 10-15% to compensate for possible losses from defects or installation errors.
Required tools and materials
If work is carried out on the ceiling, scaffolding will be required to avoid the collapse of the structure. In all other situations, a basic set of tools is sufficient:
- drill with hammer;
- hacksaw;
- sandpaper or fine construction grater;
- laser level;
- hammer;
- spatulas of different sizes.
A set of tools for laying penoplex.
Auxiliary materials will also be required:
- dry adhesive mixture for installation of extruded polystyrene foam;
- polyurethane foam;
- reinforcing mesh;
- dowels;
- plaster mixture;
- finishing materials (lining, drywall, etc.).
Preparation
To ensure that the slabs are light, even and dense, before installation, you need to remove old finishing materials, dust and cement residues from the working surface. After this, using a building level, you should check the evenness of the structure and, if necessary, eliminate deviations with putty and plaster. Then the surface is primed.
When it stops being wet, you can start insulating it. There are 2 common installation methods: with glue and with the additional use of dowels. Whichever one is chosen, the slabs are first lightly rubbed with sandpaper to improve adhesion. The glue is applied with a spatula.
During installation, you can lay the finishing material directly on the insulation, or you can use a wooden frame and guides installed at the width of the slabs. The frame method will take more time, but is considered more reliable.
Walls
It is recommended to start insulation from the bottom corner of the wall, slightly moving the slabs at each next level. For reliable fixation, use bitumen mastic, cement-based glue, polyurethane glue or polyurethane foam.
The slabs are attached to the wall using special glue.
After applying glue to the slab, it should be pressed firmly against the wall and held for 1 minute, if necessary driving in dowels in the corners and in the center. The adhesive layer may be uneven, so it is necessary to check the evenness of the installation from time to time using a level. The gaps between the plates are filled with polyurethane foam. When it dries, the resulting mounds are cut off.
Ceiling
As in the case of walls, it can be mounted with or without a frame of guides. If a private house is being insulated, then penoplex is laid on the ceiling from the inside and outside, from the attic side.
In apartments there is no possibility to use the outside, so installation is carried out only from the room.
The ceiling should be cleaned, leveled and primed. Glue is applied to the material and pressed tightly to the installation site. For best fixation, dowels can be used. The seams are sealed with foam.
Finishing
Depending on what decorative material will be used to complete the finishing, the finishing of the insulation is carried out. Reinforcing plaster is applied under the tiles or wallpaper, then a reinforcing mesh is laid, plastered again (the second layer is at least 3 mm) and puttied.
It is permissible not to apply plaster under drywall. When the glue has dried, the decorative sheets are mounted to the insulating structure with self-tapping screws, and the joints between them are puttied. Before gluing wallpaper, the surface should be sanded.
How to calculate the thickness of penoplex for high-quality insulation
In order to accurately determine the required thickness of extruded polystyrene foam, you should take into account the material of the wall that needs to be insulated, its thickness, and the features of the finishing.
Thermal resistance is calculated. The data is determined based on SNiP readings for a specific region. So, for the central region this figure is close to 3.
The thermal resistance of each layer of the cake is different, so it is determined by adding the indicators of each layer and their thickness.
According to the formula, the thermal conductivity coefficient is determined as follows:
P=R/K, where R is the layer thickness, K is thermal conductivity.
Each material has its own thermal conductivity.
Calculation of penoplex thickness
After determining the values of the coefficients of all layers from the regional indicator (in our case it is equal to 3), the sum of all coefficients should be subtracted. This results in the thickness of the insulation layer.
IMPORTANT!
As a rule, penoplex up to 30 mm thick is used for internal thermal insulation.
The manufacturer recommends using “Wall” penoplex for interior finishing.
The need to install vapor and waterproofing
If the outside of the wall is not insulated, experts recommend adding a vapor barrier.
Vapor barrier installation diagram.
This rule does not apply to wood and other “breathable” surfaces. The waterproofing layer is added when installing extruded polystyrene foam using a frame method, with lathing. At the same time, it is secured with a stapler, overlapping, after first checking that the layer is laid correctly. The joints are taped.
The effectiveness of penoplex for interior wall cladding
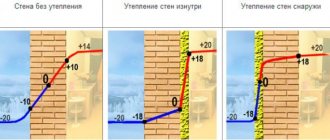
If you line the walls of a house with penoplex from the inside, this can lead to a shift in the dew point. The temperature value below which condensation forms depends on this indicator.
Before buying penoplex, the insulation of which you plan to do yourself, you need to familiarize yourself with all the technical characteristics of the thermal insulation material. This will allow you to compare it with other insulation materials in order to determine the ideal option for thermal insulation of the external walls of the house.
When wondering how to insulate a house from the outside with penoplex, you need to know the positive and negative aspects of this stage of building construction. The square footage of the room is significantly reduced even when using insulation that has a small thickness. This is explained by the need to install lathing when carrying out thermal insulation work. Another negative aspect of using penoplex for thermal insulation of the internal walls of a building is the factor of deterioration of the microclimate inside the house.
The dew point should move inside the room. As a result, humidity increases, and the walls of the house begin to become covered with condensation. In this case, mold formation is observed.
Internal thermal insulation of a house leads to a decrease in room space.
Even those insulation materials that are manufactured using the latest technologies for the production of thermal insulation materials do not allow wood or other types of building materials to “breathe.” Do-it-yourself insulation of a wooden house with polystyrene foam prevents the dew point from shifting, so thermal insulation of the facade is planned at the stage of building the house.
Common Mistakes
At first glance, insulation work looks simple. However, inexperienced installers may make mistakes that will not allow them to achieve the required thermal insulation properties or may lead to delamination of the material. Most often, beginners make the following mistakes:
- The number of slabs is calculated incorrectly or the design stage is completely neglected. There is not enough material or there is a large residue.
- During installation, moisture is allowed to enter the work surface or the temperature regime is not observed.
- The place and tools are poorly prepared. This increases the risk of damage to the insulation or contamination of surfaces.
- They do not follow a checkerboard pattern when laying them. Because of this, cracks form and heat escapes from the room.
- Glue is applied unevenly or in insufficient quantities.
- Neglect grinding the material. The grip becomes less strong.
- Do not fill the seams with foam.
To insulate the joints, fill them with polyurethane foam.
Benefits of penoplex
For internal insulation under gypsum plasterboards, foam plastic, mineral wool or penoplex can be used. Polystyrene foam does not have the best thermal conductivity, and mineral wool is hygroscopic, so penoplex is more preferable for this method of thermal insulation. This is facilitated by its characteristics:
- Light weight of slabs.
- Easy to process and give the desired shape, which greatly facilitates installation. For example, if there is a window or radiator on the wall, then it is not difficult to cut out a piece of foam plastic of the required size to go around them.
- Good moisture and vapor barrier performance.
- Good noise-absorbing properties.
- Strength, durability, safety.
There are few disadvantages:
- The material does not withstand prolonged exposure to the sun. Therefore, you must follow the rules for its storage.
- During operation, it may be damaged by rodents.
- Quite expensive compared to other materials.
Myths and misconceptions
To finally decide to install extruded polystyrene foam, it is worth understanding the misconceptions and myths associated with it:
- Penoplex is harmful to health. It releases toxic substances into the environment. This is a myth, because during initial processing the material becomes denser and loses the ability to release any vapors.
- Walls must “breathe”, and insulation prevents this. This is a misconception, because if city houses were permeable to air or steam, they would be damp and cold in winter.
- Using insulation increases the risk of fire. This statement is partly true. To reduce the risk of fire, you should choose a material with a high class of fire protection and additionally treat them with protective substances.
Tools and materials:
- Penoplex slabs - insulation for interior decoration,
- Deep penetration primer to strengthen the base,
- Dowels for foam plastic, as additional fasteners,
- Adhesive for foam plastic - foam or dry mixture,
- Reinforced mesh - for strengthening before decorative finishing,
- Cement-based plaster - used before finishing work,
- Maklovitsa brush - used when applying primer, you can also use a roller,
- Perforated corner to give clarity to corner bends (internal or external),
- Notched trowel for applying and spreading glue,
- Plaster spatula 300 – 400mm wide,
- Decorative finishing.
Reviews about penoplex insulation from the inside
Oleg, 36 years old, Moscow: “Our loggia runs along the room and kitchen. They installed double-glazed windows, but in the frosty winters we were still cold, and this also affected the temperature in the apartment. I read the reviews on the forum and chose penoplex for insulation. I did it myself by watching videos on the Internet. I liked that almost no debris was generated during operation. I installed all the slabs in a day, and another 2 were spent on clapboard cladding. The temperature on the loggia is now significantly higher than before insulation.”
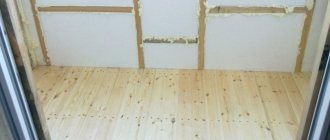
Mikhail, 45 years old, Kaluga: “I bought an apartment on the ground floor with a rough finish. I decided to use thermal insulation when screeding the floor. The building materials store recommended penoplex. I was surprised by its weight - the slabs are light, but they are not so easy to break. I placed a reinforced mesh between the insulation and the cement. Installation went quickly and without any difficulties. And I didn’t have to spend money on electric heated floors.”
Insulation from the inside: advantages and disadvantages
Unfortunately, this method has more disadvantages than advantages and they are quite significant. The disadvantages include the fact that insulation from the inside is, in fact, a violation of the requirements of heating engineering, according to which the heat insulator must be attached on the cold air side. In this case, the dew point (the place where condensation will accumulate) moves into the thickness of the walls, which can lead to their destruction. The following points can also be considered as disadvantages:
- complexity of interior decoration;
- reducing the usable area of rooms;
- insecurity of supporting structures from exposure to cold air from outside.
Accumulation of condensate inside the wall
If you choose the method of insulating the walls from the inside with penoplex, then you need to be prepared for the negative consequences listed above. But there are cases when it is not possible to use other options. Such situations include the following.
Application in apartment buildings
Insulation of external walls from the inside with penoplex may be required for residents of the upper floors. Unfortunately, in the past there were rather lenient requirements for thermal protection of buildings. This has led to the creation of a huge amount of housing in the country, which is not comfortable for living in winter and requires enormous heating costs.
The only method of thermal insulation on the upper floors
Among such houses, it is worth highlighting panel houses, where the thickness of the concrete wall is 30-50 cm, although to comply with modern heating engineering requirements it would be necessary to build a concrete wall more than 4 meters thick. In this situation, only one option is possible - insulation from the inside.
Firstly, no one will give permission to make changes to the facade of a house on a small plot; it will be too conspicuous. Secondly, it is impossible to insulate the walls on the upper floors yourself; you will need to resort to the expensive services of industrial climbers.
Capital facade
If fairly expensive and durable materials were used in finishing the facade, it is irrational to dismantle them. It is better to insulate the walls from the inside. Only careful adherence to technology will allow you to get a fairly good result for a long time.