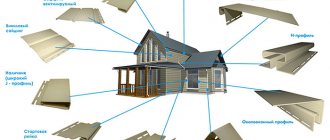
Types of arches
There are several types of arches in an apartment or house:
- completely curved - in such structures only the floor surface is straight, the opening is completely formed by curved lines;
- partially curved - with straight and curved segments;
- regular (based on parts of a circle and straight lines) and irregular - with curved lines more complex than parts of a circle.
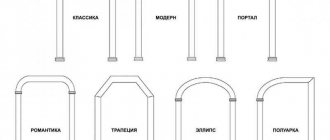
- In addition, there are symmetrical and asymmetrical designs, options with a single opening or several (multi-segment). The most popular arch shapes are shown in the illustration.
It should be noted that correctly making a beautiful arch at home is quite difficult for a non-specialist. Therefore, novice repairmen usually opt for relatively simple design options, for example, “classic” or “modern.”
Varieties of design of decorative arches from gypsum plasterboard
Arches made of gypsum plasterboard are shaped like:
- Round - suitable for classic, Victorian style. They are decorated with stucco, columns, carved inserts;
- Rectangular - reminiscent of ordinary doorways, decorated with shelves and screens;
- Elliptical - the upper part is formed by half of a horizontal ellipse. This is a suitable option for loft, Provence, and modern interiors;
- Oriental or “Arab” - the top of the structure is pointed, which is convenient only if you have high ceilings. The design is suitable for all styles of the East;
- Trapezoidal - the top is decorated with two angles of at least 110-130 degrees. A great idea for cabinets, formal living rooms, offices;
- Curly - have any intricate shape, suitable for romantic interiors. To perform them, you will need quite a lot of experience;
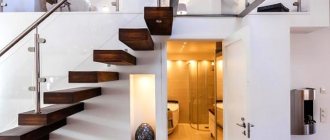
- Semi-arches are structures in openings where one corner is straight and the other is rounded. The item is installed in the place of the former door, it comes out asymmetrical, as in the photo.
Due to the good plasticity of this material, it is easy to create a unique design that will complement any interior.
Design selection and calculation
A do-it-yourself interior arch made of plasterboard does not require complex calculations, but preliminary calculations are still needed: you need to determine the required number of gypsum boards, profile (or wooden block), fasteners, and select the shape itself.
The initial data for calculations is the size of the existing opening. If you plan to erect a plasterboard partition, as described in the article, the limiter will be the desired size, and not the one already present in the main wall. Depending on how exactly the arch will be erected, we will consider two options.
Finishing an existing opening in a main wall (panels, bricks, blocks)
The layout of the house may include several options for the width and height of the opening. Below are three types of classic arches for different dimensions.
In this case, the permissible distance from the top point of the arch to the level of the finished ceiling should be observed.
Reducing this distance is permissible only in light frame structures and only with distributed support of the floor on the frame. Otherwise, the load from the floor on the load-bearing wall will be excessive, and the ceiling slab or beams may sag, or a section of the wall or floor may collapse.
Depending on the existing dimensions of the opening and the permissible reduction in the distance from its top point to the ceiling, a semicircular (right) or arched (left) shape of the arc is selected. The possibility of bending plasterboard sheets is also taken into account (only in the longitudinal direction); for ordinary panels, bending with a radius of 300...1000 mm or more is acceptable; the bend radius is affected by the thickness of the sheet. The thinner the sheet, the greater the opportunity to bend it in the desired way.
After the size of the arch and opening are established, a sketch of the future structure is made, indicating the position of the racks and frame struts, the dimensions of the drywall sheets and the placement of fasteners.
You can make an arch opening with your own hands without using an arched profile, using a regular one with notches.
When calculating, one should take into account the presence or absence of side profiles that strengthen the opening on both sides and, accordingly, the number of sheets. Thus, for a semicircular structure with reinforcement of the opening to the very bottom on both sides, with an initial opening size of 900x2000 mm, you will need:
- straight racks (corner profile PU31/31 or rack PS50/50) – 2000x4+900x2=9800 mm (rounded to 2 m);
- radius (arched) profile CD60 along the length of the arch with a small margin - πx450x2 = 2,826 mm, rounded to 3 m. Instead of an arched one, you can use PS50/50 of the same length, notching its side strips in increments of 30...50 mm;
- sheets of plasterboard (for a wall width at the opening of 250 mm) - 3,000x250 mm for the arched part (preferably a special type of plasterboard with longitudinal grooves), cutting only in the longitudinal direction, and two strips 2,000-450 long = 1,550 mm with a width of 250 mm;
- you also need two (or four, depending on the design) direct hangers for attaching the arched profile or a corresponding number of connecting elements;
- dowels for fixing the profile to the doorway, self-tapping screws for attaching plasterboard to the profile.
Creating a partition with an arched opening
You can make a door arch with your own hands with no less success in a newly erected gypsum plasterboard partition. A drawing of such a design is presented below.
As can be seen from the drawing, the curve of the arched opening is quite complex, it has several conjugate radius arcs; in addition, the structure has three small rectangular openings. The partition reinforcement scheme is based on the use of several full-length vertical posts and a large number of fastening lintels, as well as an arched profile. It is more difficult to calculate the total amount of necessary materials here, and it is necessary to take into account a reserve of at least 10...15% in case of unforeseen difficulties when cutting the profile and gypsum board. The enlarged calculation is made based on the drawing data:
- PS profile 75x40 mm - ((5x2,700)+(6x200)+3,200+500+790+450+(2x220)+130+600)x2=41,620 mm, rounded taking into account the required margin to 50 m;
- arched profile 5,500x2 = 11,000 mm, 11 m (replacement of PS 50x50 mm is acceptable);
- GKL - two panels 3,200x2700 (for the entire partition area of 8.64 sq.m.). Taking into account the standard size of 1,200x2,500 mm (sheet area 3 sq.m.), at least three sheets will be required;
- GKL with longitudinal grooves or regular - a plate with a total size of 5,500x200 mm (here 200 mm is the thickness of the partition);
- connecting elements, dowels, screws.
Types of arches and their design
The most popular types of plasterboard arches
It would seem that we are talking about a simple arched structure, so talking about types and design makes no sense. However, the opposite is true, and there are different types of plasterboard arches. GCR is very easy to work with, and the metal profile bends well. Therefore, there are a lot of variations on the theme of the doorway. Before you make a plasterboard arch with your own hands, you need to decide what shape it will be. Let's look at the most popular types of this design.
- The classic version assumes the presence of a regular circle at the top of the structure. To be more precise, there should be a semicircle. For the option to be considered classic, the diameter of this circle must be the width of the doorway. This option looks great in apartments with high ceilings or in large rooms. Such decorative arches made of plasterboard in the hallway are not uncommon.
Classics are not so often used in apartments due to their small area
- Semi-arches are very often used in interior partitions. Such structures have only one rounded corner. Increasingly, semi-arches are beginning to appear in modern interiors, but they are extremely rarely created during renovations in old doorways.
Half-arches are often used as a decorative element
- Interior plasterboard arches in an apartment can have the shape of an “ellipse”. This form is used in cases where the opening is small. This option looks beautiful when the doorway is either 60 cm wide (instead of the usual 80 cm), or, conversely, is very wide, as in the hall. In both cases, the elliptical shape does not look bulky.
Arches in the shape of an ellipse belong to the “Romantic” style
- Figured arches have a non-standard shape. The most bizarre arched structures can be created from profiles. Most often, figured plasterboard arches are installed in the hall, because they must be large in size so that you can realize all your fantasies. Such designs are the most difficult to create. Often the arch in a plasterboard niche is shaped.
It is almost impossible to create curly arches without the help of a professional
- Portal. Typically, this design is used in old doorways, when they want to do with a minimum of effort without hiding the free space. In fact, for such a design you only need to slightly round the corners of the doorway. Sometimes it is not the corners themselves that are rounded, but only the upper part of the portal. This design is as close in shape as possible to a regular doorway. Quite often, such a door arch is made from plasterboard with your own hands in the kitchen.
The portal is an opening with slight roundings of its corners or upper part
- The design of a plasterboard arch can be made in the Modern style. An opening of this type is characterized by a sharp transition at the junction of the vertical and horizontal parts. Also, the radius of curvature should not be very large. The resulting design is considered quite ordinary and looks good if there are no more elaborate interior elements. Such openings in the hall look very good.
The Modern style is good for a wide and low arched opening
- "Trapezoid" is an arch for the lazy. There are no arcs in this design, but only broken lines. This means it will be much easier to create. This option is suitable for those who do not dare to create round openings. Installing plasterboard arches with your own hands is a difficult task, but in the case of “Trapezium” everything is greatly simplified. This type is used extremely rarely, because few people see the point in making a trapezoidal one from a rectangular opening.
If making the corners round doesn’t work out, then you can change everything to a “trapezoid”
The nuances of constructing a frame for an arch with your own hands
Two ways of creating an arched opening were described above - when installing a plasterboard partition and in an existing opening. In both cases, the curved part of the structure requires the use of a special arched profile or a change in the bending capacity of a conventional wall profile. The arched profile is available in two versions - concave and convex, and its use is limited by the permissible bending radius. This parameter depends on the location of the cutouts on the side parts of the profile. The arched profile is available in U-shaped and L-shaped.
If it is not possible to purchase such products or your budget is limited, you can use a regular rack profile, choosing its dimensions according to the table below.
The cuts are made as shown in the illustration below, in increments of 100...120 mm (or less, depending on the bend radius) using tin snips or a similar tool.
Cutting a profile to give it a curved shape
We prepare materials and tools
Making plasterboard arches with your own hands is impossible without certain tools and materials. During work you simply cannot do without the following tools:
- The profile will be trimmed using metal scissors. After this, it can be given any desired shape;
- A screwdriver with a bat speeds up and simplifies installation using self-tapping screws. You can do everything with a shaped screwdriver, but with a screwdriver it’s much faster and easier. It also doesn’t hurt to get a special bit that will allow you to drive the screws to the required depth in order to “drown” the caps. The device will especially appeal to beginners who find it difficult to apply the correct force when working with self-tapping screws;
- a hammer drill or a drill will be needed to attach the frame to the walls;
- a level, tape measure and pencil are used to correctly mark the future arch and apply guidelines for work on the wall;
- A wallpaper knife is needed to cut plasterboard. It’s a good idea to make a gypsum board arch with your own hands using a jigsaw. But the tool may not be accessible to most, so you will have to cut the sheets with a regular knife.
To fasten profiles and drywall, you will need dowels with self-tapping screws. As for the profiles themselves, a rack profile of 60*27mm and a guide of 28*27mm are usually used (other profiles can be used). You also cannot do without a perforated reinforcing corner. Instead, you can use fiberglass mesh. You will also need finishing materials and the plasterboard itself. I would like to talk about it and its flexibility in more detail.
How to bend drywall for an arch
Installation of curved structural elements requires bending the gypsum board with the required radius. This process is performed in two ways - dry and wet.
How to bend drywall with moisture
To do this, a section of plasterboard cut to the required size (with a small margin in length) is rolled with a special needle roller on the side where it will be concave, and moistened with warm water using a brush two or three times.
Needle roller for drywall
It is important to choose the right direction in which the panel will bend.
After moistening (after 10...15 minutes), the sheet is bent according to a template or directly along the profile, fastening it with self-tapping screws in increments of 20...25 cm. Putty is possible only after the sheet has completely dried! If the sheet bends according to the template and is attached to the profile after drying, you can putty it immediately.
Bent drywall without moisture
There are two ways to bend gypsum board without moistening - by creating longitudinal (parallel) grooves along the entire length of the panel or by simply bending the sheet with a significant radius of curvature of the arch. For the second option, the pitch of the screws is 10...15 cm (depending on the radius), fastening is carried out with the tension of the panel. It is advisable to carry out the procedure with an assistant - one person bends the sheet with force, pressing it against the profile, the second attaches the screws. For the first type of installation (with cuts), it is necessary to first make cuts in increments of 5...10 cm to a depth of 3...5 mm. The cuts should go through the surface layer of the cardboard and go slightly deeper into the plaster. Along the cuts, the sheet is slightly cracked and fastened so that for each segment there are two self-tapping screws on each side of the panel (that is, a total of 4 per segment).
You can also use ready-made sheets with grooves.
After installation, the grooves, homemade or industrial, must be puttied and sealed with reinforcing tape, as shown in the illustration.
Below is a video about methods of bending gypsum boards:
Stacked arch without profile
How to make a plasterboard arch into a doorway without a profile? Is this even possible? Yes, it's real. And we are not talking about some wooden blocks to which gypsum boards are hemmed. The essence of the typesetting method is that with the help of pieces of plasterboard, the necessary curvature is created in the doorway.
In the selected corner, the longest piece of plasterboard is attached to the putty. Then a shorter piece is attached to it. Then even shorter and even shorter and so on. For greater reliability, PVA is added to the putty and diluted with water as needed. To know how long the pieces should be, lay them out on the table and see if the desired curvature is achieved. Here's how to assemble a plasterboard arch without the help of a profile. If you just need to round the corners a little, then this method is ideal. It is not suitable for more complex designs.
Excess putty is removed immediately, otherwise when it dries, it will be difficult to remove. Also, for better adhesion, it is advisable to prime all pieces of drywall.
You will need to place washers under the heads of the screws to prevent the drywall from breaking through.
To ensure that the plates do not fall off, they are periodically attached with self-tapping screws. There can be more than ten such pieces at each corner. When the entire structure is dry, it is puttied in such a way as to smooth out all the corners from the plates. Now you know how to make an arch from gypsum board without a profile.
How to make an interior arch with your own hands: step-by-step instructions
Below are two algorithms for performing work on creating a plasterboard arch in a hall or any other room in accordance with the drawings and calculations presented above.
Arch in the doorway made of plasterboard
Sequence of work after preparing the opening (cleaning, rough leveling):
- reinforcement of a rectangular opening with a U-shaped metal profile (side and top sides). Angular or U-shaped profiles are used. Important! If the wall in which the opening is made already has a fine finish, the profiles are mounted at a distance equal to the thickness of the plasterboard from the planes of the wall inside the opening. If the entire wall is intended to be finished with plasterboard, the profiles are installed on the same line as the wall racks ;
- the curved part of the structure is mounted using hangers or other connecting elements. At this stage, you can carry out wiring in order to subsequently hide it under the plasterboard;
- spacers are installed to strengthen the opening (with a wall thickness of more than 250 mm);
- installation of the side sections of gypsum boards flush with the wall finishing;
- installation of a curved strip using a dry or wet method on the curved part of the arch. If you plan to install lamps in an arch, the places for them must be marked and cut out in advance.
Arch in the partition
Here the sequence of actions is described for the entire partition:
- installation of ceiling and floor (guide) profiles along the entire length of the future wall;
- installation of full height racks;
- installation of spacers and shortened vertical fragments of the frame;
- fastening the arched part of the structure;
- sewing the front and back sides of the partition with pre-cut sheets;
- sewing the curved part of the arch in advance or locally with a curved strip (strips).
Do-it-yourself rough finishing of an arch in an apartment involves gluing all corners (especially in curved fragments) with reinforcing tape (the so-called sickle tape) and careful putty, followed by sanding. The finishing depends on the chosen design of the plasterboard arch. This can be decorative plaster, painting, pasting with regular or liquid wallpaper, cladding with panels or tiles of various kinds.
Installation of a wooden frame for a plasterboard arch
Making a wooden frame for your plasterboard arch is also easy. True, for this you will still need plywood and wooden blocks. Measure the width of the doorway, subtract the thickness of the drywall and plywood, and you will get the thickness of the wood pieces you need. Draw the arc of the arch on the plywood and cut it out using a jigsaw.
A frame for a plasterboard arch made of plywood and bars screwed to it.
Using 5-centimeter self-tapping screws, attach wooden blocks to the plywood to serve as the frame of the arch. Then fix the arch in the doorway using long self-tapping screws screwed in every 15 cm.
Drywall attached to a wood frame.
The last step is to attach the second plywood wall and cover the plywood with drywall. The latter must be secured using drywall screws.
Design features for door installation
If you plan to install a door (hinged or sliding) in an arched opening, it is necessary to use a more powerful profile or selectively strengthen the installation sites of door hinges (sliding mechanism. Since standard door leaves have a rectangular shape, a square arch is usually used for their installation; build such a structure with your own hands simpler than arched.
The illustration shows the reinforcement of a future square arch with timber.
Finish options
To further emphasize the unusual shape of the arch, various finishing methods are used:
- pasted over with colored wallpaper or painted, highlighting the outline of the opening with a contrasting shade;
- glue on polyurethane moldings that imitate stucco;
- decorated with wooden carved elements, cork;
- faced with stone, tiles, plastic panels;
- decorative plaster is applied.
If the opening is wide enough, shelves are installed, LED lighting is laid along the contour, or spotlights are installed. This design is harmonious with the strength of Art Nouveau.
The ethnic character of the interior is emphasized by original bamboo or textile curtains, glass threads, wooden beads, and wicker. The marine theme will be supported by shells or pebbles, glued along the contour or randomly.
Important. The decoration should be combined with the style of the overall space, echoing the materials or interior design details of the apartment or house.
Installation of plasterboard structures: 4 basic scenarios
GKL slopes are attached to the main wall using gypsum glue. The same fastening method can be used to level walls without a frame. It is applicable if the maximum difference between sections of the wall does not exceed 5 centimeters.
The seams between the factory edges of the sheets do not need to be jointed: the edges of the most common type - PLUK - are made rounded. Gypsum putty is traditionally used to putty the seams and fasteners. It differs from building gypsum in a longer setting period - 30 - 45 minutes versus 3 - 5. To ensure a tight connection between the profile and the box, first apply strips of polyurethane foam or sealant to its outer edges.
Self-tapping screws for drywall differ from fasteners for wood with a smaller thread pitch, which allows more precise positioning of the head relative to the surface of the sheet. When screwed in, the cap sinks about a millimeter below the surface and then disappears under the putty. When there are two pieces of drywall for the outer parts of the arch, and they have already been cut along the contour, then you can proceed to creating the frame. All the necessary sizes are already available. It is created according to the same principle as described in the step-by-step instructions, but now we can use an arched profile for drywall.
There is no need to cut it, because it bends in any way. A plasterboard arch is an architectural element that allows you to create an arched ceiling in a wall, doorway or partition. Most often, arches are door arches, because they are the easiest to make.
However, if partitions are created, then they often use curved ceilings for a decorative effect.
All about installation
Oblique arch
Luxurious French arch
If you wish, you can build an oblique arch, a French arch or any other, but in our article we will look at how to make a symmetrical domed plasterboard arch. So let's get started.
Required material and tools
- sheets of plasterboard (when building arches, it is recommended to use special gypsum boards, 6.5 mm thick - they are best suited for creating curved structures);
- rack metal profiles;
- plastic dowels;
- metal screws (3.5 mm by 25 mm and 4.2 mm by 13 mm);
- metal scissors;
- drywall cutting knife or jigsaw;
- pliers;
- drill, screwdriver and hammer drill;
- needle roller;
- building level, tape measure, pencil;
- sickle tape;
- spatula and gypsum-based putty;
- sandpaper for sanding the putty layer;
- perforated corner for decorating the edges of the arch;
- primer;
- paint or wallpaper.
Preparing the opening for the arch
Before making a wall with a plasterboard arch, you need to thoroughly prepare the opening into which it will be mounted. To do this, you will have to dismantle the door frame in order to slightly increase the opening, since the arch will visually reduce its height. Next, we clean the surface from flaking materials, dirt and dust.
Also learn about the principles of installing a metal frame for drywall.
Related article: How to choose the right ball valve
A clear example of a dismantled door frame
Lateral plasterboard elements of the arch
As a rule, a classic arched arch consists of three drywall elements: 2 identical side parts and 1 curved part. To make the side parts, we do the following with our own hands: using a tape measure, measure the width of the opening and calculate the radius of the future arch.
Then we tie two loops on a nylon thread, the length of which is equal to this very radius. We insert an awl into one loop and a pencil into the other. Now we stick the awl into the plasterboard sheet and, evenly pulling the thread, draw an arc with a pencil.
Scheme for manufacturing the side parts of the arch
After this, using a jigsaw or an ordinary construction knife, we cut out the first side part of the arch along the drawn arc. We apply the cut out part to a new sheet of drywall, outline it with a pencil, cut it out and get the second side part of our arch. So, we have partially answered the question of how to make arches from plasterboard.
Side arched part
Installation of the profile frame and fastening of the side elements
How to properly make an arch from plasterboard? Here it is important to take care of a reliable frame. Let's take a closer look at this stage:
- First, a metal profile guide is attached to the top of the opening using dowels. After this, the same guides are fixed to the wall, on both sides - from the upper corner to the place where the arch will end.
Important! The length of the side guides must be the same, otherwise the arch will turn out crooked.
- Then we make an arc-shaped profile from a regular metal profile. To do this, you need to make cuts in it with metal scissors and bend it, as in the photo. To make the frame as accurate as possible, we use the previously made side parts as a template. The profile is attached as follows: to the vertical guides - with dowels, and to the drywall - with self-tapping screws. You will need 2 of these arc-shaped parts.
Making cuts
The result is an arched profile
- In order to make the frame more reliable, additional sections of the profile must be attached in the space between the two arcs.
Ready frame
- The next step is to secure the side arched parts of the arch to the frame using self-tapping screws. Now let's move on to the curved element.
Here the side parts are already fixed
Bending and installing a curved element
To carefully decorate the lower end of the arch, you need to cut an even strip of drywall of the appropriate length and width. When measuring length, it is better to use a flexible measuring meter. Also, do not forget to add 10 cm to the length of the strip.
Ordinary water will help us make a plasterboard end element in the form of an arc. Wet the bottom surface of the strip, then pierce it with a needle roller and leave for a while. After this, you can carefully place the curved element in the shape of an arch, secure it with adhesive tape and wait until it dries a little.
Attention! You don't need to wet the drywall too much, otherwise it will soften and crack.
A slightly damp strip can now be fastened with self-tapping screws to the frame, along both sides. You need to start doing this from the middle of the arch. Now we wait for the drywall to dry completely (about 12 hours).
Securing a Curved Element
Answering the question of how to make an arch from plasterboard, you need to add that in addition to bending the arch using a wet method, you can also do this by cutting a layer of material. But this method is only suitable for creating small bends.
And it consists in the following:
- On one side of the drywall, a layer of paper and plaster is carefully cut through (almost to the entire depth).
- The future arch element is cracked along the slots made using light pressure. It is important here that the gypsum mixture remains on the intact layer of paper.
- The slots are sealed with putty (if necessary, they are glued with flying serpyanka before doing this).
- The curved part is attached to the frame with self-tapping screws. Please note that self-tapping screws should not be screwed into the very edge of the plasterboard part in order to avoid its destruction. In addition, the screw heads must be slightly recessed into the drywall.
- Those places that have been puttied are sanded with sandpaper until a perfectly smooth surface is obtained.
- Now the arch is ready for decorative cladding (painting or wallpapering).
Related article: Choosing adhesive for facing tiles
Adding bends using cuts
How to make an arch on a plasterboard wall? As you can see, it's very simple!
The process is quite painstaking, but not complicated and, moreover, very interesting. If you are concerned about the question of how to make a large arch, then we will answer you right away - everything is using the same technology, only the dimensions change.
Finishing
Finishing the arch
After the constructed structure has completely dried, it is time to finish it.
We will, again, look at this process step by step:
- First of all, we go over all the elements of the plasterboard arch with fine sandpaper. Thus, we remove all the irregularities and end up with beautiful rounded protrusions.
- Then we seal the installation seams with a special putty for seams, not forgetting to seal the joints with sickle tape.
- Before you start puttingty, you need to secure the corner perforated profiles made of galvanized metal or plastic (they are needed so that the corners of the arch keep their shape). Such profiles are attached to putty and then also covered with a layer of putty.
- We wait for the putty to dry completely, after which we clean out all the unevenness using the same sandpaper.
- Now apply a layer of primer and wait for it to dry.
- We putty the arch with a special finishing compound and sand it one last time.
- All! The arch is ready for decoration.
Choosing a decorative coating
We figured out how arches are made from plasterboard. However, installing the arch is only half the battle.
How to beautifully refine the resulting structure? After all, you need to take into account not only originality and compliance with the entire interior, but also practicality.
The arch will periodically be subject to contact with passing people or objects carried through it, which can cause damage.
Therefore, let's think together which decorative coating is most suitable for it.
- Wallpapering. A fairly common choice for those who are wondering how to make a door arch from plasterboard. Traditional cladding option. But thanks to the limitless assortment of wallpaper, a wide variety of colors, textures and patterns, such decoration can turn out to be very interesting and exclusive. As for practicality, it all depends on the material from which the wallpaper you choose is made. Non-woven vinyl wallpaper is considered the highest quality and most durable. Wallpaper with a three-dimensional pattern will look amazing.
Arch covered with wallpaper
- Painting with water-based paint. Perhaps the best option, from a practical point of view. A painted arch can be washed as much as you like, and it will be quite resistant to damage.
Painted arch
Note! The arch will require little paint, so we recommend that you do not skimp on expensive, high-quality paint. The price will pay off doubly - this will make your design even more reliable.
Alternatively, after applying the paint, you can decorate the arch with beautiful painting along the entire arc - here it is important to have imagination and some artistic skills.
- Covering the entire opening with decorative fabrics is very unusual and noble. The most varied material can be used: linen, satin, jute, brocade, jacquard, viscose and so on. All fabrics have their own special texture, pattern and color. But, it must be said that this option is not suitable for every apartment, it all depends on the size and style of the interior.
Related article: Is it possible to apply acrylic paint to oil paint?
Wall covered with decorative fabric
- Stone finishing. The most reliable and, at the same time, incredibly beautiful way. However, it is also the most expensive, because the facing material will cost much more than the same paint or wallpaper. Yes, and you will have to work hard here. But if we make an arch from plasterboard with our own hands, then we are not afraid of it! Moreover, the service life of stone finishing is almost unlimited.
Stunning faux stone finish
Finishing the arch with stone