Modern designers are increasingly using suspended structures in interior decoration. Having a lot of advantages, they not only fulfill the requirements placed on them, but also completely transform the space. The use of plasterboard, slats or plastic panels will allow you to quickly install a suspended ceiling with your own hands.
Construction device
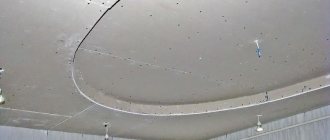
A suspended (another name is suspended) ceiling is an iron structure consisting of one or several levels, which is attached to the ceiling and covered with plasterboard (spotlights can be installed if desired).
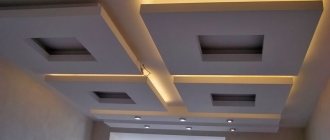
Suspended rack ceiling
The frame usually consists of metal profiles UD or CD, connected to each other with self-tapping screws, and fastening “crabs”. The frame is attached to the ceiling with special hangers (they can be spring or straight).
Installation diagram of slatted suspended ceiling
Attention! The structure is sheathed with sheets of plasterboard 0.95 cm thick and dimensions 60x120x150-250 cm (the last value is length). If installed correctly, the weight of the ceiling will be 13 kg/m².
Now let's look at the installation technology.
Variety of ceiling coverings
Typically, suspended ceilings are installed on a pre-assembled frame, the basis of which is made of wooden beams or metal profiles. The difference lies only in the external surface finish, namely the material used for the cladding.
Therefore, suspended ceilings can be divided into:
- plasterboard. GKL is an environmentally friendly finishing material that, during operation, does not emit harmful fumes into the environment and has no odor.
On sale you can find several types of drywall (standard, moisture-resistant, fire-resistant, fire-moisture-resistant), each of which has its own marking and shade.
Attach drywall to a frame made of wood or metal. Using the material you can create a perfectly flat surface and any complex geometric shape.
Easy to install, gypsum plasterboard allows you to repair ceilings yourself without special knowledge and skills. Installation of a plasterboard ceiling, step-by-step instructions;
- suspended ceilings made of panels are represented by special strips made of PVC, wood or aluminum. Aluminum elements are often called slats, and the suspended structure is called rack and pinion.
Surfaces made of aluminum lining, on which a layer of special enamel is applied on top, look advantageous in the interior. Thanks to the variety of textures and shades, you can find the best option for a specific style and design direction.
The slats are also attached to a metal or wooden frame base. Description of how to make a ceiling from plastic panels.
On a note! If this finishing method is used in the bathroom or kitchen, the frame should be made of a metal profile. It is more resistant to temperature and humidity changes than wooden beams.
The main thing, when installing a suspended ceiling, is to choose the required height of the system so that you can build in artificial light devices and hide communications.
Plastic suspended ceilings are installed similarly to slatted ceilings, but unlike them, the surface formed after attaching the PVC panels is perfectly flat, and the joints between adjacent elements are almost invisible.
Wooden lining is in most cases used for finishing private houses, the wall surfaces of which are made of wood. The lining will support the overall style of the interior and highlight it favorably;
- Stretch ceilings change the space better than other types of coverings, visually expanding and enlarging it. A wide range of canvases, a rich color palette, moisture resistance, excellent adaptation to any indoor conditions - this is only a small part of the advantages of tension structures.
The canvas is fastened to a frame made of aluminum or plastic profile framing the perimeter of the room. To disguise the transition between the ceiling and walls, decorative skirting boards are used. Often the finishing includes combined ceilings, which combine structures made of plasterboard and stretched fabrics. Special cornices allow you to install original lighting using LED strips. Designers create real works of art from spotlights on the ceiling. As an example of lighting, we can consider the example of floating stretch ceilings;
- Cassette ceilings are represented by a metal profile frame suspended on special brackets from the rough ceiling, forming cells of the same shape and size. Panels are placed in them. This type of suspended systems includes Armstrong ceilings, which are widely used in the decoration of office premises and public buildings. An interesting example of a ceiling is a cassette slatted mirror ceiling.
Stage 1. Preparatory work
Despite the fact that suspended ceilings hide the entire floor area, the surface will still have to be prepared.
Step 1: Remove old finish.
How to clean a ceiling
Step 2. The ceiling is inspected for cracks, dents and other defects.
Step 3. If everything is fine, the ceiling is primed and puttied. The result should be a flat and smooth surface.
How to prime a ceiling
Prices for mixtures for leveling walls and ceilings
Mixtures for leveling walls and ceilings
Stage 2. Creating a project
To create a project, it is advisable to use one of the many architectural programs that allow you to obtain a finished diagram with the exact amount of consumables. But if you plan to do everything on paper, then you will have to spend a lot more time and effort.
Suspended plasterboard ceilings
Step 1. First, the perimeter is determined - there is a special formula for this (for example, the dimensions of the room are 5x3 m):
(5 + 3) x 2 = 16 m (P)
The resulting figure will also be the length of the guides. The calculation results are transferred to graph paper.
Attention! If the lengths of opposite walls are different (this often happens), then a larger value should be taken as a basis.
Step 2. Next, the frame profile is calculated. A 2.7x6 cm profile will be used for the frame - it is attached in 60 cm increments. The length of one profile should be equal to the width of the room. To calculate the number of slats, the width of the room (300 cm) is divided by the pitch (60 cm), resulting in 8.3 (rounded to 8).
The first and last planks must be installed 10 cm from the walls, the rest - with the above step. By the way, the length of the step is not accidental, since standard plasterboard sheets have a width of 60 cm or 120 cm.
The location of the planks is indicated in the project.
Project
Step 3. The number of hangers is determined, which are fixed with the same step of 60 cm. 300/60 x 8 = 40 pieces. The first and last of them are installed 30 cm from the walls. The location of the hangers is indicated in the project with crosses.
Attention! In most cases, it is recommended to use spring hangers. The use of direct lines is acceptable if:
- the height of the hanging structure exceeds 12 cm;
- The ceiling surface is absolutely flat.
Step 4. Calculate the number of connecting jumpers (necessary to increase rigidity):
((300/60) – 1) x 8 = 32 pieces
Step 5. Next, all that remains is to calculate the amount of drywall and screws. There is nothing complicated about this, because the total area of the room is already known (15 m²), and the area of one sheet (determined by size) will be 3 m². Therefore, a total of five sheets will be required.
Calculating the number of screws consists of several stages.
- Products 6x60 are used for the ceiling (step – 60 cm) and walls (step – 30 cm).
- Thirty self-tapping screws will be required to fix the drywall (step – 25 cm).
- The fittings are fastened with self-tapping screws LN-11, two pieces each for profiles and hangers, four pieces each for profiles and “crabs”.
After this, lighting fixtures are noted in the project and the amount of electrical wiring is determined.
Content:
The decisive factor in the interior is simplicity and beauty, as well as an affordable price. In the current conditions, when building materials hit the wallet, repairs turn into real money laundering. A suspended ceiling requires little cost, and it is also easy to do it yourself, without resorting to calling craftsmen for an additional fee.
Armstrong panels are suitable for installing suspended ceilings, as they have many advantages over other types of materials.
What materials are suitable:
- Drywall;
- PVC or MDF panels;
- Ceiling tiles;
- Armstrong panels;
- Metal modules;
- Rack plates.
The last three options are the most expensive, so there is no point in talking about them in detail. But it is worth noting the cladding made of plasterboard, PVC panels (or MDF) and ceiling tiles.
Suspended ceilings made from these materials can most often be found in Russian apartments. The design for all materials is the same and does not differ significantly.
Stage 3. Surface marking
First you need to mark the ceiling, which will require a marker and tape measure.
Step 1. The height of the suspended ceiling is measured (the thickness of the drywall is not taken into account). Three or four marks are made on each wall, which are connected using painter's thread into a continuous line. In the future, a guide profile will be installed along this line.
Step 2. Next, the ceiling is marked for suspensions and the main profile (2.7x6 cm). An indentation is made from the walls at the distance indicated above, several marks are made and a line is drawn (the same as in the previous paragraph). The procedure is repeated for all planks, that is, every 60 cm. The points of attachment of the suspensions are marked along the lines.
Preparation and planning of work
There are two options for mounting the frame - from a galvanized profile or a wooden block with a cross-section of 20x40 mm. You can also use wood for an apartment, but in a private house it is best to use metal slats and profiles. If there are hesitations and doubts about the correctness of the decision, then it is best, before making a suspended ceiling with your own hands, to first look at the cladding that has stood for at least a couple of years in the same house or apartment. A metal frame is more expensive, but its service life is almost unlimited, which cannot be said about wood.
Stage 4. Installation of the suspended ceiling frame
Parts for ceiling installation
To assemble the frame, you need to prepare the following materials:
- profiles (guides and for ceilings);
- dowels;
- self-tapping screws of all specified types;
- pendants;
- X-shaped brackets.
Step 1. A guide profile is installed around the entire perimeter. Holes for dowels are drilled along the previously made line, and similar ones are made in the profiles. Then dowels are driven into the holes and the profile is screwed on.
Attention! It is advisable to use a screwdriver in your work, since you will have to screw in a lot of different screws. This tool will make the job much easier.
Step 2. Next, the hangers are fixed. Each hanger is applied to the mark strictly in the center of the line, after which the locations for the dowels are marked and holes are made. Then the dowels are driven in and the suspension is attached. A similar procedure is carried out for each of the forty suspensions.
Attaching hangers
Attention! To fasten each element, you can use either one or two screws. It all depends on the desired strength of the structure.
Step 3. The frame is installed. All suspensions have antennae that are bent downward enough so that a profile can fit between them. The profiles are inserted inside and fixed with self-tapping screws at the required height.
Step 4. After attaching the planks, mark the places where the “crabs” are fixed (you will need a tape measure). The “crabs” are inserted with their tendrils down over the slats and pressed tightly until they snap into place.
Step 5. Jumpers are cut from a 2.7x6 cm profile. First, the entire profile is cut into pieces with a grinder so that each finished jumper fits tightly between the guides.
Step 6. After cutting, the jumpers are mounted. Each jumper is pressed against it so that it snaps into place. After installing all jumpers, they should be aligned in accordance with the diagram.
Step 7. The profiles are connected to the “crabs” with four screws.
Frame
Frame
Do-it-yourself installation begins with assembling the frame.
For this we need:
| Image | Description |
| CD profile (ceiling, 60*27 mm). In the domestic naming system it appears under the name PP. This is what the horizontal lathing of a single-level ceiling will consist of; it is also used for the manufacture of racks of ceiling boxes and transitions between levels. |
| The UD profile (ceiling guide, 27*28) is also known as PNP. Its task is to ensure fastening of the horizontal sheathing to the walls, as well as the racks to the floor surface. |
| With a significant span between the walls, the lathing must be supported not only on the wall guides. Its additional fastening to the ceiling will be provided by direct ceiling hangers. |
| Dowel nails will allow you to securely secure wall guides with minimal time. The most popular fastener sizes are 6*60 and 6*40 mm. |
| Wedge anchors will perform the same functions when installing guides for a box or transition between levels, as well as suspensions. Unlike dowel-nails, they adhere perfectly to the hollow-core floor slab and do not threaten the ceiling to collapse in the event of a fire. |
| Self-tapping screws for sheet metal will connect the profiles to each other. Their optimal length is 9 mm. The presence of drills and press washers is welcome. |
What is the procedure for installing a suspended ceiling at the frame assembly stage?
Single level
- Mark the line along which you will attach the ceiling guide profiles to the walls. Marking is done according to a level (preferably a laser or water level) using a painting cord or a ruler with a pencil;
Marking on the photo is done using a laser level
Hint: the minimum distance from the marking line to the bottom point of the ceiling is equal to the thickness of the profiles - 27 millimeters. This distance is often increased in order to place lamps, air ducts, air conditioning lines, etc. in the ceiling.
- Attach UD profiles end-to-end or with a slight overlap along the markings with a fastening pitch of 500 mm;
UD are fixed according to the markings
- Mark the position of the ceiling sheathing profiles with a step between them of exactly 600 mm for plasterboard and 500-600 mm for panels;
- Anchor the hangers along the marking lines marked on the surface of the ceiling. The step between them is 600 mm for gypsum boards and up to 800 mm for lighter panels;
Installation of hangers
- Cut the CD profiles to length, insert them into the UD profiles on the walls, and pull each profile to the ceiling using straight hangers that are bent and interlocked with each other;
- Pull one or two laces across the sheathing at the bottom of the guides. One by one, release the profiles from the hangers, align them with the cords and fix them by screwing the hangers to the side walls. The part of the ears protruding beyond the plane of the sheathing is bent upward;
Alignment and fastening of profiles
- Lastly, connect the CD and UD profiles with self-tapping screws.
Box
It is believed that seeing once is better than hearing a hundred times. We will not argue with the obvious, and will bring to your attention several designs of ceiling box frames with our comments on them.
Stage 6. Sheathing with plasterboard
Sheathing with plasterboard
Fastening drywall The
sheathing procedure is quite simple and does not need a detailed description. Plasterboard sheets are applied to the finished frame and screwed to the profiles using screws. You need to ensure that the edges of the material fit exactly on the profile.
Attention! For reliability, drywall can be attached “staggered”, which is why some sheets will have to be trimmed a little. This is easy to do: on one side the material is cut to fit the ruler, then the plaster is broken, and after that the cardboard is cut on the reverse side.
Video - Installation of a suspended ceiling
Required tools and materials
Let's start with the tools for installing a stretch ceiling. To fix the profile you will need a hammer drill and a screwdriver. If these are models compatible with the vacuum cleaner, very good. Then it will be clean during work. It is best to mark the structure using a laser level. A regular bubble bottle will not work. The probability of error is too great. Painting cord is used to make marks. If you don't have it, you can replace it with a regular one. Before work, chalk or powder paint is applied to it.
In addition, you will need special clamps, or crocodiles, as the craftsmen call them. They pre-fix the strips. A heat gun is used to soften PVC film. Which gun you use to stretch suspended ceilings doesn’t really matter. Usually they choose one that runs on gas, although you can also take an electric one. It's safer this way. To tuck the material inside the baguette, spatulas are used. It is better to take a set with different blades. This way you can reach the most difficult to reach places.
Since you will have to work under the ceiling, select a convenient stepladder or any other support of suitable height. To cut the fastening system at an angle, you will need a miter box. Another essential tool is a metal detector. It will help determine where the hidden wiring is located. Otherwise, it may be damaged during installation work.
The necessary materials can be purchased as a kit. Stores sell kits for self-stretching ceilings. They include polyvinyl chloride film with a processed edge, profiles, a template platform for the lamp, a thermal ring, and pipe linings. In addition, it contains special glue and sealant. If for some reason the set cannot be purchased, everything must be purchased separately. In addition, you will need metallized tape and fasteners.
Stage 7. Final finishing of the ceiling
Once the installation is complete, all that remains is to do the final finishing.
Step 1. First, all joints between the sheets are carefully puttied and leveled.
Step 2. After the putty has dried, a layer of finishing material is applied (for example, paint, plaster, etc.).
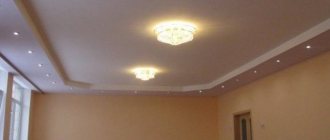
Step 3. Lighting devices are installed.
How to install spotlights
Installation of lamps in a suspended ceiling
Installation of lamps in a suspended ceiling
Video - Insertion of spotlights
Prices for various models of recessed lamps
Recessed luminaires
Advantages of suspended ceilings
Suspended ceiling systems make it easy, quick and at a reasonable price to get a finished ceiling that will hide cracks and defects in the base, as well as hide electrical wiring, ventilation and communication cables.
Suspended ceilings are universal; they can be used to decorate almost any residential, office, commercial and industrial facility.
The great advantage of installing suspended ceilings is the ability to erect complex geometric structures with every possible combination of textures, colors and patterns
Such ceilings make the height of the room smaller and, due to this, have good thermal insulation, which is especially important for owners of apartments on the upper floors.
Some types of materials for suspended ceilings can provide sound insulation in a room, which will be very helpful if noisy neighbors live on the floor above.
Features of operation
- To increase the service life of suspended ceilings, timely cleaning of the surface is required. Cleaning can be dry (removing dust with a rag) or wet (using a sponge dipped in water diluted with a cleaning agent).
- It is prohibited to use any abrasive materials when cleaning ceilings.
How to wash the ceiling - You can use a simple eraser to remove pencil stains.
- The space between the main floor and the structure must be well ventilated. Therefore, a gap must be left.
Don't forget about ventilation gaps - To avoid temperature differences between the space inside the suspended ceiling and the rest of the room, plasterboard panels should be removed immediately after installation. Installation of a vapor barrier layer will be required. If there is a layer of thermal insulation on the reverse side of the structure, then a vapor-proof material is also necessary.
- The quality of a suspended ceiling depends on its moisture resistance. Indoor humidity levels can vary from 45ᵒ to 75ᵒ, so regular ventilation is required.
Ventilate the room more often
Main stages
Before you run to the store for building materials, you need to decide on a few basic points. First of all, you should choose the design that will be used, as well as the decorative material. Structurally, as well as in terms of materials, these can be the following types and models of ceilings:
- Tensioners
- Plasterboard
- Rack and pinion
- Panel
Design . It all depends only on the imagination of the one who will design the ceiling. You can come up with and assemble suspended ceilings, including with your own hands, almost any kind, but it is necessary to take into account the specific requirements of the room where the ceiling will be installed.
Construction . In cases where a suspended ceiling will be made, participation in its installation can only be limited to going to the office of the company that manufactures them. The rest will be done by the masters. If another type of ceiling covering is chosen, then, based on the specifics of the room, you should choose the most suitable one. Most often, plasterboard ceilings are constructed in apartments.
Dimensions and material counting . Everything here is extremely simple - you need to measure the room as accurately as possible, in all dimensions - height, length of walls, sizes of window and door openings. Do not forget about the distances above the doors, as well as below the window.
Purchase of building materials . Depending on which ceiling model is chosen, you can buy either not too heavy plastic panels or rather bulky and heavy plasterboard sheets. Therefore, it is worth worrying in advance about how to deliver everything and who will bring the materials directly into the house.
Installation of the structure . If you carefully calculate everything in advance, installation will not be a hassle. The main thing is to know exactly what should happen in the end, and to carry out all operations accurately. Depending on the material from which the ceiling will be made, you may need an assistant to install it. Holding a sheet of drywall suspended while simultaneously screwing it to the frame is quite problematic.