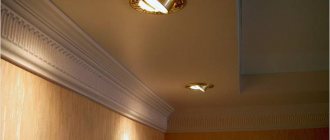
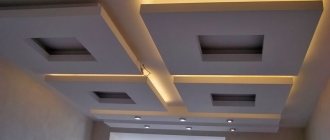
The most common material used for finishing the ceiling surface is plasterboard. With its help, you can not only properly level the base base, but also create a more complex structure into which you can integrate original lighting. For example, two-level ceilings.
How to make a two-level plasterboard ceiling - plan
First of all, there are several important points to consider:
- height of the room. A two-level ceiling design will reduce the height of the room. For residents of modern apartments in a panel house, even 5-10 cm is already a significant loss;
Advice. If you have a perfectly flat ceiling, then you can mount the second level of the frame directly on it. This way you will save space.
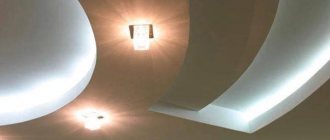
- distribution of accents. With the help of lamps built into the frame of a plasterboard ceiling, you can zone the space or shift the emphasis to any part of the room.
You can purchase lamps of any power. Plasterboard systems do not impose any restrictions on your choice. Such as, for example, suspended or plastic ceilings, where there is a danger of using powerful lighting devices (can lead to deformation and even fire).
- room humidity. It is not recommended to install such a ceiling in the bathroom, because the sheet may become deformed. Although, there is moisture-resistant drywall (GKLV), for example, Knauf, with proper installation and organization of high-quality ventilation, it can serve well.
Advice. To protect drywall from moisture, a primer is used in several layers.
- presence of assistants. A person cannot do this work on his own.
- complexity of the design. The more complex the design, the more difficult it is to calculate the amount of materials and install them, and accordingly, the longer the work will take.
Plasterboard ceiling projects
(single-level, two-level and multi-level)
Plasterboard ceiling projects
Tool for installing drywall and profiles
- metal scissors;
- hammer drill or drill;
- painting knife;
- square;
- roulette;
- plumb line;
- building level;
- planer for drywall;
- drywall float;
- narrow and wide spatula;
- gloves and glasses.
Materials for plasterboard ceilings
This selection is needed so that you can calculate and know exactly what to buy, what this or that element looks like, and for what purpose it is used. We hope that thanks to such a detailed description you will not buy too much and save money and nerves.
Drywall Drywall.
As a rule, ceiling plasterboard is used. Its thickness is 9.5 mm.
For the second tier, which does not have lamps and sidewalls, you can use arched plasterboard. Its thickness is 6 mm.
Profile UD Profile UD
Profile CD Profile CD
CD connectorCD connector.
Designed for splicing two CD profiles.
Direct ceiling suspension or ES - bracket Direct ceiling suspension or ES - bracket.
The profile is attached to it to the ceiling.
Spring suspensionSpring suspension.
Used when the length of the direct suspension is not enough for installation. That is, the second level of the ceiling is lowered too low.
Two-level connector
Double level connector 2
Two-level connector.
For connecting CD profiles at different levels.
Advice. When installing, try to reduce the number of extensions of this type of profile.
Drywall crab
The plasterboard crab is fixed. The plasterboard crab is fixed.
Designed to connect CD profiles at the same level.
How to replace drywall crabTip. Crab can be substituted. How to do this can be seen in the photo.
Corner profile connector Corner profile connector.
Its purpose is to connect the CD profile perpendicularly and at the same level.
Dowel screw for fastening profilesDowel screw for fastening profiles.
Anchor wedge for fastening profilesAnchor wedge for fastening profiles.
The choice depends on the material from which the walls and ceiling are made.
Self-tapping screw for fastening drywall sheets Self-tapping screw for fastening drywall sheets.
Self-tapping screw “flea” Self-tapping screws for metal 3.5 by 9.5 mm. - “flea”.
Serpyanka tapeSerpyanka tape (self-adhesive)
For gluing seams or interlining for completely covering the ceiling.
Putty for sealing seams and joints Putty for sealing seams and joints.
Recessed luminairesRecessed luminaires (ceiling, spotlight, halogen or LED).
Advice. The wiring for the lamps is started before the plasterboard work begins.
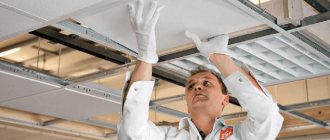
Ceiling installation
It is necessary to join in a T-shape, and not in a cross, as professionals advise, in order to prevent cracks from the joints. For cutting straight parts, it is convenient to use a fine-toothed hacksaw or a breadboard knife; for curved surfaces, a jigsaw is recommended.
Install the cut plasterboard sheets until the completely horizontal surface is covered. For small halogen lamps, holes of the required size are cut in the marked places using a special crown.
Installation of vertical end parts, the so-called steps - the main feature of a multi-level ceiling. When decorating the straight parts of the steps, you just need to correctly screw the strips of the required width.
But with a curvilinear, curved part, you will need to try. It is recommended to use hot water for this, wetting the strips on both sides; after 15 minutes you can carefully bend and screw them.
Some specialists cut the strips a few centimeters into small segments that fit the curve. Finishing putty and painting.
Diagrams and sketches of two-level plasterboard ceilings
Knowing what you want to see on the ceiling will ultimately make it much easier for you to calculate the material and work.
Before making ceiling drawings, familiarize yourself with what types of two-level plasterboard ceilings exist.
Illuminated plasterboard ceiling - installation methods
The first method is to install a second level without installing the first. Used if you have an ideal ceiling surface. And the lamp is supposed to be placed in the frame.
Diagram of a two-level plasterboard ceiling - the first method
The approach is the same. But the lamps are also mounted on the side of the frame.
Diagram of a two-level plasterboard ceiling - second method
Installation of two frames. The lamps are mounted in the second of them.
Diagram of a two-level plasterboard ceiling - third method
The installation approach is the same. But the lamps are also located around the perimeter of the second tier.
Diagram of a two-level plasterboard ceiling - fourth method
Similar approach. But for side lamps, instead of a frame, a polypropylene profile is provided, which is glued to the second-level frame using putty.
Diagram of a two-level plasterboard ceiling - fifth method
Using one of the presented basic types of installation, you can easily create sketches of a two-level ceiling that will appeal to all family members.
Preparatory work
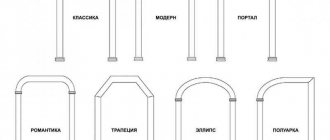
Regardless of the planned design, the main task of the preparatory work is accurate measurements and markings. Because due to poorly executed first steps, the product becomes distorted. The design usually consists of the following geometric shapes:
- Semicircle;
- Oval;
- Rectangle.
Important! The task of the preparatory work is to carry out rough finishing of the floor and walls.
Leveling the surface
The final finishing is done after installing the “skeleton” of the structure. It is important not to forget that the structure must be level. For this purpose, a level is applied every 0.5 m along the room and across the width. If the ceiling has unevenness of about 5 mm, then it is leveled.
Important! If the ceiling is dry and the plaster is firmly in place, the old layer is removed and leveled with finishing plaster.
Pay attention to this nuance: if the plaster peels off, it is removed all the way to the ceiling.
How to make a two-level plasterboard ceiling - installation instructions
It should be noted that there is disagreement among professionals about the order in which the tiers should be installed. There are two ways.
- In the first case, work begins with the installation of the first level frame. And then the frame of the second tier is suspended from it. Applicable if the area of the second tier is insignificant, because virtually the entire weight of the second frame falls on the sheets of the first.
- In the second case, the frame of the second tier is assembled first, and the frame of the first is made between its elements. More complex design.
We will talk in more detail about the first option for installing a two-level ceiling. This will give you basic installation information. The second option, more complex, will be described below and illustrated in the photo.
We make a two-level plasterboard ceiling consistently and in accordance with the instructions, then the work will be done efficiently.
The technology for manufacturing 2-level plasterboard ceilings involves performing work in the following order:
- Preparing the ceiling for plasterboard (preparing the workplace).
- We mark the ceiling for the plasterboard frame.
- Installation of a frame for drywall - first level.
- Installing a frame under drywall - second level.
- Finishing a two-level plasterboard ceiling.
Preparing the ceiling for drywall
Preparing the work area Finishing the ceiling is not like screwing in a light bulb - you can't do it without removing the furniture.
Clear out the room and the approaches to it, this will make installation easier. It is important to prepare the surface itself. Agree, it’s better to do something in the free space than to constantly go around, trim, and wash off any leftovers. All loose plaster should be removed. Some craftsmen leave it, but everything that doesn’t hold up well will sooner or later fall away.
Marking the ceiling for a plasterboard frame
To do this you need to take the following steps:
Measuring the height of the corners - measure the height of the corners in the room;
— determine the angle with the smallest height.
It will serve as a starting point for marking. After all, we need the structure to be level relative to the horizontal;
Marking the ceiling - make markings.
On the walls for the profiles we mark a straight line. We place dots on the ceiling for direct hanging. There is no need for extra markup; it will only confuse. For these purposes, it is convenient to use a laser level or a water level.
Homemade water levelTip. You can make a water level of the required length yourself using a nylon hose (for example, from a medical dropper) with a diameter of 10-15 mm. and filling it with water.
It may happen that in your room not only the angles are different, but also the length of the opposite sides. In this case, try to level it horizontally first. And then draw a clear pattern on the ceiling and level the structure around the edges. This way you can visually center the ceiling.
Ceiling installation
We route the wires for spotlights. Markings on drywall.
It is necessary to join in a T-shape, and not in a cross, as professionals advise, in order to prevent cracks from the joints. For cutting straight parts, it is convenient to use a fine-toothed hacksaw or a breadboard knife; for curved surfaces, a jigsaw is recommended.
Install the cut plasterboard sheets until the completely horizontal surface is covered. For small halogen lamps, holes of the required size are cut in the marked places using a special crown.
Installation of vertical end parts, the so-called steps - the main feature of a multi-level ceiling. When decorating the straight parts of the steps, you just need to correctly screw the strips of the required width.
But with a curvilinear, curved part, you will need to try. It is recommended to use hot water for this, wetting the strips on both sides; after 15 minutes you can carefully bend and screw them. Some specialists cut the strips a few centimeters into small segments that fit the curve. Finishing putty and painting.
Installation of a frame for drywall - installation of the first level
Installing UD profiles
3.1. Installation begins with the installation of UD profiles.
They are guides and are mounted on the wall, along the perimeter of the entire structure. Fastening pitch – 600 mm. And also on the ceiling.
Method of connecting the profile on the wall The method of connecting the profile on the wall and in the corner is shown in the photo (right and left, respectively).
Method of connecting the profile in the corner
If you plan to form rounded elements, you need to draw a picture on the wall and attach the UD profile to it. But first, you need to make notches on the profile.
Fastening the UD profile according to the markings and fasten it along the line drawn on the ceiling.
Marking for suspension
3.2. We attach a direct suspension to the points placed on the ceiling.
Step for suspension At the same time, we observe the mounting step - 600 mm.
Recommendation.
If your ceiling surface is ideal, then you can skip this step. And start right away with the installation of the second level.
Attaching the CD profile to the suspension
3.3. A CD profile is attached to a direct suspension.
Fixed CD profile on the suspension
The resulting frame will look like the one shown in the diagram and photo.
Fixed CD profile on the ceiling
Crabs on a CD profile The use of crabs will give rigidity to the frame.
We sew up the frame with sheets of plasterboard
3.4. We sew up the frame with sheets of plasterboard.
Chamfer on drywall sheetsTip.
Where the sheet was cut, a chamfer must be provided. To do this, use a knife to cut off part of the material from the sheet of drywall.
Why chamfer on sheets of drywall? This is necessary so that the putty fits better on the seam. And the seam did not come apart over time.
DIY ceiling marking
Marking
Before the actual manipulations, you need to do preparatory work. Everything that is not useful during the direct installation of the ceiling is removed from the room.
The marking involves marking all corners of the structure.
The orientation of the profile device along the circle should be marked with a continuous line. Holes are drilled in the wall in increments of 20-30 cm to attach the control profile. Dowels are fixed in the holes, into which guide profiles are fastened with self-tapping screws.
Important! Proper marking will help save time and building materials.
Installation of a frame under drywall - installation of the second level
Next, we move on to consider the phased installation of the second ceiling level.
4.1. Marking the frame for drywall.
Lines for the UD profile To do this, draw lines for the UD profile on the wall, and draw the future drawing on the ceiling.
Having a diagram on the ceiling will not only simplify the installation process, but will also help you understand what your structure will look like after the work is completed. And, therefore, you will have the opportunity to make the necessary adjustments.
4.2. Frame made of profiles for plasterboard
Frame made of profiles for plasterboard
We mount a ceiling frame made of a metal profile (UD profile), fixing it to the wall and ceiling.
We already know how to make a frame of the desired shape (round the profile).
Material prepared for the website www.moydomik.net
4.3. Lower the frame to the desired length.
To do this you need:
- cut the CD profile to the length to which you want to lower the frame;
- cut out “tongues” on one side of these pieces. To do this, you need to cut off the side parts of the profile. This will make it easier to install them.
- insert the cut pieces into the UD guide profile, which is already fixed to the ceiling. You need to insert it with the flat side.
- secure the pieces with a flea. The pitch between straight sections is 500-600 mm. A larger step will make the structure insufficiently reliable, a smaller step will make it heavier. The step between curved segments is 200-300 mm. This is due to the fact that the curved sheet needs to be fastened more often.
- “put” a UD profile on the hanging pieces and secure them with a “flea”.
Frame side As a result, you should end up with a frame side like this.
Then follows:
- cut the CD profile to a length that is equal to the distance from the side of the frame to the UD profile located on the wall;
- secure them with “fleas” on both sides.
Finished frameYou now have a finished metal frame. After which, it should be covered with plasterboard and proceed to finishing work.
Advice. When assembling the frame, look at the drawings. Otherwise, it may happen that the jumper will be placed in the place of the future lamp.
{banner_link_1}
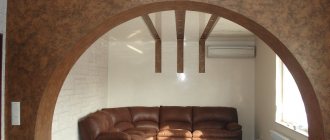
4.4. Making an arch from plasterboard.
Making an arch from plasterboard - diagram The photo and picture show how to bend plasterboard for an arch and how the CD profile and sheet of plasterboard should be prepared.
Making an arch from plasterboard Their device is very simple; it is important to correctly make notches on the sheet without cutting through the front layer of cardboard.
4.5. Plasterboard covering of round surfaces
If it is possible to cut the required size from a whole sheet, the issue is easily resolved. If not, cut out the segments and install them in parts.
It should be noted that in this case the frame must be stiffer. Because each self-tapping screw is screwed into the profile.
The result of covering round surfaces with plasterboard. The result of your efforts should look something like what is shown in the photo.
Diagram of the second level ceiling with a niche for lighting
So, below the ceiling we make marks along the walls, connect them with lines and install guide profiles. If the second level is planned along the entire perimeter of the room, the guides go along all the walls. If it is diagonal, then the profile is attached only in those places where the second level adjoins the wall.
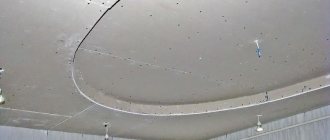
The second level of the ceiling is usually curved. To create smooth curves, it is best to use an arched profile. But most “masters” prefer to save money. They cut out triangles on the sides of the ceiling or track profile as often as possible and bend it according to the pattern. The drawing is best applied to the ceiling of the first level. This line is repeated, retreating 10-15 cm deep from the future edge of the second level. This distance can be less if you use LED strip or duralight for lighting. This level will be attached to the first one here.
We cut pieces of the ceiling profile 12-15 cm long (level height). These pieces will replace straight hangers. Along the internal winding line, we bend and install an arched profile or a cut guide profile on the ceiling. We attach hanging pieces to it. We connect their lower edge to the PNP, mounted on the wall, using PP segments. The length of these segments should be equal to the distance from the wall to the outer, extreme winding line of the future level. If the length of such sections is more than 60 cm, it is recommended to make transverse inserts from single-level connectors and PP sections.
Try to make the structure as rigid as possible. The final touch will be edging the protruding PP with a guide profile with cut sidewalls. It is bent so that when viewed from below, the line of this profile follows the curves of the pattern on the ceiling. The resulting edging is secured with self-tapping screws. The frame is ready.
Electrical wiring in corrugated ceiling
Electrical wiring is installed similarly to the first level. The location of the spotlights is roughly marked on the ceiling.
Covering the resulting frame with plasterboard will be the next step. A flat surface is sheathed as described above for the first level. The edges are sawed along the bend line. The problem will be covering the end of the second level. There are two proven ways to do this:
- A strip of drywall is pricked from the inside with a needle roller or the tip of a knife. Then the surface is moistened with water using a sponge or rag. Moisture permeates the plaster and the strip is applied to the profile. Bend it slowly and carefully, fixing it step by step to the profile with self-tapping screws.
- The inner side of the strip is cut in a V-shape to the outer cardboard at small intervals. In this case, the strip will repeat the bend of the profile. But this method is only good for short sections.
Next, the drywall is primed, and rough and finishing layers of putty are applied using spatulas. Holes are cut for spotlights, an LED strip and other track light sources are mounted in the niche. Contacts are well insulated and hidden. The surface is painted in the selected colors. Do-it-yourself two-level plasterboard ceiling with lighting is ready.
Plasterboard ceiling finishing
Sealing the seams with serpyanka tape. We sew the seams with serpyanka tape.
Sealing seams with putty Apply a little putty to the tape with a small spatula.
Sealing seams and holes with putty We also apply putty to the screws.
This is necessary so that rust does not show up through the paint or wallpaper over time.
General putty Good to know. If you plan to paint a two-level plasterboard ceiling, it is better to putty the entire surface. Otherwise, unsightly seams will appear under the paint.
Processing and grinding The seam area (or the entire surface) is rubbed with a mesh grater or a grinding machine.
Processing and grinding cornersTip. Rub the surface especially carefully in the corners. To prevent the appearance of side grooves from the grater.
Decorating a plasterboard ceiling. Painting the ceiling is optimal and very popular. Painting a plasterboard ceiling should be accompanied by pre-treatment of the surface with a primer.
The second method of installing a two-level plasterboard ceiling
In conclusion, as promised, we provide photo instructions for the second option for attaching the ceiling, when the frame of the second tier is assembled first, and the frame of the first is mounted between its elements.
Installation of a two-level plasterboard ceiling frame
Installation of a plasterboard ceiling frame
Sheathing a plasterboard ceiling frame
Covering the ceiling frame with plasterboard
Making a plasterboard ceiling
Plasterboard ceiling installation
Construction of a 2-level plasterboard ceiling frame
Construction of a 2-level plasterboard ceiling frame
Mounted frame of the 2nd level ceiling made of plasterboard
Fastening drywall
Drywall installation
Covering the profile frame with plasterboard
Ceiling covered with plasterboard
Plasterboard ceiling ready for finishing
Design of two-level plasterboard ceilings - photo
Ideas and inspiration for every color and taste
How to make a two-level plasterboard ceiling with your own hands
Two-level plasterboard ceiling - original design
Design of a two-level plasterboard ceiling
Example of a two-level plasterboard ceiling
Design of a two-level plasterboard ceiling
Design options with installation of additional lighting
The special charm and exclusivity of a room design with lighting, which can play the role of both the main source of lighting and a decorative element. Almost the most common option at the moment is the use of an LED lamp, which is characterized by reliability, efficiency, safety and particular effectiveness when creating a space design. This lighting is excellent for plasterboard surfaces in two levels, which are easy to experiment with by creating a variety of patterns and shades.
Another option is ceilings with LED strip lighting, which you can do yourself. In addition, it represents an excellent basis for the embodiment of all kinds of creative ideas. Such lighting equipment is produced in single or full color. The first type is cheaper and more suitable for long-configuration lighting devices, when price plays a decisive role.
Additional lighting equipment is installed before installing the structure or directly into it. It is possible to use lightweight lighting fixtures equipped with their own clamp. Large lamps for plasterboard ceilings, as a rule, are not used due to the significant load they create.
The ceiling design should be stylistically consistent with the overall design concept of the living room.
Hidden backlight
Combination of several types of lighting
Spotlights