Types of attic structures
Before building an attic, it is important to decide what type of device it will have.
Attics are divided into the following types:
- single-level;
- two-level.
In addition, attic roofs are:
- 1-slope;
- 2-slope;
- broken;
- 4-slope;
- hip;
- half-hip;
- with a balcony.
The simplest to install are single-pitched roofs , since they do not have a ridge. In such a roof, the walls have different heights, due to which a bevel is formed; its angle should be in the range from 35 to 45 degrees. 1-slope types are the cheapest.
2-slope - this is the most popular option; it has many different types of designs.
At low financial costs, you can create the required area of the room. Double-pitched roofs can be symmetrical, when the ridge is located strictly in the middle of the building, or asymmetrical, in which case the ridge is shifted from the center.
The gable attic has straight gables, the room is shaped like a trapezoid. Sloping roofs also have two slopes, but their design is much more complicated.
Options for the attic and its use
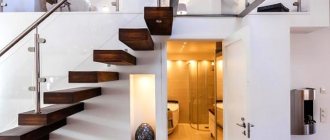
The attic is an advantageous place to transform it or combine it with other types of extensions. It can be converted into a dressing room, allowing you to get rid of unnecessary cabinets that take up a lot of space in the main part of the house.
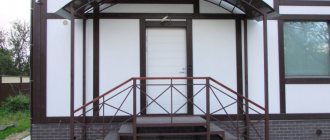
House with an attic converted into a terrace
In this case, the main thing is to ensure maximum light intake; windows can be installed for this not only at the ends, but also in the roof. Opening windows will solve the issue of ventilation. You can build in balcony windows, thereby giving the building an original modern look.
A terrace equipped in the attic will provide residents with excellent views and allow them to enjoy the surrounding landscape without leaving the house.
House with attic and garage
This option will save a lot of space and is convenient for motorists. The garage can be entered both from the street and through the interior.
House with an attic over a bay window
A small attic niche can be used as a place to store things. A large attic can be arranged at your discretion. Usually there is a beautiful view here, so the attic can become a place to relax.
Attic with a small balcony
The presence of a small balcony in the attic will slightly increase its area and allow you to admire nature.
What materials are used to complete the attic?
To build any type of attic, you will need the following building materials:
- wooden bars, most often used with a cross-section of 50x80 millimeters, to create a rafter structure;
- boards from which the sheathing will be made;
- wall panels or other material used for cladding gables
- fasteners, such as: metal corners, screws, nails, metal profiles;
- thermal insulation material;
- vapor barrier;
- waterproofing;
- roofing material;
- interior finishing materials.
The type of materials depends on the preferences of the home owner, and the amount of building materials is influenced by the size of the attic space.
Building codes and regulations for attic extensions
The safety requirements and rules for carrying out work when adding an attic are defined by SP 118.13330.2012 and SP 54.13330. Here are the basic standards that need to be taken into account when designing:
- the line of intersection of the roof plane and the facade should be at a height of no more than 1.5 m from the floor level of the attic floor;
- it is allowed to place administrative premises in built-on attic floors in buildings with a fire resistance level of at least II and a height of no more than 28 m;
- the area of the bedroom and kitchen in the attic floor is allowed to be at least 7 m2, provided that the common living room has an area of at least 16 m2;
- in living rooms and kitchens of apartments located in the attic floor, it is allowed to reduce the normalized ceiling height in an area not exceeding 50%;
- buildings of fire resistance levels I, II and III may be built on with one attic floor with load-bearing elements having a fire resistance limit of at least R45 and a fire hazard class of K0, regardless of the height of the buildings, but located no higher than 75 m;
- when using wooden structures to add an attic, proper fire protection must be provided;
- When constructing emergency exits from the attic floors to the roof, it is necessary to provide platforms and transition bridges with fencing.
These are only the basic rules and requirements, since their list may be significantly wider. For example, for attics in apartment buildings, the thermal insulation and waterproofing schemes, the heat supply and ventilation systems must be changed. If you deviate from building codes, the project will not pass approvals.
How to calculate whether an old house can withstand an attic
Before starting to build a new attic structure, it is important to correctly calculate its weight, because not every old house can withstand the additional load.
To calculate the mass of the attic, calculate how much all the components used for its construction weigh:
- rafters;
- sheathing;
- Decoration Materials;
- insulation;
- roofing material.
Log and aerated concrete houses can withstand a maximum load of 600 kilograms per square meter, for cinder block this figure is 1200 kg/m2, and for solid brick 1800 kg/m2.
If, after performing calculations, it was determined that the building will not support the weight of the attic, it is necessary to either lighten it or strengthen the foundation.
What are the components of the price of adding an attic to an old house?
In order to correctly calculate the cost of building an attic, it is important to consider what building materials will be used and what dimensions the building will have.
The first step is to take accurate measurements, after which the following is calculated:
- length and width of the rafter system;
- attic height;
- skate length;
- rafter section;
- number of rafters;
- area of the attic room;
- the total number of rows of sheathing, the number of boards required for it;
- the amount of roofing materials, such as waterproofing and vapor barrier;
- roofing material area;
- volume of insulation material;
- the number of square meters of gable cladding material;
- the length of the boards that will be laid on the attic floor;
- window size.
This is a list of the main materials that will be used for the construction. Depending on the situation, other building materials may be required.
Load on foundation and walls
If you decide to install a habitable, comfortable attic instead of an old attic, most likely you will not have to strengthen the lower walls or make changes to the foundation design. Unfortunately, this cannot be said about the extension of a full floor - with its load-bearing walls, upper ceilings and other clutter. Consequently, expanding the living space by improving the attic will be much easier and cheaper than doing the same by building an additional floor.
Any shortcomings can be smoothed out with a competent construction project
Of course, attic spaces are not only famous for their advantages: “dead” zones of the living space, which cannot be avoided due to the peculiarities of the rafter system, create difficulties when arranging large furniture. The need for careful insulation of the roofing pie definitely increases construction costs. But that’s why there are design solutions aimed at eliminating characteristic shortcomings, so that the external attractiveness of a residential property does not come at the expense of everyday comfort.
How to make an attic on an old house
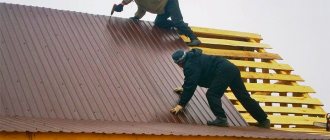
Removing the roof is the first stage. Before starting to build an attic, the first step is to dismantle the old roof.
Some people think that you can do without this process, but dismantling the old roof provides double benefits:
- the attic space will be reliable and will not leak;
- Saves money on repairing an old roof.
Dismantling work begins with the removal of roofing material, such as slate, tiles or other covering. It is important to carry out dismantling carefully and slowly.
You should not throw roofing material from a height; it is advisable to lower it carefully, because if there is no damage on it, then it will be used in the future when covering the attic.
When the roof is removed, they begin to remove the roofing felt, if any, it is usually placed as waterproofing. Then the sheathing is dismantled. If the planks are in good condition, they are suitable for creating a new roof sheathing.
After complete removal of the roofing materials, they begin to dismantle the old rafter system, if its height does not allow for an attic, or if the bars are unsuitable for further use.
It takes two or three people to dismantle heavy wooden beams; this work is difficult to handle alone.
The beams and rafter system begin to be disassembled from the ridge.
Mansard roof design
So, in total, the attic roof is a kind of pie with the following layers:
- the topmost layer is roofing material;
- waterproofing layer;
- lathing (usually solid);
- thermal insulation layer;
- vapor barrier layer;
- ceiling finishing.
The sequence of layers cannot be changed. A layer of insulation is laid on the rafter system, and a gap is provided between it and the roof for its ventilation, as described above. In some cases, it can be laid on the sheathing. For roof insulation, mineral wool or other suitable fire-resistant material is most often used. The thickness of the thermal insulation layer is quite large - about 25-30 cm, which even exceeds the thickness of the rafters.
In order to evenly distribute and securely fix this layer, you need to make an additional frame for it, located perpendicular to the rafters.
The vapor barrier layer is a breathable membrane that is attached with tape at some distance from the insulation to allow air to enter. A waterproofing layer of superdiffusion membrane is laid over the insulation.
All layers must be secured with tape. The sheathing of the rafter system is usually continuous, although in some cases it may have small gaps between the boards.
On the attic floor, it is necessary to insulate not only the roof, but also the walls around the perimeter. Otherwise, heat will accumulate in the room in summer and cold in winter. A correctly selected and correctly installed layer of thermal insulation will create the most comfortable living conditions at any time of the year. The material for wall insulation can be used the same as for the roof. A layer of thermal insulation is laid behind a backing made of plywood, lining or plasterboard. If you choose sandwich panels as cladding, you can make this layer much thinner.
After installing all the layers of the “pie,” all that remains is to cover the roof with roofing material. If the roof has skylights, they must be installed in pre-prepared openings.
The interior decoration of the attic roof and ceiling requires special attention. The most common finishing method is a suspended ceiling, which is attached to the elements of the rafter system: crossbars and racks. You can use sheets of plywood or plasterboard, clapboard, ceiling tiles, etc. Decorative finishing directly depends on the chosen design. The walls and ceiling can be wallpapered, painted or plastered.
Attic design elements
Each attic has its own structural elements, however, in general, the attic space consists of the following elements:
- Mauerlat. These are wooden beams, they are laid along the perimeter of the walls, and then secured to the walls with reliable fasteners. It is to the Mauerlat that the rafter system is attached.
- Rafters are stiffening ribs; they are set at a certain angle.
- The ridge purlin is the top of the rafters.
- The sheathing is made of wooden boards; insulation materials and roofing material are fixed to the sheathing.
- Diagonal ties are used to give the attic additional strength; these ties connect rafters, posts and beams.
- Supports installed inside the attic make the structure more stable, especially when the attic area is large. Internal supports are used as supports for rafters and ridge girders.
- Insulating materials, including sound insulation, insulation, vapor and waterproofing.
Construction of the attic
Most often, a new attic is made in the form of a gable sloping roof. This is due to the large interior space, which can be used as a living space.
Before starting construction, you need to make a correct calculation of the optimal distance between the rafters (see Gable roof rafter system). An old wooden house cannot always withstand the load of a new roof, so you should choose the installation step of load-bearing structures based on the calculated weight of the roof. Data about this parameter can be taken from the table.
Then, based on the calculated data, material is purchased - wooden beams, rafters and slats for sheathing. The last step depends on the coating material. Often it should not exceed 400 mm. But the final parameters are determined based on the recommendations of the roofing material manufacturer.
The procedure for performing installation work
The first step is to install the Mauerlat, these are wooden blocks that are located horizontally, they are placed on top of the walls, rafters and other load-bearing elements are attached to them.
Mauerlat allows you to evenly distribute the load along the entire length of the walls.
To secure the Mauerlat, you will need the following tools, materials and devices:
- wood saw, hammer;
- drill;
- anchor;
- roulette, level.
For the Mauerlat, wood blocks are most often used, the dimensions of which are 150x100 millimeters.
A mauerlat is installed along the perimeter of the walls; these wooden blocks are connected to the walls using mounting dowels.
After installing the Mauerlat, load-bearing beams are attached to it. Then vertical posts are attached to them with self-tapping screws or nails, and the posts are connected to each other from above with beams. Rafters made from wooden blocks are installed on these beams.
For rafters, bars are most often used, the dimensions of which are 50x180 millimeters. Their length depends on the slope of the bevel and the size of the house.
The rafters must be built rigidly; they are the frame that carries almost the entire load of the attic. To ensure that all the rafters are at the same angle, experts recommend first making a template that is applied to the bars being knocked down.
It is advisable to make rafters at an angle of 45-60 degrees. If you reduce this angle, this will significantly reduce the living space of the attic. And if you increase this angle by more than 60 degrees, then the attic will become vulnerable to gusts of wind.
After preparing the frame, it is important to determine what material will be used as the sheathing. The vapor barrier, waterproofing material and roofing will be attached to the sheathing.
If a soft roof is used, then OSB boards must be installed on the wooden frame.
And if the roofing is slate, corrugated sheets, tiles or any other material, wooden planks are used for the sheathing, their dimensions are 40x60 millimeters.
Let's watch a video on how to make an attic on an old house:
Comprehensive thermal protection
To prevent the attic from turning into a steam room in the summer, and into a “snow queen’s apartment” in the winter, high-quality insulation of the attic should be provided at the design stage. The attic is insulated along the entire perimeter of the walls of the building, as well as along the entire roof plane. The thickness of the insulation is determined based on the climatic characteristics of the area.
Special attention should be paid to the proper installation of roof windows. This is the key to their long and reliable operation. A reliable connection between the windows and the roofing pie is provided by a special installation kit. It consists of hydro- and heat-insulating materials, as well as a vapor barrier apron.
External awnings will neutralize the flow of ultraviolet radiation and save the room from the heat - special accessories that will be appreciated by everyone who values comfort.
Attic curtains and blinds will complement the interior and regulate lighting. These, at first glance, familiar interior items will improve everyday life and create an elegant ambiance.
Waterproofing and insulation
Waterproofing material and thermal insulation are installed because warm air rising from the attic space can cause serious damage to the ceiling and rafters, over time it will destroy the wood.
To avoid this, waterproofing is installed during the construction of the attic. Insulation helps keep the room warm.
Waterproofing materials are made in the form of film or roll material, they are mounted on the sheathing.
Waterproofing can also be rolled, coated, sprayed or liquid. The waterproofing material is the substrate for the roof. The following is used as thermal insulation:
- mineral wool;
- fiberglass;
- expanded polystyrene;
- extruded polystyrene foam boards;
- penoizol;
- bulk materials.
The most common material for thermal insulation is mineral wool; it is simple and easy to install, is non-flammable, can withstand temperatures up to 800 degrees, has good thermal insulation characteristics and is inexpensive.
Expanded polystyrene is used less frequently because it cannot retain or transmit moisture, and its thermal insulation characteristics are no worse than mineral wool.
Loose insulation is great for a roof that has a lot of unevenness, where wool and polystyrene cannot fit tightly to all curved surfaces.
Thermal insulation with foam insulation is used when special equipment is available. Penoizol penetrates perfectly into any cracks and holes because it has a semi-liquid consistency.
The thermal insulation material must fit tightly to the rafters; there should be no cracks, voids or gaps.
For the heat-insulating layer, the lathing should have a pitch of about 50 centimeters, thanks to which the insulation will be tightly fixed.
Ventilation of the attic floor
Particular attention should be paid to the arrangement of the attic ventilation system. If in a non-residential attic it could be limited to minimal ventilation, then here it is necessary to create conditions for comfortable living. The main problems with the microclimate of the attic are related to the heat that comes from the lower floor and causes condensation to accumulate on the insulating layer. Under its influence, the insulation rots and collapses, completely losing its properties. To protect it, ventilation alone is not enough, so another layer is added to the roof structure - a vapor barrier. When installing insulation, you need to ensure a gap between it and the roof of about 3-5 cm. If, despite all the protection methods, condensation still continues to accumulate on the heat-insulating layer, you should think about organizing a forced ventilation system. The insulation ventilation system consists of holes made in the eaves and ridge.
Roofing
Roofing materials are mounted on the sheathing.
Most often used as a roof:
- corrugated sheets,
- slate,
- ondulin,
- metal tiles,
- galvanized metal, and others.
The lathing is fixed in increments of 20-80 centimeters, depending on the angle of the roof.
The smaller the angle of inclination, the shorter the pitch of the sheathing will be. Roofing materials are installed starting from the bottom row. This row is fastened slowly, very carefully, so that the bottom line is without protrusions and perfectly smooth. Roofing material must be installed with an overlap.
The roofing material is secured with nails, self-tapping screws or screws, depending on the type of sheets. After installing the entire roof, a ridge is mounted on the top of the rafters.
Interior decoration
All kinds of materials are used for interior decoration of the attic.
The following are used as flooring:
- linoleum;
- laminate;
- ceramic tiles;
- carpet;
- parquet;
- wooden boards;
- cement screed.
Before installing any material, preparatory work is carried out.
For finishing walls and ceilings use:
- plywood;
- OSB boards;
- drywall;
- eurolining;
- slats;
- block house;
- Fiberboard or chipboard.
After installation of any of these materials, finishing is carried out.
It could be:
- putty;
- painting;
- wallpaper sticker;
- wood varnishing;
- textured finish.
Any type of interior finishing is carried out strictly in accordance with technological requirements.
Let's watch another video about building an attic with your own hands:
Construction of houses
39 votes
+
Vote for!
—
Vote against!
Construction of an attic is a very important process that is carried out both at the design stage of the entire house and after its construction. This room provides its owners with additional square meters of living space. Let's look at the features of the attic construction below.
Table of contents:
- Construction of an attic: project and its development
- Do-it-yourself attic construction in the house
- Frame attic construction technology
- Recommendations for making an attic with your own hands
Construction of an attic: project and its development
The attic is a rather difficult part of the building to construct. It is preferable to design it at the stage of building the house itself. Because building a residential attic on a finished building is not always possible. First of all, due to the fact that the attic space has considerable weight, and therefore loads the foundation.
The construction of an attic consists of a certain kind of stages, such as:
- attic construction drawings;
- dismantling old roofing materials, if the attic is being built on an already completed building;
- strengthening the walls on the upper floor, strengthening the foundation, if necessary;
- erection of attic walls;
- construction of the roof, its insulation, waterproofing and finishing;
- installation of window structures;
- interior finishing works.
Compliance with all technological nuances in the construction of an attic will allow you to obtain a reliable and durable building.
The first and most important stage is drawing up a project for the attic space. At this stage, you should take into account such features as the size of the room, the material used in its construction, the roof and the level of its slope and many other nuances.
There are three ways to design an attic. The first is the most budgetary, drawing up the project manually. However, minimal design experience is required to carry out this operation. The second way is to use ready-made design documentation; however, it is not a fact that someone else’s attic design will be completely suitable for your home, so you will still have to make some adjustments to it. The third way is to contact specialized organizations that, in the shortest possible time, will help you draw up an attic project that is ideal for your home.
In the process of independent design, you should take into account the wall loads on the building, its appearance and finishing materials used both inside and outside the premises. In addition, it is imperative to take into account the load from the building on the foundation; it may need to be strengthened. If the attic is too heavy, there is a risk of deformation or cracks in the house.
Experts will help you choose the optimal building materials, which, on the one hand, will ensure the attic’s durability in operation, and on the other hand, will help reduce its load on the base of the entire building.
In addition, after drawing up the project, it must be agreed upon with special government agencies. If you have a competent project, this process will go quite quickly.
Do-it-yourself attic construction in the house
We invite you to familiarize yourself with the option of constructing an attic in an already built and commissioned residential building. In this case, the first step is to dismantle the old roof. Thus, it will be possible to expand the under-roof space and increase the safety of the building under construction.
To dismantle the roof, it is not necessary to hire specialists; all work can be done with your own hands. To do this, you must first get rid of the external roofing finishing material. Next, you need to completely remove the sheathing and rafter system.
After this, it is necessary to strengthen the walls on the adjacent floor, since the attic will exert a certain pressure on them. The design features of the attic exert pressure not only on the surface of the base of the building, but also on its walls. Therefore, first of all, before constructing an attic, it is necessary to strengthen the walls close to it. To do this, you should use special calculations, according to which this process is carried out and the strength level of old walls is determined.
The next stage is insulation and waterproofing of the attic floor, which is also the ceiling on the previous floor. With the help of these actions it will be possible to ensure a healthy atmosphere in the room. To insulate the attic, you can use various thermal insulation materials in the form of polystyrene foam, mineral wool, etc.
Construction of the attic photo:
Next follows the process of erecting walls in the attic. The walls are made in accordance with the project developed in advance. Most often, wood or timber is used to build walls. To insulate the attic, it is recommended to use mineral wool or expanded polystyrene. When choosing a material for external and internal wall decoration, try to give preference to materials with a high level of fire safety.
The next process is the construction of the roof. In this case, calculating the correct roof slope angle is very important. Since a roof that is too flat will negatively affect the ease of use of the attic space. Please note that the roof must be properly waterproofed, since if there is the slightest leak on its surface, moisture enters the attic.
In addition, the shape of the roof should be as simple as possible; the presence of broken and shaped elements will only complicate the process of their construction. Also important is the issue of insulating the attic space. For these purposes, various types of building materials are used. When choosing insulation for the attic, try to give preference to materials that do not absorb moisture and are resistant to frost, temperature changes and rodents. In addition, the thermal insulation material should not allow heat to escape from the room.
It is best to focus on carrying out internal thermal insulation work. To create it, follow a number of steps:
- install finishing in the form of plasterboard or plywood base;
- form a vapor barrier layer; special films are used for these purposes;
- lay thermal insulation material - the ideal solution is mineral wool;
- ensure proper waterproofing of the roof using a special type of membrane;
- lay external finishing roofing material.
To erect a roof, you will also need to install a rafter system and install sheathing, the installation step of which depends on the type of roofing material. After the roof installation is completed, windows should be installed.
In order to ensure high-quality lighting in the room, several windows should be installed in it, the size of which directly depends on the size of the attic itself. The window in the attic ceiling must be of high quality. It must be resistant to precipitation, wind, and temperature changes. In addition, with the help of window structures, high-quality ventilation of the attic is ensured.
Further actions for the construction of the attic are related to the carrying out of interior finishing work, the organization of heating, the decoration and design of the room. Strict adherence to all recommendations for attic construction will help ensure long-term operation of this room.
Frame attic construction technology
A frame attic is an excellent solution for any home, garage, or even a bathhouse. Among the advantages of frame-type attics, we note:
- lightness of the structure, so it does not load the main building, there is no need for additional strengthening of the walls and foundation;
- affordable cost of the attic - in comparison with its stone options;
- high level of thermal insulation and sound insulation;
- the possibility of constructing an attic of almost any shape and configuration;
- ease of construction work, since the materials for the construction are quite light and special equipment is not required to lift them to the surface of the house.
The construction of a frame attic allows you to obtain a finished building with excellent heat and sound insulation properties. In addition, the roof will remain completely intact, and the usable area of the room will increase significantly.
A simpler process is to build an attic on a building that has not yet been erected. The construction of an attic on an already finished house requires the dismantling of the old roofing. Work should begin by studying the characteristics of the soil on the site and determining the bearing capacity of the foundation. If the foundation is not able to support the attic, then a series of works will be required to strengthen it.
Next, you should inspect the walls of the house for their susceptibility to additional loads. In this case, if necessary, it is necessary to strengthen the walls. After this, the old roof is dismantled and the ceiling is strengthened.
The construction of a wooden attic consists of the following stages:
- production of frame system;
- installation of walls;
- insulation of attic walls;
- installation work related to the installation of the roof;
- finishing the attic with roofing materials and insulating the roof;
- interior decoration of the attic.
In addition, the construction of an attic involves the installation of window and door structures, the manufacture and installation of stairs, etc.
In order to construct an attic from timber, you should prepare an edged board, plywood, screws and the timber itself. The frame structure should be of a height convenient for the average person to move around. The optimal height of the attic is at least two meters. The height of the ridge zone should be about 350 cm.
The easiest way is to assemble the frame on the ground and then lift it onto the roof. The top beam or frame frame will act as a hearth in the attic. To fix the frame structure on the surface of the house, special boards or plywood are used. In this way it is possible to obtain a special platform. The knots and quality of fastening depend on the material from which the attic walls are made. Self-tapping screws are used to connect the timber at the top of the structure. After making the frame walls, the roof should be thermally insulated and waterproofed. After this, external and internal wall cladding is carried out, windows and doors are installed, and internal finishing work is carried out.
Recommendations for making an attic with your own hands
When planning an attic, you should carefully analyze the general condition of the main building. The attic can be one room or will consist of several rooms. At the design stage, you should also take into account the design and shape of the windows, as well as their location.
The attic should be constructed from light, but at the same time durable materials. Since the materials should easily rise to the roof and place minimal load on the base of the building.
The most optimal materials for constructing an attic are wood or steel profiles. An attic made of stone or concrete will load the main building. Roof finishing materials should also be light, but at the same time durable and reliable. It is preferable to use bitumen shingles or piece metal for roofing. We recommend using plasterboard for interior wall decoration and leveling.
Since the attic is located above the main building, it is in greater contact with cold air. Therefore, proper thermal insulation of this room should be ensured. Heated air in the room should not penetrate through the insulation. In addition, in order to prevent moisture from entering the room, it is necessary to ensure its waterproofing.
In relation to the design features of the attic, it consists of a rafter system, which is installed in increments of sixty centimeters. To fill the gaps between the rafter system, it is recommended to install thermal insulation materials, such as mineral wool, inside them. It is possible to lay the insulation in one, two or even three layers. To calculate the total thickness of the thermal insulation material, the total heat loss coefficient in the room should be taken into account. To protect the roof from inside the room, a vapor barrier should be installed. Next, you should finish the roof using plasterboard, lining or finishing panels.
Do not forget to leave a ventilation gap, the main function of which will be to get rid of excess moisture in the under-roof space. The width of this gap directly depends on the type of roofing material. A vapor-permeable wind barrier should be installed on the outside of the heat-insulating material.
An excellent vapor barrier material is polyethylene film, glassine or roofing felt. The insulation is laid with an overlap of 15 cm. Construction tape is used to seal the seams. Please note that foil waterproofing is laid with a foil covering inside the room. Thus, the foil will reflect the heat that comes from the room.
Construction of the attic video: