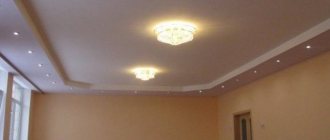
When carrying out renovations, there is always a choice of ceiling finishing. High requirements for the aesthetics of the room do not allow open pipes, ventilation and other communications. You can hide any wires and lines by installing a plasterboard box. This design looks impressive on the ceiling in any room: kitchen, hallway, living room, bedroom. The finished structure looks like a two-level ceiling, but its installation will be cheaper. The shape of the box is selected in accordance with the overall interior of the room; spotlights will become its organic addition.
In this article we will tell you how to make a plasterboard box yourself, consider various options, and also demonstrate photo and video instructions.
Advantages of finishing
Can be built in backlight
- Drywall is a safe and environmentally friendly material, its use is safe for health.
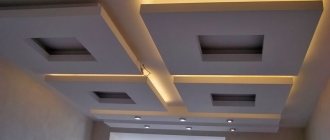
- The design allows you to create any geometric shapes and serves as an important element of ceiling decor.
- Possibility to integrate additional lighting.
- Easy to process and install.
- High degree of fire safety.
How to choose drywall?
Drywall consists of a layer of gypsum, which is protected on both sides by layers of paper.
There are three types of drywall:
- Ordinary. Suitable for installation of walls, interior partitions and ceilings;
- Moisture resistant. Impregnated with a solution that repels moisture and prevents the occurrence and development of fungus. Used for finishing baths, garages, bathrooms;
- Fire resistant. Contains additives that contribute to the material's resistance to fire.
Types of drywall
How to choose drywall
A plasterboard sheet is a building material based on a hardened layer of gypsum with filler. Both sides of the sheet are covered with paper, which serves to protect the inside and ensures stretching of the material during operation. The versatile and inexpensive material has become widespread. Depending on the purpose, it is divided into moisture-resistant, material intended for normal humidity, and fire-resistant. Cellulose-reinforced gypsum fiber sheets have excellent strength characteristics.
Box finishing
Puttying drywall is an important stage of work, since if it is done poorly, the structure will have an unsightly appearance. In the video you can see what a plasterboard box looks like after finishing in reality.
- The surface of the drywall is coated with a primer, special attention is paid to the seams
- After the primer has dried, the seams and recesses of the screw heads are filled with specialized putty. The joints of the sheets are glued with reinforcing tape or serpyanka mesh, and after drying, the putty is reapplied.
- On the internal and external corners of the structure, perforated paint corners are attached to the putty.
- After processing the joints and corners, the entire surface of the box is puttied. The mixture is applied in several layers to level the surface as well as possible. The last layer is made the thinnest.
- After drying, the surface of the structure is sanded with an emery mesh, after which it is painted, covered with wallpaper or finished with decorative plaster.
Materials required for installation
Profiles UD and CD
The basis for installing a ceiling box is a frame made of a metal profile; for it you will need:
- guide profile UD;
- supporting profile CD;
- brackets and crab connectors;
- fastening materials (screws, dowels);
- sheets of plasterboard 12 mm thick, corresponding to the humidity level in the room;
- primer;
- gypsum putty;
- mesh for seams.
When choosing a material, you need to pay attention to its quality: the plasterboard sheets should not be chipped, the galvanization of the surface of the profiles should be uniform. The rigidity of the metal frame ensures the safety of the entire structure; it is better to purchase material from well-known manufacturers. Fasteners and profiles must be of the same brand.
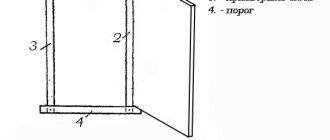
Box drawing
Before installing the box, you must complete a drawing that will allow you to calculate the amount of material required.
Until sheathing, the sheets are stored only in a horizontal position.
What does the box consist of?
To make a plasterboard box on the ceiling with your own hands, you need to know what it consists of and how it is attached. In order for the material to hold better, it is better to attach it to a metal grid. The result is a lightweight design that is easy to assemble yourself. You can attach drywall to wooden slats. This option may not last long due to its weak strength. It should be taken into account that the wood can, under the influence of temperature, move to the side along with the frame, and also rot over time.
A reliable product will be obtained if you use a metal profile. Galvanized material is not subject to corrosion; there are two types of profiles: main and guide.
The main one fixes the plasterboard panels, it is installed in a horizontal guide, they are shaped like the letter “P”. The main profiles have curved edges, which makes them look like the letter “C”.
To create a frame for a suspended ceiling, take the main profile, its length is from 3 to 4 meters. Sheet size 28 by 27 mm. The horizontal profile is used as a guide.
To create a curved frame, take a curved profile, and it is also used for arched shapes.
To assemble a plasterboard box on the ceiling, you need to purchase a connector. It is two-level, taken to fix elements that run perpendicular to each other. In component parts there is a term “crab”, which refers to single-level connectors. They combine and fix the parts at the same level. They are usually fastened with self-tapping screws, sometimes with latches.
To assemble a plasterboard box on the ceiling, a direct suspension is required. It can be secured with a pair of self-tapping screws. It is attached directly to the ceiling. As a rule, an anchor suspension connects the load-bearing base to the profile. Since the module has a spring, it is used to increase the length of the suspension. It stretches from 25 to 100 cm. It is also worth taking a longitudinal connector. Its function is to lengthen the profile element. Some people replace the crab with a simple corner connector.
Box installation rules
Installation rules
- The ceiling on which the plasterboard structure is installed must be level, for this purpose preparatory work is carried out.
- The reliability of the design is guaranteed only by an aluminum profile manufactured at the factory. Only high-quality material can withstand the load and ensure installation of structures of any shape.
- If the frame guides pass near hot pipes, then it is necessary to increase the distance between them, otherwise the heating will cause expansion of the metal and damage to the shape of the box.
- Before cladding begins, markings are applied to the sheet.
- After attaching the sheets, the surface of the structure is puttyed and painted.
The construction of the box will require preparing various tools for work:
- Measuring instruments: tape measure, plumb line, level.
- Metal scissors.
- Hammer.
- Screwdriver.
- Spatulas.
- Hammer.
- Construction knife.
Preparing for work
In order to assemble a box for a suspended ceiling, you need to understand the drawings and fastening diagrams. Initially, you should set the thickness of the drywall, as well as the height of the future box. You need to understand how deep it will be.
If a plaster box on the ceiling is planned before installing suspended ceilings, then the surface does not need to be leveled. If a person is going to prepare ceilings for painting, he will have to work hard.
The first step is to remove the previous coating. If the whitewash was chalk-based, you will have to wet the layer with water and carefully remove it with a tool. The remaining layer is wiped off with a rag.
If the ceiling was plastered a long time ago and it is crumbling, then the old layer must be removed.
The next step is to use a primer, applying two thin layers in succession. Some cracks remain and are sealed with reinforcing mesh. After this, putty is applied. It takes time for the ceiling to dry completely. When the surface is ready for further work, sandpaper is used. She is “walked” across the ceiling several times. Afterwards a primer is applied, which penetrates deep into the layers.
The last step is to apply the finishing layer of putty.
Stages of work
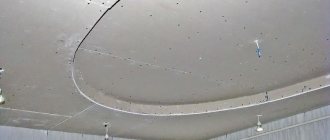
Markings on the ceiling
- Before assembling the box on the ceiling, it is necessary to mark it. The lines are drawn with a pencil, the parallelism of the markings is controlled by a bubble or laser level. Lines for subsequent fastening of the guides are drawn on the walls and ceiling. The pipes that the box will hide need to be properly primed and painted; after the structure is installed, they will become difficult to access.
- For convenience, you can lay out the profiles for the frame on the floor and transfer the markings to the ceiling. Along the fastening lines, holes for dowels are made using a hammer drill.
- The guides that form the upper part of the box are attached to the ceiling.
- Hangers for fastening are made independently; the guide profile is cut into pieces of the required length.
- A UD guide profile is screwed around the perimeter. It forms the plane of the structure; the shape of the box depends on the accuracy of maintaining the horizontal level when securing it. Galvanized slats are fixed using self-tapping screws. The fastening pitch should be from 30 to 60 cm, it depends on the weight of the structure. If the starter profile has holes, this will make installation easier.
- According to the markings, hangers are attached to the ceiling. They are easily cut with scissors to fit the length of the box. The supporting CD profile is attached to their lower part with self-tapping screws. The main load of the structure falls on this element, because the sheets of drywall are screwed to it. All parts must be in the same plane, no bends are allowed.
- It is necessary to prepare the wiring for spotlights by marking their installation locations. The wires are secured so as not to damage them during further installation of the box.
- Lastly, the transverse parts are screwed on; they are fastened perpendicular to the wall in increments of 60 cm. The frame is ready, you can sew it up with sheets.
Assembling the frame with simultaneous plasterboard covering
This method is suitable for those who do not want to bother with jumpers, but are looking for simpler ways to solve the problem. Assembling the frame using this method is carried out in the same way as described above, but only until the jumpers are installed.
After attaching the guide to the drywall, install horizontal jumpers
Instead of installing jumpers, you need to screw a piece of drywall to the ceiling guide, which will become the front part of the box. A piece of plasterboard should be taken with a reserve, so that later it can be cut to height. It is screwed to the top profile and to the one installed on the wall adjacent to the side. You may need to use multiple pieces of drywall.
Now a guide is attached to the plasterboard from the inside parallel to those already installed on the wall and ceiling. It is clamped with self-tapping screws, which are screwed into the gypsum board from the front side. Thus, the guide and the drywall itself are simultaneously attached. Next, all that remains is to drive the horizontal jumpers into the lower part of the box to give the structure greater rigidity.
How to make a box from gypsum plasterboard on the ceiling according to the specified scheme can be found in the video.
Box lining
Box lining
Before fixing the sheathing, insulation is laid, if provided. Drywall sheets are cut to fit the box. The joints of two adjacent sheets should be placed on one CD profile. Initially, the lower part of the structure is sutured, and then the side.
The material is fixed with self-tapping screws, the heads of which are recessed by 1–2 mm to facilitate puttying.
Round holes are cut in the places where the lamps are installed.
Preparatory work
Before making a frame, you should first map the location of the drywall sheets. This will make the work easier and allow you to economically select the material. The standard sheet widths are 600 mm and 1200 mm. Their length ranges from 2 m to 4 m. The thickness of the sheet for a box made of plasterboard on the ceiling is from 6.5 to 9.5 mm. If the box on the ceiling is small, it is enough to pick up pieces from waste. It is important here that they are free of chips and cracks.
The base surface is prepared as follows:
- Old finishing is removed from the ceiling.
- Slots, cracks and holes near the pipe exit are sealed.
- A cable is attached to the ceiling in a corrugated sleeve, hanging from the ceiling at the locations of the lamps.
- The base ceiling is primed.
It is also necessary to take care of the hidden metal pipes: prime them and paint them. This will prevent rust stains from appearing on the box trim in the future.
Now you need to make a drawing and markings:
- A diagram of the box frame is drawn with the obligatory indication of dimensions. It also marks holes for pipes and built-in lights.
- Markings are made on the walls and ceiling with a pencil and the lower level of the box is beaten off with a cord. The evenness of the lines is checked with a building level. Attachment points are marked
The recommended distance between the suspended ceiling and the box representing the second level failure is 10–20 cm.
Finishing
Box putty
Work on finishing a plasterboard box begins with priming the entire surface. After drying, it’s time for the starting putty. Applying putty is a responsible and complex procedure; incorrect finishing will spoil the overall impression of the appearance of the structure. To perform the job efficiently, professional craftsmen use two spatulas - a working one and an auxiliary one; it is worth taking into account their experience and preparing a wide and narrow spatula. A layer of putty is applied with the auxiliary tool, and leveled with the main tool.
Simple box
The corners of the structure are formed with a metal corner attached to the starting putty. It is necessary to press the element to ensure a tight fit to the box. After removing the corners, the connecting seams are glued with mesh and filled with putty. When the finishing of the joints has dried, putty is applied to the entire surface of the box. This procedure occurs more than once, each layer gradually removes all irregularities. The finishing layer is very thin. Another secret is to use starting and finishing putty from the same manufacturer, this guarantees compatibility of materials. Dried putty requires sanding the surface. To do this, use first coarse and then fine sandpaper.
How to make a plasterboard box on the ceiling
Selection of materials and tools
If you are puzzled by installing a plasterboard box on the ceiling, it is advisable to first reproduce the idea on paper. This will make it easier for you to imagine the location of individual elements, decide on materials, and calculate their quantity.
To work you need to purchase the following materials:
- gypsum board sheets 12.5 mm thick. Depending on the temperature and humidity in the room, select the required type of plasterboard (standard, moisture- or fire-resistant);
- UD – profile (guide);
- CD – supporting profile;
- Fastening elements (dowels, screws).
To install lighting, you will need to purchase the appropriate devices - LED strip, spotlights. In addition, you will need finishing materials:
- primer;
- putty;
- special corners made of aluminum or galvanized steel.
Prepare the following tools:
- screwdriver;
- perforator;
- scissors for cutting profiles;
- building level;
- available tools for finishing work - rollers, brushes, spatulas.
Preparatory work
Before starting installation work, you will need to prepare the ceiling surface:
- using a spatula, remove the previous finish from the base;
- repair all unevenness on the ceiling - seams, cracks, cracks, gaps;
- place the wires in corrugations and secure them to the ceiling to prevent them from sagging;
- Cover the surface and base of the pipes with a layer of primer. This will prevent rust from occurring.
It is necessary to prepare a gypsum board. To do this, the sheets are brought into the room where the box is supposed to be mounted, placed horizontally and left in this position for several days so that they take the correct shape.
Drawing and marking of the box
Since the plasterboard box is installed at a certain height, marking the surface cannot be avoided. This will not only make it more convenient for you to work, but you will also be able to get a high-quality result.
First, the lower level of the structure is determined. Despite the location of each tier, if a multi-tier system is installed (in the center, along the perimeter, etc.), the boundaries of all levels must be marked on the wall surface with a control line outlining the perimeter of the room. At this stage, it should already be known in advance what the distance will be between the base base of the ceiling and the gypsum board, since it is in this niche that the hidden areas of the spotlights are placed.
We proceed as follows:
- we mark the base of the box, put points at the place where the hangers and guides are attached;
- Be sure to take into account and note communications, pipes, wiring and lighting elements.
If the design is of irregular geometric shape, then a drawing is also first made, after which the drawing is transferred to the ceiling.
To make it more convenient, you can make a preliminary marking on the floor, and then, using a laser level, move it upstairs.
Frame making
The UD ceiling guide profile is fixed to the wall surface with dowels. To do this, you will need to drill 6 mm wide holes in the ceiling using a hammer drill.
It will be much more convenient to construct the base of the frame for a box from a profile on the floor, and only then secure it to the ceiling. Be sure to check the evenness of the structure.
After the profile is finished, we begin to attach the hangers, which we make ourselves from guide profiles. They are easily cut with metal scissors.
Important! The length of the hangers should be equal to the height of the plasterboard box. When taking measurements, take into account the part of the profile that will bend inward.
The guides are fixed to the hangers with self-tapping screws. It is very important that there are no kinks in the profile. Therefore, purchase only high-quality materials.
Next, we move on to assembling the lower part of the structure, namely, we connect the transverse profile with the lower one. We attach the latter to hangers, insert the transverse strips into it and fix them with self-tapping screws. They should be located perpendicular to the wall surface. We mount them on self-tapping screws in increments of 30-60 cm.
See how to make a ceiling frame from a plasterboard profile.
At the last stage of installing the frame, we draw and secure the wires for future lighting fixtures, and mark the locations of the spotlights.
Fastening drywall
After completing the installation of the frame, we begin to assemble the plasterboard box. We proceed as follows:
- cut the sheet of drywall into pieces of the required size, immediately making holes in the material for spot lighting;
- It is better to fasten the elements immediately with the lamps built into them;
- fix the parts so that they do not overlap each other’s edges. Otherwise, you will have to waste time and cut off excess parts;
- Attach the sheets to the frame with self-tapping screws no less than 3.5-4 cm long in increments of 2-2.5 cm. This will provide the structure with additional reliability. The screw head should be “recessed” into the material by 3-5 mm.
Sealing seams
After the box on the ceiling is ready, we move on to finishing it. First, secure the metal corners, then fill the holes from the self-tapping screws with putty and apply the putty in an even layer of 2-3 mm over the entire surface of the structure. After the ceiling box has dried thoroughly, putty it again with the finishing compound, a layer thickness of no more than 1-1.5 mm. Use fine-grit sandpaper to clean the ceiling. Before final finishing, coat the surface with a layer of deep penetration primer. It will improve the adhesive properties of the paint.
On a note! Choose starting and finishing putties for finishing plasterboard surfaces from one manufacturer. Otherwise, over time, different compositions may begin to peel off from each other.
Installation of a box with lighting
The assembly of the box follows the same scheme as described above. But there are some details to consider. It is necessary to make suspension stands from the ceiling profile. For this purpose, a profile should be cut with a size equal to the height of the box. On one side, make cuts along the folds, 40–50 mm high, and bend the back wall inward. The number of such blanks should be calculated so that they are installed every 60 cm along the length of the entire box. Insert the prepared hanging stand with the uncut side into the guide profile on the ceiling and attach it with a self-tapping screw.
Now you need to make a blank from the ceiling profile. Cut a profile from it to a length equal to the bottom of the box. Please take into account the fact that the lower length will differ from the upper one, since there should be a shelf at the bottom for installing the backlight. That is, the length of the profile segment should be 5 cm greater than the length of the lower part of the box. This distance is quite enough to place the LED strip there. At one end, insert the workpiece into the guide profile on the wall with the shelves up and fix it with self-tapping screws. The other end is attached to a suspension stand. It is important to maintain an angle of 90°.
Making the frame
The result is a box with a protruding profile. Protruding sections should be drowned out. To do this, insert cut pieces of the profile of the appropriate length onto them. This will serve as the basis for attaching a strip of drywall, and the LED strip will be mounted on top.
Now you can sheathe the box. Finally, all that remains is to build the lighting. To do this you must first purchase:
- 220 V power supply for 12 V LED strip.
- LED strip, which can be one color or changing color.
Belt power selection
To select the appropriate power supply, you need to determine the power of the LED strip. To do this, you need to measure the perimeter of the entire niche and multiply the resulting figure by the power of a linear meter of tape. But that’s not all, as the following nuances should be taken into account:
- It is not recommended to connect the tape to the power supply in series, since the subsequent section of the tape will glow weaker.
- If the power of the block is too large, this will significantly affect its size. Therefore, when arranging the frame, take this into account. There is another option, for example, to purchase a power supply for each piece of tape; it has small dimensions.
The tape must be glued to the made shelf. When everything is laid out, you can connect it to the power supply.
Positive and negative points
Creating a box, and even on the ceiling, requires additional skills and abilities. It's not as simple as covering a profile along a wall with plasterboard, but it's also not as difficult as creating a multi-level ceiling with shaped elements. Since we are talking about building a ceiling box from plasterboard with your own hands, you must first learn about all the positive and negative aspects of creating such a structure. Let's start with the positive aspects.
- This design provides an additional opportunity to install lighting of your choice. Additional lighting fixtures can be placed not only at the bottom of the box, but also on the side or even hidden lighting .
- The appearance of the room will be transformed by adding a new decorative element.
- The box can hide ventilation ducts and can also be used for laying wires.
- It becomes possible to zone the premises.
Box on the ceiling made of plasterboard with lighting
. There are several negative points that are worth paying attention to:
- the height of the room will be hidden. Not only that, the suspended ceiling has already taken up 10 centimeters of the room’s height, or even more. The height of the plasterboard box on the ceiling depends on the specific needs, but it will not be less than 10 centimeters. In some cases, its height can reach 20 cm. Therefore, after renovation, the room will be at least 20 cm lower;
- an inexperienced worker can create a rectangular structure. For more complex elements, you will have to hire a professional or get involved, spending a lot of time and effort at the same time;
- Despite the small dimensions of the ceiling box, it will be difficult to assemble it yourself, so an assistant may be required.
If the pros outweigh the cons, then you can get to work.
You can do the work yourself
Dimensions
If we talk about the size of the box, it will depend on what you want to disguise behind it. For example, this could be wiring, water pipes, gas pipes, ventilation ducts, etc. If backlighting is to be installed, the size must be sufficient to allow installation of a power supply and LED strip.
A properly installed box will decorate the room and will last for many years.
Attaching drywall to the frame
Sheathing the gypsum board box occurs in the following order:
- If necessary, insulation or sound insulation is placed inside the frame.
- Pieces of drywall are cut to the size of the box. At the joints of the sheets, chamfers are made so that the seams can be properly sealed with putty.
- The bottom sheets are installed. The joints must be on the CD profile.
- Lastly, the side edges of the box are sewn up.
Each self-tapping screw head is recessed into the sheet material by 1–2 mm, which will then allow these places to be puttied. To control the depth of screw tightening, it is convenient to use a special bit with a limiter.
- The corners of the drywall are not screwed tightly, otherwise cracks may appear.
- It is advisable to cut holes for spotlights before installing the sheet. After its installation, the ends of the cables for connection are led out through the holes.
Types of drywall
Drywall is a universal material that is used for finishing walls, ceilings, ventilation shafts, etc. Structurally, drywall looks like a sandwich of several layers of cardboard and plaster. At the same time, manufacturers can add various impurities to the composition to improve quality and various characteristics.
There are 4 types of drywall according to the general classification:
- GKL is a type of plasterboard structures that are used for finishing offices and technical premises. For them, the temperature regime does not exceed permissible standards. The maximum permissible humidity is 70%. It is gray in color with blue markings.
- GKLO - this type has an increased level of fire resistance due to the addition of special reinforcing substances to the core of the sheet. Marking is red, color is gray. They are mainly used for finishing production premises, ventilation shafts, electrical panels and other places where there may be an increased risk of fire.
- GKLV - this type is characterized by a neutral attitude towards moisture in the room due to the presence in its composition of various antifungal components and silicone granules. For a higher degree of protection, it is recommended to treat the material with waterproof paints or primers. Color: green, with blue markings. Used for rooms with high levels of moisture, for example, for a bathroom, kitchen, etc.
- GKLVO - green color, with red markings. Has increased protection from moisture and fire. It is used for utility rooms with certain requirements for fire safety and moisture.
In addition to the main varieties according to certain characteristics, drywall can also be divided according to the type of edge or other equally important parameters.
Features of drywall
Today, the most common building material is plasterboard. Not a single renovation or construction of a new facility can be done without it. Thanks to him, repair work is carried out quickly and efficiently. It belongs to the category of inexpensive goods. The advent of drywall negated the need for plastering work, diluting a huge number of various mixtures, and wasting time for their complete drying. Moreover, poorly applied plaster can crack and fall off over time; walls are perfectly smooth only in extreme cases.
Drywall sheets
To manufacture simple structures from a metal frame covered with plasterboard, you will need a minimum of free time and effort. This kind of work can be done by any man who has repaired his own home at least once in his life. Working with plasterboard is a pleasure. There is no need to obtain special knowledge and a very common set of tools, without specific inclinations. The main thing is to understand the principle of manufacturing a structure and select the necessary tools and materials.
Required tools and materials
You can make a plasterboard ceiling with your own hands if you prepare the necessary raw materials and tools:
- Metal profile and guides, which must be rigid, made of good, even galvanization, without stains, and not bending when pressed.
- Suspensions. You can make them yourself from guides.
- Drywall. For a wall box, sheets with a thickness of 12.5 mm are suitable, for other structures - thinner ones.
- Various fastenings: nails, screws, dowels. Knife, hammer.
- Putty, primer solution, special paint corners, regular and corner spatulas, tapes for seams.
- Tape measure, level, brushes, metal scissors.
- Screwdriver, grinder, cutter, hammer drill.
Types of box designs
Ceiling boxes made of plasterboard come in various types depending on their purpose.
Camouflage
Designed to hide minor defects in walls, ventilation ducts, kitchen hoods, electrical wiring, various heating, water, and gas pipes located under the ceiling.
The main purpose of the design is to hide imperfections and give the surface an attractive appearance.
Using it, you can create any shape, align corners, hide seams between panels. Decorating with original lighting and plinth will give the design a complete look.
Backlit
A combined ceiling box made of gypsum plasterboard, which is mounted to install lighting around the perimeter of the room. The lighting is installed inside the box. Its installation takes into account all the requirements of lighting devices, their placement and fixation. In this case, you should use the services of an electrician who will install electrical wires for the lamps.
For ventilation
The gypsum plasterboard box is mounted on various surfaces, contains holes for ventilation grilles, can have a horizontal and vertical orientation with a smooth transition to the walls to make the overall appearance attractive and well-groomed. These designs are most often used in kitchens. To support the ventilation pipes inside the frame, fasteners designed for such ducts are used.
A plasterboard ceiling box consists of a frame made of aluminum profiles, wooden elements and covered with plasterboard. The complexity of the device lies in the type of design and the solution to the problem.
Types of plasterboard ceilings
The design features of plasterboard ceilings are determined by the owner of the premises and the hired designer (optional). Currently, three forms are widely used:
- complex multi-level;
- two-level;
- ordinary single-level.
Single-level ceilings can be either independent structures or a component of multi-level ceilings. Even a non-professional builder can do this option. The main point that needs to be taken into account is that the design must be of high quality, reliable, based on a metal profile. Single-level ceilings are:
- do not reduce the height of the premises (this is especially true for rooms where the ceilings are already low);
- sounds coming from rooms located on the upper floors are less audible;
- you can hide wiring and all kinds of communication systems in them;
- If there are ceiling irregularities, gypsum boards can hide them.
Single-level ceiling
As for two-level and multi-level ceilings, they have many more advantages. They give the room style and exclusivity, allow it to be zoned, and change the geometry. With multi-level ceilings, the room can become visually larger or smaller. Moreover, she will definitely change her appearance to a more attractive one.
Multi-level ceiling
Suspended ceilings also differ in shape. They are:
| Diagonal | Having a level base with lower levels that protrude from one side of the room |
| Framework | Curved or rectangular ceilings. They are a structure consisting of a box with a metal base and steps in the amount of one or several pieces |
| Zonal | Serve to visually divide any room into certain zones (parts) |
| Curly | Flight of fancy. They look like complex geometric designs of various shades and directions |
Drywall is an integral element of any renovation. As for the ceiling, it enjoys well-deserved authority in this matter, since it is quite inexpensive and attaching it to the ceiling is easy and simple.
Ceiling with hidden lighting - what the box should be like
The plasterboard box around the perimeter of the ceiling can be equipped with hidden lighting. To do this, a niche of an open or closed type is arranged in the structure, extending the transverse guides from the profile to its curb. The niche will become the basis for attaching the LED strip.
As an option, you can consider a backlit box based on a U-shaped profile mounted on a guide profile. An LED strip is attached to the niche formed in the form of an inverted letter “P”.
When planning the installation of a stretch ceiling, you should remember the algorithm for its construction - the structure is attached only after installing the plasterboard ceiling and finishing the finishing work at a distance of 3 cm in relation to the main surface. It is worth understanding that the height of the box in this case will decrease by at least 3 cm and take into account the necessary transition level between the ceiling and the box structure.
The system is attached to the vertical plane of the box, so a double layer of material is used to enhance its rigidity. Installation of tension fabric with an area of more than 40 square meters is allowed only after strengthening the vertical structure with special wooden slats.
Another important point is the parameters of the box for a suspended ceiling with lighting. Even simple lighting based on an LED strip will require a length of at least 100 mm and a box width of no more than 100 mm.
Finishing drywall
After the final installation of the plasterboard box under the suspended ceiling, it is necessary to begin its finishing. To do this, the following actions are taken:
- The structure is carefully primed and the seams are embroidered.
- After the soil mixture has completely dried, the seams are sealed and all perforated elements are installed on the corner components of the box. For this purpose putty is used. Even before the putty dries, a reinforced mesh is glued to it, on which a layer of the mixture is applied so as to create a flat surface.
- The same procedure applies to the joints between the box and the wall, as well as the ceiling.
- The corner protection is installed and left until completely dry.
- Afterwards, the surface of the box is puttied with the base mixture using a wide spatula. Once the first coat is completely dry, a second coat of finishing material is applied.
- After drying the last layer, it is necessary to sand the surface using fine sandpaper or a sanding mesh.
- The final touch is priming the box and finishing it with facing material.
Helpful information! When installing a stretch ceiling, do not putty the drywall in the immediate vicinity of the ceiling.
Useful video on the topic:
Advantages and disadvantages
Plasterboard ceilings today occupy a leading position among other similar building materials. This is not surprising, since it has many advantages.
The main advantages include:
- The material completely covers all irregularities, seams, and other details without much effort. This means that you do not need to level the ceiling, plaster it several times or use other technologies for this. You just need to assemble and install the frame, screw in the drywall sheets and do the final finishing (paint, glue foam sheets, etc.). In addition, you do not need to prepare various tools for installation. The sheets can be cut with a utility knife and then screwed using a screwdriver.
- There are a very large number of possible options for plasterboard ceilings. For example, you can make two or more levels, mount various figures, and paint them with various designs. Thus, the design will give a special style to the room and visually enlarge it. It is difficult to bend drywall, but it is possible if you know certain techniques. You can install modern lamps or LEDs in it, which will not take up the space of the room as it does when installing an ordinary chandelier.
- You can hide all cables and other communication elements that do not look aesthetically pleasing on the walls in a plasterboard structure under the ceiling. Otherwise, you will need to ditch the walls. This is very easy to do with drywall.
- Drywall is not a dangerous material, although many people have the opposite opinion. This is an environmentally friendly material, which includes gypsum and cardboard.
- Sound insulation is one of the main advantages of this material. Thermal insulation is also at a fairly high level.
In addition, there are many other advantages that plasterboard provides. In different types of this material, the list of advantages can be increased or decreased.
There are quite a lot of advantages, but there are also significant disadvantages. These include:
- Although visually the space of the room can be increased, in fact it will decrease by 5-10 cm from above if there is only one ceiling level. This indicates that it is advisable to use such material in houses of the Austrian type, that is, with a high ceiling.
- Drywall does not have sufficient strength. Although this is not necessary on the ceiling, it can lead to some difficulties during transportation and installation. If the sheet is cracked, it will not be possible to repair it at home.
- Installing a ceiling is not a very easy task. It is better, in the absence of even minimal experience, to invite a team of craftsmen who can do everything efficiently. Otherwise, an incorrectly assembled frame can lead to destruction or sagging of the structure.
- Helpers are needed during the work process. Even with the necessary experience, you will not be able to install the sheet on the frame yourself.
- Quite low level of moisture resistance. In this regard, it is not recommended to install such a structure if there is a high risk of flooding of the apartment from above. There is also no need to install a plasterboard ceiling in the bathroom. The material absorbs moisture well, so the weight and size of the sheet increases, which leads to the destruction of the structure.
Having dealt with the pros and cons of plasterboard ceilings, we cannot definitely recommend this material. It all depends on the features of the room. Although it is clear that drywall has more advantages than disadvantages. With high-quality assembly, it will last a long time.
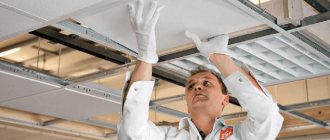
Installation of plasterboard box on the ceiling
Metal lathing is optimal for creating a box on the ceiling. Construction of metal lathing The cost of profiles is not much different from wooden bars. Some home craftsmen try to save money and install wood lathing on the ceiling, but this method is not strong enough, and the wood shrinks. When the temperature changes, wooden blocks may “lead”.
- Buy a tool.
- Prepare the material.
- Clean the surface.
- Mark the location of the box.
- Install the sheathing of their profiles.
- Cover the frame with plasterboard.
- Finish the structure.
Return to contents The first thing that sheathing begins with is cutting out gypsum board sheets in accordance with the dimensions of the box. Next, a step-by-step technology for attaching drywall is carried out, which is carried out as follows:
- First of all, the lower fragment is fixed, from the wall from the far corner. You need to screw the gypsum board section from the corner, moving towards the opposite edge. The screw pitch is no more than 20 centimeters. The screws are screwed in strictly perpendicularly and flush.
- The second sheet is screwed with a shift of about half, if provided.
- Once all the sheets at the bottom are installed, we proceed to the side sections.
- We check the level of the structure and, if necessary, trim the corner joint with a construction knife or plane.
- U-shaped guides, fastened along the perimeter of the walls and ceiling in the intended installation location of the box, dimensions 27x28;
- rack-mount C-shaped - the main structure is constructed from it, onto which drywall is attached, the price of the material is affordable; Ready mounted box frame on the ceiling
- how to make a curved ceiling structure? For this, a special arched profile is used. If such a profile is not commercially available, you can bend the guide profile to the desired size yourself.
Return to contents
Decoration
A plasterboard structure turns out faded and unattractive, but this can be corrected with the help of decorative elements. Experts recommend equipping the box with bright lighting, which will add coziness to the room.
Of all lighting fixtures, preference is given to built-in models that are used in suspended ceilings. The number of built-in lamps and their location is determined depending on desire.
It is necessary to decide on the number of lighting products in advance by connecting wires to these places. Since it is easier to cut drywall on the floor than on the ceiling, you can pre-cut holes for the lamps with a crown.
When the holes are cut and the structure is assembled, all that remains is to connect the lamps to the power supply and insert them into the prepared holes.
Ceiling box putty
It is necessary to putty all the joints between the gypsum board sheets, as well as the locations of the screws.
To avoid the formation of cracks, the joints must be glued with a special reinforcing tape - serpyanka.
We glue the joints of the gypsum board sheets with a special tape - serpyanka
First, a universal putty is used, it is intended for filling unevenness up to 10 mm, and then finishing. I used Knauf Fugen as a universal putty, and Vitonit as a finishing putty.
Putties used during work
After applying each layer of putty, you need to wait until it dries completely, then use a spatula and sandpaper to remove any unevenness.
Puttying the surface of the ceiling box
Typically, the required result is achieved using 1-2 layers of each type of putty.
Decoration options
There are quite a lot of techniques for decorating suspended ceilings. One of the most effective and at the same time simplest is the use of different colors. This looks especially elegant on multi-level structures. In addition, the ceiling can be decorated using foam or polyurethane baguettes. Which decoration method to choose depends on the personal preferences of the residents.
But in practice, there are several popular methods that are useful to mention:
- Ceiling tiles. They can be with different patterns, three-dimensional, etc. They are used for simple plasterboard ceilings. With their help, you can focus on certain details, for example, on chandeliers, or arrange them in a checkerboard pattern.
- Stucco molding. A good option for a classic room design. This decor is quite attractive, but there is no need to use it for a high-tech room, since the interior will only suffer from it.
- Fabric draperies. They are rarely seen on plasterboard ceilings.
- Fresco is considered a traditional method of ceiling decoration. The cost of such finishing is not cheap, but it is worth it. Moreover, after a long period of inactivity, it is being popularized again.
- If tastes are constantly changing, then the ideal option in this case would be to use vinyl stickers. They are easy to replace with others.
In addition, more traditional methods of decoration can be distinguished. For example, baguettes, curtains, cornices. If they are decorated appropriately, they can also be beautiful decorative elements. Moreover, even a chandelier can be considered a decorative element if you choose a unique, individual model.