Home » Articles » Ceilings » DIY plasterboard suspended ceiling
September 26, 2021 No comments
Suspended ceiling made of plasterboard sheets: all stages of installation on your own - from project preparation to coating with the finishing composition.
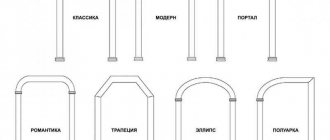
When a homeowner intends to install a suspended ceiling with his own hands, he is faced with a choice of what materials to choose and what design solution will suit him perfectly. After all, he can buy building materials of any color and install a ceiling structure in any design solution.
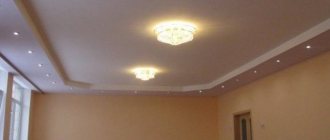
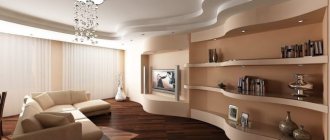
Plasterboard ceiling
Plasterboard suspended ceiling
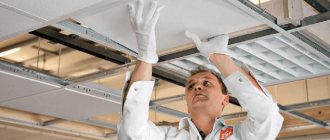
The most widespread is the plasterboard ceiling. The main idea is that the ceiling frame is suspended on a “rough” base, then sheet material is attached to the frame, which creates a flat plane for any type of finishing.
Do not think that a suspended ceiling can only be made from plasterboard. Any sheet material is suitable for these purposes: gypsum fiber sheet (GVL), aqua panels, wood composite materials (plywood, chipboard, OSB). But we will talk specifically about drywall, because this coating option is the most common.
Preparatory work
The first thing you need to do before installing a suspended ceiling with your own hands is to solve the issue of lighting the room. At this stage, it is important to choose the type of lamps that are supposed to be installed, their power, location on the ceiling surface and the total number of lighting fixtures.
The height of the frame will depend on these parameters, which will ultimately affect the height of the walls of the room.
Having designed the lighting for the suspended ceiling, electrical wires are laid out, the ends of which are lowered down at the places where the lighting fixtures are installed and secured with clamps.
Diagram: lighting system installation
To determine the ceiling level and create a perfectly straight line for arranging the frame, first make marks on the walls. To simplify the task, strokes are first applied with a pencil along the walls of the room at a convenient height of 1.7 m, each time guided by a laser or water level. Then they are connected using a painting cord into a single line.
Then, using a tape measure, measure the distance from the drawn line to the base surface, determining the lowest point of the ceiling.
Tip: To calculate the height of the future frame, step back from the intended lowest point of the base surface to the height of the profile and add 5-8 mm to this value for the gap. When installing spotlights, the height of the frame should be correlated with the size of their base.
Having established the distance from the lowest point mark to the horizontal line, draw a parallel line under the ceiling. It will serve as a guide for securing the guide profile.
Advantages and disadvantages of using drywall
Let's look at the main advantages and disadvantages of using a plasterboard ceiling.
Advantages:
- The prevalence of the material – the advantages include the popularity of drywall. GCR is not difficult to find in the required quantity, and a large number of craftsmen have experience working with this material.
- The ability to do the work yourself - working with drywall is quite easy on your own. Sheets are cut using a regular knife. For example, it will be difficult to make a suspended ceiling without many years of experience.
- Environmental friendliness - drywall consists of a gypsum core and thick cardboard. These components do not have a negative effect on the human body.
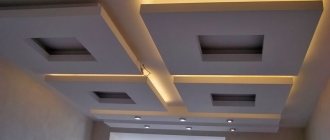
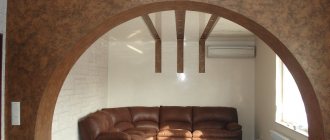
- The ability to produce complex shapes - the material is well suited for the production of complex multi-level suspended ceilings. GKL will allow you to create bends, which cannot be done with other sheet materials (OSB, plywood, etc.)
- Relative strength - plasterboard coating cannot be called durable, but compared to stretch ceilings, the material is more resistant to mechanical stress.
- High maintainability - you can patch holes in drywall even without the involvement of a professional.
- Fire resistance - the material and all frame elements are non-combustible materials.
- A hidden method of installing communications - the material hides communications. True, the wiring is installed in a hidden way, so it will be more difficult to access it in the future.
Flaws:
- Poor resistance to mechanical shock loads - plasterboard on the ceiling can be easily broken when rearranging furniture or cleaning.
Don’t be surprised that the strength characteristic is included in both the pros and cons. This is a relative parameter and it depends on what material you are comparing with.
- Destruction due to contact with moisture - drywall will not be able to protect against leaks from the upper floors. When it comes into contact with moisture, the plaster swells and cracks - the suspended ceiling will need repair.
- Long-term installation - construction work will take 2-4 days. In this case, the installation of a suspended ceiling must be carried out at the stage of rough work. During the work, a large amount of dust and debris is generated.
- Installation does not tolerate errors - this can be said about many materials, but this applies especially to drywall. Violation of technology leads to the appearance of cracks and destruction of the finish. As a result, it will be necessary to eliminate errors and then restore the finishing layer.
Read about errors when installing the frame and when attaching sheets in the articles at the link “”.
Final finishing
After installing the suspended ceiling, the most crucial moment comes: finishing the plasterboard. The appearance of the ceiling space depends on the quality of its implementation. Here it is necessary to highlight the following stages of work:
- sealing connecting seams and marks from hardware heads;
- puttying the entire surface of the ceiling;
- cutting holes for lamps;
- painting the ceiling with water-based paint;
- installation of lamps.
Sealing seams
The joints of the sheets are sealed with reinforcing tape, “serpyanka”. Gypsum putty is rubbed into the seams through it. At this stage, it is also necessary to putty all damage to the sheet and screw heads.
After a day, when the plaster dries and shrinks, you can cover the problem areas with a finishing layer of putty. After the last layer of putty has dried, it is sanded with fine-grained sandpaper. A guide on how to properly finish drywall can be found in the work “Leveling walls with plasterboard without a frame.”
Puttying drywall
Many recommendations for finishing gypsum board indicate a mandatory condition - applying a primer before puttingty. However, modern putty mixtures (“Vetonit LR+”, “KR”, “JS”, “Osnovit Ekonsilk”, “Plitonit KP”, “Kreps KR”) do not require a primer. Instructions for putting gypsum board putty can be studied in the article “How to glue wallpaper on drywall?”, paragraph 2.5. "Drywall putty."
Cutting holes for lamps
Using the diagram drawn at the beginning of the ceiling installation work, the installation locations of the lamps are marked on the sheets of drywall. Holes are drilled using a removable bit for a hammer drill or electric drill. The crown can be purchased at any hardware store. Its price is 140-350 rubles. The crown contains sets of cutting blades for cutting holes with a diameter of 26, 32, 38, 45, 50, 63 mm.
Painting the ceiling with water-based emulsion
Painting must be done before installing the lamps, which will greatly simplify the whole process (the ceiling can also be finished with wallpaper or decorative plaster). How to choose the right paint, in what order to apply each layer and other nuances of painting can be learned from the work “How to paint a ceiling with water-based paint without streaks?”
Where can you install plasterboard ceilings?
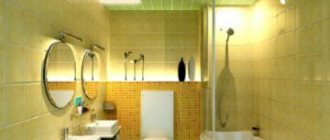
Before making a suspended ceiling from plasterboard with your own hands, you should decide whether the room is suitable for installing such a structure. Here you need to immediately pay attention to three factors: humidity, room height and temperature.
- Gypsum is not afraid of negative temperatures, so it can be used in unheated rooms. Some types of suspended ceiling structures do not have this opportunity.
- Humidity is the weak point of drywall; it cannot be said that the material is not suitable for wet rooms. This is permissible, but subject to certain conditions. In most cases, other materials are more durable for ceilings in wet areas.
Drywall is often used under tiles to level walls in damp rooms. In this case, the material is protected by a layer of tile adhesive, and the mills are not threatened by leaks from the upper floors. Read the article about laying tiles on drywall by following the link.
- The height of the room also needs to be taken into account, since a suspended ceiling “takes away from the room” from 5 cm. A two-level ceiling can reduce the height of a room by 20 cm. It is recommended to make single-level plasterboard suspended ceilings in rooms with a height of at least 2.7 m, and multi-level structures are better made in rooms no less than 3 m.
Marking the ceiling and walls
In a new building, using a hydro- or laser level, the horizon line is marked. Then, after numerous measurements, the lowest point of the ceiling is found. From it, measure at least 5 cm down (when installing built-in lamps - 10 cm) and form the ceiling line. For those who are encountering such concepts and methods for finding the ceiling line for the first time, we recommend viewing the article “How to check the floor level in an apartment yourself?” Here everything is one to one, only upside down.
In an apartment with an installed floor, there is no need to cut off the horizon line - the floor will successfully fulfill its role. After finding the key point (the lowest part of the ceiling space minus 5 cm), using a hydraulic level (laser level), a line is drawn on the wall along which the ceiling will be installed.
Along it, every 60 cm, starting from the wall, marks for the passage of longitudinal ceiling profiles are placed. A similar operation is carried out on the opposite wall. Using a plumb line, a metal ruler (rule) and a pencil, vertical lines are drawn from the marks to the ceiling, after which a mark along which the profile will pass is made along the ceiling with a construction cord (twine smeared with colored chalk). If everything is done correctly, you get a series of lines parallel to each other and adjacent walls.
Attention: longitudinal profiles must be perpendicular to the window, regardless of the size of the room. Therefore, the markings are initially placed on the wall with the window, then on the opposite side.
A similar operation is carried out with another pair of walls, but in increments of 50 cm. Places for attaching plumbs are marked at a distance of 30 cm from the wall and 60 cm between each other for longitudinal profiles and 25 cm from the wall in increments of 50 cm. This can be explained even more simply as follows : hangers are attached in the middle of each side of the rectangle formed by the profiles (see diagram).
Materials and tools
If you plan to install a plasterboard ceiling with your own hands, then you need to stock up on the necessary materials.
- Drywall varies in thickness; in most cases, 12.5 mm is used on the ceiling. The rigidity of the entire structure depends on the thickness of the sheet.
The strength of the structure is given not by the frame, but by the gypsum plasterboard sheets that hold this frame together.
Drywall is divided into regular (GKL), moisture-resistant (GKLV) and fire-resistant (GKLO). Moisture resistant is suitable for wet areas; usually modified material with additional properties is more expensive.
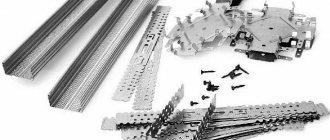
- To form the frame you will need galvanized profiles . For suspended ceilings, two types of profiles are used: ceiling guide (PPN, UD) and ceiling profile for lathing (PP, CD). The profile varies depending on the thickness of the steel. The frame made of 0.3 mm steel bends easily in your hands, so it is better to use material with a thickness of 0.5 - 0.6 mm.
PPN
PP
The ceiling sheathing can also be made of wood, but it is more practical to install it on a galvanized profile, since it does not rot and allows you to create empty space for communications between the plasterboard and the sub-ceiling.
- To secure the frame to the base you will need hangers . These elements come in two types: straight and anchor. A direct suspension (“crocodile”) is made if the distance to the main ceiling does not exceed 12 - 12.5 cm. This suspension is one-piece, so the thickness is adjusted when fixing the ceiling profiles.
Direct suspension
- Anchor hangers consist of a pin that is attached to the ceiling and a movable part with fastening under the profile. Anchor hangers can be lowered and raised after the profile is attached to it; the distance between the plasterboard and the ceiling can be 12 cm.
Anchor suspension
Adjusting the anchor suspension
- The sealing (damping) tape serves to soundproof the room. It is glued to the back of the guide profiles. It allows you to reduce the spread of impact noise through the frame.
In addition to the tape, you can create additional sound insulation on the fasteners. For this purpose, there are special suspensions on a soundproofing pad.
Impact noise propagation with and without tape
- The set of fastening elements includes dowel-nails for installing guides, anchor wedges for fastening suspensions to the base of the ceiling, black self-tapping screws for fastening profiles and for fastening drywall to the frame.
Set of tools for sealing gypsum board joints
- To seal the joints you will need putty (in the form of a dry mixture or ready-made). You will also need a sickle mesh or perforated sealing tape for the joints.
Single level crab connector
- Connectors are required when installing ceilings; there are two types of connectors: single-level and two-level. When using a two-level ceiling, the thickness of the ceiling is greater, therefore, with simple ceiling designs, in most cases a single-level connector (“crab”) is used. It allows you to create cross-shaped connections of profiles.
GKL profile extension
- The extension is needed to increase the length of the short profile. They are usually needed in large spaces that are not covered by standard profile sizes.
- Sound insulation and insulation - sometimes the creation of a suspended ceiling is combined with sound insulation and additional insulation; in this case, thermal insulation and sound insulation materials will be required. Typically, this role is played by mineral wool.
Now let's look at the tools that will be required to carry out the work.
- A construction knife is the most necessary tool for working with drywall. It is used for cutting material and for chamfering if there is no edge plane.
- An edge plane is required to chamfer cut edges. It allows you to cut the corner of the sheet at an angle of 22.5 degrees, so at the junction you can get 45 degrees.
Working with an edge plane.
A standard sheet of drywall has a front and back side; on the front side, the edges of the sheet have chamfers (factory edges). Due to this, when two sheets meet, a recess is formed, which in the future is filled with putty. If gypsum boards are cut during the installation process, then the chamfers must be made independently. It is advisable to do this before fixing the sheets to the frame, but sometimes craftsmen remove the chamfer after installing all the sheets. It is difficult for a beginner to make a neat cut. Read more about cutting drywall in the article “” on our website.
A cutter is a tool for fastening profiles; it partially replaces self-tapping screws. When using a cutter, you must remember that there are many hard-to-reach areas on the ceiling where the tool will not fit. The cutter makes holes in the metal and bends the edges. Thanks to this, the elements stick together. At the same time, the screw head does not rise above the surface.
Self-tapping screws with a press washer in some places may prevent the drywall from adhering to the frame; in places where rigid fixation is required, they cannot be avoided.
- Tin snips may be needed to cut ceiling and guide profiles.
- A drill or hammer drill will be needed to drill holes. For example, under dowels.
- A screwdriver is necessary for tightening a large number of screws; you cannot rely on a screwdriver, as your hand will get tired very quickly.
- Measuring instruments - a bubble level is a must; it will be useful to have a laser level; if you don’t have a laser level, you can make a hydraulic level yourself. Also, if there is no laser level, it is useful to have lacing with paint for marking horizontal lines.
The hydraulic level operates based on the law of connected vessels. Two containers with scales are connected by a flexible tube. Two people are required to use the hydraulic level.
Frame assembly
How to make a frame yourself? With proper marking, this is not difficult at all:
- Guide profiles are installed. Using a hammer drill, holes are drilled at 35–40 mm intervals, fastening is done using dowel-nails, and much less often, using anchor bolts. It is important that both guides certainly lie in the same plane.
A self-adhesive sealing tape is attached to the side of the profile adjacent to the wall. It will improve the sound insulation of the future ceiling.
- Holes for hangers are drilled in the ceiling surface. The center of this fastening element must be located strictly along the marking lines. The pendants are attached to dowel-nails, and their edges are bent down. The result is a figure in the shape of the letter “P”.
- Ceiling profiles are installed. They are inserted into the guides and secured with “bugs”. They are also used when connecting to direct hangers.
USEFUL INFORMATION: Profile for fastening plasterboard: ceiling, wall, load-bearing and guide
- Each profile is leveled; a number of holes are provided in the hangers for fixation. After the screws are tightened, the protruding parts of the “whiskers” can be bent so that they do not interfere with the installation of the gypsum board.
- The cross members are mounted on hangers and connected to the longitudinal profiles using “crabs”. In this case, the same small metal screws – “bugs” – are used.
- After assembly, the entire frame is checked again using a level. It is much easier to correct deficiencies at the stage of assembling the frame than after attaching the drywall.
Instructions for installing a plasterboard ceiling
Stage 1. Marking the frame level and fastening the guide profiles
Before installing the profile, the ceiling must be thoroughly cleaned of dust and debris. It is also recommended to treat the surface with an antiseptic, this recommendation is especially important for wet rooms.
It is better to start making a plasterboard ceiling with markings. Using a bubble level, you need to find the most protruding part of the ceiling. We make a mark from it down the wall. This will be the thickness of the suspended ceiling. At this stage, you need to resolve the issue with built-in lighting. If it is, then we immediately set the size of the lamps to the thickness of the ceiling (from 9 cm). If there are no built-in lamps, then make a mark at a distance of 5 cm.
At this level, we beat off the horizontal line around the perimeter of the entire room. The easiest way to do this is with a laser level. If there is no laser level, then you need to make a hydraulic level. Use it to mark the corners, then use a tapping thread to draw a horizontal line.
We will attach the guide ceiling profile along this line. The bottom of the profile should follow the line. Fasteners should be in 50cm increments or 25cm increments on loose substrates. There are already holes in the profile, but they do not always coincide with the points we need, so if necessary, we make new holes.
If the wall on which the guide profile is attached is uneven, then you need to make cuts on the side planes of the profile. If this is not done, the guide pressed by the fasteners will bend.
We glue the sealing tape to the back side of the guide profile. The minimum number of fasteners on one profile is three. For installation, you can use dowel nails or nylon dowels with self-tapping screws with a press washer.
Stage 2 Marking ceiling profiles
The ceiling profiles should form a sheathing to which the drywall will be attached. It is recommended to first lay out the layout of the sheets on paper. The joints of the sheets must fall on the ceiling profile; the edges of the sheets must not be allowed to sag. Also make sure that no cross-shaped joints appear; for this, the sheets should be spaced apart.
Layout example
Sometimes the factory edge of the outer sheet is cut off to make it easier to putty. In this case, the distance from the wall to the first profile must take into account the size after trimming
The pitch between the ceiling profiles is 1200 mm, which corresponds to the width of the plasterboard sheet. This profile performs the main load-bearing function. Another ceiling profile is attached perpendicular to it (it is usually called “load-bearing”). One side of the supporting profile is inserted into the guide, the other is connected with a single-level connector to a perpendicular ceiling profile. It is recommended to place them every 50 cm.
Before starting work, mark the location of all profiles on the ceiling using tap lacing.
Stage 3 Attaching the hangers
We already have the location of the ceiling profiles, now we need to install the hangers. They should be secured to 2 anchor wedges. The quantity depends on the weight of the ceiling. The recommended distance between hangers is 1 meter if the ceiling weight is 15 kg per square meter. We make a distance from the wall of 25 - 100 cm.
Stage 4 Fastening the main frame profiles
We proceed to attaching the main profile, which comes in increments of 120 cm. The length of the profile should be 10 mm less than the length of the room. The frame should not be rigidly fixed to the walls so that temperature deformations can occur freely.
To level the frame, it is convenient to use a magnetic level; in this case, you can magnetize the measuring device to the profile and not hold it with your hand. At this time, we can adjust the frame position we need.
If the room is longer than the profile, then the length must be increased by connecting several profiles. To do this we use an extension cord. The direct suspension should cover the profile on both sides. Self-tapping screws are screwed into it on both sides. The height should be set using a laser level or string should be pulled in the room. The evenness of the fastening should be checked using a rule and a level.
Direct hangers are more difficult to adjust than anchor ones, since after screwing in the screws, the height of the direct fastener cannot be changed.
When all the profiles are level, you can bend the edges of the hangers so that they do not interfere with the fastening of the drywall sheets.
Stage 5 Installation of “crabs” and supporting profiles. Minvata
The supporting profiles are placed perpendicular to the main ones. First, every 50 cm you need to install single-level connectors (“crabs”) on the installed profile. Then we cut the ceiling profile to size so that it can fill the spaces between the “crabs” on the ceiling. It is better to make a distance of 10 cm from the wall.
The easiest way to trim a profile is with metal scissors. To do this, cut off two side walls of the profile, then bend it back and cut off the back surface. It must be remembered that the length of the supporting profile should be less than the distance from one main profile to another, so that expansion will not occur.
The supporting profile must be screwed to the crabs with self-tapping screws. Each profile is secured with two hardware; a total of 8 screws may be required for one fastening.
When the frame is formed, you can begin laying the insulation. Mineral wool must be placed in the spaces between the frame posts.
Stage 6. Covering the frame with plasterboard
Sheets of drywall are fixed to the frame according to the layout that was previously marked on paper. Before installation, you need to chamfer the edges; you can use an edge plane or a construction knife to do this. You can also make chamfers after fixing the sheets, but on the ceiling this will not be so easy to do. If there are protruding corners in the room, then the sheets cannot be joined on them; it would be more correct to make an insert.
Please note that the sheet should not rest close to the wall anywhere; a temperature gap of 3 - 5 mm should remain everywhere. Since a factory joint is not always justified when adjacent to a wall, sometimes it makes sense to cut it off and make a chamfer. This way you can reduce putty consumption
There are usually no factory chamfers at the ends of the sheets, so they will also need to be made. To cut sheets, it is better to use a regular construction knife: first we cut through the top layer of cardboard, then the sheet is moved to the edge of the plane and the gypsum core is broken. The break is made in the direction opposite to the cut, after which the cardboard is cut from the reverse side. Uneven edges can be removed using a plane.
Two people are required to lift the sheets to the ceiling. If the work is performed by one person, then a lift will be required that will hold the sheet at the desired height.
Drywall is fixed to the frame using self-tapping screws, the step between them should be no more than 15 cm. The fasteners should go at right angles to the profile, do not leave screws that go at the wrong angle or go too deep into the material. The cap should be slightly recessed by 1 mm, and it should not tear the cardboard itself. If you went too far and screwed the screw too deeply, then you need to unscrew it, seal the hole with putty, and make a new fastening in a different place.
Also pay attention that the self-tapping screw is not located too close to the edge of the sheet. The distance to the edge should be at least 5 - 10 mm, but not more, because then you risk simply missing the profile.
Stage 7. Sealing gypsum board joints
When all the main work on installing a plasterboard suspended ceiling in an apartment has been completed, you can proceed to sealing the joints. To do this, you will need sickle tape or perforated tape, putty, several spatulas, containers, primer and brushes.
First, it is important to properly prime the joints. For these works, you need to take deep penetration soil with a large proportion of dry residue. It is better to apply the primer with a brush rather than a roller, since the brush allows you to coat the joints and chamfers well. After treatment, the time indicated on the instructions for the primer should pass.
If we use dry putty, it must be mixed first. To do this, it is better to use a small container; you need to prepare the solution in small portions so that the mixture does not have time to harden.
To mix the putty, you need to use clean containers and clean tools; the remnants of old solutions will get into the fresh batch and disrupt the uniformity of the structure.
Pour water into the container, then begin to add dry putty in small portions. We do this until dry elevations remain on the surface, then mix the composition with a spatula and leave it for 10 - 15 minutes. Then mix again until smooth and you can work.
First you need to use a small spatula to fill the joint with mortar, then apply another layer of putty. A perforated tape or mesh is glued onto it. The tape can be pre-soaked in water. Using a spatula, the tape must be firmly glued to the surface of the seam, then the tapes are covered with another layer of mortar.
Instead of joints, it is necessary to cover with putty and the screws that secured the drywall to the frame. Detailed instructions for sealing drywall joints can be found at the link "".
When the putty has dried, its surface must be sanded. The skin can be wound on a block or secured on a special grater, if you have one.
Collection of equipment, purchase of consumables
Tools for installing drywall
Each master independently determines what tools he will need. Much depends on the skills acquired by each specialist individually. Therefore, only those tools and materials are listed here without which it is impossible to perform the work efficiently:
- guides;
- metal scissors;
- hammer drill (respectively, drill bit);
- “serpyanka” (a suitable width of tape for seams);
- screwdriver;
- dowels;
- laser level (to take measurements of the entire room);
- water level (minimum length - 2 m);
- drywall;
- hammer;
- self-tapping screws;
- roulette;
- anchors fixing suspensions;
- “crabs” (fasteners);
- ceiling suspensions;
- mounting knife;
- ceiling profiles;
- Master's protective equipment - plastic goggles, respirator, gloves.
Important! Each ceiling has its own characteristics. Therefore, additional elements may be required to work with it. For example, if the butt profiles are located at different heights, clamps will be needed. This means that large stones were mixed in the concrete, now preventing normal drilling.
Cutting holes for lamps
You should think about the need for built-in lighting at the ceiling planning stage. Firstly, there should be enough space inside the ceiling to accommodate devices. If the room has low ceilings, then taking an additional 5 cm under the equipment will not be a good idea.
Also, the lamps must be taken into account immediately on the plan and before installing the frame. It is necessary to make communications lines for all lamps. Electrics in a plasterboard suspended ceiling are installed in a hidden way, so the requirements of the PUE for this type of installation must be observed.
When the main stages of ceiling installation are completed, you can proceed to drilling holes for the lamps. To do this, you will need a core drill that is capable of making round holes. The diagram drawn up earlier will allow you to avoid getting into the frame profiles.
Drafting
To carry out design work, you will need a tape measure, a simple pencil (ballpoint pen) and a double sheet of notebook paper, in a box. All work is done in several steps.
1. Using a tape measure, measure the length of each wall without taking into account protrusions and niches. If there are them in the room, the perimeter of the walls is additionally measured. The first dimension is necessary to calculate the number of lines of the ceiling profile, the second, the perimeter, is necessary to determine the length of the guide profile.
2. The resulting dimensions in a certain scale are applied to a notebook sheet. The result should be a drawing of the ceiling.
3. A diagram of the frame passage, as well as places for attaching hangers, is being developed. The following points are important here:
- Longitudinal profiles can be attached in increments of 40 or 60 cm, due to the weight of the drywall. The larger it is, the more often profiles should be installed. Builders adhere to the following recommendation: for gypsum boards with a thickness of up to 9.5 mm inclusive, the step is 60 cm, for thicker, naturally, heavier ones - 40 cm. Why these particular values? These figures are multiples of the standard width of a plasterboard sheet of 120 cm.
- Transverse profiles are attached only in increments of 50 cm (not 60 and 70 cm, as indicated in many materials), which is a multiple of the length of the gypsum board;
- When the distance between the longitudinal profiles is 40 cm, only they are attached to the ceiling suspensions, while “crabs” are sufficient for the transverse profile. With a step of 60 cm, transverse profiles should also be attached to the ceiling.
4. Marking of the passage of electrical wiring and places of fastening of lamps is carried out.
The result should be a drawing similar to the one in the photo below.
Approximate installation diagram of a suspended ceiling frame.
How to make a backlight
The location of the backlight is also decided at the design stage. This question is more related to a design project. It is desirable that the lighting not only perform a decorative function, but also play the role of additional lighting.
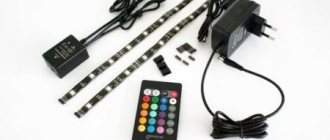
- Perimeter lighting creates a bright outline of the ceiling. If the ceiling has several levels, then both are illuminated. This type of lighting is created using LED strips, which are glued in special recesses.
- Spotlights can also act as the main source of light, but they do not cope with this function as well as a chandelier. Under them, you need to make round holes in the drywall, to which you must first connect the electrics. Such lighting devices illuminate the space below them more and, due to the large number, often have to be changed.
- Light panels were developed for Armstrong-type ceilings, but are also suitable for plasterboard if you make an appropriate hole for them. Light panels have their own frame for fastening.
- Chandeliers are the most common method of lighting, and it is also the most effective. One hole in the central part of the room is enough for the chandelier.
Install the main frame profiles
YouTube channel “KNAUF Russia”
Cut out the necessary pieces from the PP 60×27 profile and insert into the guides. Position them so that the centers of the beams coincide with the previously marked marks.
YouTube channel “KNAUF Russia”
If the length of one profile is not enough, add an additional section and join them together using a special connector.
Preparation
The room, the ceiling of which is supposed to be covered with gypsum board sheets, must be completely cleared of furniture and decorative items. If there are old suspension systems on the floor, they must be completely dismantled. Finishes such as wallpaper, paint or putty can be left (provided that it is held firmly and does not crumble). If it is necessary to lay any communications on the ceiling (cables, ventilation ducts, wires), then this must be done before the construction of the frame begins. In this case, special care should be taken, because Removing decorative trim to repair wiring is quite problematic.
The horizontal installation of plasterboard slabs is ensured by pre-applied markings:
- It is important to understand that floor slabs in multi-storey buildings are not always laid evenly, so when arranging the markings you should not start from them.
- Horizontal guides are most conveniently applied with a laser level. To do this, it is fixed at the required height, after which horizontal lines are drawn along the laser beam along all the walls.
- Considering the high cost of a laser level, a cheaper hydraulic device is often used instead, which uses the idea of communicating vessels.
- Having chosen an arbitrary place, a horizontal mark is applied there: it should rise 1 cm above the level of the future decorative surface.
- Next, one worker places one transparent end of the water level along this mark. In this case, you need to ensure that the level in the tube coincides with the line on the wall.
- The second worker, working from a stepladder, applies a similar line at two points on each wall. The reference point is the liquid level in the second transparent tube. In addition, each of the corners in the room is marked in a similar way.
- Focusing on the finished marks, you need to draw a solid line: the lower cut of the profile supporting frame will be oriented along it. Since the distance between the marks can be large, the line is marked with a construction cord.
For ease of installation of the ceiling profile when installing a gypsum board ceiling, in addition to the walls, it is also necessary to mark the floor slab:
- The ceiling is equipped with a guide line along the long walls strictly in the center: two identical sectors should form on the base.
- Starting from the axis, they beat off side sections 60 cm long in each direction towards the long side walls. After this, their ends need to be connected with parallel lines. The extreme crossbars at each end can have any length up to 60 cm.
- A similar procedure is carried out in relation to short walls. Here you will also need to mark the center line, and from it, in increments of 60 cm, marks are placed that are connected to each other. As a result of marking, the entire ceiling should be divided into square sectors with a side size of 60 cm.
To make your own water level you will need:
- Two transparent tubes 20-30 cm long and 8-12 mm in cross-section.
- Flexible hose made of rubber or silicone 5-8 meters long.
The middle of each tube must be marked with two lines, connected via a flexible hose. Next, water is poured into the finished structure: its volume should be such that the tubes are filled from mark to mark.