Types of arches
Before you make a beautiful arch, you need to figure out what variations of arches exist.
We will consider only three of the most popular options, so as not to clutter your head with unnecessary, completely unnecessary information.
Wooden arch
So, a good place to start is probably a wooden arch. Working with wood is usually quite complex and requires special attention. When working with wood, try to eliminate all possible miscalculations and other errors, because even the most seemingly insignificant nuances can ruin the entire structure.
Completely different timber materials are suitable for making an arch, but most often people use pine, because the material is quite cheap, but at the same time it is very easy and comfortable to work with.
Moreover, this material does not rot. But not everyone likes pine, so for final work you can use more expensive and elite types of wood, such as oak and beech.
Types of arches
Interior or corridor arches can have different shapes. They differ mainly in the shape of the upper part and sometimes in the way they are connected to the vertical parts. Their main types are presented in the photo.
Types of interior and corridor arches
This group lacks one of the most popular recently - the half-arch. They have a rounded corner only on one side, on the other it remains straight. This is where the name came from - semi-arch. It looks good in modern interiors: minimalism, hi-tech, maybe art deco.
One of the options for a semi-arch in the interior
The classic is distinguished by the correct shape of the top. This is strictly a semicircle, the radius of which is equal to half the width of the doorway. This type looks good with an opening height of at least 2.5 m. It fits well into any interior, but looks best in a long corridor, or instead of the entrance door to the kitchen.
A classic arch requires a height of at least 2.5 m
An arched opening in the Modern style is distinguished by a small radius of curvature and a sharp transition at the junction with the vertical components of the opening. It looks good if the walls and ceiling have a more or less simple design. Looks great in place of the former balcony door, good at the entrance to the office.
Art Nouveau arch on the site of a former balcony door
The “Romantic” style arch is more likely to be simply rounded corners (mostly masters call it that). Looks good with a large width and not the greatest height.
The “romantic” shape is good with large width and small height
The “ellipse” shape is very close to “romance”. It differs only in greater curvature in the middle part. Also suitable for low and wide openings. It just looks a little softer.
Suitable for openings of large width and not very high height
Trapezoid is a non-standard design consisting of broken lines. It is difficult to play out in the interior, therefore it is used infrequently: for some non-standard designs.
One of the design options is trapezoid
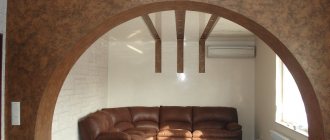
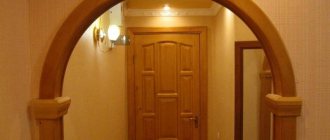
It is very similar to an ordinary opening, and that is essentially what it is, only without the door leaf. For greater originality, it is often accompanied by wooden carved elements in the form of columns on the sides. In this form it is good for classical interiors, as well as ethno-style - Greek or Roman, depending on the type of columns.
Portal with wood frame
For decoration in modern styles, they use another example - next to the main arch, smaller portals are located. This technique allows you to “beat” a simple form.
Another version of the “portal” arch
Before you start making an arch, you need to decide on its parameters. select the type, and then the parameters: where it will start, and what the radius of curvature will be. It could be a really sharp bend, or it could just be some rounding of the corners.
Rounded corners in standard doorways look better than steep arched curves
To understand how your chosen shape will look, you can cut out a template from cardboard and attach it to the doorway. Evaluate the effect. If everything suits you, you can make a blank using this template. But only one - for one of the sides of the opening. The second one needs to be done in place, otherwise it will turn out crooked.
Installation of a wooden arch
In order to install this structure in a room, you need to follow some rules:
- The place where the structure will stand must be prepared very well. Be sure to remove all excess and putty the surface.
- Prepare in advance all the materials necessary for work.
- Eliminate all possible problems that could ruin your design.
So, we have the answer to the question of how to make an arch in a doorway. If you did everything correctly, then you have a structure that can play the role of a door arch.
If you decide to make a door arch with your own hands, know that the process is very complicated and requires special skills in working with wood.
DIY installation of a vaulted arch
And even a more complex arch with vaults can be made a reality during home renovations. An important point is that simply placing a vault on the top of the doorway will not work for aesthetic reasons. You will have to increase the height of the opening so that the passage between the rooms does not resemble a pirate grotto pressing on all sides. Solve the issue of expanding the wall opening or demolish the wall and install a new plasterboard structure . Please note that it is prohibited to violate the integrity or change the load-bearing walls in any way .
And now - step-by-step instructions on how to make a vaulted arch in an interior partition:
- Option with widening of the opening . We mark the boundaries of the future opening on the existing one. To the desired width of the arch, add 4 cm in width and the same in height. Mark with serifs on the wall. Next, every 10 cm you need to punch through holes in the wall with a hammer drill and widen the opening with a circular saw. Then we will organize a base for the side panels made of plasterboard or chipboard with installation on a U-profile. You will see how the vault is made in a separate section.
- Option with an interior arch made of plasterboard on a new wall. Before installing a new plasterboard wall, apply vertical markings using a plumb line on the load-bearing wall to which the structure will be adjacent. Take a piece of profile and transfer the markings to the opposite wall. Install and secure the U-shaped CD profile with dowels according to the markings. From the sidewalls on both sides, place profile sections on the floor equal to the width of the plasterboard wall to the arched opening, and screw these elements. The ceiling profile will take up the entire width of the wall. Next, we draw two slats from the ceiling profile and connect them to the ends of the segments on the floor to form the base of the side arched panels. We install crossbars on the frame with a pitch of 20 cm, which contributes to the stable position of the gypsum boards (plasterboard sheets) that we will lay on this frame. And at the last stage we will make a vault for the arch.
Useful: Types and areas of application of foil insulation
Plywood arch
A plywood arch is another, but less popular variation. This option is used when an arch is really needed, but it is not possible to use wood.
Before installing this structure, you need to carry out some preparatory work:
- Create a detailed project. To do this, carefully take all possible measurements.
- Prepare the installation site
- Prepare all the supplies you will need during the work process.
Note!
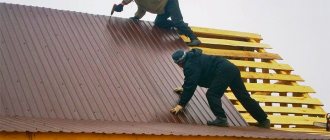
How to make a roof - a step-by-step description of building a roof with your own hands. 110 photos and videos of roof construction
- Do-it-yourself strip foundation: instructions from A to Z, photos, dimensions, calculations, choice of materials
How to make sound insulation - tips on choosing materials and a review of the best methods of insulating a car and apartment (video + 85 photos)
We will not consider this option in detail, since it is used quite rarely.
Which drywall to choose and how to bend it
There is a special arched plasterboard 6 mm thick. It is quite possible and even necessary to use it to create arches. However, there are several points that may prompt the use of conventional wall gypsum board 12.5 mm thick. Although arched material is twice as thin as wall material, it is twice as expensive. If only one or two arches are made, then very little wall gypsum board will be required, and you will have to buy a whole sheet.
Arched drywall is easy to bend with your own hands
At the same time, wall plasterboard is probably already used in apartment renovations, since the question of making an arch has arisen. Therefore, this material is at hand. But it is too thick to bend properly. There is a way to bend drywall for an arch.
If, while bending a sheet of arched gypsum plasterboard, it begins to crack slightly, then this is a signal that it is time to stop. A little more effort and it will simply crack.
The dry method involves bending the plasterboard with your own hands to the desired radius. If this is an arched gypsum plaster, then it easily gives in and bends. The wall sheet does not lend itself to this procedure at all, so it is bent using a wet method.
| Table of bending radii of drywall | ||
| Sheet thickness | Minimum dry bend radius | Minimum wet bend radius |
| 6.5 mm | 100 cm | 30 cm |
| 8 mm | 155 cm | 38 cm |
| 9.5 mm | 200 cm | 50 cm |
| 12.5 mm | 275 cm | 100 cm |
To create beautiful arches from plasterboard, you need to bend it correctly. To do this, a frame is created for the entire sheet. It should be a curved frame with the same radius as the arch. A sheet of wall plasterboard is placed on the floor and many holes are made on its back side with a needle roller. Then it is moistened for ten minutes with a wet roller. Then the sheet is transferred to the frame and carefully bent on both sides. You need to moisten it carefully so that the sheet does not become completely soaked.
A wet sheet gives in easily, but there is no need to rush. When the gypsum board completely rests on the frame, you will need to fix it in this position overnight. During this time it will dry and take a new shape. More details about this process and other subtleties of bending gypsum boards can be seen in the video.
You don't have to bother with the whole sheet. If there are one or two arches, then you just need to cut the gypsum board strips to the specified size and bend only them. This is much simpler, and the frame for bending will then be used for work on the same sheet.
Conclusion
If you still decide to make an arch at home, try to analyze all the above information again.
Also remember that if it is possible to make a structure from wood, you should not save, because such structures are of the highest quality and most beautiful.
If this is not possible, then read more about the construction of plasterboard and plywood arches on the Internet. We wish you good luck!